41
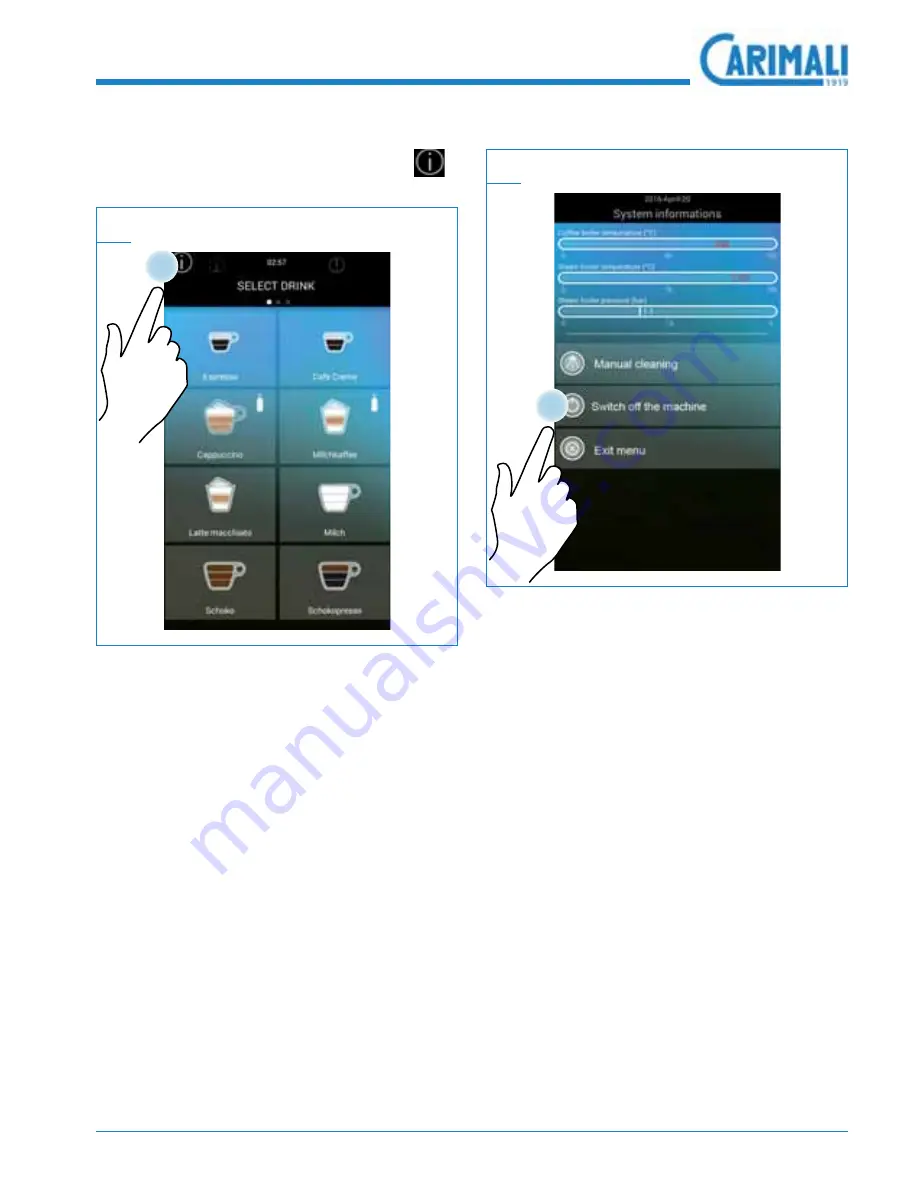
9.4 SWITCHING
OFF
To switch off the machine, press
.
38
Then press “Machine off”.
39
The display will return to the initial screen.
Page 1: ...USER S MANUAL Translation of original instructions Armonia Ultra...
Page 2: ......
Page 3: ...7 HANDLING AND STORAGE 29 8 INSTALLATION AND STARTUP 31 8 1 PACKAGING CONTENTS 31 8 2 PRIOR CHECKING AFTER RECEIPT 32 8 3 POSITIONING 32 8 4 INSTALLATION 33 8 4 1 Power mains connection 33 8 4 2 Wate...
Page 4: ...4 11 TROUBLESHOOTING 65 11 1 HOW TO DETECT AN ERROR 66 11 2 OPERATING ALARMS 67 12DECOMMISSIONING AND DISPOSAL 68...
Page 5: ...dB After unpacking the machine veri fy its integrity In case of damage or doubts about the packaging contents please contact the CARIMALI Ser vice Centre Handle the machine with care to pre vent the...
Page 6: ...not position the machine in close proximity of water jets or heat sourc es Avoid direct contact with water or other liquids also during cleaning Do not expose the machine to weath er conditions sun ra...
Page 7: ...he appliance in a safe way and understand the hazards involved Children shall not play with the machine Never touch the hot parts of the ma chine Never touch the machine when hands or other body parts...
Page 8: ...ice Centre indicating the model the type and the serial number of the machine The data are shown on the apposite data plate In case the machine is not used any longer render it inoperative Once the ma...
Page 9: ...bility for damage caused by non compliance with the aforesaid provi sions NOTE IT IS possible to ac cess the latest ver sion of the manual by registering in the area reserved to cus WRPHUV RQ WKH RI F...
Page 10: ...tially dangerous situation that may cause minor injury or machine damage NOTE This points out notes or operation procedures that helps the operator when using the ma chine 3 2 USER TYPES ICON DESCRIPT...
Page 11: ...eshment areas in shops 5HIUHVKPHQW DUHDV LQ RI FHV Refreshment areas in other envi ronments Holiday farms Hotels Motels Bed Breakfast ATTENTION The machine is not intended for outdoor use 3 3 1 Reason...
Page 12: ...spensable products COFFEE MILK POWDERED DRINKS 1 Grinder 1 Grinder 1 Powdered drinks container 2 Grinders 1 Powdered drinks container o 1 Grinder 2 Powdered drinks containers 2 Grinders 1 Powdered dri...
Page 13: ...um Self Cup Station Card reader Telemetry system Coin slot Box Decaf door closure Basin block NOTE The Premium Grinder Setup new or run in by the manufactur er is available as an optional extra Additi...
Page 14: ...FRQ JXUHG PRGXODU WR KDYH PRUH RU fewer options installed according to the needs of the customer 05 Product containers Decaf door Touch screen display Door lock Adjustable delivery nozzles Drip tray C...
Page 15: ...KLQH LV WKH 3UHPLXP 6HOI YHUVLRQ WR OO WKH FRQWDLQ ers it is necessary to unlock them with the apposite key CONTAINER CAPACITY Coffee standard 0 6 kg Coffee maxi 1 1 kg Powdered drinks standard 2 0 kg...
Page 16: ...16 4 3 TOUCH SCREEN DISPLAY 4 3 1 Using the display 07 Sample page Pressure Scrolling up down Scrolling right left...
Page 17: ...will be shown when the machine is switched on NOTE The info bar icons described refer to the machine with all op tional extras If your machine does not have all of the optional extras some of the ico...
Page 18: ...alarm mode NOTE Based on the pres ence of the steam boiler this screen may be shown dif ferently on your ma chine NOTE There are two types of boiler heating The PDFKLQH LV FRQ J ured at the factory wi...
Page 19: ...steam can be dispensed by means of the appo site wand if present in the machine con JXUDWLRQ NOTE The dispensing stop button is enable at the factory It can be disabled by a skilled technician At the...
Page 20: ...E Enter the relevant password for access Press and select the Dose Setting menu from the Drinks Selection page Then select Set Doses Select a new or existing drink to ac cess its settings ATTENTION Do...
Page 21: ...menu will show the last 10 alarms that have occurred NOTE The new alarms to view are in red In case of alarm the signal light will EHJLQ WR DVK UHG DQG WKH DODUP PHV sage will appear on the display P...
Page 22: ...he dispens ing in progress pages NOTE According to the in terface setting there will be a different number of drinks on each page Press setup and enter the password IURP WKH UVW VFUHHQ 11111 Select th...
Page 23: ...or emptying the drawer of used grounds IWHU HPSW LQJ ZKHQ FORVLQJ WKH IURQW GRRU FRQ UP WKH GUDZ er emptying on the display If the door is open all dispensing is disabled and the display will show a s...
Page 24: ...detected Cup presence if no cup is detected Timeout timer based on a time setting No drink dispensing No button pressure In all these conditions are present the machine enters the Energy Save mode and...
Page 25: ...op Dispensing to stop beverage delivery manually NOTE The manual delivery stop is not instant but occurs when the system detects a safe situation for machine operation WARNING If there is an MDB payme...
Page 26: ...it is necessary to insert the re quired money to delivery the beverage WARNING The management of drinks prices and change is managed by VRIWZDUH UHVHUYHG WR WKH TXDOL HG VHUYLFH HQJLQHHU DQG LV diffe...
Page 27: ...acity 1 0 l Drip tray capacity 2 0 l Water pressure version with Water connection min 1 bar 0 1 Mpa min 6 bar 0 6 Mpa Net weight empty 38 kg EASY 42 kg LM Gross weight loaded machine 45 kg EASY 49 kg...
Page 28: ...s safety when using the machine Anyway some inconveniences may occur in certain conditions and or sit uations The causes may be Operator not suitably trained and or experienced Machine misuse Use of f...
Page 29: ...FFEE MACHINES Made in Italy COFFEE MACHINES Made in Italy COFFEE MACHINES NOTE Handle the packaging by means of the apposite carrying han dles WARNING 0 C 30 70 non condensante Made in Italy COFFEE MA...
Page 30: ...e is not responsibility of the Manu facturer and must be carried out in compliance with the applica ble regulations Disassemble the machine parts Separate them according to material type Deliver the m...
Page 31: ...this chapter are re VHUYHG IRU D TXDOL HG WHFKQLFLDQ 8 1 PACKAGING CONTENTS Made in Italy COFFEE MACHINES 22 Machine User s manual Brush Brush Adhesive hook for Power Cleaner drain Mixer conveyor Conn...
Page 32: ...nts with tem SHUDWXUH EHWZHHQ W D PLQLPXP GLVWDQFH RI PP from walls or other objects to fa FLOLWDWH YHQWLODWLRQ RUL RQWDOO RQ D DW VWDEOH VXU face at a minimum height above PP 950 mm 20 mm 20 mm 5 C 3...
Page 33: ...properly in serted into the appo VLWH PDFKLQH VRFNHW 8 4 2 Water mains connection 25 ATTENTION The mains water pressure must nev HU H FHHG EDU 03D LI WKLV LV QRW WKH FDVH D TXDOL HG WHFKQLFLDQ PXVW W...
Page 34: ...d technician in compli ance with applicable UHJXODWLRQV 8VH WKH certified CARIMALI 26 To prevent damages to the hydraulic cir cuit the optimal range of the water inlet from the mains is between DQG UH...
Page 35: ...HQWDWLRQ RLOHU OOLQJ 7KLV RSHUDWLRQ VHUYHV WR OO WKH ZDWHU FLUFXLW DQG WKH ERLOHU ATTENTION By omitting this op eration the machine may be seriously damaged and the manufacturer s liabil ity for machi...
Page 36: ...g For further details refer to the main tenance chapter NOTES IWHU ZDVKLQJ OO WKH water circuit 3URGXFW OOLQJ Open the required product container using the corresponding key 29 Pour the required produ...
Page 37: ...ut the installation and the preliminary operations proceed to switch on the machine Open the front door with the special key 32 Press the on button I 0 33 The following screen will appear when the mac...
Page 38: ...RXW LI WWHG DWHU E SDVV LI WWHG Long or powdered coffee dis pensing nozzle without any products in the relevant contain ers 2 Start an All in One wash to re SHDW WLPHV WR XVK RXW WKH FLUFXLW LQFOXGLQJ...
Page 39: ...steam boiler has not reached the working temperature drinks requiring the use of steam will not be available NOTE During the heating stage when the cof fee boiler reaches WKH machine will carry out a...
Page 40: ...d out for at least 2 seconds NOTE If the A icon is pres ent it is possible to dispense beverages with Extramilk To use this option hold down the drink button for a few sec onds NOTE Adjust the dispens...
Page 41: ...41 9 4 SWITCHING OFF To switch off the machine press 38 Then press Machine off 39 The display will return to the initial screen...
Page 42: ...wn as neces sary The operator must always use protec tive gloves to prevent abrasions WARNING Do not pull the pow er cord or the ma chine itself to unplug the machine from the mains power socket WARNI...
Page 43: ...d grounds container Manual When counting is reached 10 1 4 Instant product coffee container cleaning Manual Weekly 10 1 5 Power Cleaner washing Automatic Start and end of the day 10 2 1 All in One was...
Page 44: ...r cleaning the chrome plated surfac es use a damp cloth an antistatic cloth or similar Do not use abrasive agents to car ry out this operation 10 1 3 Cleaning of machine sur faces Proceed with the dai...
Page 45: ...bacteria 10 1 5 Instant product coffee container cleaning Open the upper front door 44 Remove the instant product contain ers from the machine and open them 45 Clean with a solution of hot water and...
Page 46: ...tory with the automatic rinsing If it is disabled carry out the Power Cleaner washing after each dispensing of milk based drinks WARNING The Power Cleaner washing cleans the milk circuit to prevent bu...
Page 47: ...nd start the Power Cleaner washing 47 Insert the milk hose support in the drip tray for discharging washing 48 Insert the milk hose inside the sup port on the drip tray 49 Wait for the end of the wash...
Page 48: ...of the shift NOTE This procedure can be carried out follow ing the instructions on the display Press and select the manual wash menu from the Drinks Selection page NOTES Before an All in One wash and...
Page 49: ...Press YES to switch the machine back on at the Power On screen at the end of washing or press NO to switch the machine on at the drinks selection screen 52 Raise the dispensing unit completely and re...
Page 50: ...S WUD 2 1 55 NOTE This operation is only necessary on ma chines without direct drainage NOTE If the machine has a milk circuit insert the RDW LQWR D FRQWDLQHU with a solution of wa ter 500 ml and with...
Page 51: ...51 57 Open the front door to clean manually the internal parts 58 When opening the front door the dis play shows the parts to be cleaned After cleaning close the front door 59 Open the front door 60...
Page 52: ...lose the front door to start the wash ing cycle 62 63 Wait for the end of the wash for Coffee group Mixer Milker optional ATTENTION Once the All in One washing cycle has been completed re PRYH WKH PLO...
Page 53: ...on the display NOTES Place a container approx 2 l under the dispensing noz zle 2 Litres NOTE If the cleaning cycle is stopped suddenly before its completion always repeat the procedure from the begin...
Page 54: ...parts 65 When opening the front door the dis play shows the parts to be cleaned After cleaning close the front door 66 Open the front door again to access the coffee group 67 Insert the pad of cleani...
Page 55: ...some test dis pensing cycles 10 2 4 Mixer wash NOTE This procedure can be carried out follow ing the instructions on the display NOTES Place a container approx 2 l under the dispensing noz zle 2 Litre...
Page 56: ...menu from the Drinks Selection page NOTE Skip previous wash es by pressing SKIP Start the Mixer washing 71 Wait for the end of the wash 72 10 2 5 Disassembly and manual cleaning of the mixer Open the...
Page 57: ...slots and free the mixer 74 Slide the mixer out towards the front of the machine 75 ATTENTION Do not put in the dish washer NOTE For cleaning oper ations use the CA RIMALI cleaning agent 06 00136 g R...
Page 58: ...instructions 10 2 6 Milker wash optional NOTE This process is only available if the milk FLUFXLW LV WWHG NOTE This procedure can be carried out follow ing the instructions on the display ATTENTION Bef...
Page 59: ...wash es by pressing SKIP Start the Milker washing 77 Connect the Milker circuit to a con tainer with water and CARIMALI san itizer 06 00136 Follow the instruc tions on the sanitizer package for a pro...
Page 60: ...end of the wash 80 NOTE For the complete rinsing of the Milker circuit use more than 1 l of fresh water When shown on the display connect the Milker circuit to a container with fresh water for rinsing...
Page 61: ...ge be careful not to damage the milk circuit parts 3UHVV WKH WZR VLGH DSV RI WKH FRI fee dispenser and remove it from the group 84 Remove the Milker hose and the dual dispenser of the milk circuit 85...
Page 62: ...t drying before installing the milk dispenser in its seat Then insert the milk dispenser back and reconnect the Milker hose 87 Insert the coffee dispenser back into the group 88 After having assembled...
Page 63: ...be carried out follow ing the instructions on the display Press and select the manual wash menu from the Drinks Selection page NOTE Skip previous wash es by pressing SKIP Start the display Cleaning p...
Page 64: ...select the manual wash menu from the Drinks Selection page NOTE Skip previous wash es by pressing SKIP Select the recommended Washing cycle to show the relevant procedures on the display 91 The displa...
Page 65: ...centre Drinks dispensed incorrectly Obstructed dispensing nozzle s Carry out an All in One washing cycle Water leakage from the drip tray Drip tray full Empty the drip tray Machine is on but does not...
Page 66: ...66 11 1 HOW TO DETECT AN ERROR 93 Follow the instructions on the display...
Page 67: ...er possible to dispense decaffeinated coffee based drinks Pour the decaf coffee soluble into the relevant chute DRIP TRAY NOT IN POSITION The drip tray is no longer in position It is no longer possibl...
Page 68: ...ord The disposal of the machine is not re sponsibility of the Manufacturer and must be carry out in compliance with the applicable regulations The Customer is held to Disassemble the machine parts Sep...
Page 69: ......
Page 70: ...Carimali S p A Via Industriale 1 Chignolo d Isola BG 24040 ITALY 39 035 4949555 39 035 905447 info carimali com carimali com LB 05124 00 EN 06 2018...