Carefree of Colorado
Service Manual
M
IRAGE
052979-301r16
6
C
ANOPY
R
EPLACEMENT
During the following instructions, use the manual override procedure on page 1 to open and close the awning.
This procedure requires two people.
1. Open the awning 18"-24".
2. Disconnect power to the awning.
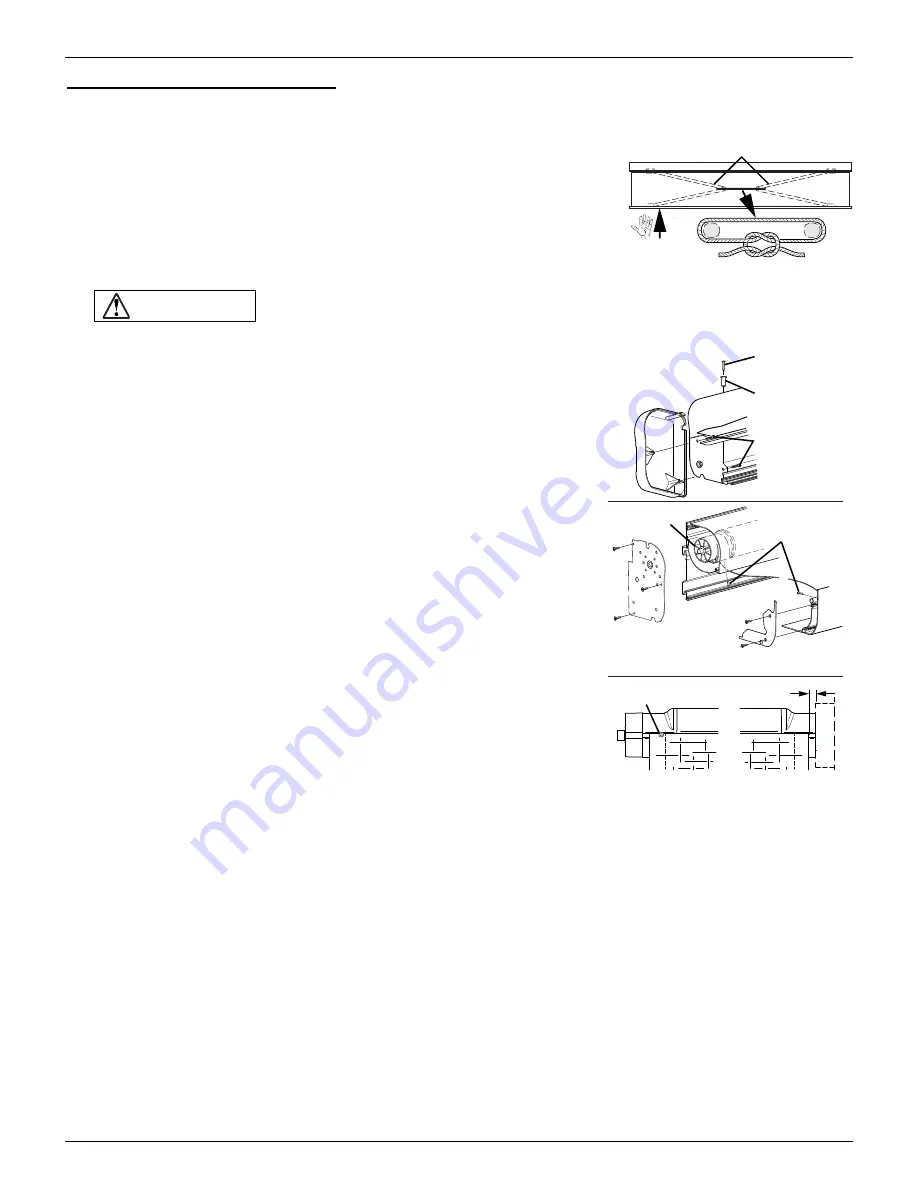
3. Carefully push the lead rail toward the case so that the arms collapse and
the fabric is slack.
4. While holding the lead rail firmly tie the elbows of the outer spring arms
together. Use a minimum 1/2" rope - do not use bungee cords. When tying
the rope, use a non-slip knot such as a square knot or equivalent.
CAUTION
Failure to secure the lead rail as described will allow the spring arms to
unexpectedly extend out possibly causing personal injury and damage to the awning.
1. Remove the fabric retainer screws in the lead rail and set aside.
2.
(refer to Detail A)
Remove the phillips head screw and rubber well
nut from the top of the case and the (2) socket head screws that
attach the end cap from the inside of the awning case.
3. Use the manual override (refer to page 1) to unroll the canopy until
the slot in the tube is aligned with the case opening.
4. Remove the fabric retaining screw from the idler end of the roller tube.
There is no screw on the motor side.
5. Remove the lead rail end plate from the idler side of the awning.
6. Remove the awning case end plate from the idler side.
NOTE:
It will be necessary to firmly support the roller tube and keep
it from coming out of the case.
7. From the idler end of the roller tube, simultaneously slide the old
canopy out of the roller tube and lead rail.
8. Inspect the slots in the roller tube and lead rail. Clean and deburr as
required. Lightly spraying the inside of the slot with a dry silicone
lubricant will aid in sliding the new fabric in.
9. Slide the new canopy into the lead rail and roller. Both edges must
be done at the same time. Orient the fabric so that the large
polycord goes into the lead rail, the smaller polycord goes into the
roller tube. The hem should be on the down side.
10. The canopy should be approximately .25" from the end of the motor crown.
11. Secure the canopy to the roller tube with the retaining screw removed previously.
12. Remove any support material from the roller tube and install the case and lead rail end plates.
13. Use the manual override to roll the canopy onto the roller tube, the material rolls under the roller tube.
Ensure the fabric rolls evenly onto the roller tube without wrinkling or folding.
14. Once the fabric is snugly rolled up, remove the rope used to tie the arms together.
15. Restore power to the awning.
16. Extend and retract the awning. Ensure the fabric rolls evenly onto the roller tube without wrinkling or folding.
Adjust the canopy position in the lead rail as necessary.
17. Install the fabric retainer screws in the lead rail.
18. Install the end cap.
19. After installing the canopy, it may be necessary to adjust the motor limits. Refer to "Adjusting the Motor
Limits" on page 3.
FRM007
Spring Arms
Firmly Tie Elbows Together
DETAIL
A
Lead Rail
Idler (ref)
DETAIL
B
Phillips Head
Screw
Rubber Well
Nut
End Cap
Socket Head
Screw (x2)
End Plate
Lead Rail End Plate
Mirage038a
Retaining
Screw (x3)
.25"
Motor
Roller Tube
Canopy
Retaining Screw (x1)
(idler side only)


