background image

English

headset.
While listening to music from an A2DP source, you will not miss any 

mobile or intercom calls, as the headset will automatically stop the 

music giving preference to the incoming call. However, after you ter-

minate your call, some MP3 sources may not automatically continue 

but require manual re-activation. 

Setting up your MP3 player for 

Bluetooth

 stereo A2DP 

transmission


To use a 

Bluetooth

 Stereo (A2DP) enabled MP3 Player or Adapter to 

listen to stereo music, you must first pair the device to your headset. 

Pairing the Headset to an MP3 Player or Adapter

NOTE: If your A2DP source is integrated inside your Mobile Phone, then 

you should pair it with your headset as described earlier in section: 

SET UP FOR MOBILE PHONE CALLS: PAIRING

1. Turn on your MP3 Player or Adapter, and make sure that its 

Bluetooth

 function is activated.

2. With the 

scala rider Q2 

pro


headset turned ON, press and hold the 

CTRL Button for at least six seconds until the Red and Blue Lights 

begin alternating rapidly:

3. Search for 

Bluetooth

 headsets on your MP3 Player by following the 

device’s instructions.

NOTE: For use of a 

Bluetooth

 adapter, follow the device’s instructions.

4. After a few seconds the MP3 Player will list 

“scala rider Q2 Pro

 as 

a discovered device. Select it and follow your MP3 Player’s instruc-

tions to accept the pairing.

5. If your MP3 player prompts for a PIN or Passkey enter 0000 (four zeros).
6. Once pairing is complete, your MP3 Player or Adapter may confirm 

that pairing has succeeded, and the headset will begin flashing 

slowly in Blue. 

NOTE: If the Pairing process is not completed within two minutes the 

headset will return to Standby mode.

Operating Your A2DP Source from Your Headset

Play

Tap the CTRL Button twice

Pause/Stop* Tap the CTRL Button twice
Forward

Press and hold the Volume Up Button for 3 seconds

Rewind**

Press and hold the Volume Down Button for 3 seconds

  * Varies depending on your mobile phone model

* * With some phones you may need to repeat this action once more

CABLE OPTION – CONNECTING YOUR MP3 PLAYER TO 

YOUR HEADSET

Your 

scala rider Q2 

pro


headset can be connected to an MP3 player 

device by plugging it to the Helmet Clamp’s jack with the MP3 cable.

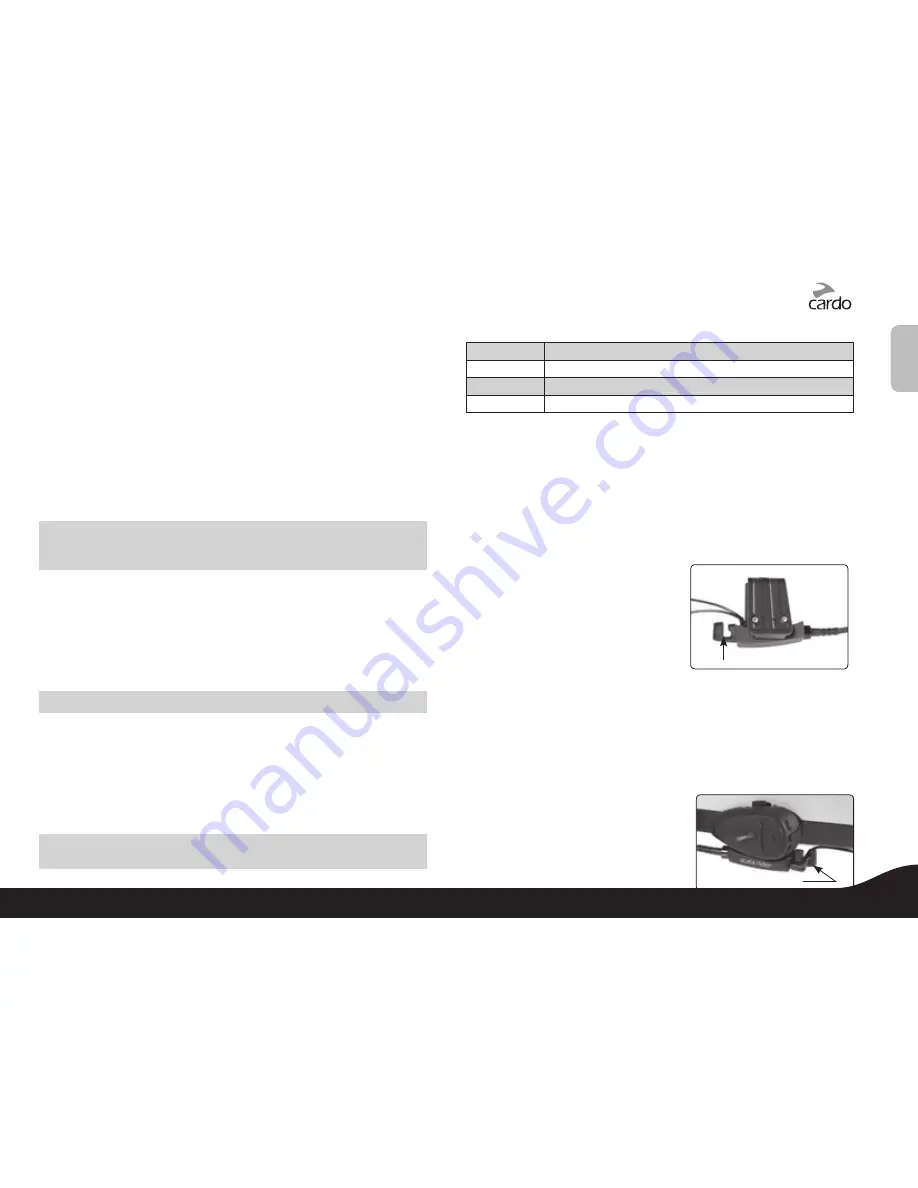
At your option, you may further secure the MP3 cable by using the MP3 

cable holder. For this purpose please proceed as follows:

MP3 cable holder hook

1. Use the enclosed Allen Wrench to 

remove both Allen screws from 

Helmet clamp and release the 

clamp’s back plate. 

2. Place the MP3 cable holder on the 

helmet clamp. Both pins on the MP3 

cable holder should be fixed into 

corresponding indentations on clamp. 

3. Place the Back Plate on top of the MP3 cable holder and secure 

all parts together using the Allen screws that were previously 

removed, as shown in photo.

4. Attach the clamp and headset onto your helmet as described 

previously in section “ATTACHING THE CLAMP ON THE HELMET”.

5. Attach the speakers to your helmet as described in section 

”POSITIONING THE SPEAKERS”.

Insert cable in hook

6. Connect the MP3 cable to your MP3 

player device’s jack and the other 

side to the helmet Clamp’s jack, 

inserting the cable through the MP3 

13

scala rider

® 

Q2

™ 

pro

Summary of Contents for SCALA RIDER Q2 PRO

Page 1: ...User Guide communication in motion Q2 pro ...

Page 2: ...he Bluetooth word mark and logos are owned by the Bluetooth SIG Inc and any use of such marks by Cardo Systems Inc is under license Other trademarks and trade names are those of their respective owners 2 scala rider Q2 pro ...

Page 3: ...with six preset stations 5 MP3 Connectivity Listen to your cable connected MP3 player while riding 6 Bluetooth stereo headset for wireless music streaming supporting the Bluetooth A2DP and AVRCP profiles compatible with a variety of MP3 Players adapters and other audio devices The scala rider Q2 pro can establish an audio connection with one Bluetooth device at a time Please read the section Using...

Page 4: ...ile charging the Red Light turns on it may take up to 15 seconds until the Red Light turns on When charging is complete the Red Light will turn off SET UP AND CONFIGURATION SETUPFORBIKE TO BIKEINTERCOM PAIRING The scala rider Q2 pro can be paired with up to two other headsets for Intercom communication referred to in this guide as Primary Buddy and Secondary Buddy Pairing is a one time process Onc...

Page 5: ...Primary Buddy and Secondary Buddy are not able to communicate directly via Intercom NOTE If the Pairing process is not completed within two minutes the headset will return to Standby mode Same process is applicable also for pairing with the Q2 i e the predecessor of the Q2 PRO SETUPFORRIDER TO PASSENGER INTERCOM PAIRING There are two ways that the scala rider Q2 pro can be used for Driver to Passe...

Page 6: ...headset is lost tap the CTRL button to reconnect the devices To Pair the scala rider Q2 pro to a Bluetooth Mobile Phone 1 Turn on your phone and make sure its Bluetooth function is activated 2 With the scala rider Q2 pro headset turned ON press and hold the CTRL Button for at least six seconds until the Red and Blue Lights begin rapidly alternating 3 Search for Bluetooth devices on your phone by f...

Page 7: ...here are two methods that can be used in order to attach the Clamp onto the helmet Standard Method Recommended for most helmet types Glue Plate Method Recommended for helmets to which the standard method cannot be applied using the Glue Plate included in the box Standard Method 1 Use the enclosed Allen Wrench to loosen the two screws on the Back Plate 2 Slide the Back Plate between the internal pa...

Page 8: ...ne please proceed as follows ATTACHING THE CORDED MICROPHONE CLAMP ON A FULL FACED HELMET If you are using the corded microphone version you must first make sure your helmet clamp is attached to your helmet as described in previous section ATTACHING THE CLAMP ON THE HELMET Clean the exact spot on the internal padding of the helmet opposite your mouth where the microphone will be placed and proceed...

Page 9: ...s volume according to ambient noise and driving speed AUDIO SOURCES AND PRIORITIES The different Audio Sources that are connected to the scala rider Q2 pro are prioritized as follows Highest 1 Mobile phone Audio GPS device Incoming outgoing calls GPS audio and navigation instructions 2 Primary Buddy Audio and Secondary Buddy Audio 3 A2DP audio source 4 FM Radio built in Lowest 5 MP3 Connectivity c...

Page 10: ...with any one once the other party tries to initiate a Buddy Intercom call the call will begin immediately TROUBLESHOOTING THE INTERCOM First make sure your microphone is located properly in front of the center of your mouth The scala rider Q2 pro is designed for use in loud environments Please make sure to test the Intercom functionality in a LOUD environment such as next to an idling motorcycle P...

Page 11: ...o link drops you can initiate and accept Buddy Intercom calls STATUSLIGHTSTATES None Headset is off Alternating red and Blue flashes Mobile phone Pairing mode Simultaneous red and Blue flashes GPS Pairing mode Rapid Red flashes Intercom Pairing mode 1 blue flash every 3 seconds Standby No call is in progress 2 blue flashes every 3 seconds Audio is on 1 red flash every 3 seconds Standby Battery is ...

Page 12: ...n on your headset Pressing Volume Up will search upwards higher frequency Pressing Volume Down will search downwards lower frequency Once a station is found searching stops and you can hear the station To save this station refer to the following section To continue searching press the Volume Up or Volume Down Button again for three seconds You may still continue to listen to the current unsaved st...

Page 13: ...irm that pairing has succeeded and the headset will begin flashing slowly in Blue NOTE If the Pairing process is not completed within two minutes the headset will return to Standby mode Operating Your A2DP Source from Your Headset Play Tap the CTRL Button twice Pause Stop Tap the CTRL Button twice Forward Press and hold the Volume Up Button for 3 seconds Rewind Press and hold the Volume Down Butto...

Page 14: ...t the interference by one or more of the following measures Reorient or relocate the receiving antenna Increase the separation between the equipment and receiver Connect the equipment into an outlet on a circuit different from that to which the receiver is connected Consult the dealer or an experienced radio TV technician for help Operation is subject to the following two conditions 1 this device ...

Page 15: ...for any bodily injuries harm or death as well as losses or damages in goods to any Vehicles including your own or to any property or asset that belong to you or to third parties any of which may result from using the Device under any circumstances or conditions and irrespective of jurisdiction Cardo will not be responsible for any physical damages irrespective of reasons conditions or circumstance...

Page 16: ...E ASSUMED IN THE ENCLOSED MANUAL Limitation of Liability IN NO EVENT SHALL CARDO BE LIABLE FOR ANY SPECIAL INDIRECT PUNITIVE INCIDENTAL EXEMPLARY OR CONSEQUENTIAL DAMAGES OR ANY DAMAGES WHATSOEVER RESULTING FROM THE USE OF THE DEVICE WHETHER BASED ON BREACH OF CONTRACT TORT INCLUDING NEGLIGENCE PRODUCT LIABILITY OR OTHERWISE EVEN IF ADVISED OF THE POSSIBILITY OF SUCH DAMAGES YOU ACKNOWLEDGE AND AG...

Reviews: