CARBEL I 100 Manual For Use And Maintenance Download Page 17


15 


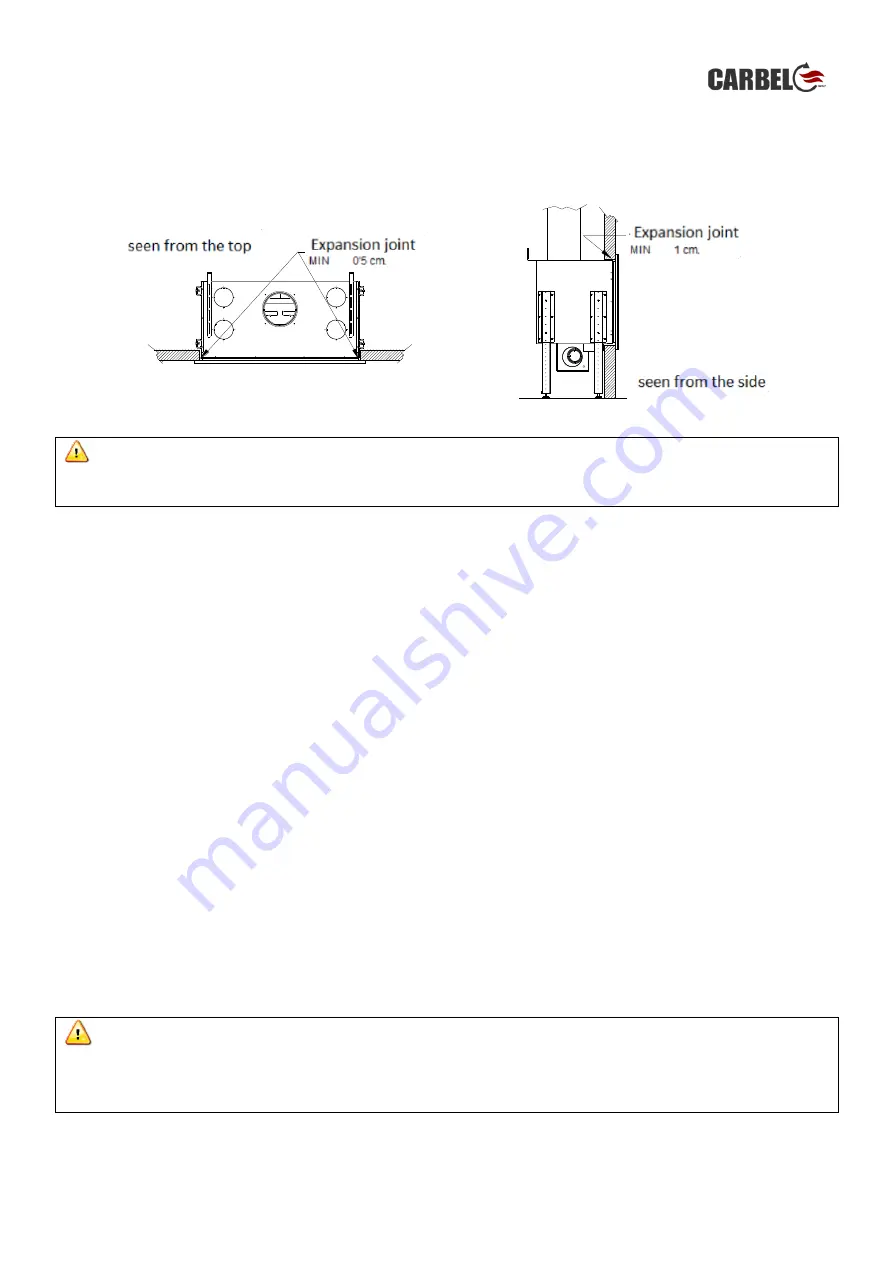
The  building  work  must  be  finished  in  such  a  way  that  the  wood  burner  can  expand  during  operation:  the 
brickwork must never be supported on or against the sides of the appliance. Leave a minimum expansion joint of 
0.5 cm on each side and at least 1 cm the top of the front. 


Warning. - 

 Any installation should be done by an authorised installer. A faulty installation of this product, and an 

inadequate maintenance might cause grave incidents.  


3.  OPERATION 


3. 1 Combustion  
 

For  good  combustion  that  is  clean  and  environment-friendly  (CO-free),  when  the  wood  is  well  lit  and  it  has 
reached a high temperature, you must close the primary air inlet and keep the secondary air inlet open. This will 
let the air for combustion (preheated) enter through the top of the fireplace next to the glass and through the 
back wall below the deflector to ensure better gas combustion.  You will notice this in an increase in flames and 
temperature. 
  
Wood burners and inserts are intermittent combustion appliances. This means that they should be lit, loaded with 
an  approximate  weight  of  fuel  as  recommended  by  the  manufacturer  for  each  model,  followed  by  a  full 
combustion cycle and fuel reloads after each combustion cycle. 
 
Good combustion is necessary for optimum performance and a better view of the flames through the glass.  
 
Guidelines: 
 
- Maintain a high and constant temperature in the fireplace. Accordingly, the fireplace door must be closed at all 
times and opened only to load firewood, which must be done as quickly as possible. Keeping the door open will 
cause the stove to cool down, it will worsen the combustion and make lighting of the new wood more difficult. 
- Do not take a long time when loading firewood and wait for the end of the combustion cycle, when the flames 
of the previous load disappear.  


Warning. 


During the use of your stove or inset appliance, the high temperatures generated during combustion and 

cooling down of the device afterwards will cause expansion and contraction of the steel plates. This may cause some metallic 
sounds; these are completely normal and should not be considered a defect in the product.


JUNTA DE DILATACION

MINIMO 0'5cm.


JUNTA DE DILATACION

MINIMO 1cm.

VISTA EN PLANTA

VISTA DE PERFIL

Summary of Contents for I 100

Page 1: ...INTENANCE Modelos I 100 I 80 I 70 CERTIFICACI N SEG N LA NORMA EN 13240 Y EN 13229 CERTIFICATION ACCORDING TO THE STANDARD EN 13240 Y EN 13229 Cocinas CARBEL S L C Ciudad de Cartagena 22 Pol gono Indu...

Page 2: ...ma de las entradas de aire P 10 4 MANTENIMIENTO P 10 5 CONSEJOS DESHOLLINADO Y NORMAS DE SEGURIDAD P 10 ENGLISH 1 NOTE FROM THE MANUFACTURER P 12 2 INSTALLATION P 12 2 1 Recommendations for the chimne...

Page 3: ...ONNECTION ASSEMBLY ANEXO IV SUJECCI N DEL APARATO A LA PARED Y SUELO P 26 ATTACHMENT OF THE DEVICE TO THE WALL AND FLOOR ESQUEMA ELECTRICO P 28 ELECTRIC DRAWING DATOS TECNICOS TECHNICAL DATA SHEET Mod...

Page 4: ...n medida de la instalaci n que se realice 2 1 Consejos para la chimenea El buen funcionamiento depende del tiro de la chimenea Le damos unos consejos pr cticos para conseguir un funcionamiento ptimo L...

Page 5: ...lluvia no entra al interior del tubo por los empalmes del tubo 2 2 Entrada de aire exterior Para que la chimenea tenga un tiro correcto es necesaria la entrada de aire exterior de la vivienda a la sa...

Page 6: ...ning n caso de la instalaci n del mismo 1 Tubo para salida de humos 200 o 150 seg n modelo 2 Entrada de airea la c mara de la chimenea por convecci n natural 3 Entrada de aire a la c mara de convecci...

Page 7: ...quiere decir que debe realizar el encendido una carga de combustible peso de le a aprox aconsejado por el fabricante para cada modelo seguida por un ciclo de combusti n completo repitiendo cargas de c...

Page 8: ...uncionamiento deseado La le a m s fina de menor calibre debe utilizarla para conseguir una mayor potencia t rmica util cela despu s del encendido para conseguir una respuesta m s r pida y cuando tenga...

Page 9: ...apa abundante de astillas o le a fina Debe dejar las piezas entrecruzadas y con suficiente espacio entre ellas para que circule aire 2 Encienda la capa superior de astillas o le a fina preferiblemente...

Page 10: ...mperatura del hogar de la estufa la calidad de la le a humedad tama o y forma 1 Regulaci n aire secundario 2 Regulaci n aire primario 3 5 REGULACION DURANTE EL ENCENDIDO Entrada de aire primario Es fu...

Page 11: ...l m ximo provecho a cada carga de le a Podr regular la entrada de aire secundario cuando el aparato este suficientemente caliente y la llama muy bien prendida Durante el funcionamiento normal nunca de...

Page 12: ...a estufa con limpia cristales agua ni productos especiales de limpieza La pintura antical rica no es impermeable Limpiar la pintura con plumero o un pa o suave y seco si con el tiempo desea restaurarl...

Page 13: ...el conducto 1 Prepare la le a dentro de la estufa para realizar el encendido 2 Coloque una pastilla o una hoja de peri dico sobre el deflector en la boca del inicio del conducto y pr ndalo 3 Transcurr...

Page 14: ...imal performance The wood burner must be connected to a flue that guarantees sufficient chimney draught at least 12 Pa The flue must have sufficient height not less than 4 m and should extend at least...

Page 15: ...h a way that it cannot be blocked Warning In homes without the appropriate outside air inlet extraction fans e g Kitchen extractors can cause problematic reverse chimney draughts Connecting outside ai...

Page 16: ...e responsible for the provided appliance but in no case for the installation of the same 1 Fumes exhaust pipe 200 or 150 according to model 2 Entry of air into the chimney chamber by natural convectio...

Page 17: ...at they should be lit loaded with an approximate weight of fuel as recommended by the manufacturer for each model followed by a full combustion cycle and fuel reloads after each combustion cycle Good...

Page 18: ...n it is not good and the glass tends to get dirty There is a danger of reaching excessive temperatures that threaten the integrity of the wood burner and user safety Select the firewood to achieve the...

Page 19: ...thin dry wood 1 Load a generous load of small or medium size open firewood with a generous layer of wood chips or thin firewood on top You should leave the pieces crossed and with enough separation be...

Page 20: ...ustion levels The optimal regulation of the air inlets can vary depending on various factors such as the chimney flue the temperature of the wood burner the quality of the wood moisture size and shape...

Page 21: ...R LEAVE OPEN 25 OF ITS RANGE 10mm Secondary air inlet Secondary air adjustment is the one that will provide better combustion that is cleaner and more efficient making the most of every load of firewo...

Page 22: ...er seals and cause oxidation of the metal parts It is very important not to wet the wood burner with window cleaner water or special cleaning products Heatproof paint is not waterproof Clean the paint...

Page 23: ...ighting the fire by heating the flue 1 Prepare the wood for lighting inside the wood burner 2 Place a firelighter or a sheet of newspaper on the deflector at the start of the flue and set fire to it 3...

Page 24: ...inas Carbel S L C Ciudad de Cartagena 22 Pol gono Industrial fuente del Jarro 46988 Paterna VALENCIA CERTIFICADO DE GARANTIA NOMBRE DIRECCION POBLACION COD POSTAL PROVINCIA TELEF EMAIL MATERIAL EXENTO...

Page 25: ...Carbel S L C Ciudad de Cartagena 22 Pol gono Industrial Fuente del Jarro 46988 Paterna VALENCIA CERTIFICATE OF WARRANTY NAME ADDRESS TOWN CITY POSTCODE PROVINCE TEL E MAIL MATERIAL EXCLUDED FROM WARR...

Page 26: ...de panels and take out the baffle 3 Con ayuda de unos alicates enderece las pesta as de seguridad del deflector superior de acero inoxidable y ret relo With pliers unbend the safety retaining hooks of...

Page 27: ...er using the holes already provided 2 Introducir las patas en las gu as Insert the legs into the guides 1 Regular la altura y fijarlas con los tornillos Para montar la caja de la turbina es necesaria...

Page 28: ...bilidad y sujeci n del aparato le recomendamos instalar las dos escuadras suministradas In order to ensure optimal stability and holding of the device we recommend that you install the two supplied br...

Page 29: ...izar las patas met licas debidamente dise adas para tal fin La elecci n de la torniller a adecuada ser competencia del instalador In order to guarantee the correct anchoring of the device to the floor...

Page 30: ...W Modelo I70 I80 KRONOS 70 KRONOS 60 A70 2 A80 2 2 POSICIONES N L T1 2 POSICIONES S1 V1 V2 V3 2 POSICIONES V4 N L V3 V2 T1 V1 2 POSICIONES S1 15 W 50 Hz 14 W 0 22 A Max POTENCIA INSTALADA 42 W TENSI N...

Page 31: ...s A ndice de eficiencia energ tica Energy Efficiency Index EEI 118 Rendimiento Performance 87 30 Potencia t rmica nominal Nominal Thermal Power 10 78 Carga de Le a para pot Nominal Firewood load for N...

Page 32: ...wood Load 2 9 Kg Peso Weight 95 kg Tiro necesario chimenea Required Chimney Flue 12 Pa Temperatura media de los humos Average Smoke Temperature 227 Modelo Model I 70 Clase energ tica Energy Efficiency...

Page 33: ...31...

Page 34: ...32...

Page 35: ...33...

Page 36: ...34...

Reviews: