


Instruction manual C3371
Instruction manual C3371
24
25
Please keep this instruction manual for future reference
Please keep this instruction manual for future reference
C A R E A N D M A I N T E N A N C E
This appliance is for household use only, don’t use it outdoors
IMPORTANT:
Unplug your oven before cleaning, or performing maintenance.
To extend the life of your oven, it must be cleaned frequently, keeping in mind that:
-
Do not use steam equipment to clean the appliance. To protect against the risk of electrical
shock, do not immerse the unit, cord or plug in water. Do not clean the appliance by spraying
water onto or into the oven.
-
Don’t clean the appliance when it is still hot. The inside and external surface of the oven should
be cleaned with a damp cloth when it has cooled down.
-
Wash all accessories in hot soapy water or in a dishwasher, wipe dry with a paper towel or cloth.
-
If you use your oven for an extended period of time, condensation may form. Dry it using a
non-abrasive cloth.
-
There is a rubber seal surrounding the oven opening which guarantees its perfect functioning.
Check the condition of this seal on a regular basis. If necessary, clean it, avoid using abrasive
products or objects to do so. Should it become damaged, please contact Caple Service. We
recommend you do not use the oven until it has been repaired.
-
Never line the oven bottom with aluminium foil, as the consequent accumulation of heat could
compromise the cooking and even damage the enamel.
-
Clear the glass door using a damp cloth and dry it with a non-abrasive cloth.
-
Do not use harsh abrasive cleaners or sharp metal scrapers to clean the oven door glass since
they can scratch the surface, which may result in shattering of the glass.
R E P L AC I N G T H E OV E N L I G H T
-
Switch off your oven at the mains.
-
Remove the glass cover, by unscrewing this from the light socket.
-
Remove the light bulb by pulling it from the light socket and replace it with a similar bulb.
Halogen lamp characteristics
Voltage: AC220V-240V
Wattage: 25W
Cap: G9
-
Remount the glass cover and reconnect the appliance to the power supply.
DO NOT TOUCH
the light bulb directly with your hands.
WA R N I N G :
Ensure the appliance is disconnected from the mains before replacing the light to avoid the
possibility of an electric shock.
REPLACING THE OVEN LIGHT
- Switch off your oven at the mains.
- Remove the glass cover, by unscrewing this from the light socket.
- Remove the light bulb
by pulling it from the light socket
and replace it with a similar
bulb
.
- Remount the glass cover and reconnect the appliance to the power supply.
DO NOT TOUCH
the light bulb directly with your hands.
WARNING:
Ensure that the appliance is disconnected from the mains before replacing the
lamp to avoid the possibility of electric shock.
Instruction manual
Please keep this instruction manual for future reference
21
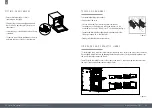
REPLACING THE OVEN LAMPS
- Switch off your oven at the mains.
-
Unscrew the glass cover attached to the lamp-holder
- Remove the light bulb and replace it with a similar one
- Remount the glass cover and reconnect the appliance to the power supply.
DO NOT TOUCH
the light bulb directly with your hands.
WARNING:
Ensure that the appliance is disconnected from the mains before replacing the
lamp to avoid the possibility of electric shock.
Halogen lamp characteristics
- Voltage: AC220V-240V
- Wattage: 25W
- Cap: G9
H
Haallooggeenn llaam
mpp cchhaarraacctteerriissttiiccss
- Voltage: AC220V-240V
- Wattage: 25W
- Cap: G9
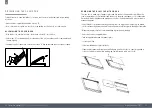
Telescopic runners
To assemble the telescopic runners:
- Remove the side racks
- Choose which shelf to use with the telescopic runner. Pay attention to the
direction in which the runner is to be extracted, position joint ‘B’ and joint ‘C’
on the frame (see Fig.
1
).
- Secure the two side racks with the guide rails using the holes provided on the
oven walls (see Fig. 3).The holes for the left rack are situated at hole F1, F2 and
the right rack at hole D1, D2.
- Finally, re-fit the side rack
Fig.
Side racks and Catalytic liners
To install, align the 2 holes in the catalytic liners with the 2 steel clips in the side of
the oven cavity. Once aligned, attach side racks by pushing these onto the furthest
steel clip and then clicking the other end onto the closest steel clip.
This will secure the catalytic liners to the sides of the oven. To remove, unclip the side
racks from the side of the oven, and remove the catalytic liners.
Visit our Caple website to view a 'How to video' on this. www.caple.co.uk
Light
CAVITY


