background image

5

-3

5

S

ett
ing Page

The various settings of the camera are configured by accessing the camera in the web browser. First, access the top page 

of the camera (P. 4-2).

For details on entering the user name and password, see P. 4-3. 

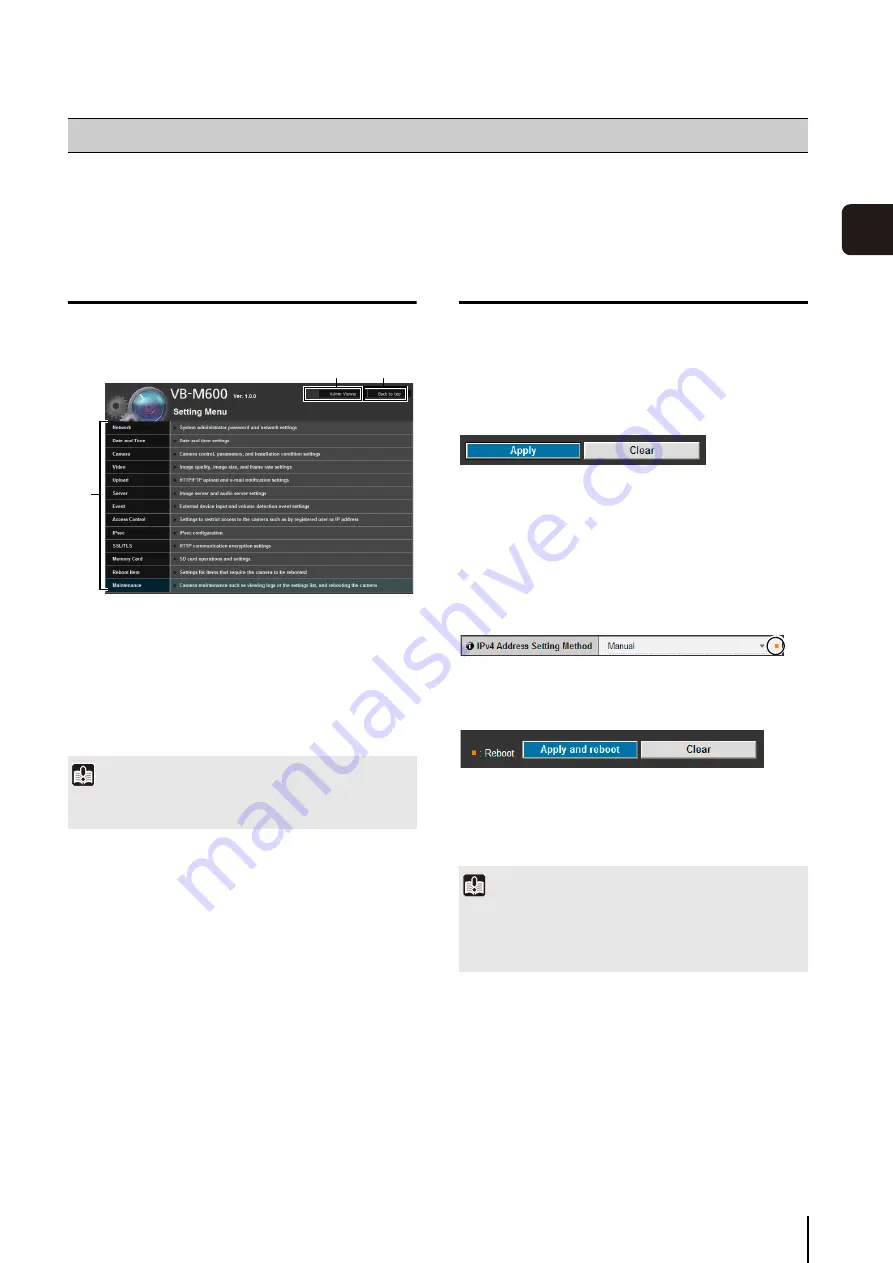
Setting Menu

You can access each setting page and Admin Viewer 

from the Setting Menu. 

1

[Admin Viewer] 

Clicking this button opens Admin Viewer. 

2

[Back to top] 

Clicking this button navigates to the top page. 

3

S

etting Menu

Clicking this button navigates to each setting page. 

Items Common to All Setting Pages

„

Applying New Settings

When a setting is changed on any setting page, [Apply] 

shown on the top right and bottom right of the setting 

page turns from grayed-out to blue. 

Click [Apply] to make the new setting effective. 

Click [Clear] to restore the previous setting. 

„

Setting Changes Requiring Rebooting

Items that require the camera to be rebooted in order to 

change settings are flagged with an orange mark. 

When any item accompanied by an orange mark is 

changed, the [Apply] shown at the top right and bottom 

right of each setting page changes to [Apply and reboot]. 

Click [Apply and reboot] to confirm the new setting. The 

new setting will be reflected and the camera will be 

rebooted. 

Click [Clear] to restore the previous setting. 

Accessing the Setting Menu

Important

To ensure security, exit the web browser after completing 
settings from the Setting page. 

1

2

3

Important

Setting changes will be lost if you navigate to another setting 
page without clicking [Apply] or [Apply and reboot]. Be sure to 
click [Apply] or [Apply and reboot] to make the new settings 
effective. 

Summary of Contents for VB-M700F

Page 1: ...ENGLISH Network Camera Operation Guide Be sure to read this Operation Guide before using the network camera...

Page 2: ...This document has been prepared with utmost attention to accuracy If you have any comment however please contact Canon sales representative 4 Canon shall assume no liability for any outcome of using...

Page 3: ...type of waste could have a possible impact on the environment and human health due to potentially hazardous substances that are generally associated with EEE Your cooperation in the correct disposal o...

Page 4: ...ting Safety Precautions viii Safety Precautions ix Maintenance xi Chapter 1 Before Use VB M700F VB M600D VB M600VE Features 1 2 Camera Software 1 4 Installed Software 1 4 Bundled Software 1 4 Network...

Page 5: ...le Setting Tool 3 2 Connecting to the Camera 3 2 Connecting with a Camera List 3 3 Disconnecting from the Camera Shutting Down 3 4 Display Screen of Camera Angle Setting Tool 3 5 Setting the Camera An...

Page 6: ...ation Encryption 5 27 Memory Card SD Memory Card Operations and Settings 5 29 Reboot Item Setting Items Requiring Rebooting 5 31 Maintenance Viewing Event Logs and Current Settings and Performing Main...

Page 7: ...dministrator 7 10 Magnifying Part of the Image Viewer PTZ 7 10 Opening Closing Control Items 7 11 Setting the Smart Shade Control 7 11 Setting the Focus 7 12 Setting the Exposure 7 12 Setting White Ba...

Page 8: ...ations Sections you should reference in this guide will be marked Installation Guide along with the name of the reference items VB M700F VB M600D VB M600VE Operation Guide This Document VBM6700OG_E pd...

Page 9: ...ause undesired operation Note This equipment has been tested and found to comply with the limits for a Class B digital device pursuant to Part 15 of the FCC Rules These limits are designed to provide...

Page 10: ...ng on the PC and network environment high precision video transmission cannot be guaranteed due to video delay or loss Canon will assume no liability for any accident or damage resulting from use of t...

Page 11: ...Using Camera Housing in the VB M700F Installation Guide to remove the protection plate See steps in Installing the Camera in the VB M600D VB M600VE Installation Guide to remove the dome case 2 Dampen...

Page 12: ...xii...

Page 13: ...Chapter 1 Before Use Camera Features Software Information Operating Environment and Precautions...

Page 14: ...on Configurable zoom focus settings Configurable pan tile rotation zoom focus settings Intelligent Functions that Enable a Wide Range of Detection The camera also boasts a wide array of intelligent fu...

Page 15: ...ing Software RM Lite This product comes with the RM Lite Network Video Recording Software P 1 6 Images captured by up to four cameras can be recorded displayed in real time to enable small scale video...

Page 16: ...ewer Bundled Software The bundled Setup CD ROM contains the VB Initial Setting Tool and the Camera Angle Setting Tool used when installing the camera and RM Lite Network Video Recording Software that...

Page 17: ...lar purposes User Support Tool A convenient tool can be installed for use on a PC Backup and Restore Tools The tools back up camera setting information to the PC Information from multiple cameras can...

Page 18: ...d functions of RM Lite see the Administrator s Manual Type Overview License RM Lite Storage Server Up to four cameras can be registered to record video 1 license RM Lite Viewer Plays recorded video sa...

Page 19: ...Viewer JPEG Receives audio from the camera one way communication RM Lite Viewer JPEG H 264 Transmits receives audio two way communication Audio from the microphone connected to the camera can be liste...

Page 20: ...a language pack from the internet If your computing environment is not internet enabled after a moment the package will be installed without the language pack The language pack is not required for ope...

Page 21: ...008 the security level for Internet sites and intranet sites on Internet Explorer is set to High by default Thus when accessing the VB M700 600 Viewer or the camera s Setting Page a content block dial...

Page 22: ...ost Name Admin Viewer and Admin Tools will not start when IE ESC Internet Explorer Enhanced Security Configuration is enabled in Windows Server 2008 Before using the tools register about internet and...

Page 23: ...on Use with Windows Vista Windows 7 The following restrictions apply when the camera is used with Windows Vista or Windows 7 RM Lite For more important information on the RM Lite operating environmen...

Page 24: ...1 12...

Page 25: ...Chapter 2 Initial Settings Preparing the Camera for Use Initial Setting Tool Installation Initial Settings...

Page 26: ...Tool to set the camera angle via PC operation Installing the Camera Angle Setting Tool P 2 4 Chapter 3 Camera Angle Setting Tool Configuring the Camera from the Setting Page The setting page lets you...

Page 27: ...correctly see the error message and log message information in Chapter 8 Appendix Log messages can be viewed in Tool P 5 32 in the setting page or the Admin Tools Log Viewer P 6 15 Chapter 8 Appendix...

Page 28: ...l to perform angle adjustments when installing the camera 1 After confirming that all other applications have been closed click Start menu Computer 2 Double click the CD ROM icon that appears Applicat...

Page 29: ...Administrator for the appropriate IP address subnet mask and gateway address Performing Initial Settings for the Camera 1 Connect the camera and PC to the network and turn on the camera Connecting th...

Page 30: ...apter 8 Appendix Checking the Camera Image 1 Click to select the camera s MAC address which will be checked and then click Settings 2 This will launch the web browser and display the top page of the c...

Page 31: ...Chapter 3 Camera Angle Setting Tool Camera Angle Setting Method Creating a Camera Specification File to Manage Multiple Cameras...

Page 32: ...iew Livescope Camera Angle Setting Tool from the Start menu Connecting to the Camera The Camera Angle Setting Tool is not connected when the camera starts Connect to the camera through the following o...

Page 33: ...ayed and the camera angle can be set Connecting with a Camera List The following explains the operations for loading a camera specification file into the Camera Angle Setting Tool and using the camera...

Page 34: ...ist select the camera to connect to and click Connect Connecting to the Next Camera on the List Click Next to disconnect the camera currently connected and connect to the next camera on the list Note...

Page 35: ...ration The camera angle cannot be changed to positions with no dotted lines 4 Pan button Control the camera s pan operation 5 Tilt button Control the camera s tilt operation 6 Rotation button Control...

Page 36: ...tion assist Operation assist correction takes about 1 minute to complete A f Focus You can control the focus A g Exposure Compensation You can control the exposure Setting the Camera Angle You can ope...

Page 37: ...and near buttons Clicking One shot AF will use autofocus to focus on a subject and then stop in manual focus Fixed at Infinity You can set the focus so that it is fixed near infinity Note One shot AF...

Page 38: ...he camera s host name or IP address Port Number The camera s HTTP port factory default setting is 80 Administrator User Name The camera s administrator user name factory default setting is root Admini...

Page 39: ...VB M600D 192 168 100 3 80 root camera3 0 2Fa VB M600D 192 168 100 4 80 root camera4 0 2Fb VB M600D 192 168 100 5 80 root camera5 0 3Fa VB M700F 192 168 100 6 80 root camera6 0 R VB M600VE 192 168 100...

Page 40: ...3 10...

Page 41: ...Chapter 4 Top Page of the Camera Accessing the Setting Page Admin Tools and Viewer Certificate Registration...

Page 42: ...VB Viewer Link Accessing the Setting Menu To specify detailed camera settings click 2 to proceed to the Setting Menu For more details on the Setting Menu see Chapter 5 Setting Page Accessing the Admin...

Page 43: ...istrator account for the camera Admin Viewer VB Viewer Important To ensure system security be sure to change the administrator password Do not forget the new password If the Administrator and an autho...

Page 44: ...d Certificate folder The Certificate dialog box will appear Note PCs configured after July 17 2011 will display the following window You can continue certificate registration without issue 1 Select Pl...

Page 45: ...mail Notification Settings Image Server Audio Server and HTTP Server Settings Settings Related to Events User Registration Authorities and Access Restriction Settings IPsec Settings HTTP Communicatio...

Page 46: ...buffer volume detection external device input timer and sound clip upload P 5 19 Access Control Authorized user account user authorities host access restriction settings P 5 22 IPsec IPsec settings P...

Page 47: ...blue Click Apply to make the new setting effective Click Clear to restore the previous setting Setting Changes Requiring Rebooting Items that require the camera to be rebooted in order to change setti...

Page 48: ...any item to display a detailed explanation of that setting item Important Do not change the settings of one camera with multiple setting pages opened at the same time Do not use the Back or Forward b...

Page 49: ...1 enter a fixed IP address 3 Subnet Mask If Manual is specified in 1 enter the designated subnet mask values for each network 4 IPv4 Default Gateway Address Enter an appropriate value if Manual is spe...

Page 50: ...ttings must be set in advance Contact your System Administrator for the DNS server settings If the name server address 1 is unavailable the name server address 2 will be accessed However the name serv...

Page 51: ...tting information can be referenced by the SNMP manager 4 Administration Function Name Set the camera name used for administration Setting information can be referenced by the SNMP manager If left bla...

Page 52: ...e camera will synchronize time with NTP broadcasts received from the NTP server Synchronize with computer time The camera will synchronize with the date and time of the computer currently accessing th...

Page 53: ...vels from 1 8 to 1 8000 When capturing a moving subject selecting a higher shutter speed can reduce blurry image capture 2 Exposure Compensation The exposure compensation when the camera starts can be...

Page 54: ...ich Day Mode and Night Mode will be switched Select Darker Slightly Darker Standard Slightly Brighter or Brighter Select Darker if you want to capture video in color as much as possible Select Brighte...

Page 55: ...ice 1 2 External Output Device 1 2 Device Name for external input device external output device Be sure to enter each device name in order to identify the corresponding external device being connected...

Page 56: ...in 1 select a desired quality from 1 to 5 total 5 levels for H 264 video transmission Greater values have higher quality 4 Video Size Select 320 x 240 640 x 480 or 1280 x 960 for the size of video tr...

Page 57: ...5 9 7 Position of text display Select the position of text display from Upper left Upper right Lower left or Lower right 8 Text string display If Display designated string is selected in 6 Text displ...

Page 58: ...proxy server using up to 63 characters 5 Proxy Port Enter the port number of the proxy server factory default setting is 80 6 Proxy User Name Proxy Password Enter the user name and password of the pr...

Page 59: ...s created first and then the image is uploaded using the file name hour minute second ms jpg Example 20080123 112122000 jpg Loop Images are loaded with a file name numbered up to the value set in Maxi...

Page 60: ...the authentication method used by the SMTP server to send to User Name Password POP Server If POP before SMTP is selected as the e mail authentication mode enter the user name and password as well as...

Page 61: ...ume Set the volume of input for the microphone connected to the camera in the range of 1 to 100 The greater the value the larger the input volume becomes 3 Voice Activity Detection If Enable is select...

Page 62: ...n the characteristics of the microphone used If Input Volume or Echo Canceller settings are changed after setting volume detection check the detection setting again Send audio from the RM Lite Viewer...

Page 63: ...to their settings upon an ON event 6 OFF Event Operation Select the operation to be performed upon an OFF event If Enable is selected 7 Upload and 8 E mail Notification will be executed according to...

Page 64: ...e mail notification operation to be performed If Enable is selected e mail notification will be performed when an external device input event occurs provided that the event is set to Enable To use th...

Page 65: ...ail notification operation to be performed If Enable is selected e mail notification is performed when a timer event occurs To use this function the E mail Notification sub menu must also be set from...

Page 66: ...ermit for each user Note Authorized users have higher authorities than guest users For details see Chapter 7 User Authorities and Camera Control Privileges P 7 2 IPv4 Host Access Restrictions 1 Apply...

Page 67: ...Access for the default policy 3 Prefix Prefix Length Create a list of permitted hosts and restricted hosts and set IPv6 address access for each host to Yes or No You can specify the prefix length and...

Page 68: ...ing is 480 IPsec Set Auto Key Exchange IPsec Sets 1 to 5 are available and you can specify IPsec settings for one communication device for each IPsec Set 1 IPsec Set Set IPsec Set to Disable Enable in...

Page 69: ...gorithm to A g SA ESP SPI inbound must be set 8 SA ESP Encryption Algorithm Set the ESP encryption algorithm to AES 3DES DES or NULL according to the encryption algorithm supported by the device to co...

Page 70: ...SPI outbound Set the SA SPI value for outbound Set a desired value in the range of 256 to 4294967295 A l SA AH Authentication Key inbound Set the SA authentication key for inbound If HMAC_SHA1_96 or...

Page 71: ...ote Generating a certificate signing request takes time so it is recommended that you stop video transmission and upload processes 2 Display Certificate Signing Request Details Click Exec to view the...

Page 72: ...effect after rebooting Encrypted Communications 1 SSL Communications Set SSL communications to Disable or Enable The setting will take effect after rebooting However if no certificate is installed SS...

Page 73: ...ions unmount status 3 Delete Images Click Exec to delete images from the SD memory card During deletion an indicator will appear to the right of Exec Note It may take 10 minutes or more to delete imag...

Page 74: ...not consistent with saved image files Image management information must be recreated 4 Image Saving Displays whether or not images can be saved to the SD memory card Can Save Indicates that images can...

Page 75: ...disable camera connection from the active web browser a dialog box appears and alerts the user Click OK to apply the new setting Depending on the new setting it may not be possible to connect to the...

Page 76: ...te It is recommended that you write down all current setting values before restoring factory default settings in Restore Settings P 8 23 The camera can be restored to factory default settings using th...

Page 77: ...Chapter 6 Admin Tools Privacy Mask Setting Intelligent Function Setting Viewing Logs...

Page 78: ...ploads notify the viewer record a log etc if a change has occurred in the captured image due to movement of a subject By setting the conditions you can let the camera detect events such as abandoned o...

Page 79: ...the Admin Tools is launched an authentication window is shown Enter a user name and password Note The first time you launch any of the Admin Tools wait about 5 to 10 seconds until the software is dow...

Page 80: ...control is effective when the image is dark due to backlight 4 Obtain release Camera Control button This button is used to obtain release the camera control privileges For details see Obtaining Camer...

Page 81: ...nd Size Set left and upper edge width and height of the privacy mask A f 3 Preview settings Reflect the settings specified under Privacy Mask Position and Size in the image display area and registered...

Page 82: ...te Select a disabled privacy mask and click Quick change to enable it How to Delete Select the privacy mask area you want to delete and click Delete The privacy mask area that was saved in the camera...

Page 83: ...erve your needs Intelligent Function Setting Tool Admin Viewer RM Lite Viewer Camera E mail notification Network Video recording on storage server Upload to FTP server HTTP server Volume Moving object...

Page 84: ...aluables Removed object detection is triggered when an object is removed from the detection area for a specified duration Background initialization Removed Object Detection Occurrence Specified durati...

Page 85: ...launched 5 Focus Focus can be operated if the control privileges have been obtained Focus operations are the same as in the Admin Viewer For details see Setting the Focus P 7 12 6 Smart Shade Control...

Page 86: ...ettings in the camera After the detection settings have been specified be sure to save the settings in the camera by clicking Save settings Flow of Intelligent Function Setting The intelligent functio...

Page 87: ...he color selected here becomes the display color of the detection area in the image display area 6 Check the detection result Important Notes on intelligent function settings and operation When settin...

Page 88: ...cted E mail Notification checkbox When selected e mail notification is performed at the timing set in 1 E mail Notification must be set in advance under Upload in the Setting page P 5 16 Upload checkb...

Page 89: ...second in the center of the image display area allowing specification of the settings while checking the size ratio Any moving objects detected are shown with contour lines If a moving object is smal...

Page 90: ...is changed for an area larger than Change Ratio contour lines take on the same color as the detection area indicating that detected mode has been triggered to ON Note Right click on the Intelligent Fu...

Page 91: ...rom where log files are loaded is shown From the camera s internal memory Camera Internal memory From an SD memory card Camera SD card From files saved to a PC File name 8 Copy Copy to the clipboard l...

Page 92: ...ay them Note Log Viewer only has a log viewing function and logs cannot be deleted Downloading Log Files When Log Viewer is launched the latest log files will be downloaded and displayed automatically...

Page 93: ...g conditions and click Apply filter to show only the logs matching the specified conditions Log Type Select the Specify type or Specify code checkbox to filter logs by type If you don t want to filter...

Page 94: ...6 18...

Page 95: ...iewer Differences between the Admin Viewer and the VB Viewer User Authorities and Camera Control Privileges Viewer Startup and Operation Camera Control and Obtaining Camera Control Privileges Admin Vi...

Page 96: ...Users with camera control authority can use this viewer You can set the applicable options to enable disable authentication etc User Authorities and Camera Control Privileges User authorities and the...

Page 97: ...another instance of the Admin Viewer launched by an Authorized User The Administrator can retain the camera control privileges but doing so prevents authorized users from obtaining camera control priv...

Page 98: ...launching the Admin Tools Launching the Viewer Important The Canon Inc Certificate must be registered on a PC that is using the Admin Viewer Refer to Certificate Registration in Chapter 4 Top Page of...

Page 99: ...n release Camera Control button This button is used to obtain release the camera control privileges A q BLC Back Light Compensation button This button turns on off backlight compensation This control...

Page 100: ...n a new window A a Information Field Information messages warning messages and error messages are shown to the user Obtaining Camera Control Privileges The camera cannot be controlled by multiple user...

Page 101: ...m Actual Pixels 160x120 320x240 640x480 1280x960 or Fit to Window Actual Pixels displays the video at the size at which it is being captured Fit to Window displays the video at the maximum size possib...

Page 102: ...Event Display Displays the event display panel Admin Viewer only You can move any panel by clicking the title bar and dragging it to the desired position Getting a Snapshot Captures a still image fro...

Page 103: ...io Receiver will be displayed in the information bar of the web browser Install the add on Displaying Information Viewer information warning messages etc are shown Information Message An information m...

Page 104: ...ew frame yellow occupying the entire image Adjusting the Preview Frame Size Drag the preview frame line to make the frame smaller and a magnified view of the image in the frame will be shown in the im...

Page 105: ...imum Number of Clients and Maximum Connection Time sec under Image Server in the Setting page Therefore depending on the settings the image may not display or will display for a certain amount of time...

Page 106: ...mode see the setting page P 5 9 2 Exposure Compensation When Auto Auto Flickerless or Auto Shutter priority AE is selected for the exposure mode the exposure compensation value desired can be selecte...

Page 107: ...ns the image 6 Gain If Manual is selected for the exposure mode set a desired gain value Moving the slider to the left decreases the gain sensitivity to brightness and darkens the image Moving the sli...

Page 108: ...ction 1 External Device Input When a contact input signal is received from an external device input will be turned ON and an icon will be displayed Example Input1 Input OFF Input2 Input ON Important S...

Page 109: ...n P 6 11 If names are entered in Detection Setting Name in Intelligent Function Setting Tools P 6 11 Setting 1 to Setting 15 will be displayed with the corresponding name Example Setting 1 Image Detec...

Page 110: ...7 16...

Page 111: ...Chapter 8 Appendix SD Memory Card Access Modifiers Troubleshooting List of Log Messages List of Viewer Messages Restore Settings List of Factory Default Settings Index...

Page 112: ...bundled to access the camera s IP address FTP Software Settings Address Camera IP address factory default setting 192 168 100 1 User ID Adminstrator user ID factory default setting root Password Admi...

Page 113: ...ed in all subdirectories is reached you cannot save to the SD memory card In this case use FTP software to download to a PC Delete JPEG images no longer needed Log Files Log files are saved in Camera...

Page 114: ...173 Intelligent Function Detection Setting 13 174 Intelligent Function Detection Setting 14 175 Intelligent Function Detection Setting 15 N Reason for capture character string External input device n...

Page 115: ...ified below HTTP Upload P 5 14 Parameter query string All modifiers can be used FTP Upload P 5 15 Subdirectory Name to Create Only the modifiers y m d w H h n can be used File Name to Create Only the...

Page 116: ...ch the camera is connected is set up correctly In particular check if the IP address subnet mask and default gateway address are set within the ranges supported by the applicable network If you have c...

Page 117: ...t to the Admin Viewer as an Authorized User you cannot control the camera unless the administrator releases camera control Consult the Administrator P 7 2 The viewer gets disconnected Check the networ...

Page 118: ...ng Warning 2xx Non operational error notice Warning 1xx Error external to the system info Information 0xx Information on normal operation Description 1 webview W001 1 Starting or stopping Meaning wvht...

Page 119: ...W111 Meaning The camera was accessed from a host from which access is prohibited Description stream buffer recovered W130 Meaning Image buffer for stream recording has recovered Description camera op...

Page 120: ...A122 Meaning The upload destination could not be connected due to a reason other than A120 and A121 Description ftp http mode invalid uploader set none forcibly A134 Meaning The upload mode setting i...

Page 121: ...usage size Countermeasure Adjust the image quality image size and frame rate for upload Description event queue is full A274 Meaning Event buffer for upload overflowed Countermeasure Make adjustments...

Page 122: ...43 specification of unsupported codec 45 specification of unpermitted user level 47 too many clients 49 or invalid operation mode 4a Countermeasure 41 Check user name password or user list used when c...

Page 123: ...ror number Meaning An audio device error was detected Countermeasure If the error is not reset automatically arrange for servicing Description audio device initialization error 1 B401 1 Error number M...

Page 124: ...ery of the video input system was detected Countermeasure Change image size or Q value or decrease data size for each JPEG image Description cannot work intelligent 1 2 3 V320 1 Error number 2 Cause o...

Page 125: ...fter rebooting the camera is faulty Arrange for servicing Description video 1 fatal error 2 V403 1 Video number 2 Error number Meaning The video input function was stopped because an error that does n...

Page 126: ...ermeasure implementation process equivalent to ftpd 2 User Name 3 IP address Meaning A wrong password was specified in user authentification Description mod_haccess c XXX host 1 access denied H145 1 I...

Page 127: ...eaning The timer service was shut down Description ssl succeeded to 1 certificate S070 1 generate load delete restore Meaning A certificate was generated loaded deleted restored Countermeasure None De...

Page 128: ...running Countermeasure If the problem persists after rebooting the camera is faulty Arrange for servicing Description cannot work timer 1 2 3 S312 1 Error number 2 Cause of error 3 Error information M...

Page 129: ...a is faulty Arrange for servicing Description timer working error 1 S413 1 Error number Meaning An error occurred while the timer service was running Countermeasure If the problem persists after reboo...

Page 130: ...ddress etc The camera is busy The connection limit was exceeded Failed to get camera control privileges The request for camera control privileges was denied because the camera was being used by the Ad...

Page 131: ...work In this case press the reset switch at the back of the camera For dome case removal see the VB M600D VB M600VE Installation Guide There is no on off switch on the camera Turn the camera on and of...

Page 132: ...y address etc Accordingly you can no longer operate the camera from the PC you were using to connect to the camera before When initializing the camera use the VB Initial Setting Tool installed in your...

Page 133: ...4 Address Subnet Mask IPv4 Default Gateway Address IPv6 IPv6 Auto IPv6 Address Manual Prefix Length IPv6 Default Gateway Address IPv6 Address Auto DNS Name Server Address 1 Name Server Address 2 Host...

Page 134: ...ra Settings Intelligent Function Information JPEG Image Quality 160 x 120 Image Quality 320 x 240 Image Quality 640 x 480 Image Quality 1280 x 960 Image Size Image Transmission Maximum Frame Rate Imag...

Page 135: ...V Mode File Upload Path File Naming Subdirectory Name to Create File Name to Create Maximum Number of Loops E mail Notification Notification Mail Server Name Mail Server Port Sender From Recipient To...

Page 136: ...IP Address Image Buffer Frame Rate Pre event Buffer number of image frames Post event Buffer number of image frames Volume Detection Volume Detection Event Detection Criteria Reference Volume Level De...

Page 137: ...Count Timer Event Setting 3 Start Time Repeat Setting Repeat Interval Repeat Count Timer Event Setting4 Start Time Repeat Setting Repeat Interval Repeat Count Upload E mail Notification Sound Clip Up...

Page 138: ...thorize 05 32 Authorize 06 32 Authorize 07 32 Authorize 08 32 Authorize 09 32 Authorize 10 32 Authorize 11 32 Authorize 12 32 Authorize 13 32 Authorize 14 32 Authorize 15 32 Authorize 16 32 Authorize...

Page 139: ...urity Gateway IPv6 Address Destination Subnet Mask Length Destination Prefix Length IKE Pre Shared Key SA ESP Encryption Algorithm SA ESP Authentication Algorithm SA ESP Encryption Key outbound SA ESP...

Page 140: ...PI inbound IPsec Set 3 IPsec Set IPsec Mode Destination IPv4 Address Destination IPv6 Address Source IPv4 Address Sender IPv6 Address Security Protocol Security Gateway IPv4 Address Security Gateway I...

Page 141: ...Pv6 Address Security Protocol Security Gateway IPv4 Address Security Gateway IPv6 Address Destination Subnet Mask Length Destination Prefix Length IKE Pre Shared Key SA ESP Encryption Algorithm SA ESP...

Page 142: ...ring Detection 6 14 Certificate Management 5 27 Certificate Registration 4 4 Control Privileges 7 6 D Date and Time 5 8 Day Mode 5 10 7 14 Day Night 5 10 Default Gateway Address 5 5 Detection Area 6 1...

Page 143: ...32 M MAC Address 2 5 Maintenance 5 32 Maximum Frame Rate 5 12 Maximum Packet Size 5 5 Message Error Message 8 20 Information Message 8 20 Warning Message 8 20 Metering Mode 5 9 7 12 Modifiers 8 4 Mou...

Page 144: ...Bit Rate 5 12 Tilt 3 6 Time 5 8 Time Zone 5 8 Timer 5 20 Top Page 4 2 Troubleshooting 8 6 U Upload 5 14 User Account 5 22 User Authentication 4 3 7 3 User Authority 5 22 7 2 User List 5 22 User Name...

Page 145: ...wloon Hong Kong CANON AUSTRALIA PTY LTD 1 Thomas Holt Drive North Ryde Sydney N S W 2113 Australia CANON EUROPA N V Bovenkerkerweg 59 61 P O Box 2262 1185 XB Amstelveen The Netherlands CANON EUROPE LT...

Reviews: