


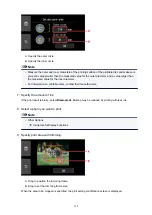


Replace the paper and print
Select if you want to print after replacing the paper of the rear tray or the cassette.
For example, when the paper setting for printing or copying is A5 and the paper information
registered to the printer is A4, you load A5 sized paper before you start printing or copying.
The paper information registration screen is displayed after replacing the paper and closing the feed
slot cover or inserting the cassette. Register the paper information according to the paper that you
loaded.
Note
• If you do not know what paper information to register to the printer, press the
Back
button when the
screen to select the operation is displayed. When the previous screen is displayed, check the paper
size and the media type and register them to the printer.
• For more on the proper combination of paper settings you can specify by the printer driver (Windows)
or on the touch screen:
Paper Settings on the Printer Driver and the Printer (Media Type)
Paper Settings on the Printer Driver and the Printer (Paper Size)
Cancel
Cancels printing.
Select when you change the paper settings specified for printing or copying. Change the paper
settings and try printing again.
Default Setting for Displaying the Message which Prevents Misprinting
•
When you print using the operation panel of the printer:
The message which prevents misprinting is enabled by default.
To change the display setting when you copy or print using the operation panel of the printer:
•
When you print from Windows:
The message which prevents misprinting is disabled by default.
To change the display setting:
Changing the Printer Operation Mode
•
When you print from Mac OS:
The message which prevents misprinting is enabled by default.
To change the display setting:
Changing the Printer Operation Mode
Important
• When the message which prevents misprinting is disabled:
The printer starts printing or copying even though the paper settings for printing or copying and the
paper information registered to the printer are different.
328
Summary of Contents for TS9150
Page 29: ...Making Settings According to Printer Status 29...
Page 51: ...Notices when printing using web service Notice for Web Service Printing 51...
Page 96: ...96...
Page 103: ...Replacing Ink Tanks Replacing Ink Tanks Checking Ink Status on the Touch Screen Ink Tips 103...
Page 133: ...Safety Safety Precautions Regulatory Information WEEE EU EEA 133...
Page 154: ...Main Components and Their Use Main Components Power Supply Using the Operation Panel 154...
Page 155: ...Main Components Front View Rear View Inside View Operation Panel 155...
Page 158: ...17 platen glass Load an original here 158...
Page 176: ...The Page Setup tab is displayed again 176...
Page 186: ...For more on setting items on the operation panel Setting Items on Operation Panel 186...
Page 198: ...Language selection Changes the language for the messages and menus on the touch screen 198...
Page 221: ...221...
Page 241: ...Note Selecting Scaled changes the printable area of the document 241...
Page 259: ...In such cases take the appropriate action as described 259...
Page 313: ...Device user settings 313...
Page 341: ...Note To set the applications to integrate with see Settings Dialog Box 341...
Page 351: ...ScanGear Scanner Driver Screens Basic Mode Tab Advanced Mode Tab 351...
Page 413: ...Other Network Problems Checking Network Information Restoring to Factory Defaults 413...
Page 439: ...Scanning Problems Windows Scanning Problems 439...
Page 440: ...Scanning Problems Scanner Does Not Work ScanGear Scanner Driver Does Not Start 440...
Page 452: ...Errors and Messages An Error Occurs Message Support Code Appears 452...


