background image

17

Canceling Printing

To cancel printing currently being performed, carry out job cancel. Job cancel lets you cancel a
job while data is being received or processed. It does not affect the printing data for the next job

or any other interface jobs for which data processing has not begun.

● Carry out job cancel off-line when data is being processed (when the ジョブ

indicator is on or flashing). If you press the  ジョブキャンセル  key when
the ジョブ indicator is off, it functions as the  ユーティリティ  key.

● Data that has already been processed and is currently being printed (when

paper feeding has begun) cannot be canceled. In this case, be careful
because carrying out job cancel might cancel the next printing data.

● If printing data is sent from a printer driver other than your printer driver and

mixed with your data, multiple printing jobs might be canceled.

Follow the instructions below to carry out job cancel. Only carry out job cancel when the ジョ
ブ indicator is on or flashing (when the data of the job you want to cancel is being received or

processed).

1

Press the  オンライン  key to turn
off the オンライン indicator.

排出

オンライン

給紙選択

両面

00 LIPS

A4

Summary of Contents for Sure shot 80 tele

Page 1: ......

Page 2: ...the Power off 4 Paper 5 Compatible paper 5 Incompatible Paper 7 Printable Areas 8 Loading Paper 9 Cautions when Loading Paper 9 Printing from the Paper Cassette 10 Paper Jams 15 Canceling Printing 17...

Page 3: ...ta from another computer when connected to a network Turning the Power on To turn on the power follow the instructions below 1 Press the power button on the printer The power button will now be in a p...

Page 4: ...he printer will go into sleep mode to save power if no operations are carried out and no data is sent from the computer for a set time Sleep mode is automatically canceled if data is sent from the com...

Page 5: ...printing Do not turn off the printer during the self diagnosis carried out immediately after turning the power on 1 Check that the indicator is off A B C D E F G Off 2 Press the power button on the p...

Page 6: ...28 g m2 Glossy paper A4 Canon Color Laser approx 50 Glossy paper GF 2 A4 Paper tray Transparencies A4 Canon Color Laser approx 50 OHP OHP paper TR 1 A4 Label sheet A4 Canon domestic approx 50 label sh...

Page 7: ...icture quality Transparencies To use transparencies use only dedicated Canon TR 1 A4 Color Laser OHP paper A4 size TR 1 A4 OHP paper is designed especially for use with the LBP 2160 LBP 2040 and the L...

Page 8: ...ady been used for photocopying or laser printing reverse side also incompatible Heat sensitive paper Paper with ink that melts burns or gives off toxic vapors in the heat of the fixing assembly approx...

Page 9: ...d on the paper are given below Plain paper thick paper transparencies glossy paper label sheet Plain paper thick paper transparencies glossy paper and label sheet can be printed in areas with a minimu...

Page 10: ...hese messages load paper into the paper source Cautions when Loading Paper Load paper only in the following circumstances When the indicator is off A F Off When the message appears on the display When...

Page 11: ...sette option 250 sheet paper cassette standard See Loading Paper p 9 for details on how to load paper into the 250 sheet paper cassette 500 sheet paper cassette option Follow the instructions below wh...

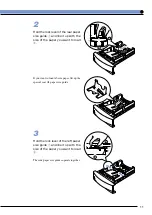
Page 12: ...ize of the paper you want to load w 1 2 If you want to load A5 size paper lift up the special rear A5 paper size guide 3 Hold the lock lever of the left paper size guide q and line it up with the size...

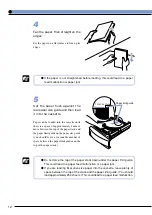
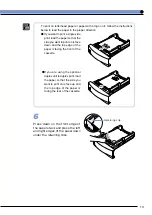
Page 13: ...space of approximately 1 mm or more between the top of the paper stack and the paper limit guide on the paper size guide you should leave a reasonable amount of space between the paper limit guide and...

Page 14: ...rint on is face down and the top edge of the paper is facing the front of the cassette If you are using the optional duplex unit to duplex print load the paper so that the side you want to print on is...

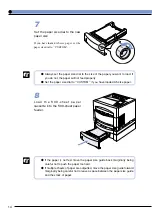
Page 15: ...properly Set the paper size dial to CUSTOM if you have loaded A5 size paper 8 Load the 500 sheet paper cassette into the 500 sheet paper feeder If the paper is not fed move the paper size guide back m...

Page 16: ...over of the duplex unit and remove any jammed paper After clearing the paper jam 1 Press the key to turn on the indicator Printing is restarted from the page where it was interrupted e If the message...

Page 17: ...b output tray and inside the rear cover and remove any jammed paper 1 2 3 4 5 Green tub Caution Do not touch the fixing assembly or surrounding area because they will be extremely hot after printer op...

Page 18: ...off it functions as the key Data that has already been processed and is currently being printed when paper feeding has begun cannot be canceled In this case be careful because carrying out job cancel...

Page 19: ...e display job cancel is complete When the message 00 appears on the display you can press the key to carry out a soft reset or hard reset If you do so any printing data being received or other interfa...

Page 20: ...printer or whenever you want to check its operating condition Test Print The printer is equipped with test print functions for checking such items as printer status and print quality After preparing a...

Page 21: ...pears on the display and test printing begins Test print contents When a test print is performed the print will be as shown in the diagram below The test print allows you to check graphic diagrams lin...

Page 22: ...n a status print To carry out a status print follow the instructions below 1 Press the key to turn off the indicator Setting can be carried out using the operation panel 2 Press the key The message ap...

Page 23: ...med the status print will also be printed as a 2 page unit on both sides of the paper However the number of copies is ignored and one sheet is printed at all times Status print contents A status print...

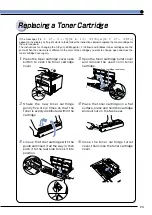
Page 24: ...ridge gently five or six times so that the toner is evenly distributed within the cartridge 2 Open the toner cartridge turret cover and remove the used color toner cartridge 1 Press the toner cartridg...

Reviews: