background image

61

P

layback/Erasin

g

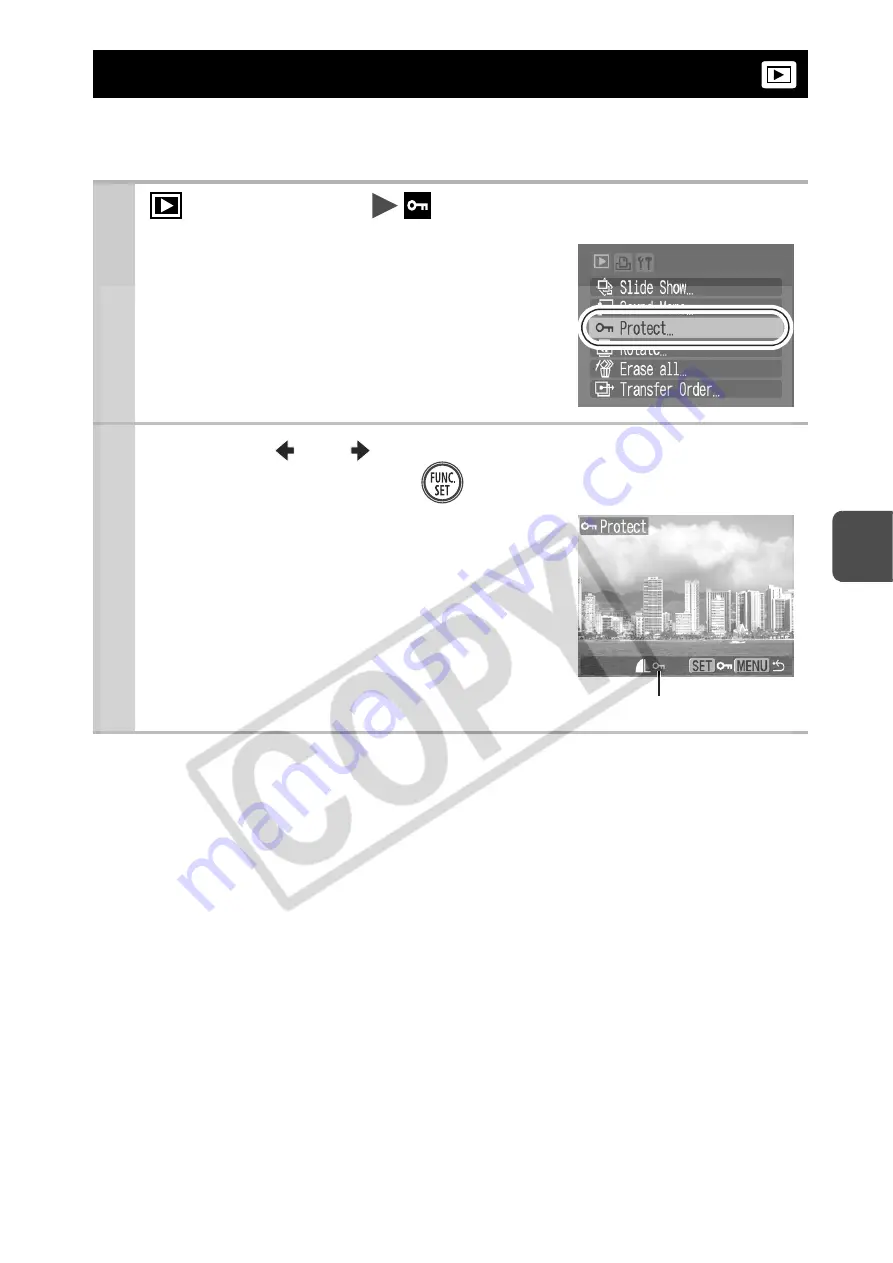
You can protect important images and movies from accidental 
erasure.

Protecting Images

1

 (Play) Menu

.

See Menus and Settings (p. 19).

2

Use the 

 or 

 button to select an image to 

protect and press 

.

z

Pressing the 

FUNC./SET

 button 

again cancels the setting.

z

You can also protect images in the 
index playback mode.

Protection Icon

Summary of Contents for PowerShot A450

Page 1: ...oting List of Messages Before Using the Camera Appendix Camera User Guide Advanced Advanced Camera User Guide This guide explains camera features and procedures in detail CDI E269 010 2007 CANON INC PRINTED IN CHINA ENGLISH DIGITAL CAMERA Photo of PowerShot A460 ...

Page 2: ...it is shot Playback z Plays movies with sound z Auto plays slideshows Editing zRecords sound memos for still images Printing zMakes printing easy with the Print Share button zAlso supports non Canon brand PictBridge compliant printers Uses of Recorded Images zEffortlessly transfer them to a computer with the Print Share button Photo of PowerShot A460 ...

Page 3: ...ory cards and MultiMediaCards with this camera These cards are collectively called memory cards in this guide Use of genuine Canon accessories is recommended This product is designed to achieve excellent performance when used with genuine Canon accessories Canon shall not be liable for any damage to this product and or accidents such as fire etc caused by the malfunction of non genuine Canon acces...

Page 4: ...ing Pixels and Compression Still Images 26 Using the Digital Zoom 27 Shooting Magnified Close Ups Super Macro 28 Continuous Shooting 29 Postcard Mode 30 Embedding the Date in the Image Data 30 Setting the Display Overlays 31 Movie Shooting 32 Switching between Focusing Modes 35 Shooting Hard to Focus Subjects Focus Lock 36 Switching between Metering Modes 37 Adjusting the Exposure Compensation 38 ...

Page 5: ...g All Images 63 Setting the DPOF Print Settings 64 Setting the DPOF Transfer Settings 67 Camera 69 When the power is turned on 69 LCD monitor 70 Shooting 71 Shooting movies 75 Playback 76 Battery 77 TV monitor output 77 Printing with a direct print compatible printer 78 Battery Handling 83 Handling the Memory Card 85 Using the Power Kits Sold Separately 87 Using an Externally Mounted Flash Sold Se...

Page 6: ...4 Camera Care and Maintenance 94 Specifications 95 Index 104 Functions Available in Each Shooting Mode 112 ...

Page 7: ...l cameras are intended for personal use and should never be used in a manner that infringes upon or contravenes international or domestic copyright laws and regulations Please be advised that in certain cases the copying of images from performances exhibitions or commercial properties by means of a camera or other device may contravene copyright or other legal rights even if the image was shot for...

Page 8: ...e camera and its accessories to prevent injuries or damage to yourself other persons and equipment zEquipment refers to the camera battery battery charger sold separately and compact power adapter sold separately Camera Body Temperature If your camera is used for prolonged periods the camera body may become warm Please be aware of this and take care when operating the camera for an extended period...

Page 9: ...me immersed in water or other liquids If the exterior comes into contact with liquids or salt air wipe it dry with a soft absorbent cloth Continued use of the equipment may result in fire or electrical shock Immediately turn the camera power off and remove the camera batteries or unplug the battery charger or compact power adapter from the power outlet Please consult your camera distributor or the...

Page 10: ...er and compact power adapter from both the camera and the power outlet after recharging or when not in use to avoid fire and other hazards z Do not place anything such as tablecloths carpets bedding or cushions on top of the battery charger while it is charging Leaving the units plugged in for a long period of time may cause them to overheat and distort resulting in fire z When recharging the Cano...

Page 11: ...erminals or plug Such conditions could lead to fire electrical shock or other damage z Avoid using placing or storing the equipment in places subject to strong sunlight or high temperatures such as the dashboard or trunk boot of a car z Do not use the equipment in a manner that exceeds the rated capacity of the electrical outlet or wiring accessories Or do not use the equipment if the cable or plu...

Page 12: ...njury Flash z Do not operate the flash with dirt dust or other items stuck to the surface of the flash z Be careful not to cover the flash with your fingers or clothing when shooting The flash may be damaged and emit smoke or noise The resulting heat build up could damage the flash z Do not touch the surface of the flash after taking several pictures in rapid succession Doing so could result in bu...

Page 13: ...avoid condensation by placing the equipment in an airtight resealable plastic bag and letting it adjust to temperature changes slowly before removing it from the bag Moving the equipment rapidly from cold to hot temperatures may cause condensation water droplets to form on its external and internal surfaces If Condensation Forms Inside the Camera z Stop using the camera immediately Continued use m...

Page 14: ...ng is changed regardless of the selected display mode zThe LCD monitor on or off setting is retained even after the camera power is turned off zThe LCD monitor does not shut off in the or mode zThe LCD monitor will not switch to the detailed display in the index playback mode p 51 Playback Mode No Information Standard Detailed Shooting Mode or Standard No Information Detailed Information View Off ...

Page 15: ...o suit the brightness of the subject making it easier to frame the subject Although noise may appear and the movement of the subject shown on the LCD monitor may appear somewhat jagged there is no effect on the recorded image The brightness of the image displayed in the monitor and the brightness of the actual image recorded will be different ...

Page 16: ... 35 Low Battery p 83 Grid Lines p 20 Recording Pixels pp 26 34 ISO Speed p 45 White Balance p 40 Compression Still image p 27 Drive Mode p 29 Basic Guide p 16 My Colors p 43 Shooting Mode Basic Guide p 10 p 32 zRec Movie Recording p 32 Flash Basic Guide p 13 Red Camera Shake Warning p 15 Exposure Compensation p 38 Macro Infinity Basic Guide p 15 Create Folder p 46 3 2 Guide p 20 Long Shutter p 38 ...

Page 17: ...n selected due to insufficient illumination Use the following methods to shoot Raise the ISO speed p 45 Select a setting other than flash off Basic Guide p 13 Attach the camera to a tripod or other device Shooting Date Time Displayed image number Total number of images Protection Status p 61 WAVE Format Sound p 54 Folder Number File Number Compression Still Images p 27 Recording Pixels Still Image...

Page 18: ...rule for Camera File System Standards p 97 RAW image Unrecognized data type Information for images shot on other cameras may not display correctly Recording Pixels Frame Rate Movies p 34 Movie Length Movies p 32 Metering Mode p 37 ISO Speed p 45 White Balance p 40 Shooting Mode Basic Guide p 10 p 32 My Colors p 43 Macro Infinity Basic Guide p 15 Flash Basic Guide p 13 Exposure Compensation p 38 Lo...

Page 19: ...ting Mode Powers down approximately 3 minutes after the last control is accessed on the camera The LCD monitor automatically turns off 1 minute after the last control is accessed even if Auto Power Down is set to Off Press any button other than the power button to turn the LCD monitor back on Playback Mode Connected to a Printer Powers down approximately 5 minutes after the last control is accesse...

Page 20: ...s the FUNC SET button cUse the or button to select a menu item Some items may not be selectable in some shooting modes dUse the or button to select an option for the menu item You can select further options with the MENU button for some options After selecting an option you can press the shutter button to shoot immediately After shooting this menu will appear again allowing you to adjust the setti...

Page 21: ...ct a menu item Some items may not be selectable in some shooting modes dUse the or button to select an option Menu items followed by an ellipsis can only be set after pressing the FUNC SET button to display the next menu Press the FUNC SET button again to confirm the setting ePress the MENU button This example shows the Rec menu in Auto mode In playback mode the Play Print and Set up menus display...

Page 22: ... p 38 Recording Pixels Still image p 26 Long Shutter Mode p 38 Compression Still image p 27 ISO Speed p 45 Recording Pixels Movie p 34 Menu Item Options Reference Page AiAF On Off p 35 Slow Synchro On Off Basic Guide p 14 Red Eye On Off Basic Guide p 14 Light Metering p 37 AF assist Beam On Off Digital Zoom On Off p 27 Review Off 2 10 seconds Hold Basic Guide p 9 Disp Overlay p 31 Still Images Off...

Page 23: ...Memo p 54 Protect p 61 Rotate p 53 Erase all p 63 Transfer Order p 67 Menu Item Reference Page Print p 64 Select Image Qty Select All Images Clear All Selections Print Settings Menu Item Options Reference Page Mute On Off Set to On to silence all operation sounds except for the warning sounds Basic Guide p 8 Default setting ...

Page 24: ...olume of the sound played when the shutter releases The shutter sound does not play when a movie is recording Playback Vol Adjusts the playback volume of movies and sound memos Start up Image On Off Sets whether or not the Start up Image appears when the camera is powered up LCD Brightness Normal Bright Use the or button to adjust the brightness Power Saving p 17 Auto Power Down On Off Sets whethe...

Page 25: ...mode to Auto however the connection method cannot be changed while connected to a printer Format You can also select a low level format p 25 File Numbering Continuous Auto Reset p 48 Create Folder p 46 Create New Folder Check mark On No check mark Off Creates a folder during the next shooting session Auto Create Off Daily Monday Sunday Monthly You can also set an auto creation time Lens Retract 1 ...

Page 26: ...2 Select OK and press zSettings cannot be reset when the camera is connected to a computer or to a printer zThe following cannot be reset Shooting mode The Date Time Language and Video System options in the Set up menu pp 22 23 White balance data recorded with the custom white balance function p 40 ...

Page 27: ...s p 19 2 Select OK and press zTo perform a low level format use the button to select Low Level Format and the or button to add a check mark zYou can stop formatting a card when Low Level Format is selected by pressing the FUNC SET button You can still use a card without problem when formatting is halted but its data will be erased Low Level Format We recommend you select Low Level Format when you ...

Page 28: ...7 in Printing to about Letter size 216 x 279 mm 8 5 x 11 in Medium 1 2048 x 1536 pixels Printing to about A5 size Approx 149 x 210 mm 5 9 x 8 3 in Medium 2 1600 x 1200 pixels Printing postcard size prints 148 x 100 mm 6 x 4 in Printing L size prints 119 x 89 mm 4 7 x 3 5 in Small 640 x 480 pixels Sending images as e mail attachments or shooting more images or Postcard 1600 x 1200 pixels Printing p...

Page 29: ... zSee Memory Cards and Estimated Capacities p 100 Using the Digital Zoom Shooting Mode PowerShot A460 PowerShot A450 Still Images Max approx 16x Max approx 13x Still Images mode only Max approx 16x fixed to max wide angle Movies Standard mode only Max approx 8 1x Max approx 6 5x zThe digital zoom cannot be used when the LCD monitor is turned off zThe digital zoom cannot be used in or Postcard or W...

Page 30: ...y in the LCD monitor zBased on the number of recording pixels set the Safety Zoom feature calculates the maximum zoom factor beyond which image quality will begin to deteriorate The digital zoom pauses at this zoom factor for a moment and appears on the LCD monitor If you press the button again you can zoom in even closer The zoom factor display color changes from white to blue to indicate that th...

Page 31: ...lished by Canon Actual results may vary according to the subject and shooting conditions Even if continuous shooting suddenly stops the memory card may not be full To Cancel Continuous Shooting Follow procedure 1 to display Continuous Shooting Shooting Mode 1 FUNC Menu Drive Mode See Menus and Settings p 18 Default setting 2 Shoot zThe camera will continue to record successive images while the shu...

Page 32: ...setting zThe recording pixels are set to 1600 x 1200 and the compression to Fine zThe area that will not get printed grays out The digital zoom cannot be used in this mode For printing instructions refer to the Direct Print User Guide Embedding the Date in the Image Data You can embed the date in image data when Postcard is selected 1 Rec Menu Date Stamp Off Date Date Time See Menus and Settings p...

Page 33: ...l and horizontal positioning of the subject 3 2 Guide Helps confirm the print area for a 3 2 print Areas outside the printable area are grayed out Both Displays both the grid lines and the 3 2 guide simultaneously 1 Rec Menu Disp Overlay Off Grid Lines 3 2 Guide Both See Menus and Settings p 19 Default setting zThe grid lines and 3 2 guide will not be recorded in the image zIn mode only Grid Lines...

Page 34: ...our Movie Shooting Shooting Mode Standard You can select the recording pixels and record until the memory card is full when a super high speed memory card is used such as the recommended SDC 512MSH The digital zoom can only be used with the setting during shooting p 27 Maximum Size 1 GB movie Compact Since there are few recording pixels and also the data size is small this mode is convenient for s...

Page 35: ...e memory card supplied with the camera may be used without further formatting zBe careful of the following while recording Do not touch the microphone Basic Guide p 1 Do not press any buttons other than the shutter button The sound that buttons make will be recorded in the movie The camera will automatically adjust the exposure and white balance to suit the shooting conditions during recording Ple...

Page 36: ...ess the FUNC SET button Recording Pixels and Frame Rates Frame rates indicate the number of frames recorded or played back each second The higher the frame rate the smoother the appearance of motion Default setting zSee Image Data Sizes Estimated p 101 zSee Memory Cards and Estimated Capacities p 100 Recording Pixels Frame Rate Standard 640 x 480 pixels 10 frames sec 320 x 240 pixels 30 frames sec...

Page 37: ...lable points that it will use to determine the focus Off The camera focuses using the center AF frame This is convenient for ensuring that your intended subject is in focus and for composing images 1 Rec Menu AiAF On Off See Menus and Settings p 19 Default setting The AF frame appears as follows when the LCD monitor is on when the shutter button is pressed halfway Green Shooting preparations compl...

Page 38: ...ass Shooting Hard to Focus Subjects Focus Lock Shooting Mode 1 Aim the camera so that an object at the same focal distance as the main subject is centered in the viewfinder or in the AF frame displayed on the LCD monitor 2 Press the shutter button halfway to lock the focus 3 Keep the shutter button pressed halfway while you recompose the image and press the shutter button all the way to shoot the ...

Page 39: ...h as the position of the subject the brightness the direct light and the backlighting and adjusts the settings to the correct exposure for the main subject Center Weighted Average Averages the light metered from the entire frame but gives greater weight to the subject matter at the center Spot Meters the area within the spot AE point at the center of the LCD monitor Use this setting when you want ...

Page 40: ...d To Cancel the Exposure Compensation Restore the compensation value to 0 You can set the shutter speed to a slow setting to make dark subjects appear brighter Adjusting the Exposure Compensation Shooting Mode 1 FUNC Menu Exposure Compensation See Menus and Settings p 18 Default setting zUse the or button to adjust the exposure compensation and press the FUNC SET button Shooting in Long Shutter Mo...

Page 41: ...rocessing to images shot at shutter speeds slower than 1 3 seconds to eliminate the noise thereby producing high quality images A certain amount of processing time however may be required before the next image can be shot zUse the LCD monitor to confirm that the image was recorded at the desired brightness zPlease note that camera shake becomes a factor at low shutter speeds Shoot with the camera ...

Page 42: ...lly set by the camera Day Light For recording outdoors on a bright day Cloudy For recording under overcast shady or twilight skies Tungsten For recording under tungsten and bulb type 3 wavelength fluorescent lighting Fluorescent For recording under warm white cool white or warm white 3 wavelength fluorescent lighting Fluorescent H For recording under daylight fluorescent or daylight fluorescent ty...

Page 43: ...for the Auto setting to detect correctly zShooting close ups Macro z Shooting subjects of monotone color such as sky sea or forest zShooting with a particular source of light such as a mercury vapor lamp 1 FUNC Menu Auto Custom See Menus and Settings p 18 Default setting 2 Aim the camera at a piece of white paper or cloth and press zIf you are viewing it with the LCD monitor ensure that the center...

Page 44: ...image appears completely black or white zShoot with the same settings as when reading the white balance data If the settings differ the optimal white balance may not be set In particular the following should not be changed ISO Speed Flash Setting the flash to on or off is recommended If the flash fires when reading the white balance data with the flash set to Auto make sure that you also use the f...

Page 45: ... saturation to record neutral hues Sepia Records in sepia tones B W Records in black and white Custom Color Allows you to adjust the contrast sharpness color saturation for shooting 1 FUNC Menu My Colors Off See Menus and Settings p 18 Default setting zUse the or button to select a My Colors mode 2 Shoot z Mode See Setting the Camera to a Custom Color Mode p 44 zModes other than Press the FUNC SET...

Page 46: ... 2 Use the or button to select Contrast Sharpness or Saturation and the or button to adjust it zThe altered color will display 3 zThis completes the setting If you press the MENU button at this point you will return to the screen where you can select a My Colors mode Select an item Adjust ...

Page 47: ...shooting in a dark area Adjusting the ISO Speed Shooting Mode 1 FUNC Menu Auto See Menus and Settings p 18 Default setting zUse the or button to select an ISO speed and press the FUNC SET button zYou can select or zThe actual ISO speed used when shooting will display in the playback information when the option is used to shoot z is not available in long shutter mode ...

Page 48: ...older the next time you shoot images To create an additional folder insert the check mark again Auto Create You can also specify a date and time if you wish to create a new folder using a shooting time after the specified date and time 1 Set up Menu Create Folder See Menus and Settings p 19 2 Use the or button to check mark Create New Folder z displays in the LCD monitor The symbol will cease to d...

Page 49: ...n and a time in the Time option z displays when the specified time arrives The symbol will cease to display after the new folder is created Up to 2000 images can be saved into one folder A new folder will automatically be created when you record more than that number even if you are not creating new folders ...

Page 50: ...e name duplication when changing folders or memory cards When a blank memory card is used If a memory card with recorded data is used the 7 digit number for the last recorded folder and image is compared with the last one on the card and the larger of the two is utilized as the basis for new images Auto Reset The image and folder number are reset to the starting value 100 0001 This is convenient f...

Page 51: ... of images in a folder is less than 2 000 because the following types of images are always saved together into the same folder Images from continuous shooting Self timer images custom zImages cannot be played back when the folder numbers are duplicated or image numbers are duplicated within folders zPlease refer to the Software Starter Guide for information regarding folder structures or image typ...

Page 52: ...he button zooms out from the image zPressing the or button moves to the previous or next image in the magnified state 2 Press and change the position of the displayed portion with the or button zThe icon will display and the display will change to the display position change mode Pressing the FUNC SET button again cancels the display position change mode Movie frames and index playback images cann...

Page 53: ...ngle Image Playback Hold down the FUNC SET button Viewing Images in Sets of Nine Index Playback 1 Hold down zUp to nine images can be viewed at once in index playback zUse the or button to change the image selection Selected Image Movie ...

Page 54: ...rame displayed Press the FUNC SET button to display the movie control panel Ends playback and returns to single image playback Prints An icon will display when a printer is connected See the Direct Print User Guide for details Play Slow Motion Playback You can use the button to slow down or the button to speed up playback Displays the first frame Previous Frame Rewinds if the FUNC SET button is he...

Page 55: ...isplay 1 Play Menu See Menus and Settings p 19 2 Use the or button to select an image to rotate and press to rotate it zCycle through the 90 270 original orientations with each press of the FUNC SET button zThis also can be set in the index playback mode zMovies cannot be rotated zWhen images are downloaded to a computer the orientation of images rotated by the camera will depend upon the software...

Page 56: ... p 19 2 Use the or button to select an image to which to attach a sound memo and press zThe sound memo control panel will display 3 Select Record and press zThe elapsed time and the remaining time display zPressing the FUNC SET button pauses the recording Pressing it again resumes recording zUp to 1 minute of recordings can be added to any one image Sound Memo Panel Elapsed Time Remaining Time Vol...

Page 57: ...rasing Sound Memo Panel Exit Record Pause Play Erase Select Erase in the confirmation screen and press the FUNC SET button zYou cannot attach sound memos to movies zSound memos for protected images cannot be erased ...

Page 58: ... specified folder in order Movies Plays movie files only in order Stills Plays still images only in order Custom 1 3 Plays the images selected for each slide show Custom 1 Custom 2 or Custom 3 in order p 59 1 Play Menu See Menus and Settings p 19 2 Select or z select a date or folder to be played back p 58 z select the images to be played back p 59 zIf you want to add a transition effect to play b...

Page 59: ...g the slide show press the MENU button Standard display The new image gradually brightens as it moves upward from the bottom The new image first appears in a cross shape and gradually expands to display the full image Portions of the new image move horizontally then the image expands to display the full image In single image playback mode you can start a slide show from the current image displayed...

Page 60: ...58 Select a date folder to play back 1 Select or and press 2 Use the or button to select a date folder to play back and press the button Date Folder ...

Page 61: ...he same way when they are set 2 Use the or button to move between images for playback and press to select or deselect them zYou can also select images in the index playback mode zPressing the MENU button completes the setting Selecting All Images Number indicating the selection order Check mark indicating selection 1 After selecting in step 1 use the button to select Mark all and press the FUNC SE...

Page 62: ...seconds and 30 seconds Displaying time can vary slightly depending on the image Default setting zRepeat Sets whether the slide show stops when all the slides have been displayed or continues until stopped 1 Select Set up and press 2 Select Play Time or Repeat and then the desired option zPressing the MENU button cancels the setting ...

Page 63: ...om accidental erasure Protecting Images 1 Play Menu See Menus and Settings p 19 2 Use the or button to select an image to protect and press zPressing the FUNC SET button again cancels the setting zYou can also protect images in the index playback mode Protection Icon ...

Page 64: ...cable to the VIDEO IN and AUDIO IN jacks on the TV 4 Turn on the TV and switch it to video mode 5 Turn on the camera zYou can also use the TV as the display in the shooting mode zThe video output signal can be switched NTSC or PAL to accommodate different regional standards p 23 The default setting varies between regions If the video system is set incorrectly the camera output may not display prop...

Page 65: ... before erasing an image zProtected images cannot be erased with this function 1 Play Menu See Menus and Settings p 19 2 Select OK and press zTo exit instead of erasing select Cancel Please format the memory card when you want to erase not only image data but also all the data contained on the memory card p 25 ...

Page 66: ...y convenient for printing on a direct print compatible printer or for sending the images to a photo developing service that supports DPOF Single Images Setting the DPOF Print Settings The icon may display for a memory card with print settings set by a different DPOF compliant camera These settings will be overwritten by those set by your camera 1 Print Menu Select Image Qty See Menus and Settings ...

Page 67: ...he camera is connected to a printer the button will light in blue while images are being selected At this time press the button confirm that Print is selected and when the FUNC SET button is pressed printing will begin 1 Print Menu Select All Images See Menus and Settings p 19 zOne copy of every image will be set to print zSelecting Clear All Selections cancels all print settings zWhen the camera ...

Page 68: ...of copies can be set When it is set to Index the number of copies cannot be set only one copy will be printed Print Type Standard Prints one image per page Index Prints the selected images together at a reduced size in an index format Both Prints the images in both the standard and index formats Date On Off Adds the date to the print File No On Off Adds the file number to the print Clear DPOF data...

Page 69: ...ard or Both Date and File No can be set to On at the same time however the printable information may vary between printers zImages dated using Postcard Date Imprint mode p 30 are always printed with the date regardless of the Date setting As a result if Date is also set to On the date will end up being printed twice on these images zDates print in the style specified in the Date Time menu p 22 Bas...

Page 70: ...age to transfer and press zPressing the FUNC SET button again deselects the setting zYou can also select images in the index playback mode 2 Select Mark all and press zSelecting Reset cancels all transfer order settings 3 Select OK and press zImages are transferred in order according to the file number zA maximum of 998 images can be selected Transfer Selection ...

Page 71: ...nd the camera will not operate Change the batteries message displays zReplace the camera batteries with 2 unused or fully charged batteries p 83 zUse the AC Adapter Kit ACK800 sold separately p 89 Poor contact between camera and battery terminals zWipe the battery terminals with a clean dry cloth zReload the batteries several times When the power is turned on Card locked message appears The SD mem...

Page 72: ...ghting zThis is not a camera malfunction flickering recorded in movies but not in still images A bar of light red purple appears on the LCD monitor Sometimes appears when shooting a bright subject such as the sun or other light source zThis is a normal occurrence in devices containing CCDs and does not constitute a malfunction This bar of light will not be recorded when shooting still photos but i...

Page 73: ...ecorded image Shooting Camera will not record Mode dial is set to playback zTurn the mode dial to Auto Manual Special Scene or Movie Basic Guide p 8 Flash is charging zWhen the flash is charged the indicator will light orange Shooting is now possible Basic Guide p 4 Memory card is full zInsert a new memory card Basic Guide p 5 z If required download the images to a computer and erase them from the...

Page 74: ... ups p 12 Image is blurred or out of focus The camera moves when the shutter button is pressed z Confirm the procedures in appears p 70 AF assist Beam is set to Off zIn dark places where it is difficult for the camera to focus the AF assist Beam will emit to assist focusing As the AF assist Beam will not function when turned off set it On to activate it p 20 Take care not to obstruct the AF assist...

Page 75: ...es white Subject is too close making the flash too strong zShoot within correct flash range of the subject when using the built in flash p 96 The subject is overexposed because the surroundings are too dark zSet the exposure compensation to a negative setting p 38 zUse the spot metering function p 37 Too much light is shining directly into the camera or is being reflected off the subject zChange t...

Page 76: ...e red eye reduction lamp Try asking them to look directly at the lamp zEven better results can be obtained by increasing the lighting in indoor settings or approaching closer to the subject The shutter will not activate for approximately 1 second after the red eye reduction lamp fires in order to improve the effect Continuous shooting slows down The memory card s performance has dropped zTo enhanc...

Page 77: ...ly during shooting the movie will be recorded correctly on the memory card Recording time will display properly if you format the memory card in this camera excluding slow recording memory cards p 25 displayed on the LCD monitor in red and shooting automatically stopped There is insufficient free space in the camera s built in memory z Try the following procedures Format the card with a low level ...

Page 78: ... or file location was changed zSet the file name or location on the file format structure of the camera Refer to the Software Starter Guide for details Movies do not play back correctly Movies recorded with high recording pixels and frame rates may momentarily stop playing if played on slow reading memory cards You may experience frame dropping and audio breakup when playing back a movie on a comp...

Page 79: ...e terminals well with a dry cloth before use z Reload the batteries several times If using Canon AA size NiMH batteries As the batteries have not been used for over a year their recharging capacity has decreased zTheir charging performance should return to normal after fully recharging and depleting them over several times Battery life has been exceeded zReplace both batteries with new ones TV mon...

Page 80: ...ra and printer are not properly connected zSecurely connect the camera and printer with the specified cable The printer power is not turned on zTurn on the printer power The print connection method is not correct zIn the Set up menu select Print Method and select Auto p 23 ...

Page 81: ...HC memory card is write protected Cannot record You attempted to shoot an image without a memory card installed with a memory card installed in the wrong orientation or attempted to attach a sound memo to a movie Memory card error There may be something wrong with the memory card By formatting the malfunctioning memory card with the camera you may be able to continue using it However if this error...

Page 82: ... immediately with unused AA size alkaline batteries or fully charged Canon AA size NiMH batteries No image No images recorded on memory card Image too large You attempted to play back an image larger than 4992 x 3328 pixels or with a large data size Incompatible JPEG You attempted to play back an incompatible JPEG image edited with a computer etc RAW You attempted to play back a RAW image Unidenti...

Page 83: ...h corrupted data or an image taken with another camera You may have also attempted to select a movie when Wallpaper was selected in the Direct Transfer menu Protected You attempted to erase a protected image movie or sound memo Too many marks Too many images have been marked with print settings or transfer settings Cannot process any more Cannot complete Could not save a part of the print transfer...

Page 84: ...k on and resume shooting or playback If this message continues to display contact your Canon Customer Support Help Desk as there may be a problem with the lens Exx xx number Camera detected error Turn the power off and then back on then shoot or play back A problem exists if the error code reappears Note the number and contact your Canon Customer Support Help Desk If an error code displays directl...

Page 85: ... under low temperature conditions or over long periods you are recommend to use of Canon AA size NiMH batteries sold separately Camera operating time may shorten at low temperatures when alkaline batteries are used Also due to their specifications alkaline batteries may expire faster than NiMH batteries z Never mix unused and partially used batteries The partially used batteries may leak z Do not ...

Page 86: ...not using the camera for long periods remove the batteries from the camera and store them separately If the batteries are left inside the camera the camera may become damaged from battery leakage WARNING Never use damaged batteries or batteries whose outer seal is completely or partially missing or peeled off as there is risk that such batteries may leak overheat or burst Always check the seals on...

Page 87: ...he memory card or cover it with another label or sticker z When writing on the memory card do not use a pencil or ball point pen Only use a soft point pen e g felt tip pen z Do not use or store memory cards in the following locations Locations subject to dust or sand Locations subject to high humidity and high temperatures z Since some or all of the data recorded on the memory card may be corrupte...

Page 88: ...roblem Memory cards formatted in other cameras computers or peripheral devices may not operate correctly in this camera When that happens reformat the memory card with this camera z If formatting in the camera does not work properly turn the camera off and re insert the memory card Then turn the camera back on and format again z Be careful when transferring or disposing of a memory card Formatting...

Page 89: ...he CB 5AH CB 5AHE battery charger can only be used to charge Canon AA size NiMH batteries NB 3AH and NB 2AH Please do not attempt to charge other type of battery zDo not mix batteries with different purchase dates or different charge states When recharging batteries always recharge both of them at the same time zDo not attempt to recharge fully charged batteries as doing so may reduce or impair ba...

Page 90: ...ou store batteries for a long period of time about 1 year it is recommended that you deplete the batteries in the camera and to then store them at room temperature 0 to 30 C 32 to 90 F in low humidity Storing them in a fully charged condition can shorten their lifespan or degrade their performance Again if you do not use batteries for more than 1 year fully charge them once a year and deplete them...

Page 91: ...ing at Canon facilities Charge batteries in an environment where the temperature is in the range of 0 to 35 C 32 to 95 F zThe charging time varies according to the ambient temperature and to the battery charge state zThe battery charger may emit noise while charging This is not a malfunction zBattery and Charger Kit CBK4 200 can also be used Turn the camera power off before connecting or disconnec...

Page 92: ...ays set the power mode switch to OFF when you finish using the flash zBe careful not to touch the flash window or sensor windows with your fingers while the flash is in use zThe flash may fire if another flash is being used in close proximity zThe High Power Flash may not fire outdoors in daylight or when there are no reflective items zFor continuous shooting although the flash fires for the first...

Page 93: ...fore switching it for the battery in the flash zNon Use over Extended Periods Leaving batteries in the High Power Flash could allow the battery fluid to leak damaging the product Remove the batteries from the High Power Flash and store them in a cool dry place zBefore attaching the bracket to the flash check that the lithium battery CR123A or DL123 is installed zTo illuminate the subjects properly...

Page 94: ... the point of manufacture not when you make the purchase Be particularly careful to keep the date batteries out of the reach of children Seek medical assistance immediately if a child swallows a battery since corrosive battery fluids can damage the stomach or intestinal walls 1 Confirm that the camera is turned off 2 As illustrated unscrew the screw from the coin battery cover on the camera s unde...

Page 95: ...set the date and time Basic Guide p 7 After purchasing the camera and turning on the power for the first time although the Date Time menu will appear you do not need to replace the date battery If you ever dispose of your camera first remove the date battery for recycling according to the recycling system of your country ...

Page 96: ... gently wipe with a soft cloth or an eyeglass lens wiper to remove stubborn dirt Camera Care and Maintenance Never use thinners benzine detergents or water to clean the camera These substances may distort or damage the equipment Never use organic solvents on the camera body or lens If dirt remains contact the closest Canon Customer Support Help Desk as listed on the customer support list supplied ...

Page 97: ...mm 35mm film equivalent 38 W 122 T mm f 2 8 W f 5 1 T Digital Zoom PowerShot A460 Stills approx 4 0x maximum of approx 16x with optical zoom combined Movies approx 2 0x maximum of approx 8 1x with optical zoom combined PowerShot A450 Stills approx 4 0x maximum of approx 13x with optical zoom combined Movies approx 2 0x maximum of approx 6 5x with optical zoom combined Optical Viewfinder Real image...

Page 98: ...ure Index Auto ISO 80 100 200 400 Camera automatically sets the optimal speed according to subject brightness White Balance Auto Day Light Cloudy Tungsten Fluorescent Fluorescent H or Custom Built in Flash Auto on off Red eye reduction is available Slow Synchro is available Flash Range Normal 47 cm 3 0 m 1 5 9 8 ft W 47 cm 2 0 m 1 5 6 6 ft T Macro 30 47 cm 12 in 1 5 ft W T ISO speed Auto Shooting ...

Page 99: ...ompression Superfine Fine Normal Number of Recording Pixels Still images Large 2592 x 1944 pixels Medium 1 2048 x 1536 pixels Medium 2 1600 x 1200 pixels Small 640 x 480 pixels Postcard 1600 x 1200 pixels Wide 2592 x 1456 pixels Movies Standard 640 x 480 pixels 10 frames sec 320 x 240 pixels 30 frames sec Recording can continue until the memory card is full can record up to a maximum of 1GB at one...

Page 100: ...nt and Bubble Jet Direct compatible Interface USB mini B Audio Video output NTSC or PAL selectable monaural audio Communication Settings MTP PTP Power Source 2 AA size alkaline batteries 2 AA size NiMH batteries NB4 300 sold separately AC Adapter Kit ACK800 sold separately Operating Temperatures 0 40 C 32 104 F 0 35 C 32 95 F when NB 3AH is used Operating Humidity 10 90 Dimensions excluding protru...

Page 101: ... images Approx 9 hours AA size NiMH Batteries NB 3AH fully charged Approx 400 images Approx 1300 images Approx 11 hours Shooting Normal temperature 23 C 2 C 73 F 3 6 F normal relative humidity 50 20 alternating wide angle end and telephoto end shots at 30 second intervals with the flash fired once every two shots and the camera power turned off after every tenth shot Power is left off for a suffic...

Page 102: ... may vary according to the subject and shooting conditions Recording Pixels Compres sion 16MB SDC 128M SDC 512MSH Large 2592 x 1944 pixels 5 49 190 10 87 339 21 173 671 Medium 1 2048 x 1536 pixels 9 76 295 16 136 529 33 269 1041 Medium 2 1600 x 1200 pixels 14 121 471 26 217 839 50 411 1590 Small 640 x 480 pixels 56 460 1777 88 711 2747 138 1118 4317 Postcard 1600 x 1200 pixels 26 217 839 Wide 2592...

Page 103: ...ec 11 min 42 sec Compact 160x 120 pixels 15 frames sec 1 min 47 sec 14 min 29 sec 55 min 57 sec Recording Pixels Compression 2592 x 1944 pixels 2503 KB 1395 KB 695 KB 2048 x 1536 pixels 1602 KB 893 KB 445 KB 1600 x 1200 pixels 1002 KB 558 KB 278 KB 640 x 480 pixels 249 KB 150 KB 84 KB 1600 x 1200 pixels 558 KB 2592 x 1456 pixels 1890 KB 1038 KB 519 KB Recording Pixels Frame Rate File size Standard...

Page 104: ...ible with MultiMediaCard standards Dimensions 32 0 x 24 0 x 1 4 mm 1 3 x 0 9 x 0 06 in Weight Approx 1 5 g 0 05 oz Interface Compatible with SD memory card standards Dimensions 32 0 x 24 0 x 2 1 mm 1 3 x 0 9 x 0 1 in Weight Approx 2 g 0 07 oz Type AA size nickel metal hydride battery Nominal Voltage 1 2 V DC Typical Capacity 2500 mAh min 2300 mAh Cycle Life Approx 300 times Operating Temperatures ...

Page 105: ...pter Kit ACK800 Rated Input 100 240 V AC 50 60 Hz 16 VA 100 V 21 VA 240 V 0 18 A Rated Output 565 mA 1 1275 mA 2 Charging Time Approx 4 hours 40 min 1 Approx 2 hours 2 Operating Temperatures 0 35 C 32 95 F Dimensions 65 0 x 105 0 x 27 5 mm 2 56 x 4 13 x 1 08 in Weight body only Approx 95 g 3 35 oz Rated Input 100 240 V AC 50 60 Hz Rated Output 3 15 V DC 2 0 A Operating Temperatures 0 40 C 32 104 F...

Page 106: ...omputer Basic 24 DPOF Print Order Print Style 66 Selecting Images 64 DPOF Transfer Order 67 E Erasing All Images 63 Single Images Basic 19 Exposure 38 F File Number 15 48 66 Flash Basic 13 Frame Rate 34 FUNC SET 18 Basic 3 G Grid Lines 31 H HF DC1 90 I Image Data Sizes Estimated 101 Index Playback 51 Indicator Basic 4 Infinity Basic 15 Interface Cable Basic 22 Basic 27 ISO Speed 45 L Language Basi...

Page 107: ...els 26 34 Red Eye Reduction Basic 14 Reset All 24 Resume Playback Basic 18 Review 20 Basic 9 Rotate 53 S Safety Zoom 28 Self Timer Basic 16 Shooting Mode Auto Basic 10 Functions Available 112 Manual Basic 10 Super Macro Basic 10 Movie Basic 11 Special Scene Basic 11 Beach Basic 11 Fireworks Basic 11 Foliage Basic 11 Indoor Basic 11 Kids Pets Basic 11 Night Snapshot Basic 11 Portrait Basic 11 Snow ...

Page 108: ...106 W White Balance 40 Wide Angle Basic 12 Wrist Strap Basic 1 Z Zoom Basic 12 ...

Page 109: ...107 MEMO ...

Page 110: ...108 MEMO ...

Page 111: ...109 MEMO ...

Page 112: ...tructions may cause harmful interference to radio communications However there is no guarantee that interference will not occur in a particular installation If this equipment does cause harmful interference to radio or television reception which can be determined by turning the equipment off and on the user is encouraged to try to correct the interference by one or more of the following measures R...

Page 113: ...rs or omissions Canon reserves the right to change the specifications of the hardware and software described herein at anytime without prior notice No part of this guide may be reproduced transmitted transcribed stored in a retrieval system or translated into any language in any form by any means without the prior written permission of Canon Canon makes no warranties for damages resulting from cor...

Page 114: ...rd Wide Recording Pixels Movie z p 34 z Compression Super Fine p 27 Fine z z z z Normal Flash1 Auto z 1 Basic p 13 On Off z z Red Eye Reduction 2 Basic p 14 Slow Synchro 3 4 Basic p 14 Drive Mode Single Shot z z z z z z Continuous Shooting p 29 10 sec 2 sec Self Timer Basic p 16 Custom Timer AF assist Beam 2 p 20 Autofocus Modes 2 p 35 Macro Mode 5 Basic p 15 Infinity Mode 5 Digital Zoom 6 p 27 ...

Page 115: ...ff in other modes 5 You cannot switch to the Macro Infinity modes in the or modes 6 Operation is possible during shooting Standard mode only 7 Automatically set by the camera 8 Cannot be adjusted when My Colors mode is set to or 9 cannot be set in Long Shutter Mode 10 Only Grid Lines can be set in the mode Exposure Compensation p 38 Metering Method Evaluative 7 z z 7 7 7 p 37 Center Weighted Avg 3...

Reviews: