background image

51

Windo

ws

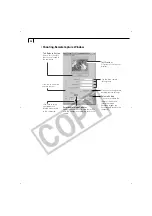
Rotate 90
Degrees
Buttons

Click a button to
rotate the selected
image 90 degrees
left or right.

Preferences Button

Click here to adjust or
check image
transmission settings.

Camera Settings Button

Click here to adjust or check camera settings (p. 36).

Image
Selection
Button

Protection
On/Off
Button

Check Mark On/Off Button

You can choose an image
selection method if you press
the [Select] button after
adding a check mark.

Play Memo
Button

Click here to play
a voice memo
associated with
an image.

Help
Button

Main Buttons

Click these buttons to
perform the main
tasks, such as loading
images and closing
the TWAIN Driver.

Image Data
Display Area

Display Area for
Image Folder
Selection

Image Display Area

Images display here
when a camera is
connected.

Comment Box

Input a comment of up to 120 characters
here. (You cannot input a comment
while the camera is connected.)

• TWAIN Driver Window

Image Transmission
Mode List Box

Click here to select to
transmit the selected
images as a single image
or as an index sheet.

Display Mode
List Box

Click here to select
between the
Thumbnail and
Preview display
modes.

Display Size
List Box

Click here to
select an image
display size.

Image Format
List Box

Click here to select
the format of the
images you wish to
display.

Summary of Contents for PowerShot A200

Page 1: ...ent in this guide before using the software By using the software you agree to be bound by the terms of the agreement ENGLISH CDI E046 010 2002 CANON INC PRINTED IN MALAYSIA To Download Images to a Computer for Windows for Macintosh Install the Software p 18 p 58 Connect the Camera to a Computer p 13 p 13 Start the Software and Download Images p 32 p 61 Camera User Guide This Guide CDI E046 Do not...

Page 2: ...nd other countries Microsoft Windows Windows media and Windows logo are either registered trademarks or trademarks of Microsoft Corporation in the United States and or other countries Netscape and Netscape Navigator are trademarks or registered trademarks of Netscape Communications Corporation in the United States and other countries Netscape Communicator is a trademark of Netscape Communications ...

Page 3: ...f the SOFTWARE is a violation of this Agreement You must reproduce and include the copyright notice on the back up copy 3 SUPPORT AND UPDATES Neither Canon nor its subsidiaries dealers or distributors will be responsible for providing maintenance or support for use of the SOFTWARE No updates fixes or support will be made available for the SOFTWARE 4 LIMITED WARRANTY AND LIMITATION OF LIABILITY It ...

Page 4: ...e null and void with respect to the jurisdiction of that court or tribunal and all the remaining provisions of this Agreement shall remain in full force and effect 9 CONTROLLING LAW The terms of this Agreement as it relates to purchases of the Software in the United States of America shall be governed and construed in all respects in accordance with the laws and regulations of the State of New Yor...

Page 5: ...e Accomplished with the Software 6 Canon Digital Camera Solution Disk 6 System Requirements 11 Windows 11 Macintosh 12 Connecting the Camera to a Computer 13 Selecting a Downloading Method 13 Connecting to a USB Port 14 Connecting to a CF Card Reader or PC Card Reader 15 ...

Page 6: ...rded images to your computer When you wish to learn the features of ZoomBrowser EX Windows and ImageBrowser Macintosh ZoomBrowser EX Software User Guide Windows ImageBrowser Software User Guide Macintosh The manuals in PDF format provide a relatively detailed description of the operating procedures for the ZoomBrowser EX program for Windows and the ImageBrowser program for Macintosh Read this Manu...

Page 7: ...he Following When you wish to install uninstall the printer driver required to use the CP 10 When you wish to install uninstall the USB driver When you wish images saved onto the computer to be printed with the CP 10 When you wish to print original photo cards When you wish to print on labels 8 label sheets Each software program is also supplied with an onscreen Help menu that explains detailed op...

Page 8: ...ce the Canon Digital Camera Solution Disk in the CD ROM drive The installer panel will display 2 In the installer panel click Using the Software and ZoomBrowser EX The guide will display If the installer panel does not display automatically open the Readme and English folders on the CD ROM and double click the ZOOMBROWSER EX GUIDE PDF file Macintosh 1 Place the Canon Digital Camera Solution Disk i...

Page 9: ... pdf file Macintosh 1 Place the Canon Digital Camera Solution Disk in the CD ROM drive 2 Double click the Canon Digital Camera Installer icon in the CD ROM window The installer panel will display 3 In the installer panel click Using the Software and CP 10 Printer Driver The Card Photo Printer CP 10 Printer Driver User Guide Windows Macintosh will display You can also display it by opening the Read...

Page 10: ...lecting the thumbnails tiny images shown on the computer display For Windows systems the ZoomBrowser EX auto start function is only supported for Windows 98 Windows 2000 Windows XP It is not supported for Windows Me TWAIN Driver Windows This driver for Windows 98 and Windows 2000 loads camera images into TWAIN compliant programs such as Adobe Photoshop WIA Driver Windows This driver for Windows Me...

Page 11: ...Categorizing and Organizing Large Volumes of Images ZoomBrowser EX Windows ImageBrowser Macintosh These programs display downloaded images in lists and allow you to sort and organize them by content They allow you to search and organize images as if they were spread out on your desktop Searching and Organizing Images Chronologically ZoomBrowser EX Windows ImageBrowser Macintosh These programs can ...

Page 12: ...nsmission The automatic start of email programs is only supported by Windows and the email programs must be enabled as MAPI clients Laying Out and Printing Images PhotoRecord Windows ImageBrowser Macintosh These programs permit you to add backgrounds and borders Windows only as well as titles and comments and print out the images You can enjoy preparing prints of your images appearing as if they w...

Page 13: ...cards with added text or design or labels 8 label sheets to Card Photo Printer CP 10 sold separately when connected to the computer by interface cable PIF 100 sold separately Merging Panoramic Images PhotoStitch This program takes images shot over several frames in the camera s Stitch Assist mode automatically arranges them in order and stitches them together in one simple procedure You can shoot ...

Page 14: ...mputer Controlled Camera Shooting RemoteCapture This program allows your camera s shutter to be controlled by the computer when the two are connected The recorded images are loaded directly into the computer ...

Page 15: ...s Free Hard Disk Space Canon Utilities ZoomBrowser EX 120 MB or more Including the PhotoRecord printing program PhotoStitch 40 MB or more RemoteCapture 20 MB or more Canon Camera TWAIN Driver 25 MB or more Canon Camera WIA Driver 25 MB or more Canon CP 10 Printer Driver 1 MB or more space required for installation Display 800 x 600 pixels 256 colors 8 bit or better 1 024 x 768 pixels High Color 16...

Page 16: ...moteCapture 15 MB or more USB Mounter 5 MB or more Canon Camera Plug In Module 15 MB or more Canon CP 10 Printer Driver 3 8 MB or more space required for installation Display 800 x 600 pixels 256 colors or better 1 024 x 768 pixels 32 000 colors or better is recommended Only ImageBrowser and PhotoStitch are compatible with Mac OS X Version 10 1 However they are not compatible with disks formatted ...

Page 17: ...computer Read the appropriate page referenced below after checking your computer system Windows Users Do not connect the camera to a Windows computer at this point The USB Driver must be installed before the camera is connected to the computer via the USB interface The USB Driver can be installed very easily so please wait until the driver is installed before connecting the camera You should use a...

Page 18: ...es happen never disconnect the USB cable Try to awaken the computer with the camera in the connected state Some computers will not awaken properly if you disconnect the camera while they are in standby mode Please refer to your computer manual for instructions regarding its standby mode 1 Install the software first time connection only Windows users see p 18 Macintosh users see p 58 2 Attach the s...

Page 19: ...apter PCMCIA adapter before placing it into the card slot on the computer or reader 1 Remove the CF card from the camera and if required insert it into a PC card adapter 2 Place the card in the CF card reader or the loaded adapter into the card slot on the computer or PC card reader Since the requirement for the power to be on or off varies widely between computers and card readers please refer to...

Page 20: ...ter starting from A which is inserted as the third digit in the name I E STA_0001 JPG STB_0002 JPG STC_0003 JPG The xxxx in file names represent four digit numbers All folders except the xxxCANON folders contain image settings files Do not open or delete them IMG_xxxx JPG JPEG format images STx_xxxx JPG Stitch Assist mode images MVI_xxxx AVI Movies MVI_xxxx THM DCIM xxxCANON CANONMSC The folder th...

Page 21: ...ver 27 Troubleshooting the TWAIN Driver WIA Driver Uninstall 28 Downloading Images to a Computer 32 Starting ZoomBrowser EX 32 The ZoomBrowser EX Camera Window 36 Downloading and Saving Images from the Camera 37 Printing Images 38 ZoomBrowser EX Features 41 Using the ZoomBrowser EX Buttons 41 Replaying Movies 43 Merging Panoramic Images with PhotoStitch 44 Shooting with RemoteCapture 45 Loading Im...

Page 22: ... to the use of the WIA Driver Before you install it please read WIA Driver Installation Precautions p 21 Users of Windows 2000 and Windows XP Professional must first log in as an Administrator computer system administrator to install programs 1 Close any programs that are running 2 Set the Canon Digital Camera Solution Disk in the computer s CD ROM drive The installer panel will display automatica...

Page 23: ...river software to allow the camera to be connected to a computer via the USB interface and download images Installing the Card Photo Printer CP 10 Printer Driver The driver for Card Photo Printer CP 10 sold separately must be installed to print from a CP 10 connected to the computer For installation instructions please see the Card Photo Printer CP 10 Printer User Guide contained on the Canon Digi...

Page 24: ...ser EX because of a corrupt database file or other problem please also delete the Database folder which can be found within the C Program Files Canon ZoomBrowser EX folder PhotoRecord PhotoStitch RemoteCapture and other programs can be removed with the same procedures Please see page 27 for instructions for uninstalling the TWAIN Driver or WIA Driver Uninstalling Deleting the Card Photo Printer CP...

Page 25: ...ror message similar to the following to appear TWAIN data source not found Reinstall the scanner software If this happens select WIA camera model in the application program as the TWAIN device Your camera model name will appear in place of the camera model in the brackets above Windows Me users cannot use ZoomBrowser EX s auto start function when the WIA Driver is installed TWAIN Driver is the dri...

Page 26: ...k the Browse button The Open dialog will display 4 Select the following folders in the order Program Files Canon PowerShot A200 TWAIN on the drive on which you installed the software Double click the drive usually the C drive on which you installed the software to display all of its folders and select the appropriate folder 5 Click the OK button once you have selected the last folder The window in...

Page 27: ...are using Windows 2000 the Event dialog will display when the installation is complete allowing you to select a program to start p 32 If you are using Windows Me the Scanners and Cameras Wizard will start p 53 Windows XP Users of Windows XP Professional must first log in as an Administrator computer system administrator to install programs 1 Attach the supplied USB cable to the computer s USB port...

Page 28: ...omatically Windows XP only You can set your computer to automatically start an event when the camera is connected to the computer via the USB cable Please set the computer to start either ZoomBrowser EX or the Scanners and Cameras Wizard If neither of these is selected the computer will not operate properly 1 Connect the camera to the computer If the Event Dialog appears click Cancel to close it 2...

Page 29: ...o start the Scanners and Cameras Wizard automatically 1 Set Select an event to Default In the Actions section set Start this program to Microsoft Scanners and Cameras Wizard 2 Now repeat the above however this time set the Select an event to camera name Connected and set the Actions section to Take no action 6 Click OK Next time either ZoomBrowser EX or the Scanners and Cameras Wizard will start a...

Page 30: ...d use a household power source to power the camera when it is connected to a computer If the Problem Lies in the Above The Add New Hardware Wizard in Windows 2000 the New Hardware Found Wizard may display If that happens click Cancel to close it Then disconnect the camera from the computer before reinstalling the USB Driver according to the procedures in Installing the TWAIN Driver WIA Driver p 21...

Page 31: ... the Windows Start menu and select Settings and Control Panel If you are using Windows XP from the start menu click Control Panel and click the Printers and Other Hardware icon 4 Double click the Scanners and Cameras icon or folder If you cannot find the Scanners and Cameras icon or folder use the procedures on page 28 to uninstall the driver 5 Delete the camera model name from the Scanners and Ca...

Page 32: ...canners and Cameras Properties dialog or the camera icon does not appear in the Scanners and Cameras folder If you installed the USB Driver by connecting the camera to the computer via the USB interface before you installed the other software on the CD ROMs Windows 98 Windows Me 1 Open the System Properties dialog and check the Device Manager tab 1 In the Control Panel double click the System icon...

Page 33: ...in the Other folder you do not need to delete anything 3 Double click the My Computer icon on the desktop followed by the C drive and the Windows and Inf folders If the Inf Folder Is Not Visible in the Windows Folder Use the following procedures to show all files and folders 1 For Windows 98 click the View menu and select Folder Options For Windows Me click the Tool menu and select Folder Options ...

Page 34: ...ra model name appears under the Other devices or Imaging Device category use the following procedures to delete it 1 Select the name of your camera model right click the mouse button and select Delete 2 In the confirmation dialog click OK 3 Click OK to close the System Properties dialog Remove all copies of your camera model name that appear in the Other devices or Imaging Device categories or tha...

Page 35: ...hich will have the same number as the Oem inf file The two constitute one set i e Oem0 inf and Oem0 pnf Please note that there may be many file sets starting with Oem so take care to get the correct set 5 Confirm that it is the correct Oem file set for Canon digital cameras Double click the Oem inf file The Windows Notepad program will start and show the file contents Click each Oem inf file until...

Page 36: ...the camera s button to reconnect Please see the Camera User Guide for more information Starting ZoomBrowser EX USB Port Connection Windows 98 Windows 2000 Windows XP 1 Attach the supplied USB cable to the computer s USB port and the camera s Digital Terminal Prepare the camera for communication with the computer For USB interface connection instructions see Connecting to a USB Port p 14 After a mo...

Page 37: ...For more details see the PDF manual ZoomBrowser EX Software User Guide p 4 What to Do the Next Time ZoomBrowser EX is Started A dialog with the previously selected automated settings will display the next time you start ZoomBrowser EX To use these settings unchanged click the Start button To do nothing click Cancel To change the settings click Modify Settings For more detailed instructions for cha...

Page 38: ...a is connected If you wish to shut off the auto start place a check mark in the Disable device events or Do nothing options USB Port Connection Windows Me 1 Attach the supplied USB cable to the computer s USB port and the camera s Digital Terminal Prepare the camera for communication with the computer For USB interface connection instructions see Connecting to a USB Port p 14 The Scanners and Came...

Page 39: ...first time ZoomBrowser EX starts asking whether you wish to register the My Pictures folder in ZoomBrowser EX Click Yes if you plan to use the My Pictures folder Canon ZoomBrowser EX Icon 3 Click the Import Images button and select From CANON_DC X Dcim Thumbnail versions of the camera images will display in the Camera window p 36 If the message The error EX_Exception ocurred in the program appears...

Page 40: ...ck the Camera Settings button to open the Camera Settings dialog 2 Check or change the settings Upload Button Copy images from the computer onto the CF card in the camera or reader An image of the connected camera or CF card will display here Thumbnail Setup Options Button Set various camera settings see inset below Delete Button Delete selected images Download Button Load the selected images onto...

Page 41: ...View area 3 Select the images you wish to download from the Camera window and click the Download button Click on thumbnails to select them Downloaded images are saved to the computer disk and appear in the Browser Display Area The folder you created above normally appears within the C Program Files Canon ZoomBrowser EX Image Library One folder The downloaded image files are saved to the folder you...

Page 42: ... the right of the Camera window to close it Printing Images 1 Select the image s you wish to print Movie images cannot be printed 2 Click the Print button and select Layout from the displayed menu Tree View Area Browser Display Area The movie icon displays on movie thumbnails The PhotoRecord printing utility will start and automatically display the selected image s in a page layout ...

Page 43: ...PDF file for a detailed explanation of the print modes 4 In the next dialog set the paper size and other settings and click Next 5 In the last dialog set the fine settings and click Finish The PhotoRecord window will display 6 If you wish to change the layout set the printing settings in the PhotoRecord window 7 Click the PhotoRecord Print button The Print dialog will display 8 Click OK to start p...

Page 44: ...ages to change the layout Slide this left to shrink the image size and right to increase it Stop importing images Switch between control panel sizes with this Display Help Display the Print Dialog Undo or restore the previous action Change the page background or borders Import images Select a layout pattern for each page Click the arrow to display a pop up menu PhotoRecord Window ...

Page 45: ...er EX window contains the buttons that control various functions This topic describes four of those buttons that are particularly convenient Switching the Display Mode You can change between the Zoom and Scroll modes to suit your purposes when images are displayed in the Browser Display Area Zoom Mode When you create a folder within a folder use this mode to display all the images inside the sub f...

Page 46: ...The folder will be registered as an Image Folder Refreshing a Folder Only image files that are added copied or edited using ZoomBrowser EX will display correctly in a folder that is part of a ZoomBrowser EX image folder If you move or copy image folders with the Windows Explorer program or edit images with another application the information contained in ZoomBrowser EX will not be up to date To up...

Page 47: ... Place the disk in the CD ROM drive and click QuickTime 5 0 Installation in the installer panel p 18 1 Double click an image with a movie icon QuickTime Player will start 2 Click the play button in QuickTime Player The movie will replay Do not double click a movie file AVI extension in the Windows Explorer to play it That will start Windows Media PlayerTM which may not support this file type To re...

Page 48: ...mages shot in Stitch Assist mode with a wide converter teleconverter or close up lens cannot be merged accurately Follow the instructions to merge the images Stitch Assist mode images have a green stitch mark Click the stitch mark to start PhotoStitch and merge the image series Images Shot in Stitch Assist Mode PhotoStitch automatically arranges images shot with the camera s Stitch Assist mode in ...

Page 49: ...h RemoteCapture are automatically saved to the folder selected in ZoomBrowser EX Save RemoteCapture Window View Button Select an image in the Thumbnail View and click here to display it in the Image Display Area Delete Button Select an image in the Thumbnail View and click here to delete it Since it is deleted from the computer too ensure that you have the correct image Histogram Check the distrib...

Page 50: ...a s shutter and record the image Recorded images are automatically saved to the computer Test Release Button Takes a test shot Test shots are not saved to the computer Recordable Image Counter Displays the number of images that will fit onto the computer or Memory card in the camera Click here to select how images are rotated when saved to the computer Click here to change more detailed camera set...

Page 51: ...canners and Cameras Wizard dialog will display Click the Cancel button and double click the Canon ZoomBrowser EX icon on the desktop to start ZoomBrowser EX After ZoomBrowser EX starts click the Edit menu and select RemoteCapture When the Shooting RemoteCapture window opens proceed to Step 6 below 2 Select Canon ZoomBrowser EX and click OK ZoomBrowser EX will start and open the ZoomBrowser EX Auto...

Page 52: ...number of frames at the specified interval You can specify an interval from 5 seconds to 60 minutes You can capture up to the number of recordable frames displayed in the RemoteCapture Shooting window 2 to 9999 frames Timer Shooting You can use the timer feature to shoot after a specified number of seconds 1 In the Shooting RemoteCapture window click the Shooting menu and select Timer Shooting The...

Page 53: ...s after the CF card is full Input a root name for the image files here If you input Capture for example the first image will be named Capture_00001 jpg and successive images will automatically be assigned a name that is one number higher than the last Select a folder where images will be saved Select the drive on the computer where images will be saved Printing an Index of the Thumbnail Images If ...

Page 54: ...to the computer s USB port and the camera s Digital Terminal Prepare the camera for communication with the computer For USB interface connection instructions see Connecting to a USB Port p 14 The Event dialog will display and allow you to select an application program to start 2 Select Photoshop and click OK Adobe Photoshop and the TWAIN driver will start p 51 If the TWAIN driver does not start au...

Page 55: ...lick these buttons to perform the main tasks such as loading images and closing the TWAIN Driver Image Data Display Area Display Area for Image Folder Selection Image Display Area Images display here when a camera is connected Comment Box Input a comment of up to 120 characters here You cannot input a comment while the camera is connected TWAIN Driver Window Image Transmission Mode List Box Click ...

Page 56: ... name and change the file location and format settings if necessary Loading from a Card Reader 1 Click the Open Folder button The Image Folder Selection dialog or the My Computer dialog will display 2 Select the folder containing the images and click OK The CF card images will display in the Thumbnail Display Area Please see page 16 for a description of the CF card file structure 3 Select the imag...

Page 57: ... For USB interface connection instructions see Connecting to a USB Port p 14 The Scanners and Cameras Wizard will open automatically 2 Click the Next button 3 Select the image s you wish to download and click the Next button To select multiple images press and hold the Ctrl or Shift key on the keyboard while clicking on images To select all the images click Select All 4 Specify a filename and save...

Page 58: ...folder and drop it This will download the image and its thumbnail Downloading with Windows Explorer Images can be downloaded to the computer with Windows Explorer just as you would copy any other file 1 Attach the supplied USB cable to the computer s USB port and the camera s Digital Terminal For USB interface connection instructions see Connecting to a USB Port p 14 The Scanners and Cameras Wizar...

Page 59: ...d and click the Open button The selected image s will load into the program To save the loaded image s click the File menu and select Save As Input a file name and change the file location and format settings if necessary Loading Images with Windows TWAIN Source You can also load images into a program with Windows TWAIN Source 1 Connect the camera to the computer with the USB interface 2 Start a T...

Page 60: ...56 ...

Page 61: ...Saving Images from the Camera 66 Printing Images 68 ImageBrowser Features 70 Replaying Movies 70 Merging Panoramic Images with PhotoStitch 71 Shooting with RemoteCapture Compatible with Mac OS 8 6 9 2 only 72 Loading Images into Plug In Compliant Programs Compatible with Mac OS 8 6 9 2 only 77 Loading Images into Adobe Photoshop 77 Downloading Images with the USB Mounter Compatible with Mac OS 9 0...

Page 62: ...era Installer icons The installer panel will display 4 Click Digital Camera Software Installation 5 Follow the onscreen instructions to proceed with the installation 6 After the installation is complete restart the computer as prompted Mac OS X 1 Close any programs that are running 2 Set the Canon Digital Camera Solution Disk in the computer s CD ROM drive 3 Double click the CD ROM icon followed b...

Page 63: ...er The driver for Card Photo Printer CP 10 sold separately must be installed to print from a CP 10 connected to the computer For installation instructions please see the Card Photo Printer CP 10 Printer Driver User Guide contained on the Canon Digital Camera Solution Disk as a PDF file Interface Cable PIF 100 sold separately is required to connect the Card Photo Printer CP 10 to a computer ...

Page 64: ...ved be careful not to accidentally delete those subfolders Uninstalling the Plug In Module For instructions to uninstall the Plug In Module please open the Canon Utilities and Camera Plug In folders and read the ReadMe file Uninstalling the Card Photo Printer CP 10 Printer Driver For instructions to delete the printer driver please see the Card Photo Printer CP 10 Printer Driver User Guide contain...

Page 65: ...f time usually about 5 minutes If the connection remains idle the camera will disconnect after approximately 1 minute Press the camera s button to reconnect Please see the Camera User Guide for more information Starting ImageBrowser USB Port Connection Mac OS 8 6 9 2 1 Attach the supplied USB cable to the computer s USB port and the camera s Digital Terminal Prepare the camera for communication wi...

Page 66: ...re The Camera Window will open and display the camera images as thumbnails tiny versions p 65 In the ImageBrowser Automation Wizard dialog you can select the action that is carried out after ImageBrowser starts For more details see the PDF manual ImageBrowser Software User Guide p 4 What to Do the Next Time ImageBrowser is Started A dialog with the previously selected automated settings will displ...

Page 67: ...ImageBrowser from starting automatically USB Port Connection Mac OS X 1 Attach the supplied USB cable to the computer s USB port and the camera s DIGITAL Terminal Prepare the camera for communication with the computer For USB interface connection instructions see Connecting to a USB Port p 14 2 Double click the Canon ImageBrowser icon on the desktop If the Canon ImageBrowser icon does not appear o...

Page 68: ...owser Double click the Canon ImageBrowser icon on the desktop Your camera model name and the USB port number i e 1 will display here For example PowerShot A200 1 If the icon does not appear on the desktop double click the folder in which you installed the program followed by the Canon Utilities and ImageBrowser folders and the ImageBrowser file 3 Double click the DCIM folder in the Explorer View S...

Page 69: ... Input a camera owner name here up to 31 characters Set the date and time here Click this button to synchronize the camera to the computer s date and time settings Check the battery charge here Click this to format the CF card in the camera Check the remaining memory capacity here How to Check and Change Various Camera Settings You can adjust the date time and owner settings in the Camera Settings...

Page 70: ...nge the folder name as you wish 3 In the Explorer View Section click the newly created folder Downloading and Saving Images from the Camera 1 With Mac OS 8 6 9 2 select Macintosh HD in the Explorer View Section With Mac OS X select the your name subfolder of the Users folder in the startup disk Mac OS 8 6 9 2 Mac OS X Explorer View Section Mac OS 8 6 9 2 Mac OS X ...

Page 71: ...hem on the Browser area or the Explorer View Section 4 Select images in the Camera window and click the Download button Click a thumbnail to select it or press Shift and click to select multiple thumbnails To disconnect the camera click the close box Mac OS 8 6 9 2 or the red close box Mac OS X at the upper left of the Camera window The Camera window will close Browser area The movie icon displays...

Page 72: ...option for the purposes of this example The Custom Layout printing option in the Layout Options window allows you to freely change the size and position of the images for printing The other options allow you to print an index or print onto Canon perforated paper For more details on the Layout Options window please see the PDF manual ImageBrowser Software User Guide p 4 The Canon perforated paper p...

Page 73: ...start printing Print Window When the Custom layout printing option is selected in the Layout Options window you can freely change the size and position of the images for printing Add Text Open the Edit menu and select Add Text Add Captions to Images Click the image and then the Edit menu and select Edit Caption Displays the Layout Options window Display the Print dialog Change the default number o...

Page 74: ... Camera Solution Disk Place the disk in the CD ROM drive and click QuickTime 5 0 Installation in the installer panel p 58 1 Double click an image with a movie icon QuickTime Player will start 2 Click the play button in QuickTime Player The movie will replay Play Button ImageBrowser Features This topic introduces additional convenient ImageBrowser features For a more detailed explanation please see...

Page 75: ...ls Images shot in Stitch Assist mode with a wide converter teleconverter or close up lens cannot be merged accurately Follow the instructions to merge the images Mac OS X Images Shot in Stitch Assist Mode PhotoStitch automatically arranges images shot with the camera s Stitch Assist mode in their correct order and orientation making it easy to merge them Stitch Assist mode images appear in the Cam...

Page 76: ...ge selected in the Thumbnail View Shooting with RemoteCapture Compatible with Mac OS 8 6 9 2 only RemoteCapture will start if you click the Edit menu in ImageBrowser and select RemoteCapture when the camera is connected to the computer via a USB interface If the camera window appears when you connect the camera to the computer close the window RemoteCapture lets you control the camera s shutter re...

Page 77: ...orded images are automatically saved to the computer Recordable Image Counter Displays the number of images that will fit onto the computer or memory card in the camera Select how images are rotated when saved to the computer Click here to change more detailed camera settings Test Preview A Preview of the test shot displays Test Shot Button Takes a test shot Test shots are not saved to the compute...

Page 78: ...l display 5 Set the Size Quality Flash White Balance and Exposure Compensation settings If you turn the camera on either side to shoot you can rotate the recorded image 90º either way when it is saved by selecting 90 degrees left or 90 degrees right in the Rotation Settings section To change where the image is saved see Changing the Save Location and Other Preferences p 76 6 If you click the Test ...

Page 79: ... use the timer feature to shoot after a specified number of seconds 1 In the Save RemoteCapture window or Shooting RemoteCapture window click the File menu and select Timer Shooting The Timer Shooting dialog will display 2 Set the delay in seconds and click OK RemoteCapture will start timer shooting recording an image after the specified delay You can specify a delay from 2 to 30 seconds Precautio...

Page 80: ...ick the File menu and select Print Index The file name and shooting date are printed along with each image in the index providing a convenient record and means of checking your images Click an option to determine whether images are saved to the camera s CF card as well as the computer If you select Computer only you can do without a CF card in the camera or continue to record images after the CF c...

Page 81: ...In folders to open them 2 Copy the Canon Camera Plug In 4 file to the Adobe Photoshop Import Export folder Starting Adobe Photoshop USB Connection 1 Attach the supplied USB cable to the computer s USB port and the camera s Digital Terminal Prepare the camera for communication with the computer For USB interface connection instructions see Connecting to a USB Port p 14 ImageBrowser will start and o...

Page 82: ...d dialog 2 In the Settings for USB Connection dialog click the The application program below will start option to clear the check mark 3 Close the Settings for USB Connection dialog This will prevent the ImageBrowser Not Found dialog from appearing the next time the camera is connected You can also open the Settings for USB Connection dialog by clicking the Apple menu and selecting Control Panels ...

Page 83: ... In Module To save the loaded images click the Adobe Photoshop File menu and select Save As Input a file name and change the file location and format settings if necessary Downloading from a Card Reader 1 Click the Adobe Photoshop File menu and select Import and Canon Camera Plug In 4 2 Click the Open Folder button 3 Select the folder containing the images and click OK The images on the CF card wi...

Page 84: ... to adjust or check camera settings p 65 Image Selection Button Protection On Off Button Check Mark On Off Button You can choose an image selection method if you press the Select button after adding a check mark Play Memo Button Click here to play a voice memo associated with an image Main Buttons Click these buttons to perform the main tasks such as loading images and closing the Plug In Module I...

Page 85: ...emoteCapture In addition images cannot be deleted from the camera and the computer images cannot be uploaded to the camera Enabling the USB Mounter To download images with the USB Mounter first enable it with the following procedures 1 Select Control Panels from the Apple menu and Canon USB Camera Driver The Canon USB Camera Driver control panel will display 2 Select Card Reader Mode and close the...

Page 86: ...ges from ImageBrowser and the Plug In Module while the USB Mounter is Enabled When the USB Mounter is enabled use the card reader downloading procedures in ImageBrowser or the Plug In Module to download from the camera See CF Card Reader PC Card Reader Connection p 64 for ImageBrowser and Downloading from a Card Reader p 79 for the Plug In Module Downloading Images 1 Attach the supplied USB cable ...

Page 87: ...This topic explains some of the causes for and solutions to problems with the software Troubleshooting Windows Macintosh ...

Page 88: ... With Windows XP the Event dialog does not display Genuine Apple Computer brand computer with a built in USB interface Cause 2 Camera is not correctly connected to the computer Read Connecting the Camera to a Computer p 13 and check the connection Ensure that you are using the correct cable and that its connectors are in good shape Cause 3 The camera is not set to replay mode Refer to the table be...

Page 89: ...e camera is being recognized as an Other device and deleting the driver 1 In the Control Panel double click the System icon The System Properties dialog appears 2 Click the Device Manager tab 3 Click the of Other devices and or Imaging Devices If your camera is being recognized as an Other device its model name will appear If your camera model name does not appear or if Other devices and or Imagin...

Page 90: ...lick the Hardware tab and the Device Manager button Deleting the Setup Information 7 Double click the My Computer icon on the desktop followed by the C drive and the Windows and Inf folders If the Inf Folder is Not Visible in the Windows Folder Use the following procedures to show all files and folders 1 Windows 98 Click the View menu and select Folder Options Windows Me Click the Tools menu and s...

Page 91: ...m Properties dialog Deleting the Setup Information 7 Windows 2000 Double click the My Computer icon on the desktop followed by the C drive and the Winnt and Inf folders Windows XP From the start menu click My Computer C Windows folder and Inf folder in succession If the Inf Folder is Not Visible in the Winnt or Windows Folder Use the following procedures to show all files and folders 1 Windows 200...

Page 92: ...les Reinstalling the Driver 10 Refer to Installing the TWAIN Driver WIA Driver and reinstall the driver p 21 The Inf folder contains numerous files that are critical to the computer s operation Be extremely careful not to delete the wrong files If you delete the wrong file you may be unable to restart Windows Cause 7 The USB driver is not installed correctly Windows only Uninstall the driver and r...

Page 93: ...puter s OS Windows 98 Windows 98SE From the Start menu select Programs and Windows Explorer The C drive will display Windows Me From the Start menu select Programs Accessories and Windows Explorer Click the button of My Computer The C drive will display Windows 2000 Windows XP From the start menu select All Programs Accessories and Windows Explorer Click on the button of the My Computer folder and...

Page 94: ...90 Canon Customer Support For Canon Customer Support contacts please see the Canon Limited Warranty supplied with your camera ...

Reviews: