background image

25

24

5

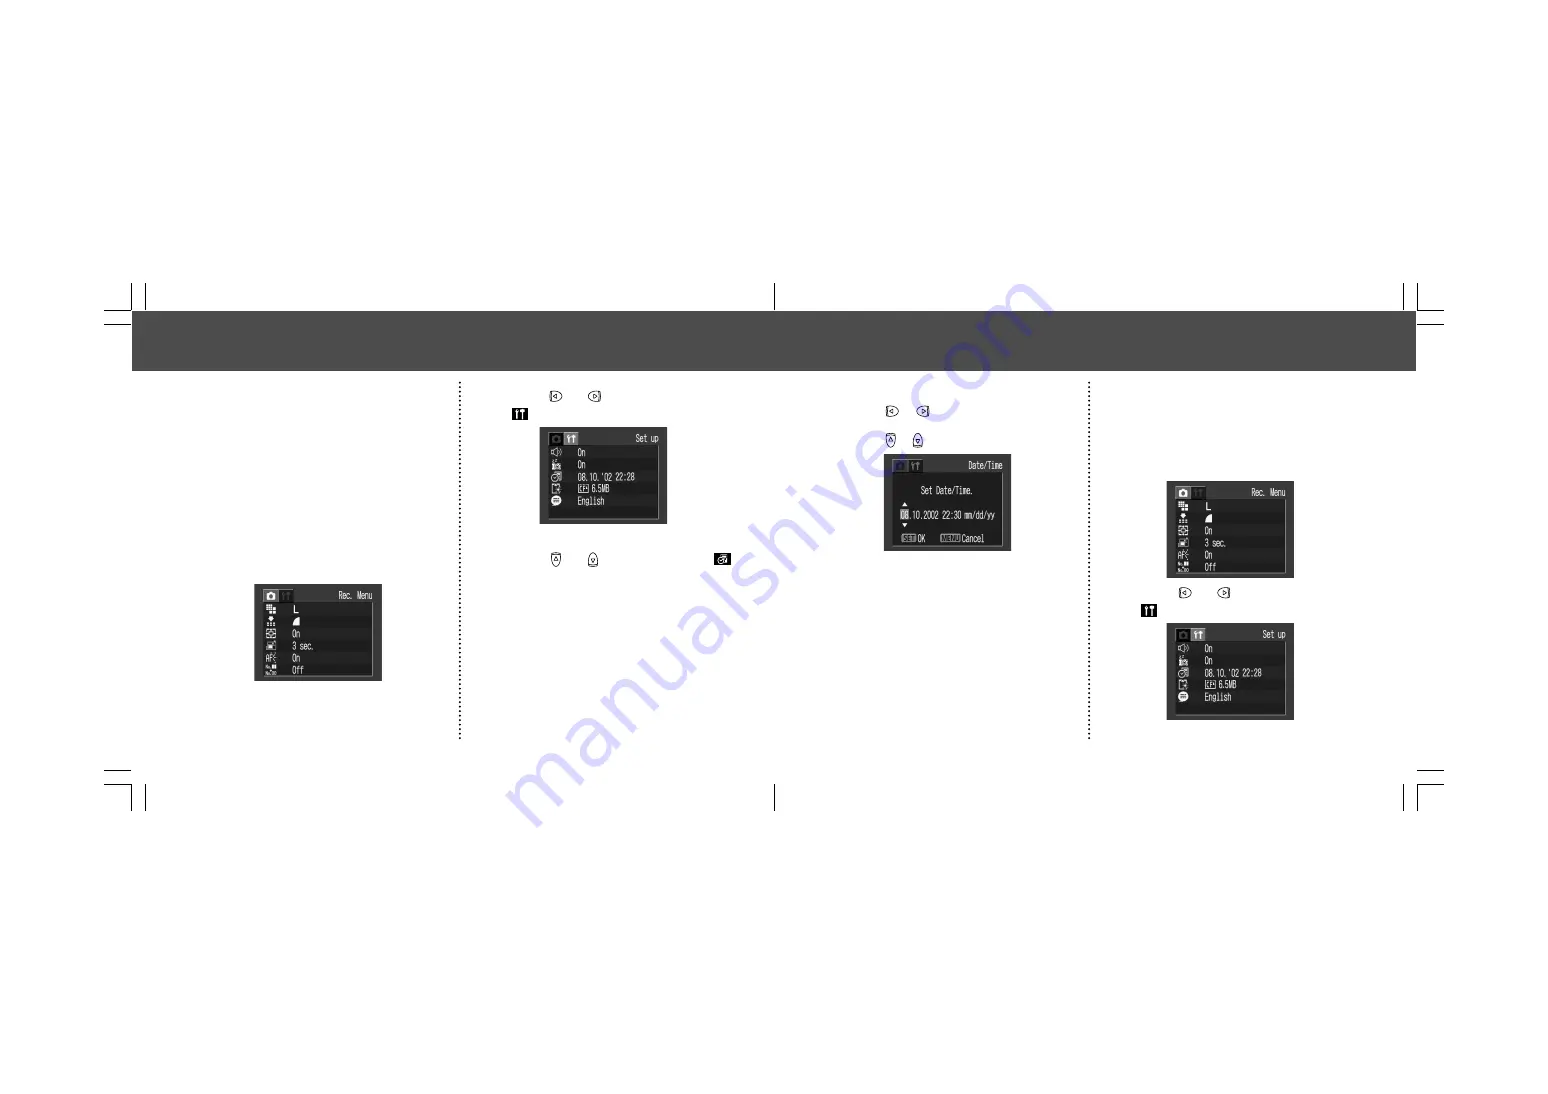
Set the date and time.

Press 

 or 

 button to select the item to be

set.
Press 

 or 

 button to set the date and time.

6

Press the 

SET

 button.

7

Press the 

MENU

 button.

Setting the Language

Sets the display language for LCD monitor
menus and messages.

1

Press the 

MENU

 button.

The Rec. or Replay menu will display.

2

Press 

 or 

 button to select the

[

 (Set up)] menu.

 Preparing the Camera 

Setting the Date / Time

The Date / Time menu will be displayed when
camera power is turned on for the first time or
at low date battery power. Perform operations
from Step 5. (Replace the date battery when
power from the current one is exhausted (p. 95).)

1

Turn the power on (p. 27).

2

Press the 

MENU

 button.

The Rec. or Replay menu will display.

3

Press 

 or 

 button to select the

[

 (Set up)] menu.


4

Press 

 or   button to select 

(Date / Time) and press the 

SET

 but-

ton.

 Preparing the Camera 

Summary of Contents for PowerShot A100

Page 1: ...tion p 11 Please refer to the Software Starter Guide for information on installing the software and downloading images Please read the Quick Start section on the following page for a simple explanation of shooting replaying and erasing Please also read the Printer User Guide included with your Canon printer ENGLISH 2002 CANON INC ...

Page 2: ...eady shot Press the button while the image is displayed Confirm that Erase is selected and press the SET button To erase 4 5 Open the CF card slot battery cover and insert a CF card and batteries Aim the camera at the subject and lightly press the shutter button half way The camera beeps twice when it is focused Set the focus p 34 The green indicator next to the optical viewfinder starts flashing ...

Page 3: ...eady shot Press the button while the image is displayed Confirm that Erase is selected and press the SET button To erase 4 5 Open the CF card slot battery cover and insert a CF card and batteries Aim the camera at the subject and lightly press the shutter button half way The camera beeps twice when it is focused Set the focus p 34 The green indicator next to the optical viewfinder starts flashing ...

Page 4: ...ow p 33 Flash p 43 AF assist Beam p 34 Red Eye Reduction Lamp p 43 Self Timer Lamp p 46 Terminal Cover p 85 Lens Cover p 27 Lens Date Battery Holder p 95 DIGITAL Terminal p 85 DC IN Terminal p 99 For connecting your camera to a computer via a USB Interface Cable IFC 300PCU supplied with camera p 85 or connecting to a Direct Print Function compliant printer via Direct Interface Cable DIF 100 suppli...

Page 5: ...ow p 33 Flash p 43 AF assist Beam p 34 Red Eye Reduction Lamp p 43 Self Timer Lamp p 46 Terminal Cover p 85 Lens Cover p 27 Lens Date Battery Holder p 95 DIGITAL Terminal p 85 DC IN Terminal p 99 For connecting your camera to a computer via a USB Interface Cable IFC 300PCU supplied with camera p 85 or connecting to a Direct Print Function compliant printer via Direct Interface Cable DIF 100 suppli...

Page 6: ...ration Panel DISP WB MENU SET ON DISP Display Button p 29 Single Image Erase Button p 65 Zoom Button p 35 Power Replay Button p 27 SET Button MENU Button p 36 Flash Right Button p 43 Continuous Self Timer Down Button p 46 Macro Infinity Left Button p 45 Exposure WB White Balance Photo Effects Up Button pp 52 53 54 Indicators Upper Indicator Green Ready to shoot or ready to communicate with your co...

Page 7: ...ration Panel DISP WB MENU SET ON DISP Display Button p 29 Single Image Erase Button p 65 Zoom Button p 35 Power Replay Button p 27 SET Button MENU Button p 36 Flash Right Button p 43 Continuous Self Timer Down Button p 46 Macro Infinity Left Button p 45 Exposure WB White Balance Photo Effects Up Button pp 52 53 54 Indicators Upper Indicator Green Ready to shoot or ready to communicate with your co...

Page 8: ...ettings 80 Image Transfer Settings DPOF Transfer Order 82 Setting the Image Transfer 82 Downloading Images to a Computer 84 Downloading Directly from a CF Card 84 Connecting the Camera to a Computer Via the USB Cable 85 Table of Contents Functions and operations tables Quick Start 2 Components Guide 4 Front View 4 Back View 5 Operation Panel 6 About this Camera User Guide 7 Read this First 11 Prep...

Page 9: ...ettings 80 Image Transfer Settings DPOF Transfer Order 82 Setting the Image Transfer 82 Downloading Images to a Computer 84 Downloading Directly from a CF Card 84 Connecting the Camera to a Computer Via the USB Cable 85 Table of Contents Functions and operations tables Quick Start 2 Components Guide 4 Front View 4 Back View 5 Operation Panel 6 About this Camera User Guide 7 Read this First 11 Prep...

Page 10: ...h this Digital camera However Canon Makes no warranties concerning and is not responsible for damages resulting from use of non Canon Brand Accessories Camera Body Temperature If your camera is used for prolonged periods the camera body may become warm Please be aware of this and take care when operating the camera for an extended period About the LCD Monitor The LCD monitor is produced with extre...

Page 11: ...h this Digital camera However Canon Makes no warranties concerning and is not responsible for damages resulting from use of non Canon Brand Accessories Camera Body Temperature If your camera is used for prolonged periods the camera body may become warm Please be aware of this and take care when operating the camera for an extended period About the LCD Monitor The LCD monitor is produced with extre...

Page 12: ...aries and affiliates and distributors of its digital cameras are not liable for any consequential damages arising from any malfunction of the Canon digital camera or CompactFlash card CF card resulting in the failure of an image to be recorded or to be recorded in a format that is machine readable Warning Against Copyright Infringement Please note that Canon digital cameras are intended for person...

Page 13: ...aries and affiliates and distributors of its digital cameras are not liable for any consequential damages arising from any malfunction of the Canon digital camera or CompactFlash card CF card resulting in the failure of an image to be recorded or to be recorded in a format that is machine readable Warning Against Copyright Infringement Please note that Canon digital cameras are intended for person...

Page 14: ...ng the potential for fires or electrical shocks Use of power sources not expressly recommended for this equipment may lead to overheating distortion of the equipment fire electrical shock or other hazards Use only the recommended power acces sories Read this First WARNINGS Do not aim the camera directly into the sun or at other intense light sources which could damage your eyesight Do not trigger ...

Page 15: ...ng the potential for fires or electrical shocks Use of power sources not expressly recommended for this equipment may lead to overheating distortion of the equipment fire electrical shock or other hazards Use only the recommended power acces sories Read this First WARNINGS Do not aim the camera directly into the sun or at other intense light sources which could damage your eyesight Do not trigger ...

Page 16: ...mble alter or apply heat to the batteries There is serious risk of injury due to an explosion Immediately flush with water any area of the body including the eyes and mouth skin or clothing that comes into contact with the inner contents of a battery Avoid dropping or subjecting the batteries to severe impacts that could damage the casings It could lead to leakage and injury Do not short circuit t...

Page 17: ...mble alter or apply heat to the batteries There is serious risk of injury due to an explosion Immediately flush with water any area of the body including the eyes and mouth skin or clothing that comes into contact with the inner contents of a battery Avoid dropping or subjecting the batteries to severe impacts that could damage the casings It could lead to leakage and injury Do not short circuit t...

Page 18: ...t Remove the CF card and battery or power cord if connected from the camera and wait until the moisture evaporates completely before resuming use Extended Storage When not using the camera for extended periods of time remove the batteries from the camera or battery charger and store the equipment in a safe place Storing the camera for extended periods with batteries installed will run down the bat...

Page 19: ...t Remove the CF card and battery or power cord if connected from the camera and wait until the moisture evaporates completely before resuming use Extended Storage When not using the camera for extended periods of time remove the batteries from the camera or battery charger and store the equipment in a safe place Storing the camera for extended periods with batteries installed will run down the bat...

Page 20: ...perating time of the batteries you purchase may not be as long as the batteries that came with the camera Camera operating time may shorten at low temperatures when alkaline batteries are used Also due to their specifications alkaline batteries may expire faster than NiMH batteries If you are using the camera in cold areas or for a long time we recommend using Canon AA size NiMH Battery Kit While ...

Page 21: ...perating time of the batteries you purchase may not be as long as the batteries that came with the camera Camera operating time may shorten at low temperatures when alkaline batteries are used Also due to their specifications alkaline batteries may expire faster than NiMH batteries If you are using the camera in cold areas or for a long time we recommend using Canon AA size NiMH Battery Kit While ...

Page 22: ... overheat or burst Always check the seals on store bought batter ies before loading them as some batteries may come with defective seals Do not use batteries with defec tive seals Never use batteries that look like this Batteries with all or part of the seal electrical insulation sheath peeled off The positive electrode plus terminal is flat The negative terminal is correctly formed protruding fro...

Page 23: ... overheat or burst Always check the seals on store bought batter ies before loading them as some batteries may come with defective seals Do not use batteries with defec tive seals Never use batteries that look like this Batteries with all or part of the seal electrical insulation sheath peeled off The positive electrode plus terminal is flat The negative terminal is correctly formed protruding fro...

Page 24: ...or button to select the Set up menu Preparing the Camera Setting the Date Time The Date Time menu will be displayed when camera power is turned on for the first time or at low date battery power Perform operations from Step 5 Replace the date battery when power from the current one is exhausted p 95 1 Turn the power on p 27 2 Press the MENU button The Rec or Replay menu will display 3 Press or but...

Page 25: ...or button to select the Set up menu Preparing the Camera Setting the Date Time The Date Time menu will be displayed when camera power is turned on for the first time or at low date battery power Perform operations from Step 5 Replace the date battery when power from the current one is exhausted p 95 1 Turn the power on p 27 2 Press the MENU button The Rec or Replay menu will display 3 Press or but...

Page 26: ... Functions 3 Press or button to select Language and press the SET but ton The Language menu may appear differently on cameras in some regions 4 Set the language Press or button to select the language 5 Press the SET button Pressing the MENU button without pressing the SET button returns to the Set up Menu without changing the language settings 6 Press the MENU button Hint for Easy Operation The La...

Page 27: ... Functions 3 Press or button to select Language and press the SET but ton The Language menu may appear differently on cameras in some regions 4 Set the language Press or button to select the language 5 Press the SET button Pressing the MENU button without pressing the SET button returns to the Set up Menu without changing the language settings 6 Press the MENU button Hint for Easy Operation The La...

Page 28: ... approxi mately 5 minutes after the last function is accessed While Connected to a Printer optional The power will automatically shut off approxi mately 5 minutes after the last camera function is accessed or printer ceases to print an image While Connected to a Computer A warning message will appear on the computer screen approximately 5 minutes after the last function is accessed The power will ...

Page 29: ... approxi mately 5 minutes after the last function is accessed While Connected to a Printer optional The power will automatically shut off approxi mately 5 minutes after the last camera function is accessed or printer ceases to print an image While Connected to a Computer A warning message will appear on the computer screen approximately 5 minutes after the last function is accessed The power will ...

Page 30: ...movies sec AF Frame p 46 p 45 p 49 p 30 p 23 Digital Zoom Setting p 35 Shooting Method Macro Infinity Movie Recording Mode red A200 x1 3 x1 6 x2 0 x2 5 x3 2 x4 0 A100 x1 3 x1 6 x2 0 x2 5 x3 2 Camera Shake Warning Low Battery ISO 50 100 200 400 ISO 64 100 200 400 Shooting Mode Exposure Compensation White Balance Photo Effect Compression Resolution ISO Speed A200 A100 Flash p 40 p 52 p 53 p 54 p 41 ...

Page 31: ...movies sec AF Frame p 46 p 45 p 49 p 30 p 23 Digital Zoom Setting p 35 Shooting Method Macro Infinity Movie Recording Mode red A200 x1 3 x1 6 x2 0 x2 5 x3 2 x4 0 A100 x1 3 x1 6 x2 0 x2 5 x3 2 Camera Shake Warning Low Battery ISO 50 100 200 400 ISO 64 100 200 400 Shooting Mode Exposure Compensation White Balance Photo Effect Compression Resolution ISO Speed A200 A100 Flash p 40 p 52 p 53 p 54 p 41 ...

Page 32: ...hot up close that appear in the viewfinder will not appear in the recorded image You are recommended to use the LCD monitor to shoot images up close Basic Functions Replay Mode Simple Display The following information is displayed for the Simple Display File no Image no Replay image no total Shooting date time Compression Resolution Movie Protection status Replay Mode Detailed Display The followin...

Page 33: ...hot up close that appear in the viewfinder will not appear in the recorded image You are recommended to use the LCD monitor to shoot images up close Basic Functions Replay Mode Simple Display The following information is displayed for the Simple Display File no Image no Replay image no total Shooting date time Compression Resolution Movie Protection status Replay Mode Detailed Display The followin...

Page 34: ...image is dis played in the LCD monitor Press the shutter button halfway again to stop displaying it You can erase the images while they are dis played p 65 Using the Digital Zoom When the LCD monitor is on you can digitally zoom in on a subject Images can be zoomed up to 4 times PowerShot A200 or 3 2 times PowerShot A100 Adjust Zoom Button The subject will be enlarged Button The subject will be re...

Page 35: ...image is dis played in the LCD monitor Press the shutter button halfway again to stop displaying it You can erase the images while they are dis played p 65 Using the Digital Zoom When the LCD monitor is on you can digitally zoom in on a subject Images can be zoomed up to 4 times PowerShot A200 or 3 2 times PowerShot A100 Adjust Zoom Button The subject will be enlarged Button The subject will be re...

Page 36: ...us shooting and replaying settings For information on menu items and settings see Menu Settings and Default Settings p 38 1 Press the MENU button The menu appears or mode modes 2 Press or button to select Rec Play or the Set up menu 3 Press or button to select a menu item 4 Rec menu Set up menu Press or button to select the settings you wish to set Play menu Set up menu Set the details after press...

Page 37: ...us shooting and replaying settings For information on menu items and settings see Menu Settings and Default Settings p 38 1 Press the MENU button The menu appears or mode modes 2 Press or button to select Rec Play or the Set up menu 3 Press or button to select a menu item 4 Rec menu Set up menu Press or button to select the settings you wish to set Play menu Set up menu Set the details after press...

Page 38: ...the menu and button operations except for Date Time and Lan guage can be restored all at once p 91 English Deutsch Français Nederlands Dansk Suomi Italiano Norsk Svenska Español Japanese or Chinese depending on the region Menu Settings and Default Settings This chart shows the options for each menu and the default settings Basic Functions Menu Items Available Settings Reference Pages Rec Menu Red ...

Page 39: ...the menu and button operations except for Date Time and Lan guage can be restored all at once p 91 English Deutsch Français Nederlands Dansk Suomi Italiano Norsk Svenska Español Japanese or Chinese depending on the region Menu Settings and Default Settings This chart shows the options for each menu and the default settings Basic Functions Menu Items Available Settings Reference Pages Rec Menu Red ...

Page 40: ... 320 240 pixels 160 120 pixels Superfine Fine Normal Compression Resolution Resolution Shooting Selecting the Shooting Mode The following modes are available with this camera Manual Auto Stitch Assist Movie The camera automatically makes most of the settings for you You can manually adjust the exposure white balance and other settings before shooting For shooting panorama composition images For sh...

Page 41: ... 320 240 pixels 160 120 pixels Superfine Fine Normal Compression Resolution Resolution Shooting Selecting the Shooting Mode The following modes are available with this camera Manual Auto Stitch Assist Movie The camera automatically makes most of the settings for you You can manually adjust the exposure white balance and other settings before shooting For shooting panorama composition images For sh...

Page 42: ...lighting The red eye reduction lamp fires with each shot Use of a tripod is recommended 1 Press the button as necessary to select the desired flash mode Available Available only for the first image 2 Shoot the image The flash will be fired when the indicator glows orange Shooting 1 In the Rec Menu select Reso lution or Compression See Selecting Menus and Settings p 36 Resolution e g PowerShot A100...

Page 43: ...lighting The red eye reduction lamp fires with each shot Use of a tripod is recommended 1 Press the button as necessary to select the desired flash mode Available Available only for the first image 2 Shoot the image The flash will be fired when the indicator glows orange Shooting 1 In the Rec Menu select Reso lution or Compression See Selecting Menus and Settings p 36 Resolution e g PowerShot A100...

Page 44: ...hese conditions Shooting in Mode Be careful to hold the camera still to avoid cam era Shake Shooting in or Mode Fix the camera to a tripod since the shutter speed will be slower than in the mode If an image is dark in mode reshooting in mode will make it brighter The flash may take approximately 20 seconds to charge The LCD monitor if it is on will go off after the indicator flashes orange while r...

Page 45: ...hese conditions Shooting in Mode Be careful to hold the camera still to avoid cam era Shake Shooting in or Mode Fix the camera to a tripod since the shutter speed will be slower than in the mode If an image is dark in mode reshooting in mode will make it brighter The flash may take approximately 20 seconds to charge The LCD monitor if it is on will go off after the indicator flashes orange while r...

Page 46: ...rlap Do not try to stitch images that include both distant and close items Objects may appear warped or doubled up Shooting Continuous Mode The camera will shoot continuously when the shutter button is pressed The shooting speed is as follows PowerShot A200 approx 2 images per second PowerShot A100 approx 3 images per second Large Fine LCD monitor off mode These figures reflect standard Canon test...

Page 47: ...rlap Do not try to stitch images that include both distant and close items Objects may appear warped or doubled up Shooting Continuous Mode The camera will shoot continuously when the shutter button is pressed The shooting speed is as follows PowerShot A200 approx 2 images per second PowerShot A100 approx 3 images per second Large Fine LCD monitor off mode These figures reflect standard Canon test...

Page 48: ... of individual movie clips A200 approx 20 frames second A100 approx 15 frames second PowerShot A200 approx 9 seconds PowerShot A100 approx 14 seconds PowerShot A200 approx 26 seconds PowerShot A100 approx 30 seconds based on standard conditions established by Canon These items may change depending on the subject or landscape conditions Shooting Make the brightness in each image consis tent The fin...

Page 49: ... of individual movie clips A200 approx 20 frames second A100 approx 15 frames second PowerShot A200 approx 9 seconds PowerShot A100 approx 14 seconds PowerShot A200 approx 26 seconds PowerShot A100 approx 30 seconds based on standard conditions established by Canon These items may change depending on the subject or landscape conditions Shooting Make the brightness in each image consis tent The fin...

Page 50: ...want it Shooting Using the Focus Lock The following types of subject may not be suited to autofocus photography Use the focus lock in these situations Subjects with extremely low contrast to the surroundings Subjects with extremely bright objects at the center of the composition Subjects that are moving quickly Subjects through glass Try to shoot as close to the glass as possible to reduce the cha...

Page 51: ...want it Shooting Using the Focus Lock The following types of subject may not be suited to autofocus photography Use the focus lock in these situations Subjects with extremely low contrast to the surroundings Subjects with extremely bright objects at the center of the composition Subjects that are moving quickly Subjects through glass Try to shoot as close to the glass as possible to reduce the cha...

Page 52: ...n to select white balance If the LCD monitor is on you can check the results by viewing the image on the LCD monitor A shot can be taken immediately by pressing the shutter button The menu will reappear after the shot allowing you to adjust the setting 3 Press the SET button The white balance cannot be set when sepia or B W photo effect is selected Shooting Adjusting the Exposure You can check the...

Page 53: ...n to select white balance If the LCD monitor is on you can check the results by viewing the image on the LCD monitor A shot can be taken immediately by pressing the shutter button The menu will reappear after the shot allowing you to adjust the setting 3 Press the SET button The white balance cannot be set when sepia or B W photo effect is selected Shooting Adjusting the Exposure You can check the...

Page 54: ... Modes An image can be recorded in a different Photo Effect Mode Vivid Off Neutral Low Sharpening Sepia B W Records normally with this setting Emphasizes the contrast and color saturation to record in bold colors Tones down the contrast and color saturation to record neutral hues Records subjects with softened outlines Records images in sepia tones Records images in black and white 1 Press the but...

Page 55: ... Modes An image can be recorded in a different Photo Effect Mode Vivid Off Neutral Low Sharpening Sepia B W Records normally with this setting Emphasizes the contrast and color saturation to record in bold colors Tones down the contrast and color saturation to record neutral hues Records subjects with softened outlines Records images in sepia tones Records images in black and white 1 Press the but...

Page 56: ...bers the last file number and starts numbering from the next number when you insert a new CF card On 1 In the Rec menu select File No Reset See Selecting Menus and Settings p 36 2 Press or button to select On or Off and press the MENU button The Off setting helps ensure that file num bers remain unique over multiple CF cards This is useful if you are planning to down load images from the cards to ...

Page 57: ...bers the last file number and starts numbering from the next number when you insert a new CF card On 1 In the Rec menu select File No Reset See Selecting Menus and Settings p 36 2 Press or button to select On or Off and press the MENU button The Off setting helps ensure that file num bers remain unique over multiple CF cards This is useful if you are planning to down load images from the cards to ...

Page 58: ...is feature to view recorded images one at a time on the LCD monitor Single Image Replay 1 Press the button The last image shot is displayed 2 Press or button to switch the displayed image Hold down or button to display images continuously Magnifying Images 1 Press the button during single replay The image enlarges gradually by up to 10 times Approximate Location of the Magnified Area When you hold...

Page 59: ...is feature to view recorded images one at a time on the LCD monitor Single Image Replay 1 Press the button The last image shot is displayed 2 Press or button to switch the displayed image Hold down or button to display images continuously Magnifying Images 1 Press the button during single replay The image enlarges gradually by up to 10 times Approximate Location of the Magnified Area When you hold...

Page 60: ...eplayed When a movie has finished replaying it will display the last frame Pressing the SET button again in this state will start replay ing from the first frame Replaying Viewing Images in Sets of 9 Changing the Displayed Images 1 Press the button while the index is being replayed 2 Press or button to change the image Hold the SET button and press the or button to jump to the first or last image ...

Page 61: ...eplayed When a movie has finished replaying it will display the last frame Pressing the SET button again in this state will start replay ing from the first frame Replaying Viewing Images in Sets of 9 Changing the Displayed Images 1 Press the button while the index is being replayed 2 Press or button to change the image Hold the SET button and press the or button to jump to the first or last image ...

Page 62: ... MENU button The display interval may vary for some im ages Movie images play for the length of time that they were recorded The power save function is disabled during Auto Play p 27 Replaying Rotating Images in the Display You can rotate an image by 90 or 270 clockwise in the LCD monitor 0 Original 90 270 1 In the Play Menu select Ro tate and press the SET button See Selecting Menus and Settings ...

Page 63: ... MENU button The display interval may vary for some im ages Movie images play for the length of time that they were recorded The power save function is disabled during Auto Play p 27 Replaying Rotating Images in the Display You can rotate an image by 90 or 270 clockwise in the LCD monitor 0 Original 90 270 1 In the Play Menu select Ro tate and press the SET button See Selecting Menus and Settings ...

Page 64: ...the images Remember that erased images cannot be recovered Be careful to avoid accidental erasures This function will not erase protected images p 64 Use the protect feature to protect important im ages from accidental erasure 1 In the Play Menu select Pro tect and press the SET button See Selecting Menus and Settings p 36 2 Press or button to select the image you want to protect and press the SET...

Page 65: ...the images Remember that erased images cannot be recovered Be careful to avoid accidental erasures This function will not erase protected images p 64 Use the protect feature to protect important im ages from accidental erasure 1 In the Play Menu select Pro tect and press the SET button See Selecting Menus and Settings p 36 2 Press or button to select the image you want to protect and press the SET...

Page 66: ...esn t work properly turn the camera off and re insert the CF card Then turn the camera back on and format again Erasing Printing Photo lab Printed images DPOF Print Settings DPOF Transfer Settings The supplied DPOF compliant software is needed for actually transferring the images Select the image you want to print p 76 Select how many copies you want p 76 Select the print style p 78 Select the ima...

Page 67: ...esn t work properly turn the camera off and re insert the CF card Then turn the camera back on and format again Erasing Printing Photo lab Printed images DPOF Print Settings DPOF Transfer Settings The supplied DPOF compliant software is needed for actually transferring the images Select the image you want to print p 76 Select how many copies you want p 76 Select the print style p 78 Select the ima...

Page 68: ...Please see your printer s user guide for instructions on loading paper and install ing an ink cassette 1 Turn off the Camera 2 Attach the power cable to the printer and plug the other end into power supply Or install the printer s rechargeable battery Depending on the type of printer you have it may or may not use rechargeable batter ies Refer to your printer s user guide Printing Selecting from t...

Page 69: ...Please see your printer s user guide for instructions on loading paper and install ing an ink cassette 1 Turn off the Camera 2 Attach the power cable to the printer and plug the other end into power supply Or install the printer s rechargeable battery Depending on the type of printer you have it may or may not use rechargeable batter ies Refer to your printer s user guide Printing Selecting from t...

Page 70: ...t the number of prints the print style p 72 and printing area p 74 settings as required 3 Select Print and press the SET button The image will start to print and when it is com pletely finished the display will revert to the replay screen Printing 3 Connect the camera and printer using the direct interface cable When you insert the cable make sure the mark of the cable faces the front of the camer...

Page 71: ...t the number of prints the print style p 72 and printing area p 74 settings as required 3 Select Print and press the SET button The image will start to print and when it is com pletely finished the display will revert to the replay screen Printing 3 Connect the camera and printer using the direct interface cable When you insert the cable make sure the mark of the cable faces the front of the camer...

Page 72: ...ttings while a printer is connected Setting the Number of Copies 1 While displaying the image press the SET button and press or button to select copies 2 Set the number of copies with or button You can set from 1 to 99 prints Setting the Print Style You can set the following print styles Prints one image per page Prints eight copies of the same image on one page Prints right to the edge of the pag...

Page 73: ...ttings while a printer is connected Setting the Number of Copies 1 While displaying the image press the SET button and press or button to select copies 2 Set the number of copies with or button You can set from 1 to 99 prints Setting the Print Style You can set the following print styles Prints one image per page Prints eight copies of the same image on one page Prints right to the edge of the pag...

Page 74: ...er portion of the re corded image is printed at an enlarged size As a result the top bottom and sides may be cropped slightly The area of the image that will be printed will appear lighter than the rest of the image allowing you to check the portion to be cropped Print Area Frame Date and borders cannot be set when Multiple is selected The image will be printed with the Date set to Off and the Bor...

Page 75: ...er portion of the re corded image is printed at an enlarged size As a result the top bottom and sides may be cropped slightly The area of the image that will be printed will appear lighter than the rest of the image allowing you to check the portion to be cropped Print Area Frame Date and borders cannot be set when Multiple is selected The image will be printed with the Date set to Off and the Bor...

Page 76: ...by any print marks set by your camera The output of some digital printers or photo lab services may not reflect the specified print settings Movies cannot be printed Printing DPOF Print Settings On your CF card select which image or images you want to print and how many copies you want This is convenient for printing images all at once on optional Canon direct print function compliant printers or ...

Page 77: ...by any print marks set by your camera The output of some digital printers or photo lab services may not reflect the specified print settings Movies cannot be printed Printing DPOF Print Settings On your CF card select which image or images you want to print and how many copies you want This is convenient for printing images all at once on optional Canon direct print function compliant printers or ...

Page 78: ...el the reset Printing Images are printed in order from oldest to newest by the shooting date A maximum of 998 images can be set per CF card The number of copies cannot be set when the Print Type is set to Index Only one copy can be set at Index Print settings can also be assigned to im ages with the bundled software programs on a computer Setting the Print Style You can set up the print style as f...

Page 79: ...set has been deleted before restarting If there was very little free space on the CF card when the printing was cancelled If these circumstances apply you can select OK in the print screen and reprint starting from the first image If printing was cancelled because the camera batteries became discharged please power the camera with a household power source or change to fully charged AA size NiMH or...

Page 80: ...set has been deleted before restarting If there was very little free space on the CF card when the printing was cancelled If these circumstances apply you can select OK in the print screen and reprint starting from the first image If printing was cancelled because the camera batteries became discharged please power the camera with a household power source or change to fully charged AA size NiMH or...

Page 81: ...set has been deleted before restarting If there was very little free space on the CF card when the printing was cancelled If these circumstances apply you can select OK in the print screen and reprint starting from the first image If printing was cancelled because the camera batteries became discharged please power the camera with a household power source or change to fully charged AA size NiMH or...

Page 82: ... be marked per CF card Transfer settings can also be assigned to images with the supplied software programs on a computer Image Transfer Settings DPOF Transfer Order Setting the Image Transfer Using the camera you can specify images you wish to transfer and attach to e mails Please use the supplied software for actually transfer ring images These settings are compatible with the Digital Print Orde...

Page 83: ... be marked per CF card Transfer settings can also be assigned to images with the supplied software programs on a computer Image Transfer Settings DPOF Transfer Order Setting the Image Transfer Using the camera you can specify images you wish to transfer and attach to e mails Please use the supplied software for actually transfer ring images These settings are compatible with the Digital Print Orde...

Page 84: ... 2 Downloading Images to a Computer Downloading Directly from a CF Card 1 Eject the CF card from the camera and insert it into a CF card reader If you are using a PC card reader first in sert the CF card into a PC card adapter optional and then insert it into the computer s PC card reader 2 Double click the icon of the drive connected with the CF card to open the drive 3 Copy images from the card ...

Page 85: ... 2 Downloading Images to a Computer Downloading Directly from a CF Card 1 Eject the CF card from the camera and insert it into a CF card reader If you are using a PC card reader first in sert the CF card into a PC card adapter optional and then insert it into the computer s PC card reader 2 Double click the icon of the drive connected with the CF card to open the drive 3 Copy images from the card ...

Page 86: ...do not take any action within the next minute the camera turns off You can turn the camera back on by pressing the button For more information about what to do after con necting your camera please refer the Software Starter Guide Downloading Images to a Computer Item Menu Screen Setting Content Item Menu Screen Setting Content Superfine Fine Normal Resolution Still images Compression Resolution Mo...

Page 87: ...do not take any action within the next minute the camera turns off You can turn the camera back on by pressing the button For more information about what to do after con necting your camera please refer the Software Starter Guide Downloading Images to a Computer Item Menu Screen Setting Content Item Menu Screen Setting Content Superfine Fine Normal Resolution Still images Compression Resolution Mo...

Page 88: ...5 Sets the images that will be transferred with your e mail software p 82 Default settings List of Menu Options and Messages Item Menu Screen Setting Content Item Menu Screen Setting Content AiAF Digital Zoom Review AF assist Beam Sets the duration images display on the LCD moni tor after the shutter button is released p 35 Off 3 sec 10 sec Sets the AiAF to on the camera automatically selects the ...

Page 89: ...5 Sets the images that will be transferred with your e mail software p 82 Default settings List of Menu Options and Messages Item Menu Screen Setting Content Item Menu Screen Setting Content AiAF Digital Zoom Review AF assist Beam Sets the duration images display on the LCD moni tor after the shutter button is released p 35 Off 3 sec 10 sec Sets the AiAF to on the camera automatically selects the ...

Page 90: ...sages Set up Menu Item Menu Screen Setting Content Item Menu Screen Setting Content Beep Auto Power Down Date Time Format Language Sets whether or not the beep sounds when the shutter button is pressed or when a menu operation is performed p 34 On Off Still beeps to warn of an error even when set to Off Sets whether or not the camera automatically powers down after a specified period of time elaps...

Page 91: ...sages Set up Menu Item Menu Screen Setting Content Item Menu Screen Setting Content Beep Auto Power Down Date Time Format Language Sets whether or not the beep sounds when the shutter button is pressed or when a menu operation is performed p 34 On Off Still beeps to warn of an error even when set to Off Sets whether or not the camera automatically powers down after a specified period of time elaps...

Page 92: ...ake the camera to a Customer Support Help Desk If this message appears immediately after you have taken a shot the camera may not have shot the image Switch to the Replay mode and check whether the image was actually recorded List of Menu Options and Messages List of Messages The following table explains each of the messages that may appear on the LCD monitor Busy The camera is recording image dat...

Page 93: ...ake the camera to a Customer Support Help Desk If this message appears immediately after you have taken a shot the camera may not have shot the image Switch to the Replay mode and check whether the image was actually recorded List of Menu Options and Messages List of Messages The following table explains each of the messages that may appear on the LCD monitor Busy The camera is recording image dat...

Page 94: ...ower Communication Error A communication error has occurred Cannot Print You attempted to print an image shot by a different camera or in an incompatible format or downloaded to and edited on a computer Could not print xx images You attempted to print xx number of images with DPOF settings that were shot by a different camera or in an incompatible format or downloaded to and edited on a computer A...

Page 95: ...ower Communication Error A communication error has occurred Cannot Print You attempted to print an image shot by a different camera or in an incompatible format or downloaded to and edited on a computer Could not print xx images You attempted to print xx number of images with DPOF settings that were shot by a different camera or in an incompatible format or downloaded to and edited on a computer A...

Page 96: ...m You may not be able to fully charge the batter ies due to their specifications right after pur chase or after long periods of non use If this happens use the batteries until their charge is depleted before charging them again After do ing this several times battery performance will be restored If battery usage time is considerably low de spite their terminals being wiped and the bat tery charger...

Page 97: ...m You may not be able to fully charge the batter ies due to their specifications right after pur chase or after long periods of non use If this happens use the batteries until their charge is depleted before charging them again After do ing this several times battery performance will be restored If battery usage time is considerably low de spite their terminals being wiped and the bat tery charger...

Page 98: ...outlet when you have finished using the camera Please do not attempt to use any AC adapter other than AC Adapter Kit ACK800 with your camera Use of a different adapter may result in damage to the camera or to the adapter kit Leaving batteries in the camera or charger may damage it causing battery leakage Remove batteries from the camera or charger and store in a dry cool location when not in use I...

Page 99: ...outlet when you have finished using the camera Please do not attempt to use any AC adapter other than AC Adapter Kit ACK800 with your camera Use of a different adapter may result in damage to the camera or to the adapter kit Leaving batteries in the camera or charger may damage it causing battery leakage Remove batteries from the camera or charger and store in a dry cool location when not in use I...

Page 100: ...intenance Clean the camera by using the following methods when the camera lens viewfinder LCD monitor or other surfaces become dirty Camera Body Lens Viewfinder LCD Monitor Wipe the camera body with a soft cloth or eyeglass lens wiper Clean dust and dirt off the lens with a commercially available lens blower brush then wipe lightly with a soft cloth Never wipe the camera or lens with cleaners that...

Page 101: ...intenance Clean the camera by using the following methods when the camera lens viewfinder LCD monitor or other surfaces become dirty Camera Body Lens Viewfinder LCD Monitor Wipe the camera body with a soft cloth or eyeglass lens wiper Clean dust and dirt off the lens with a commercially available lens blower brush then wipe lightly with a soft cloth Never wipe the camera or lens with cleaners that...

Page 102: ...ry clean cloth Be sure to set batteries firmly into the charger Be sure that the power cable is firmly connected to the charger and is firmly plugged in to the electrical outlet Wipe them well with a dry cloth before charging Replace both batteries with new ones Cause Solution Problem Camera is in replaying mode The flash is charging The CF card is full The CF card is not formatted correctly Batte...

Page 103: ...ry clean cloth Be sure to set batteries firmly into the charger Be sure that the power cable is firmly connected to the charger and is firmly plugged in to the electrical outlet Wipe them well with a dry cloth before charging Replace both batteries with new ones Cause Solution Problem Camera is in replaying mode The flash is charging The CF card is full The CF card is not formatted correctly Batte...

Page 104: ...Cause Solution Problem The camera was moving when you took the shot Autofocus function hampered by obstruction to AF assist beam The AF assist beam settings are set to Off The subject was outside the range over which the camera can focus Insufficient light for shooting The subject is darker than the surroundings Shots are blurry or unfocused The subject comes out underexposed too dark Hold the cam...

Page 105: ...Cause Solution Problem The camera was moving when you took the shot Autofocus function hampered by obstruction to AF assist beam The AF assist beam settings are set to Off The subject was outside the range over which the camera can focus Insufficient light for shooting The subject is darker than the surroundings Shots are blurry or unfocused The subject comes out underexposed too dark Hold the cam...

Page 106: ...r off Approx 3 images sec Large fine mode LCD monitor off Available USB connection only Exclusive software program RemoteCapture is included in the camera kit PC Connected Shooting Specifications Specifications All data is based on Canon s standard testing methods Subject to change without notice PowerShot A200 PowerShot A100 Camera Effective Pixels Image Sensor Lens Digital Zoom Optical Viewfinde...

Page 107: ...r off Approx 3 images sec Large fine mode LCD monitor off Available USB connection only Exclusive software program RemoteCapture is included in the camera kit PC Connected Shooting Specifications Specifications All data is based on Canon s standard testing methods Subject to change without notice PowerShot A200 PowerShot A100 Camera Effective Pixels Image Sensor Lens Digital Zoom Optical Viewfinde...

Page 108: ...1024 768 pixels Small 640 480 pixels Large 1600 1200 pixels Medium 1024 768 pixels Small 640 480 pixels 320 240 pixels Approx 14 sec 160 120 pixels Approx 30 sec Approx 15 frames sec The data in parentheses refer to the maximum movie length per shooting 320 240 pixels Approx 9 sec 160 120 pixels Approx 26 sec Approx 20 frames sec The data in parentheses refer to the maximum movie length per shooti...

Page 109: ...1024 768 pixels Small 640 480 pixels Large 1600 1200 pixels Medium 1024 768 pixels Small 640 480 pixels 320 240 pixels Approx 14 sec 160 120 pixels Approx 30 sec Approx 15 frames sec The data in parentheses refer to the maximum movie length per shooting 320 240 pixels Approx 9 sec 160 120 pixels Approx 26 sec Approx 20 frames sec The data in parentheses refer to the maximum movie length per shooti...

Page 110: ...20 x 240 pixels 160 x 120 pixels 1024 x 768 pixels 1600 x 1200 pixels PowerShot A200 1280 x 960 pixels PowerShot A100 The shooting time for 1 movie PowerShot A200 approx 9 seconds PowerShot A100 approx 14 seconds PowerShot A200 approx 26 seconds PowerShot A100 approx 30 seconds The figures in the table reflect recording times for repeated shooting PowerShot A200 Movie PowerShot A100 Specifications...

Page 111: ...20 x 240 pixels 160 x 120 pixels 1024 x 768 pixels 1600 x 1200 pixels PowerShot A200 1280 x 960 pixels PowerShot A100 The shooting time for 1 movie PowerShot A200 approx 9 seconds PowerShot A100 approx 14 seconds PowerShot A200 approx 26 seconds PowerShot A100 approx 30 seconds The figures in the table reflect recording times for repeated shooting PowerShot A200 Movie PowerShot A100 Specifications...

Page 112: ...nput 100 240 V AC 50 60 Hz 8W Rated Output 1 6 V DC 2 A Charging Time Approx 110 minutes for two batter ies 220 minutes for four batteries Operating Temperature 0 35 C 32 95 F Dimensions 113 74 27 5 mm 4 4 2 9 1 1 in Weight Approx 100 g 3 5 oz body Compact Power Adapter CA PS800 Supplied with the optional AC Adapter Kit ACK800 Rated Input 100 240 V AC 50 60 Hz 16VA 100V 26VA 240V Rated Output 3 15...

Page 113: ...F Card Slot Battery Cover 5 CF Cards and Estimated Capacities 110 Formatting 66 Installing 19 Compression 41 Continuous Mode 46 D Date 24 Default Settings 38 91 Digital Zoom 35 Downloading Images to a Computer Connecting the Camera to a Computer Via the USB Cable 85 Downloading Directly from a CF Card 84 Using a PC card reader 84 DPOF 76 82 E Erasing Erasing All Images 65 Erasing Images Individual...

Page 114: ... the Household Power Source 99 V Viewfinder 33 W White Balance 53 Index Functions 57 I Image Transfer Settings DPOF Transfer Order 82 Index View 60 Indicators 6 Infinity 45 ISO Speed 55 L Language 25 LCD Monitor Information Displayed 31 Using 29 M Macro 45 Magnifying Images 59 Menus 36 Movie Recording 49 Replay 61 P Photo Effect 54 Play Menu 89 Power Save Function 27 Pressing Fully 34 Pressing Hal...

Page 115: ... the Household Power Source 99 V Viewfinder 33 W White Balance 53 Index Functions 57 I Image Transfer Settings DPOF Transfer Order 82 Index View 60 Indicators 6 Infinity 45 ISO Speed 55 L Language 25 LCD Monitor Information Displayed 31 Using 29 M Macro 45 Magnifying Images 59 Menus 36 Movie Recording 49 Replay 61 P Photo Effect 54 Play Menu 89 Power Save Function 27 Pressing Fully 34 Pressing Hal...

Page 116: ...ue to a mistaken opera tion or malfunction of the camera the software the CompactFlashTM cards CF cards personal comput ers peripheral devices or use of non Canon CF cards Trademark Acknowledgments Canon and PowerShot are trademarks of Canon Inc CompactFlash is trademark of SanDisk Corporation iBook and iMac are trademarks of Apple Computer Inc Macintosh PowerBook Power Macintosh and QuickTime are...

Page 117: ...ue to a mistaken opera tion or malfunction of the camera the software the CompactFlashTM cards CF cards personal comput ers peripheral devices or use of non Canon CF cards Trademark Acknowledgments Canon and PowerShot are trademarks of Canon Inc CompactFlash is trademark of SanDisk Corporation iBook and iMac are trademarks of Apple Computer Inc Macintosh PowerBook Power Macintosh and QuickTime are...

Page 118: ...119 118 MEMO ...

Page 119: ...119 118 MEMO ...

Page 120: ...tion p 11 Please refer to the Software Starter Guide for information on installing the software and downloading images Please read the Quick Start section on the following page for a simple explanation of shooting replaying and erasing Please also read the Printer User Guide included with your Canon printer ENGLISH 2002 CANON INC ...

Reviews: