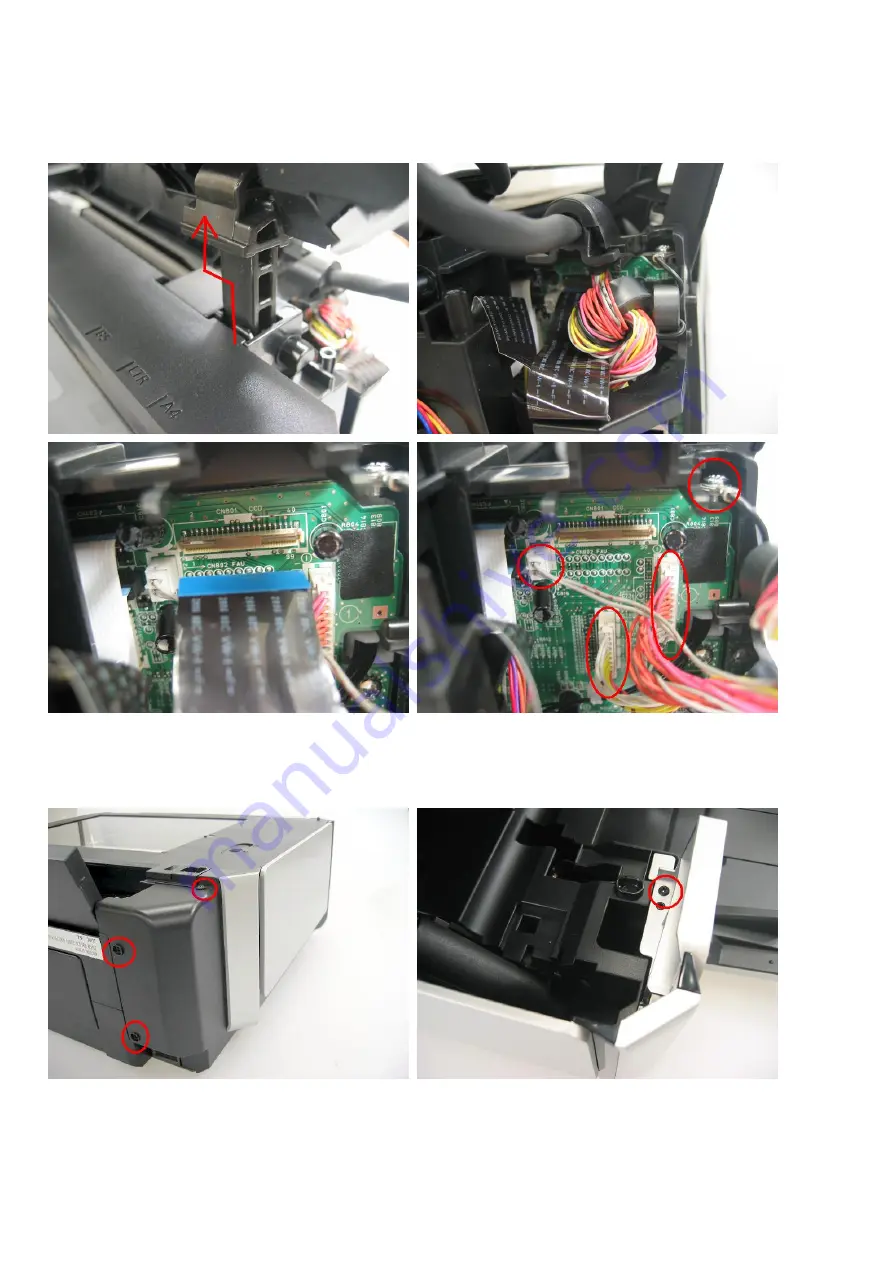
3) Remove the document cover (document pressure plate unit).
<While slightly pushing the left and right hinges toward the center, pull the cover upward to remove it. The cover
will not be removed just by pulling it.>
<Remove the scanner unit FFC>
<Disconnect the 3 connectors and the ground wire of the operation panel harness (fastened to the chassis).>
4) Remove the side cover L (4 screws).
<The side cover L holds the scanner unit hinge.>
<Since the pressure from the scanner lock arm spring is in the upward direction, hold the scanner unit while
removing the side cover.>
18 / 45
Summary of Contents for PIXMA MP970
Page 30: ...28 45 ...
Page 40: ...Left margin correction flowchart 38 45 ...
Page 41: ...39 45 ...
Page 46: ... 2 Ink absorber counter value print Print sample 3 4 Verification Items 44 45 ...
Page 55: ...B PARTS LAYOUT PARTS LIST FIGURE 1 PACKING CONTENTS PRINT HEAD B 1 ...
Page 57: ...FIGURE 2 AC ADAPTER B 3 ...
Page 59: ...FIGURE 3 EXTERNAL COVERS SCANNER UNIT B 5 ...
Page 61: ...FIGURE 4 DOCUMENT PRESSURE PLATE UNIT B 7 ...
Page 63: ...FIGURE 5 OPRATION PANEL UNIT B 9 ...
Page 65: ...FIGURE 6 MAIN CASE UNIT FRONT DOOR UNIT B 11 ...
Page 67: ...FIGURE 7 CARD BOARD ASS Y IrDA BOARD ASS Y B 13 ...
Page 69: ...FIGURE 8 LOGIC BOARD ASS Y B 15 ...
Page 71: ...FIGURE 9 BOTTOM CASE UNIT INK ABSORBER KIT B 17 ...
Page 73: ...FIGURE 10 SHEET FEEDER UNIT B 19 ...
Page 75: ...FIGURE 11 CARRIAGE UNIT B 21 ...
Page 77: ...FIGURE 12 PLATEN UNIT B 23 ...
Page 79: ...FIGURE 13 PURGE UNIT B 25 ...
Page 81: ...FIGURE 14 PAPER FEED CARRIAGE LIFT PART B 27 ...
Page 83: ...C OPTION CONSUMABLES FIGURE 15 OPTION CONSUMABLES C 1 ...
Page 86: ...E TOOL FIGURE 16 TOOL E 1 ...


