Canon PIXMA MP810 Service Manual Download Page 7

(2) Periodic maintenance 

No periodic maintenance is necessary. 


(3) Periodic replacement parts 

There are no parts in this machine that require periodic replacement by a service engineer. 


(4) Replacement consumables 

There are no consumables that require replacement by a service engineer. 


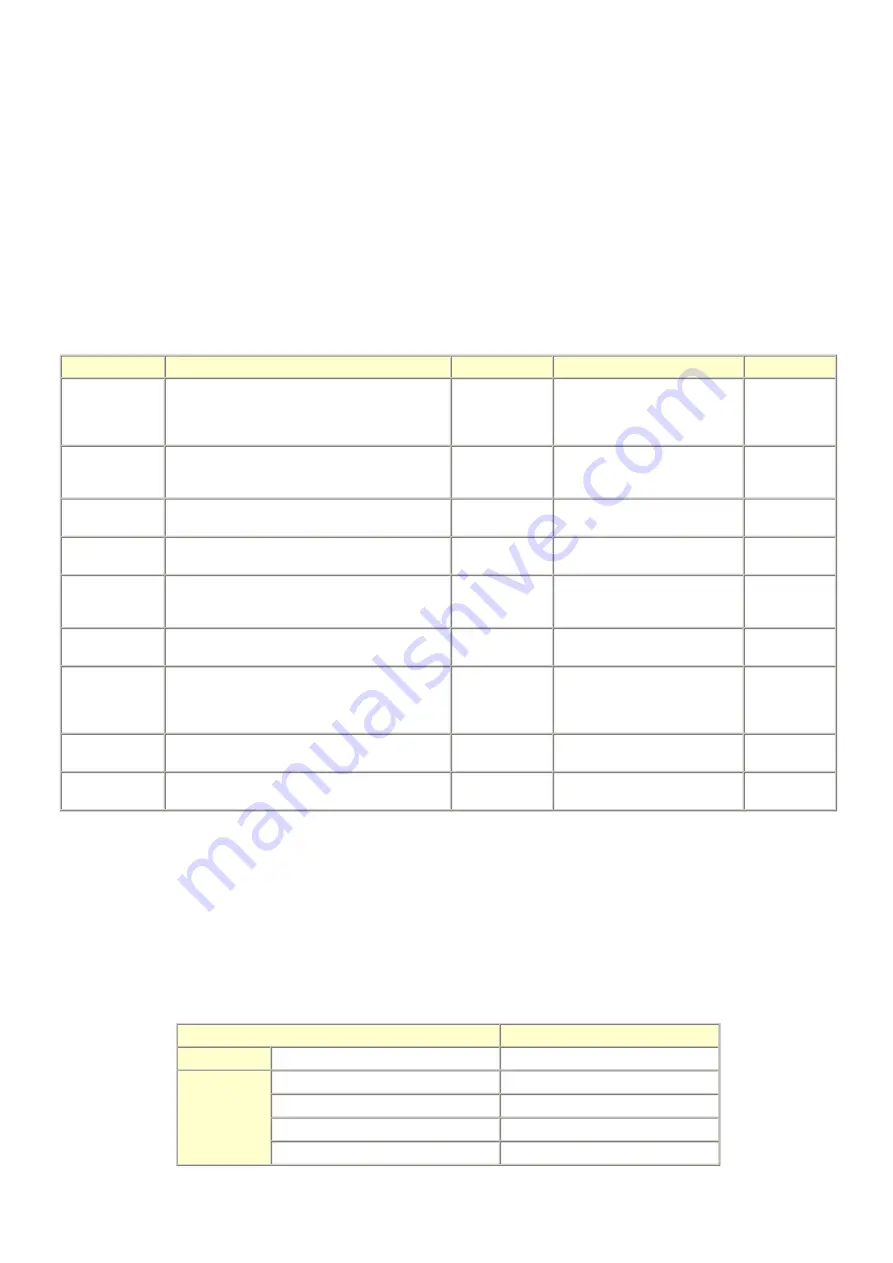
1-2.  Customer Maintenance 


1-3.  Product Life 

(1)  Machine 

Specified print volume (I) or the years of use (II), whichever comes first. 

(I) Print volume:  24,000 pages 

(II) Years of use: 5 years of use 


Adjustment

Timing

Purpose

Tool

Approx. time

Automatic print 
head alignment

- At print head replacement 
- When print quality is not satisfying (uneven printing, 
etc.) 

To ensure accurate 
dot placement.

- Machine buttons 
- Matte Photo Paper (MP-101) for the 
MP810 
- Computer (MP driver)

MP810: 13 min. 
(Use MP-101.) 
MP960: 6 min.

Manual print head 
alignment

- At print head replacement 
- When print quality is not satisfying (uneven printing, 
etc.) 

To ensure accurate 
dot placement.

- Machine buttons 
- Computer (MP driver)

MP810: 15 min.
MP960: 6 min.

Print head cleaning

When print quality is not satisfying.

To improve nozzle 
conditions.

- Machine buttons 
- Computer (MP driver)

1 min.

Print head deep 
cleaning

When print quality is not satisfying, and not improved by 
print head cleaning.

To improve nozzle 
conditions.

- Machine buttons 
- Computer (MP driver)

2 min.

Ink tank 
replacement

When an ink tank becomes empty. ("No ink error" 
displayed on the monitor or on the machine LCD, or 
short flashing of an ink tank LED)

--- 

--- 

1 min.

ASF paper feed 
roller cleaning

- When paper does not feed properly. 
- When the front side of the paper is smeared. 

To clean the paper 
feed rollers.

- Machine buttons 
- Computer (MP driver)

2 min.

ASF sub- roller 
cleaning

When the paper fed from the ASF is smeared due to ink 
mist attached to the ASF sub-rollers.

To clean the ASF 
sub-rollers.

- Machine buttons 

See Part 2, 4. FAQ, How to make and 
set the ASF sub-roller cleaning sheet, 
for details.


1 min.

Bottom plate 
cleaning

When the back side of the paper is smeared.

To clean the platen 
ribs.

- Machine buttons 
- Computer (MP driver)

1 min.

Scanning area 
cleaning

When the platen glass or document pressure plate sheet is 
dirty.

To clean the platen 
glass.

Soft, dry, and clean lint-free cloth.

1 min.


MP810 / MP960 

Black

1500 character pattern

11,000 pages

Color

7.5% duty per color pattern

7,200 pages

A4, photo, borderless printing

500 pages

4 x 6, photo, borderless printing

4,300 pages

Postcard, photo, borderless printing

1,000 pages

1-2

Summary of Contents for PIXMA MP810

Page 1: ...yright 2006 Canon U S A This technical publication is the proprietary and confidential information of Canon U S A which shall be retained for reference purposes by Authorized Service Facilities of Canon U S A Its unauthorized use is prohibited ...

Page 2: ...MA MP810 MP960 Part 2 Technical Reference New technology and technical information such as FAQ s Frequently Asked Questions of the PIXMA MP810 MP960 Part 3 Appendix Block diagrams and pin layouts of the PIXMA MP810 MP960 PIXMA MP810 MP960 Reference This manual does not provide sufficient information for disassembly and reassembly procedures Refer to the graphics in the separate Parts Catalog I MAN...

Page 3: ...cover FAU removal 2 Operation panel removal 3 Cable wiring and connection 4 Scanner cable and FAU panel cable wiring 5 Carriage unit cable and DC cable wiring 6 Emblem removal 7 Printer unit separation from the bottom case how to remove the screw under the purge unit 3 3 Adjustment Settings 1 Paper feed motor adjustment 2 Document pressure plate sheet sponge sheet replacement 3 Grease application ...

Page 4: ... MP810 3 2 MP960 4 FAQ Problems Specific to the MP810 or MP960 and Corrective Actions Part 3 APPENDIX 1 BLOCK DIAGRAM 2 CONNECTOR LOCATION AND PIN LAYOUT 2 1 Logic Board 2 2 Carriage Board Print Head Connector 2 3 Memory Card Board 2 4 IrDA PictBridge Board 2 5 Operation Panel Board 3 PIXMA MP810 and MP960 SPECIFICATIONS 4 PRINT MEDIA SPECIFICATIONS II TABLE OF CONTENTS ...

Page 5: ...Part 1 MAINTENANCE PIXMA MP810 MP960 TABLE OF CONTENTS ...

Page 6: ...t When print quality is not satisfying To secure the dot placement accuracy None Perform in the user mode MP810 13 min Use MP 101 MP960 6 min Manual print head alignment At print head replacement At logic board replacement When print quality is not satisfying To secure the dot placement accuracy None Perform in the user mode MP810 15 min MP960 6 min Grease application At carriage unit replacement ...

Page 7: ...er 1 min Print head deep cleaning When print quality is not satisfying and not improved by print head cleaning To improve nozzle conditions Machine buttons Computer MP driver 2 min Ink tank replacement When an ink tank becomes empty No ink error displayed on the monitor or on the machine LCD or short flashing of an ink tank LED 1 min ASF paper feed roller cleaning When paper does not feed properly...

Page 8: ...lder visible on the right of the carriage after the machine is turned on the scanning unit is opened and the carriage stops at the ink tank replacement position Scanning unit right On the right side of the scanning unit visible on the right side when the scanning unit is opened Average yield Estimated supplemental yield PGI 5BK CLI 8BK CLI 8C CLI 8M CLI 8Y CLI 8PM CLI 8PC MP810 Color document ISO ...

Page 9: ...he paper and press OK Remove the jammed paper and press the OK button Paper jam in the rear guide 1303 Paper jam in the under guide 1304 Ink may have run out 1600 U041 The following ink may have run out Replacing the ink tank is recommended Replace the applicable ink tank or press the OK button to clear the error without ink tank replacement When the error is cleared by pressing the OK button ink ...

Page 10: ...longer to disable the function to detect the remaining ink amount After the operation it is recorded in the machine EEPROM that the function to detect the remaining ink amount was disabled Ink tank not recognized 1684 U140 The following ink tank cannot be recognized Applicable ink tank icon A non supported ink tank is installed the ink tank LED is turned off Install the supported ink tanks Ink tan...

Page 11: ... feed cam sensor error 6B10 An error occurred in the paper feed cam sensor during paper feeding from the front paper feed cassette Sheet feed unit Logic board 15 times USB Host VBUS overcurrent 9000 The USB Host VBUS is overloaded Logic board 16 times Pump roller sensor error 5C20 The pump roller position cannot be detected Purge unit Logic board 17 times Paper eject encoder error 6010 An error oc...

Page 12: ...s and half side layout together Check markings on handwriting sheet The selected layout on the handwriting sheet is not supported for Stickers A temporary error Press the OK button to clear the error The LCD returns to the display before the error occurrence Cannot print via wireless communication No photo data Unsupported photo data Photo data too large In infrared communication the received data...

Page 13: ...ed up soon prepare for a new ink tank Print head temperature rise If the print head temperature does not fall the print head error will occur When the print head temperature falls the error is automatically cleared If the print head error is indicated repair servicing is required Protection of excess rise of the print head temperature If the print head temperature does not fall the print head erro...

Page 14: ...rial Replace the carriage timing slit strip film or carriage unit Faulty scanning no scanning strange noise Confirm the connection between the scanning unit and the logic board Replace the scanning unit or logic board The FAU lamp does not turn on Confirm the connection between the scanning unit the FAU and the logic board Replace the scanning unit or logic board Unsatisfactory print quality No pr...

Page 15: ...on Clean grease or oil off the timing slit disk film or the timing slit disk eject film Replace the timing slit disk film timing slit disk eject film timing sensor unit LF roller platen unit or logic board Faulty scanning No scanning Confirm the connection between the scanning unit and the logic board Replace the scanning unit or logic board Streaks or smears on the scanned image Clean the platen ...

Page 16: ...ystem function See 3 3 Adjustment Settings 6 Service mode for details 3 Perform print head alignment in the user mode Service test print Confirm automatic print head alignment sensor correction and ink system function Paper feed motor The red screws securing the paper feed motor are allowed to be loosened only for paper feed motor replacement DO NOT loosen them in any other cases At replacement 1 ...

Page 17: ...amages Do not touch the timing slit strip film timing slit disk film and timing slit disk eject film No grease or abrasion is allowed Protect the units from soiled with ink Protect the housing from scratches For the MP810 automatic print head alignment use Matte Photo Paper MP 101 to ensure alignment accuracy Exercise caution with the screws as follows i The screws of the paper feed motor may be l...

Page 18: ...it and logic board from static electricity in repair servicing 1 External housing scanner unit and document cover FAU removal MP810 MP960 Part 1 MAINTENANCE TABLE OF CONTENTS 1 Remove the cassette MP810 MP960 2 Open the front door and scanner unit then remove the front cover R MP810 MP960 3 Remove the front cover L 1 13 ...

Page 19: ...MP810 MP960 4 Remove the side cover R 3 screws 1 on the front 2 on the rear MP810 MP960 MP810 1 14 ...

Page 20: ...MP960 5 Remove the side cover L 3 screws 1 on the front 2 on the rear MP810 MP960 MP810 MP960 1 15 ...

Reviews: