


Windows
Macintosh
9
10
11
อ่านหน้าจอ
สัญญาอนุญาต
(LicenseAgreement)
อย่างละเอียด
และคลิก
ใช่
(Yes)
ปฏิบัติตามคำแนะนำบนหน้าจอเพื่อดำเนินการติดตั้ง
ในระหว่างการติดตั้งให้ปฏิบัติตามขั้นตอนบนหน้าจอเพื่อติดตั้งซอฟต์แวร์
เมื่อหน้าจอ
ขอให้อนุญาตการดำเนินการตัวช่วยสร้างการติดตั้ง
ทั้งหมด
(PleaseAllowAllInstallWizardProcesses)
ปรากฏขึ้น
คลิก
ถัดไป
(Next)
บนหน้าจอ
วิธีการติดตั้ง(SetupMethod)
เลือก
เชื่อมต่อเครื่องพิมพ์
เข้ากับเครือข่ายเป็นครั้งแรก
(Connectprintertothenetworkforthe
firsttime)
แล้วคลิก
ถัดไป
(Next)
หากหน้าจอข้างบนไม่แสดงขึ้นคลิก
ยกเลิก
(Cancel)
และเริ่มต้นอีกครั้งจากขั้นที่
ตรวจสอบว่าเลือก
ใช้เครื่องพิมพ์บนเครือข่าย
(Usetheprinteronnetwork)
ในขั้นที่
•
사용계약서
(License Agreement)
화면을
자세히
읽고
예
(Yes)
를
클릭합니다
.
화면의
설명에
따라
설치를
계속합니다
.
설치하는
동안
화면의
설명에
따라
소프트웨어를
설치합니다
.
모든
설치
마법사
프로세스를
허용하십시오
(Please
Allow All Install Wizard Processes)
화면이
나타나면
다음
(Next)
을
클릭합니다
.
설치
방법
(Setup Method)
화면에서
처음으로
프린터를
네
트워크에
연결
(Connect printer to the network for the
first time)
을
선택한
다음
다음
(Next)
을
클릭합니다
.
위의
화면이
표시되지
않는
경우
,
취소
(Cancel)
를
클릭한
다음
단계
부터
다시
시작합니다
.
단계에서
네트워크
연결을
통해
프린터
사용
(Use the printer on network)
을
선택하도록
하십시오
.
•
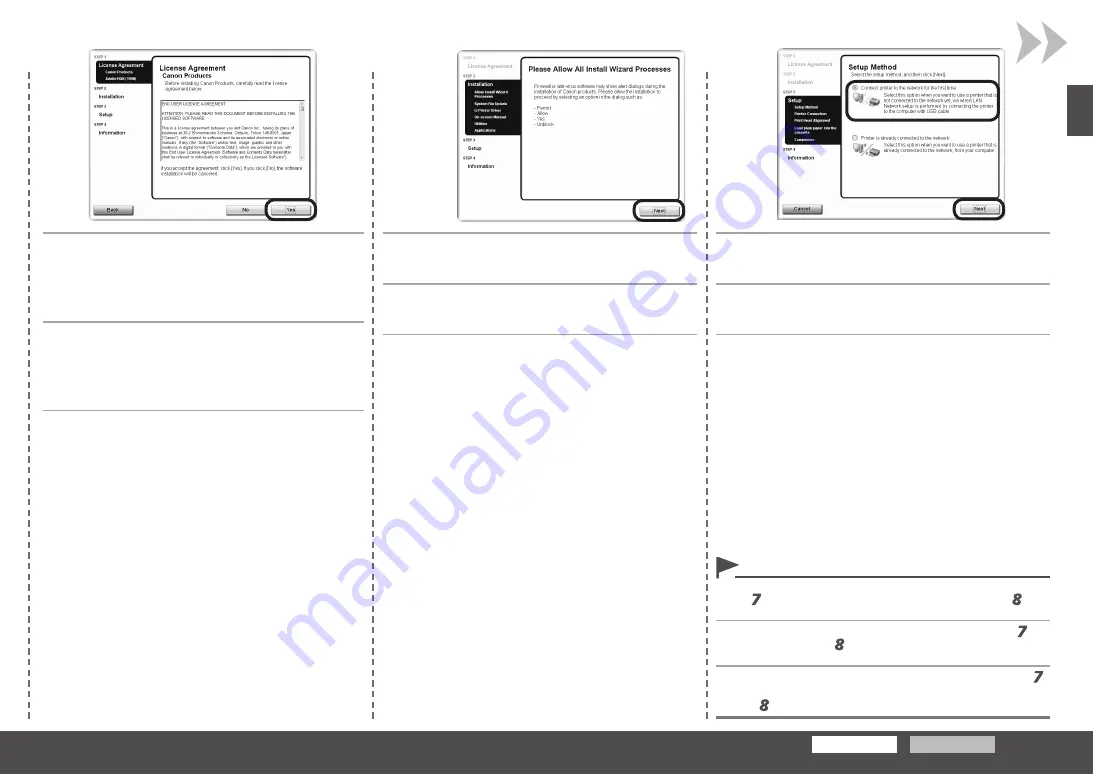
Read the
License Agreement
screen carefully and
click
Yes
.
Follow any on-screen instructions to proceed with the installation.
During installation, follow any on-screen instructions to install the
software.
When the
Please Allow All Install Wizard
Processes
screen appears, click
Next
.
On the
Setup Method
screen, select
Connect printer
to the network for the first time
, then click
Next
.
If the above screen is not displayed, click
Cancel
and start again from
step . Be sure to select
Use the printer on network
in step .
•


