background image

Printing Maintenance

53

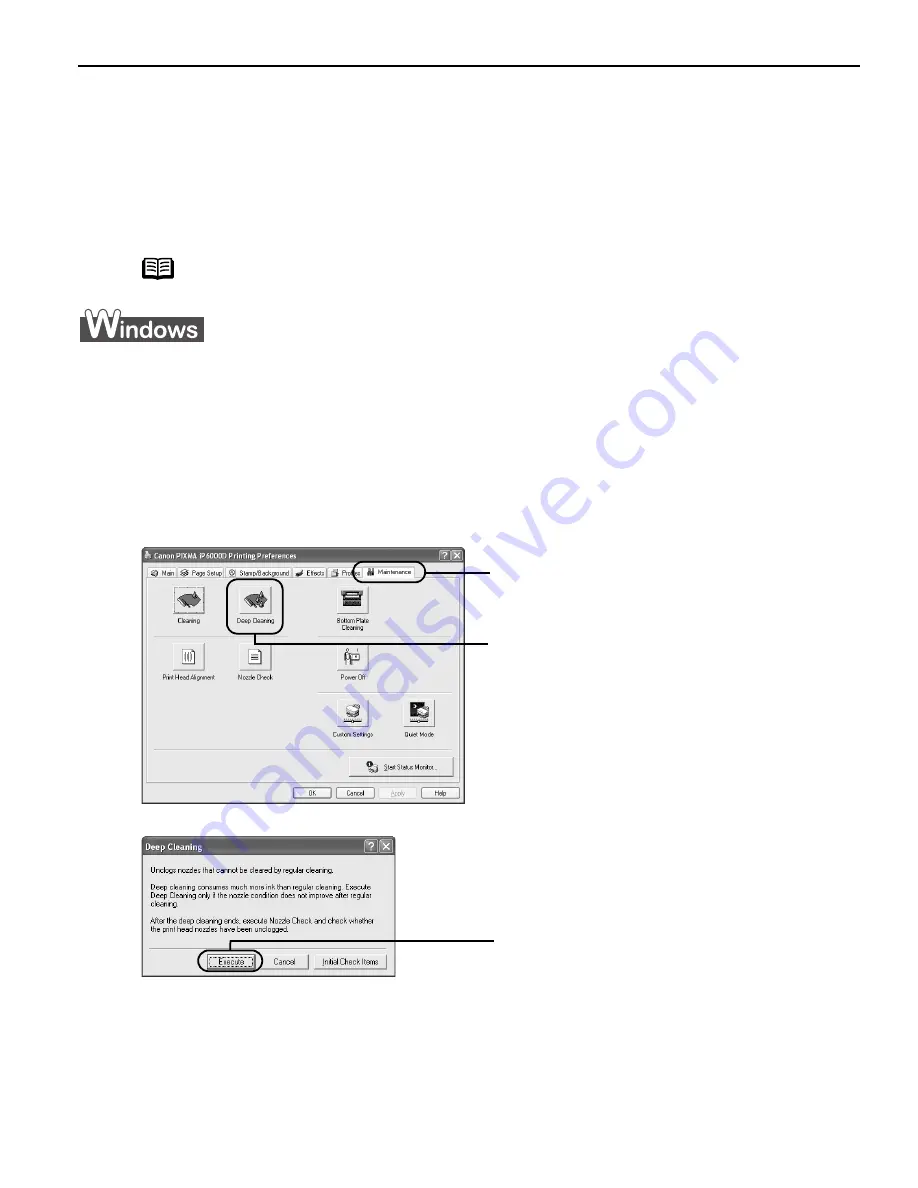
Print Head Deep Cleaning

If print quality does not improve by standard print head cleaning, try    the print head deep 
cleaning, which is a more powerful process. The print head deep cleaning consumes ink, so 
perform this procedure only when necessary.

1

Ensure that the printer is turned on.

2

Open the Printer Properties dialog box.

See “Opening the Printer Properties Dialog Box Directly from the Start Menu

Opening the Printer Properties Dialog Box Directly from the Start Menu

Opening the Printer Properties Dialog Box Directly from the Start Menu

Opening the Printer Properties Dialog Box Directly from the Start Menu” on 

page 21.

3

Start the print head deep cleaning.

Note

Ensure that the inner cover is closed.

(1)

Click the Maintenance

Maintenance

Maintenance

Maintenance tab.

(2)

Click Deep Cleaning

Deep Cleaning

Deep Cleaning

Deep Cleaning.

(3)

Click Execute

Execute

Execute

Execute

.

US_iP6000D_QSG.book  Page 53  Thursday, June 10, 2004  2:44 PM

Summary of Contents for PIXMA iP6000D

Page 1: ...Photo Printer Photo Printer Photo Printer Photo Printer Quick Start Guide Quick Start Guide Quick Start Guide Quick Start Guide ...

Page 2: ...to change without notice As an ENERGY STAR partner Canon U S A Inc has determined that this product meets the ENERGY STAR guidelines for energy efficiency All information regarding non Canon products was compiled from publicly available information No representation is made regarding the accuracy thereof Trademarks Trademarks Trademarks Trademarks Canon is a registered trademark of Canon Inc BJ is...

Page 3: ...acing an Ink Tank 37 When Printing Becomes Faint or Colors are Incorrect 43 Printing the Nozzle Check Pattern 44 Print Head Cleaning 49 Print Head Deep Cleaning 53 Aligning the Print Head 57 Troubleshooting Troubleshooting Troubleshooting Troubleshooting Cannot Install the Printer Driver 62 Print Quality is Poor or Contains Errors 63 Troubleshooting Printer Hardware 65 Paper Does Not Feed Properly...

Page 4: ...es Properties Properties window press the F1 F1 F1 F1 key or click in the upper right corner Then click the feature you want to know more about or click Help Help Help Help when displayed While in the Page Setup Page Setup Page Setup Page Setup dialog box or Print Print Print Print dialog box click in the lower left corner Clicking provides detailed information about each setting When the Help win...

Page 5: ...lfunction Folded curled or wrinkled paper Damp paper Excessively thin paper less than 64 gsm or 17 lb Excessively thick paper more than 105 gsm or 28 lb non Canon branded paper Picture postcards Postcards with an affixed photos or stickers Envelopes with double flaps Envelopes with sticker flaps Envelopes with an embossed or treated surface Any type of paper with holes Loose leaf paper is an excep...

Page 6: ...lain paper is always fed from the cassette whenever you print Continuous printing on the same type size of paper by using both the sheet feeder and cassette together If the sheet feeder or cassette runs out of paper the paper source automatically switches to the other one This is useful for printing onto a large volume of paper To use this feature you need to configure the printer driver beforehan...

Page 7: ...ow to load envelopes and specialty media into the printer Note If paper is curled gently bend the corners in the opposite direction until the paper becomes completely flat Refer to Uncurling the Media on the User s Guide Note You can also select the paper source with the printer driver For details refer to Changing the Paper Source in the User s Guide 1 1 Open the paper support 2 Pull out the pape...

Page 8: ... mm or 0 52 inches in height in the sheet feeder However do not stack more than 50 sheets in the paper output tray 2 Align the paper stack against the right side of the sheet feeder 3 Slide the paper guide against the left side of the paper stack load limit mark Do not load beyond this load limit mark 1 Load the paper into the sheet feeder with the print side facing up ...

Page 9: ... Notes For detailed information on the specialty media Canon provides for use with its various printers refer to Using Speciality Media Using Speciality Media Using Speciality Media Using Speciality Media on page 12 See Printing Media in the User s Guide for detailed instructions on how to load envelopes and specialty media into the printer Note If paper is curled gently bend the corners in the op...

Page 10: ...and extend the cassette if needed Notes When loading A5 or larger sized paper nonstandard size paper 203 mm 8 inches or longer in length extend the cassette When loading 5 x 7 or smaller sized paper nonstandard size paper 202 mm 8 inches or shorter in length do not extend the cassette Legal sized paper is not loadable in the cassette ...

Page 11: ...ay Note If the cassette has been extended to accommodate paper sizes larger than 5 x7 the front edge of the cassette will extend beyond the front of the printer 2 Align the paper stack against the right side of the cassette 3 Slide the paper guides to fit the loaded paper stack load limit mark Do not load beyond this load limit mark 1 Load the paper into the cassette with the print side facing dow...

Page 12: ...t the paper source with the printer driver For details refer to Changing the Paper Source in the User s Guide 1 1 Open the paper output tray 2 Pull out the paper output tray extension completely cassette lamp 2 Press the paper feed switch so that the cassette lamp is lit 1 2 ...

Page 13: ...with Printing with Printing with Windows Windows Windows Windows on page 14 or Printing with Macintosh Printing with Macintosh Printing with Macintosh Printing with Macintosh on page 17 1 Load the paper into the cassette and align the paper stack against the right side of the cassette Notes Do not extend the cassette Load the paper lengthways regardless of the direction of the document with the pr...

Page 14: ...o ensure optimal print quality Photo Quality Media Photo Paper Pro Photo Paper Plus Glossy Photo Paper Plus Semi gloss Photo Paper Plus Double Sided Matte Photo Paper Glossy Photo Paper High Resolution Paper Photo Stickers Media Suited to Business Documents High Resolution Paper Transparencies ...

Page 15: ...ssy Letter up to 10 sheets 5 x 7 up to 10 sheets 4 x 6 up to 20 sheets Letter up to 10 sheets 5 x 7 up to 10 sheets 4 x 6 up to 20 sheets Photo Paper Plus Glossy Photo Paper Plus Semi gloss Letter up to 10 sheets 4 x 6 up to 20 sheets Letter up to 10 sheets 4 x 6 up to 20 sheets Photo Paper Plus Glossy Photo Paper Plus Double Sided Letter up to 10 sheets 5 x 7 up to 10 sheets Letter up to 10 sheet...

Page 16: ...o 150 sheets 13 mm or 0 52 inches in height can be loaded in the sheet feeder and cassette respectively Select Plain Paper Plain Paper Plain Paper Plain Paper from Media Type Media Type Media Type Media Type in the printer driver For detailed description of printing media types refer to the User s Guide Notes The menu screens and dialog boxes that appear may vary depending on the software applicat...

Page 17: ... Canon PIXMA iP6000D iP6000D iP6000D iP6000D is selected 3 Click Preferences Preferences Preferences Preferences or Properties Properties Properties Properties 1 Click Media Type Media Type Media Type Media Type to select the media loaded in the printer 3 Click OK OK OK OK 2 Ensure that Paper Feed Switch Paper Feed Switch Paper Feed Switch Paper Feed Switch is selected from Paper Source Paper Sour...

Page 18: ...ser s Guide or Help Help Help Help Select Preview before printing Preview before printing Preview before printing Preview before printing by clicking the check box This displays a preview screen that allows you to confirm the selected printing effects and how your document will look when printed Some applications do not contain the function to display the preview Notes You can cancel a print job i...

Page 19: ...ng Paper Loading Paper on page 3 3 Ensure that the proper paper source is selected 4 Create a document or open a file to print Notes The menu screens and dialog boxes that appear may vary depending on the software application you are using The steps described in this section are for printing in Mac OS X v 10 3 When the cassette lamp is lit paper is fed from the cassette When the sheet feeder lamp ...

Page 20: ...Paper Size Paper Size Paper Size pop up menu 2 Select iP6000D iP6000D iP6000D iP6000D from the Format for Format for Format for Format for pop up menu 4 Click OK OK OK OK 3 Select the desired media type from Media Type Media Type Media Type Media Type pop up menu 5 Select the print mode appropriate to your document from the Print Print Print Print Mode Mode Mode Mode pop up menu 2 Select Quality M...

Page 21: ...s Select when printing documents consisting mainly of graphs and graphics illustrations with strong color definition Printing a composite document Printing a composite document Printing a composite document Printing a composite document Select when printing documents consisting mainly of text Detailed Setting Detailed Setting Detailed Setting Detailed Setting Select to fine tune the Print Quality ...

Page 22: ...ME button on the printer See Canceling Printing Canceling Printing Canceling Printing Canceling Printing on page 20 Double clicking iP6000D iP6000D iP6000D iP6000D in the Printer Printer Printer Printer list displays a dialog that prompts you to confirm the status of the print job s To cancel a job in progress select the desired document then click Delete Delete Delete Delete To temporarily stop a...

Page 23: ... Properties Printer Properties dialog box opens Opening the Printer Properties Dialog Box Directly from the Start Menu This method is used for maintenance operations such as print head cleaning or to specify printer settings common to all application programs 1 Click Start and select Control Panel Printers and Other Hardware and then Printers and Faxes For non XP Windows users click Start Start St...

Page 24: ...dialog box from Properties Properties Properties Properties the default Window tabs e g the Ports Ports Ports Ports tab or the Details Details Details Details tab are displayed These tabs are not displayed when the Printer Properties Printer Properties Printer Properties Printer Properties dialog box is opened from Printing Printing Printing Printing Preferences Preferences Preferences Preferences...

Page 25: ...graphs Many of these features are covered in this chapter For more detailed information refer to the User s Guide Adjusting Print Quality Features that affect the appearance and quality of your printed images can be controlled with the printer driver The PIXMA iP6000D automatically adjusts printer settings to improve print quality based on the media type Plain Paper Photo Paper Pro and so on You c...

Page 26: ...ox from Your Application Opening the Printer Properties Dialog Box from Your Application Opening the Printer Properties Dialog Box from Your Application Opening the Printer Properties Dialog Box from Your Application Program Program Program Program on page 21 2 On the Main tab select Custom from Print Quality then click Set to open the Set Print Quality dialog box 3 Move the slide bar to adjust th...

Page 27: ...ith Macintosh Printing with Macintosh Printing with Macintosh Printing with Macintosh on page 17 2 Select Quality Media from the pop up menu and then click Detailed Setting 3 Move the slide bar to adjust the print quality 4 When the process is complete click Print ...

Page 28: ...O is available for Windows only 1 Open the Printer Properties dialog box See Opening the Printer Properties Dialog Box from Your Application Opening the Printer Properties Dialog Box from Your Application Opening the Printer Properties Dialog Box from Your Application Opening the Printer Properties Dialog Box from Your Application Program Program Program Program on page 21 2 Click the Effects tab ...

Page 29: ...oto Vivid Photo select the Vivid Photo Vivid Photo Vivid Photo Vivid Photo check box on the Effects Effects Effects Effects tab To use Vivid Photo Vivid Photo Vivid Photo Vivid Photo select the Vivid Photo Vivid Photo Vivid Photo Vivid Photo check box under Special Effects Special Effects Special Effects Special Effects Note In Windows Me or Windows 98 If Background Printing Background Printing Ba...

Page 30: ...hoto Noise Reduction Photo Noise Reduction select the Photo Noise Reduction Photo Noise Reduction Photo Noise Reduction Photo Noise Reduction check box on the Effects Effects Effects Effects tab To use Photo Noise Reduction Photo Noise Reduction Photo Noise Reduction Photo Noise Reduction select the Photo Noise Reduction Photo Noise Reduction Photo Noise Reduction Photo Noise Reduction check box u...

Page 31: ...the Printer Properties Dialog Box from Your Application Opening the Printer Properties Dialog Box from Your Application Opening the Printer Properties Dialog Box from Your Application Program Program Program Program on page 21 2 In each tab set all necessary items 3 Click the Profiles tab 4 Register new printer driver settings The Add to Profiles Add to Profiles Add to Profiles Add to Profiles dia...

Page 32: ... Retrieving profile Retrieving profile Select the desired profile from Printing Profiles Printing Profiles Printing Profiles Printing Profiles and click Retrieve Retrieve Retrieve Retrieve from Profiles Profiles Profiles Profiles Deleting unwanted profile Deleting unwanted profile Deleting unwanted profile Deleting unwanted profile Select the desired profile from Printing Profiles Printing Profile...

Page 33: ...Retrieving the registered driver settings Select the name of the driver settings to retrieve from Presets Presets Presets Presets in the Print Print Print Print dialog box Changing the registered drivers settings Changing the registered drivers settings Changing the registered drivers settings Changing the registered drivers settings Select the name of the driver settings to delete or change from ...

Page 34: ...t is compatible with Exif Print Easy WebPrint Windows You can easily print out homepages displayed on Internet Explorer at full size without its right hand side being cropped This application is automatically added to the Internet Explorer toolbar Internet Explorer 5 5 or later must be installed For more information on the applications refer to the Photo Application Guide Exif Print is the worldwi...

Page 35: ...ith Macintosh 1 Turn on the printer See Turning on the Printer Turning on the Printer Turning on the Printer Turning on the Printer on page 2 2 Load the paper on the printer See Loading Paper Loading Paper Loading Paper Loading Paper on page 3 Notes Media Types Suitable for Borderless Printing The following media are compatible with Borderless Printing Borderless Printing Borderless Printing Borde...

Page 36: ...t Easy PhotoPrint Easy PhotoPrint to open the Easy PhotoPrint Easy PhotoPrint Easy PhotoPrint Easy PhotoPrint Double click the hard disk icon the Applications Applications Applications Applications folder the Easy PhotoPrint Easy PhotoPrint Easy PhotoPrint Easy PhotoPrint folder and then double click the Easy PhotoPrint Easy PhotoPrint Easy PhotoPrint Easy PhotoPrint icon 5 Select photographs 1 Se...

Page 37: ...r Feed Switch Paper Feed Switch Paper Feed Switch from Paper Source Paper Source Paper Source Paper Source For information about the other settings refer to Changing the Paper Source in the User s Guide Increases the number of copies Displays the specified number of copies Decreases the number of copies 1 Click the Paper Selection Paper Selection Paper Selection Paper Selection tab 3 Select the si...

Page 38: ...Layout Print Layout Print tab 2 Select Borderless full Borderless full Borderless full Borderless full 3 Click Print Print Print Print click Print Print Print Print When the confirmation message is displayed click OK OK OK OK And then click Print Print Print Print in the Print Print Print Print dialog box ...

Page 39: ...WER lamp will change from green to orange and flash four times as soon as printing begins It is important to quickly identify the empty tank using the BJ Status Monitor BJ Status Monitor BJ Status Monitor BJ Status Monitor Windows or error messages Macintosh and replace it Magenta BCI 6M PhotoMagenta BCI 6PM Yellow BCI 6Y Black BCI 6BK Cyan BCI 6C PhotoCyan BCI 6PC Note Should missing characters o...

Page 40: ...acement tank as soon as possible Click Cancel Printing Cancel Printing Cancel Printing Cancel Printing to cancel the current print job The ink tank with X symbol is out of ink Replace with a new ink tank Press the RESUME RESUME RESUME RESUME button to resume printing with an empty ink tank When printing is finished replace the ink tank immediately If you continue printing with an empty ink tank it...

Page 41: ...re Configure Configure 4 Select iP6000D iP6000D iP6000D iP6000D from the Product Product Product Product list and click Maintenance Maintenance Maintenance Maintenance BJ Printer Utility BJ Printer Utility BJ Printer Utility BJ Printer Utility appears 5 Select Ink Level Information Ink Level Information Ink Level Information Ink Level Information from the pop up menu Indicates a low ink level Obta...

Page 42: ...The print head holder moves to the center 3 Remove the empty ink tank Important Handle ink tanks carefully to avoid staining clothing or the surrounding area Discard empty ink tanks according to the local laws and regulations regarding disposal of consumables Note Be sure to replace ink tanks one by one when replacing more than one ink tank Do not touch the print head lock lever remove only the in...

Page 43: ...emove the clear film from the ink tank in the exact order shown in step 4 1 as failure to follow this step may cause the ink to leak and stain your clothes and hands Do not squeeze the side of ink tanks as this may cause the ink to leak and stain your clothes and hands Do not re attach the protective cap once you have removed it Once the protective cap is removed do not touch the open ink port Ens...

Page 44: ...inter and leave it out in the open This will cause the ink tank to dry out and the printer may not operate properly if it is reinstalled Color ink consumption may occur even when black and white or grayscale printing is specified Color ink is consumed in the head cleaning and deep cleaning which are necessary to maintain the printer s capabilities When you start printing after replacing the ink ta...

Page 45: ...y Print Quality setting in the printer driver settings See Print Quality is Poor or Contains Errors Print Quality is Poor or Contains Errors Print Quality is Poor or Contains Errors Print Quality is Poor or Contains Errors on page 63 Note If print head deep cleaning does not resolve the problem contact the Customer Care Center Step 1 If the problem remains after performing print head cleaning thre...

Page 46: ...he Printer Properties Dialog Box Directly from the Start Menu Opening the Printer Properties Dialog Box Directly from the Start Menu Opening the Printer Properties Dialog Box Directly from the Start Menu on page 21 4 Print the nozzle check pattern Notes Ensure that the inner cover is closed Nozzle check pattern printing can also be executed from the printer itself 1 With the printer on load a shee...

Page 47: ... the Nozzle Check Pattern Examining the Nozzle Check Pattern Examining the Nozzle Check Pattern Examining the Nozzle Check Pattern on page 47 6 If you want to start the print head cleaning click Cleaning Cleaning Cleaning Cleaning on the Pattern Check Pattern Check Pattern Check Pattern Check dialog box Otherwise click Exit Exit Exit Exit to finish Note Clicking Initial Check Items Initial Check I...

Page 48: ...ity Printer Setup Utility icon When using Mac OS X v 10 2 x double click the Print Center Print Center Print Center Print Center icon 3 Select iP6000D iP6000D iP6000D iP6000D from the Name Name Name Name list and click Utility Utility Utility Utility When using Mac OS X v 10 2 x select iP6000D iP6000D iP6000D iP6000D from the Name Name Name Name list and click Configure Configure Configure Configu...

Page 49: ...e click Quit Quit Quit Quit to finish Examining the Nozzle Check Pattern The nozzle check pattern should appear as follows when ink is discharged properly Examine the nozzle check pattern output by the printer If these patterns have white stripes the Color Color Color Color print head nozzle needs cleaning Note Clicking Initial Check Items Initial Check Items Initial Check Items Initial Check Item...

Page 50: ...ern Check Pattern Check Pattern Check dialog box to start the print head cleaning See Print Head Cleaning Print Head Cleaning Print Head Cleaning Print Head Cleaning on page 49 If the patterns have no white stripes click Exit Exit Exit Exit or Quit Quit Quit Quit Nozzle check pattern finishes ...

Page 51: ...erties Dialog Box Directly from the Start Menu on page 21 3 Start the print head cleaning Notes Ensure that the inner cover is closed The print head can also be cleaned from the printer itself With the printer on hold down the RESUME RESUME RESUME RESUME button until the POWER POWER POWER POWER lamp flashes once Note The print head cleaning dialog box of step 3 3 is directly displayed when you cli...

Page 52: ...rn on page 44 Important Do not perform any other operations until the print head cleaning finishes This takes about 30 to 40 seconds Note Clicking Initial Check Items Initial Check Items Initial Check Items Initial Check Items displays the items to be checked before cleaning Notes The nozzle check pattern will not be printed correctly if there is not enough ink Replace the ink tank if the remainin...

Page 53: ...ac OS X v 10 2 x select iP6000D iP6000D iP6000D iP6000D from the Name Name Name Name list and click Configure Configure Configure Configure 4 Select iP6000D iP6000D iP6000D iP6000D from the Product Product Product Product list and click Maintenance Maintenance Maintenance Maintenance 3 Start the print head cleaning Note The Print Head Cleaning Print Head Cleaning Print Head Cleaning Print Head Cle...

Page 54: ...rn on page 44 Important Do not perform any other operations until the print head cleaning finishes This takes about 30 to 40 seconds Note Clicking Initial Check Items Initial Check Items Initial Check Items Initial Check Items displays the items to be checked before cleaning Notes The nozzle check pattern will not be printed correctly if there is not enough ink Replace the ink tank if the remainin...

Page 55: ...x See Opening the Printer Properties Dialog Box Directly from the Start Menu Opening the Printer Properties Dialog Box Directly from the Start Menu Opening the Printer Properties Dialog Box Directly from the Start Menu Opening the Printer Properties Dialog Box Directly from the Start Menu on page 21 3 Start the print head deep cleaning Note Ensure that the inner cover is closed 1 Click the Mainten...

Page 56: ...nk Tank Replacing an Ink Tank Replacing an Ink Tank Replacing an Ink Tank on page 37 Note Clicking Initial Check Items Initial Check Items Initial Check Items Initial Check Items displays the items to be checked before cleaning Important Do not perform any other operation until the print head deep cleaning finishes This takes about one minute Notes If the print head nozzles are still not clean ope...

Page 57: ...lick the Print Center Print Center Print Center Print Center icon 3 Select iP6000D iP6000D iP6000D iP6000D from the Name Name Name Name list and click Utility Utility Utility Utility When using Mac OS X v 10 2 x select iP6000D iP6000D iP6000D iP6000D from the Name Name Name Name list and click Configure Configure Configure Configure 4 Select iP6000D iP6000D iP6000D iP6000D from the Product Product...

Page 58: ...n Ink Tank Replacing an Ink Tank on page 37 Note Clicking Initial Check Items Initial Check Items Initial Check Items Initial Check Items displays the items to be checked before cleaning Important Do not perform any other operation until the print head deep cleaning finishes This takes about one minute Notes If the print head nozzles are still not clean open the cover and ensure that there are suf...

Page 59: ...box See Opening the Printer Properties Dialog Box Directly from the Start Menu Opening the Printer Properties Dialog Box Directly from the Start Menu Opening the Printer Properties Dialog Box Directly from the Start Menu Opening the Printer Properties Dialog Box Directly from the Start Menu on page 21 3 Align the print head automatically Note Ensure that the inner cover is closed 1 Click the Maint...

Page 60: ...w the print head is aligned automatically The printer is now ready to use Notes If the pattern is not printed successfully open the cover and ensure that the ink tanks are correctly installed If the pattern is still not printed successfully refer to Eleven flashes in Handling Error Messages Handling Error Messages Handling Error Messages Handling Error Messages on page 72 ...

Page 61: ...ck the Print Center Print Center Print Center Print Center icon 3 Select iP6000D iP6000D iP6000D iP6000D from the Name Name Name Name list and click Utility Utility Utility Utility When using Mac OS X v 10 2 x select iP6000D iP6000D iP6000D iP6000D from the Name Name Name Name list and click Configure Configure Configure Configure 4 Select iP6000D iP6000D iP6000D iP6000D from the Product Product P...

Page 62: ...nsure that the ink tanks are correctly installed If the pattern is still not printed successfully refer to Eleven flashes in Handling Error Messages Handling Error Messages Handling Error Messages Handling Error Messages on page 72 3 3 3 3 Read the message and click Print Print Print Print Head Alignment Head Alignment Head Alignment Head Alignment Note It takes about 60 seconds to start printing ...

Page 63: ...Errors Print Quality is Poor or Contains Errors on page 63 Troubleshooting Printer Hardware Troubleshooting Printer Hardware Troubleshooting Printer Hardware Troubleshooting Printer Hardware on page 65 Paper Does Not Feed Properly Paper Does Not Feed Properly Paper Does Not Feed Properly Paper Does Not Feed Properly on page 68 Paper Jams Paper Jams Paper Jams Paper Jams on page 69 Handling Error M...

Page 64: ...Windows XP open the My Computer My Computer My Computer My Computer window and then double click the CD ROM CD ROM CD ROM CD ROM icon Double click the CD ROM CD ROM CD ROM CD ROM icon on your desktop to start installation Installation CD ROM is not working properly Ensure that there are no problems with the Setup Software User s Guide CD ROM If there is any problem with the Setup Software User s G...

Page 65: ...confirm that the Media Type Media Type Media Type Media Type selected matches the paper loaded In the Print Print Print Print dialog box of the printer driver select Quality Media Quality Media Quality Media Quality Media from the pop up menu and then confirm that the Media Type Media Type Media Type Media Type selected matches the paper loaded Glossy photo paper other than the Canon specialty med...

Page 66: ... paper abrasion Prevent paper abrasion Prevent paper abrasion check box to widen the clearance between the print head and the loaded paper 1 Open the Printer Properties Printer Properties Printer Properties Printer Properties dialog box 2 Click the Maintenance Maintenance Maintenance Maintenance tab and then Custom Settings Custom Settings Custom Settings Custom Settings In Windows XP and Windows ...

Page 67: ...tions Applications Applications or Applications Mac OS 9 Applications Mac OS 9 Applications Mac OS 9 Applications Mac OS 9 folder 3 Double click the PIXMA iP6000D Memory Card Utility PIXMA iP6000D Memory Card Utility PIXMA iP6000D Memory Card Utility PIXMA iP6000D Memory Card Utility icon 3 Select Read only Mode Read only Mode Read only Mode Read only Mode 4 Click OK OK OK OK Print head has overhe...

Page 68: ...s Documents Documents Documents in the Printer Printer Printer Printer menu 5 When the confirmation message is displayed click Yes Yes Yes Yes The print job is deleted In Windows 2000 the print jobs may not be deleted 1 Select Applications Applications Applications Applications from the Go Go Go Go menu 2 Double click the Printer Setup Utility Printer Setup Utility Printer Setup Utility Printer Se...

Page 69: ...educe spool data size Reduce spool data size check box and click OK OK OK OK When Reduce spool data size Reduce spool data size Reduce spool data size Reduce spool data size is set the print quality may be degraded Use reduced Use reduced Use reduced Use reduced printing printing printing printing is not selected when performing automatic duplex printing In automatic duplex printing the printable ...

Page 70: ...POWER POWER POWER lamp flashes three times The paper feed roller rotates as it cleans 4 Repeat this cleaning operation two times 5 Load three or more sheets of Letter sized plain paper lengthways in the sheet feeder or cassette selected in step 2 6 Hold down the RESUME RESUME RESUME RESUME button down and release after the POWER POWER POWER POWER lamp flashes three times Paper is fed and output 7 ...

Page 71: ...e it After removing all paper close the cover Be careful not to touch the components inside the printer 3 Reload the paper into the printer and press the RESUME RESUME RESUME RESUME button on the printer When reloading the paper into the printer refer to Paper Does Not Paper Does Not Paper Does Not Paper Does Not Feed Properly Feed Properly Feed Properly Feed Properly on page 68 to confirm that yo...

Page 72: ...sette reload the paper in the cassette 7 Reload the paper in the sheet feeder if necessary and press the RESUME RESUME RESUME RESUME button on the printer When reloading the paper into the printer refer to Paper Does Not Paper Does Not Paper Does Not Paper Does Not Feed Properly Feed Properly Feed Properly Feed Properly on page 68 to confirm that you are using the correct paper and are loading it ...

Page 73: ...r 4 If any paper is sticking out of the cassette reload the paper in the cassette Reload paper in the sheet feeder if necessary 5 Insert the cassette into the printer 6 Press the RESUME RESUME RESUME RESUME button on the printer When reloading the paper into the printer refer to Paper Does Not Paper Does Not Paper Does Not Paper Does Not Feed Properly Feed Properly Feed Properly Feed Properly on p...

Page 74: ...ad If the print head is already installed remove the print head and check the electrical contacts for foreign matter then reinstall After reinstalling the print head you may need to realign it If this error still remains the print head may be damaged Contact the Customer Care Center Six flashes Inner cover is open Close the inner cover and press the RESUME RESUME RESUME RESUME button Eight flashes...

Page 75: ...nt head nozzles are clogged Press the RESUME RESUME RESUME RESUME button See Printing the Nozzle Check Pattern Printing the Nozzle Check Pattern Printing the Nozzle Check Pattern Printing the Nozzle Check Pattern on page 44 for information on how to print a nozzle check pattern The paper output slot has been exposed to a strong light source preventing correct print head alignment Press the RESUME ...

Page 76: ... the Start Opening the Printer Properties Dialog Box Directly from the Start Opening the Printer Properties Dialog Box Directly from the Start Opening the Printer Properties Dialog Box Directly from the Start Menu Menu Menu Menu on page 21 2 Click the Port Port Port Port tab or the Details Details Details Details tab to confirm the port settings A USB port is selected if either USBnnn Canon PIXMA ...

Page 77: ...nt on both sides of the page manually follow the procedure below On the Page Setup Page Setup Page Setup Page Setup tab clear the Duplex Printing Duplex Printing Duplex Printing Duplex Printing check box Then try printing again When using Mac OS 9 x select Options Options Options Options from the pop up menu in the Print Print Print Print dialog box and then clear the Automatic Automatic Automatic...

Page 78: ...ed there is a possibility that you are using a digital camera or digital video camcorder that is not supported by this printer Use a digital camera or digital video camcorder compatible with this printer Error No 2500 Automatic print head alignment failed See Eleven flashes in Handling Error Messages Handling Error Messages Handling Error Messages Handling Error Messages on page 73 When using Mac ...

Page 79: ... The printer driver will load automatically 6 If the message No other applications can be running is displayed click Continue 7 When the Installation was successful screen displays click Restart 8 Open the Mac OS 9 x folder on the CD ROM then double click the Memory Card Utility folder 9 Double click the Memory Card Utility mpkg icon Follow the on screen instructions 10 If prompted restart your co...

Page 80: ... the Chooser 18 To ensure highest quality output carry out print head alignment Note Register your product at www registercanon com to ensure product support Note Refer to the Printer Driver Guide for Mac OS 9 located on the Setup Software User s Guide CD ROM for instructions on how to align the print head ...

Page 81: ...MP 101 Glossy Photo Paper GP 401 High Resolution Paper HR 101N T Shirt Transfers TR 301 Transparencies CF 102 Envelopes Checking the Status of the Printer BJ Status Monitor Functions Windows Printer Setup Utility Macintosh Routine Maintenance Replacing an Ink Tank When Printing Becomes Faint or Colors are Incorrect Printing the Nozzle Check Pattern Print Head Cleaning Print Head Deep Cleaning Alig...

Page 82: ...ode Approx 35 dB A in the highest print quality mode Operating environment Operating environment Operating environment Operating environment Temperature 5 to 35 C 41 to 95 F Temperature 5 to 35 C 41 to 95 F Temperature 5 to 35 C 41 to 95 F Temperature 5 to 35 C 41 to 95 F Humidity 10 to 90 RH no condensation Humidity 10 to 90 RH no condensation Humidity 10 to 90 RH no condensation Humidity 10 to 9...

Page 83: ...6 x 152 4 mm 101 6 x 152 4 mm 101 6 x 152 4 mm Card 2 Photo Paper Plus Glossy Photo Paper Plus Semi gloss or Card 2 Photo Paper Plus Glossy Photo Paper Plus Semi gloss or Card 2 Photo Paper Plus Glossy Photo Paper Plus Semi gloss or Card 2 Photo Paper Plus Glossy Photo Paper Plus Semi gloss or Glossy Photo Paper 4 Glossy Photo Paper 4 Glossy Photo Paper 4 Glossy Photo Paper 4 x 6 x 6 x 6 x 6 101 6...

Page 84: ...equirements Use a computer equipped on which Windows XP Windows Use a computer equipped on which Windows XP Windows Use a computer equipped on which Windows XP Windows Use a computer equipped on which Windows XP Windows 2000 Windows Me Windows 98 can operate 2000 Windows Me Windows 98 can operate 2000 Windows Me Windows 98 can operate 2000 Windows Me Windows 98 can operate USB interface USB interf...

Page 85: ...uals 15 MB of available hard disk space when installing electronic manuals 15 MB of available hard disk space when installing electronic manuals 2x or higher CD ROM drive 4x or higher recommended 2x or higher CD ROM drive 4x or higher recommended 2x or higher CD ROM drive 4x or higher recommended 2x or higher CD ROM drive 4x or higher recommended Windows Microsoft Internet Explorer 5 0 or later Wi...

Page 86: ...the power supply and call for service Periodically unplug the printer and use a dry cloth to wipe off any dust or dirt Periodically unplug the printer and use a dry cloth to wipe off any dust or dirt Periodically unplug the printer and use a dry cloth to wipe off any dust or dirt Periodically unplug the printer and use a dry cloth to wipe off any dust or dirt collected on the plug and the power ou...

Page 87: ...chased the printer purchased the printer AC 100 120 V 50 60 Hz AC 100 120 V 50 60 Hz AC 100 120 V 50 60 Hz AC 100 120 V 50 60 Hz AC 220 240 V 50 60 Hz AC 220 240 V 50 60 Hz AC 220 240 V 50 60 Hz AC 220 240 V 50 60 Hz Working around the Working around the Working around the Working around the printer printer printer printer Never put your hands or fingers in the printer while it is printing Never p...

Page 88: ...ed to try to correct the interference by one or more of the following measures Reorient or relocate the receiving antenna Increase the separation between the equipment and receiver Connect the equipment into an outlet on a circuit different from that to which the receiver is connected Consult the dealer or an experienced radio TV technician for help Use of a shielded cable is required to comply wi...

Page 89: ... Canon USA repair facility or ASF Without limiting the foregoing dropping the Product scratches and abrasions will be presumed to have resulted from misuse abuse or failure to operate the Product as set forth in the user s manual or other documentation for the Product b Use of parts or supplies other than those sold by Canon USA that cause damage to the Product or cause abnormally frequent service...

Page 90: ...ia the website at www canontechsupport com Please note that under the InstantExchange program a replacement product will be provided to you prior to your return of the defective product Since the defective product becomes the property of Canon USA at the time of the exchange the defective product must be returned in the shipping materials provided If the defective product is not returned as direct...

Page 91: ...74 E Easy PhotoPrint 32 33 34 Easy WebPrint 32 Examining the Nozzle Check Pattern 47 Exif Print 32 G Glossy Photo Paper 13 H Handling Error Messages 72 Help button 2 High Resolution Paper 13 I Ink tank 37 40 Installing the Printer Driver when using Mac OS 9 x 77 L Load Limit Mark 6 9 Loading Paper 3 Loading Paper in the Cassette 7 Loading Paper in the Sheet Feeder 5 M Matte Photo Paper 13 Media sp...

Page 92: ...ver Setting for Media Type 13 Printer Properties dialog box 15 21 44 64 Printing the Nozzle Check Pattern 44 R Read only Mode 65 Recalling Driver Settings 29 Regulatory Information 86 Replacing an Ink Tank 37 RESUME button 16 20 S Safety Precautions 84 Saving Driver Setting 29 Speciality Media 13 Specifications 80 T Technical support 88 Transparencies 13 Troubleshooting 61 Troubleshooting Printer ...

Reviews: