background image

6

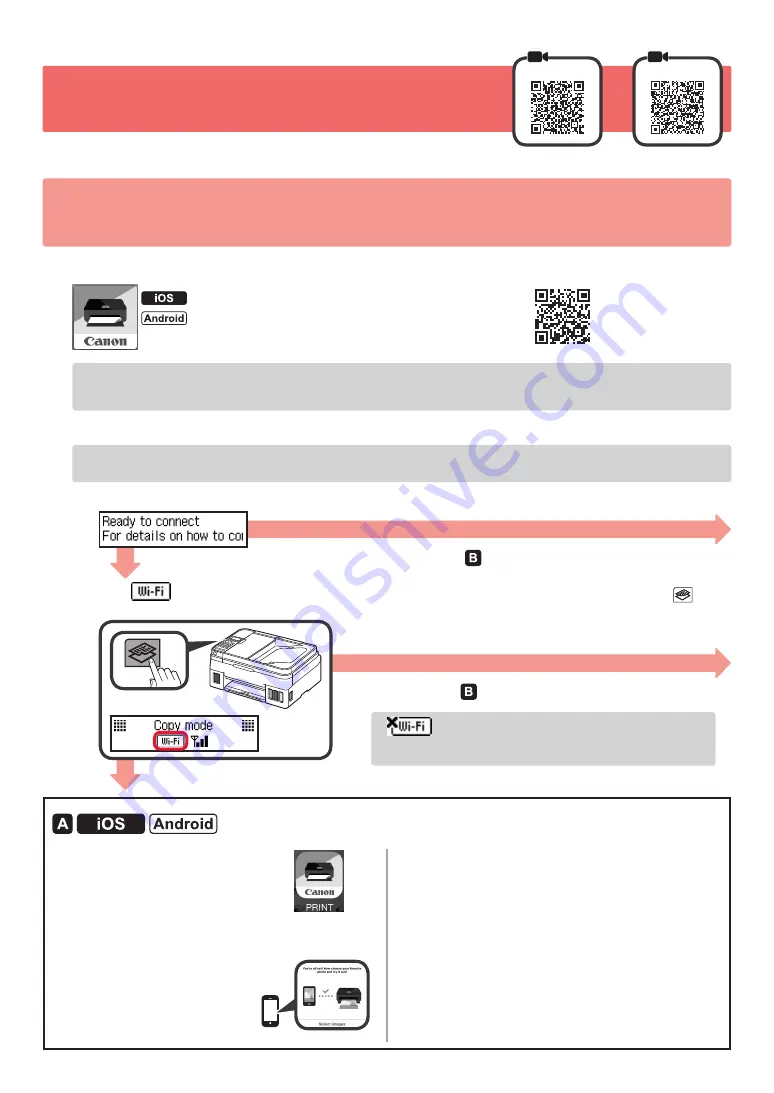
7-B.  Connecting to Smartphone 


iOS

Android

You need a connection setup for each smartphone. Proceed with the setup from step 1 for each smartphone.

Preparation

•  Turn on Wi-Fi on your smartphone.

•  If you have a wireless router, connect your smartphone to the wireless router you want to connect to the printer.

*  For operations, refer to manuals of your smartphone and the wireless router or contact those manufacturers.

Install the application software Canon PRINT Inkjet/SELPHY in your smartphone.

 : Search "Canon PRINT" in App Store.
 : Search "Canon PRINT" in Google Play.

Or access the Canon website by scanning the QR code.

*  You may not connect your smartphone to the Internet wirelessly during connecting the printer to the smartphone directly. 

In that case, you may be charged depending on the contract with your service provider.

*  Up to 

5

 devices can be connected to the printer via wireless LAN connection directly.

Check the display on the printer.

The screen turns off when no operation is made for about 10 minutes. Press one of the buttons on the operation 

panel (except for the 

ON

 button) to display the screen.

a

   Does the following screen appear?

b

   Does 

 (the printer is connected to the network) appear on the screen displayed by pressing the 


Copy

 button?

Tap the installed application 

software.

Follow the on-screen instructions to register the 

printer.

Make sure that the right 

screen appears.

The connection with your smartphone is 

now complete. You can print from your 

smartphone.

To print photos, load photo paper. Proceed to "Loading 

Paper" on page 8.

To continue fax setup, proceed to page 

8.

Yes

No

Yes (Proceed to  .)

No (Proceed to  .)

If 

 appears, the printer cannot communicate by 

wireless LAN connection. For details, access "http://ij.start.

canon" to see 

Frequently Asked Questions

.

Summary of Contents for PIXMA G4010 Series

Page 1: ...n o c Th ng tin an toa n va quan tro ng phu lu c Baca Keamanan dan Informasi Penting lampiran terlebih dahulu H ng d n b t u Mari Memulai Read Safety and Important Information addendum first Getting...

Page 2: ...ng Pencetak halaman 1 Menghubungkan dengan Komputer dan Ponsel Pintar Tablet halaman 4 Ca ch gi Ma y in oa n phim gia i thi ch 1 4 Cara Memegang Pencetak Video Penjelasan Installing the Printer page 1...

Page 3: ...nit cover b Remove the orange tape and the protective material and discard them a b 3 Installing the Cartridge 1 Open the cartridge locking cover 2 Take out the C color cartridge from the package and...

Page 4: ...ink bottle upright and remove the bottle cap 4 Insert the nozzle of the ink bottle into the inlet and stand the ink bottle upside down 5 Pour all ink into the ink tank Confirm that the ink has been fi...

Page 5: ...d yet 2 Press the ON button 3 When the following screen appears use the and buttons to select a language and then press the OK button 4 If the following screen appears select your country or region an...

Page 6: ...oaded file Proceed to step on the next page to continue 6 Preparing for Connection 1 Press the OK button Preparing the ink starts This takes about 5 to 6 minutes Proceed to the next step 2 Check that...

Page 7: ...If the contents of the CD ROM appear double click Msetup4 exe 4 Proceed to step d When using Windows 7 b When the AutoPlay screen appears click Run Msetup4 exe c If the User Account Control dialog box...

Page 8: ...contract with your service provider Up to 5 devices can be connected to the printer via wireless LAN connection directly 2 Check the display on the printer The screen turns off when no operation is ma...

Page 9: ...the connection method selecting screen the appropriate connection method is selected automatically depending on your environment d Make sure that the following screen appears a Tap the installed appl...

Page 10: ...Set Up c When the screen for selecting a model appears input the model name of your printer d Select Making Fax Ready for Use Opening from the manual installed into your computer The following is an e...

Page 11: ...1 1 Setup CD ROM Windows 2 1 2 a b a b 3 1 2 C 3 4 C 5 2 4 B 6 7...

Page 12: ...2 4 1 2 3 4 5 A A 6 7 8 1 7 A A...

Page 13: ...3 9 5 1 2 3 OK 4 OK 5 6 Yes OK...

Page 14: ...4 7 A macOS Windows 1 1 a b URL Canon c d e Windows macOS Windows macOS Chrome OS f g 6 1 OK 5 6 2 7 A 7 B 6 a Stop b Do not connect OK c Yes OK d 8...

Page 15: ...Msetup4 exe Run Msetup4 exe d User Account Control Yes 1 File Explorer 2 This PC 3 CD ROM CD ROM Msetup4 exe 4 d Windows 7 b AutoPlay Msetup4 exe Run Msetup4 exe c User Account Control Continue AutoP...

Page 16: ...6 7 B iOS Android 1 Wi Fi 1 Canon PRINT Inkjet SELPHY Canon PRINT App Store Canon PRINT Google Play Canon QR 5 LAN 2 10 a b a b c 8 8 LAN http ij start canon...

Page 17: ...OK c iOS Android a Settings Canon_ij_XXXX Wi Fi Canon_ij_XXXX a b c Auto Select Conn Method recommended d a b Printer is not registered Perform printer setup Register Printer A A G4010 series xxx xxx...

Page 18: ...8 1 2 3 4 5 a b a b a Canon b c d Windows 10 a Start b All apps Canon G4010 series c...

Page 19: ...nit pemindaian penutup b Lepaskan pita oranye dan material pelindung kemudian buang a b 3 Memasang Kartrij 1 Buka penutup pengunci kartrij 2 Keluarkan kartrij C warna dari dalam kemasan dan lepaskan l...

Page 20: ...ta dengan tegak dan lepaskan penutup botol 4 Masukkan mulut botol tinta ke dalam lubang pengisian dan balik botol tinta menghadap ke bawah 5 Tuangkan semua tinta ke dalam kotak tinta Pastikan bahwa ti...

Page 21: ...n kabel listrik terlebih dahulu 2 Tekan tombol DAYA 3 Ketika layar berikut ini muncul gunakan tombol dan untuk memilih bahasa kemudian tekan tombol OK 4 Jika layar berikut ini muncul pilih negara atau...

Page 22: ...nya untuk meneruskan 6 Menyiapkan untuk Koneksi 1 Tekan tombol OK Penyiapan tinta dimulai Ini membutuhkan waktu sekitar 5 sampai 6 menit Lanjutkan ke langkah berikutnya 2 Periksa apakah layar berikut...

Page 23: ...OM muncul klik dua kali Msetup4 exe 4 Lanjutkan ke langkah d Ketika menggunakan Windows 7 b Ketika layar AutoMain AutoPlay muncul klik Jalankan Msetup4 exe Run Msetup4 exe c Jika kotak dialog Kontrol...

Page 24: ...g pada kontrak Anda dengan penyedia layanan Maksimal 5 perangkat dapat dihubungkan ke pencetak melalui koneksi LAN nirkabel secara langsung 2 Periksa tampilan pada pencetak Layar akan mati jika tidak...

Page 25: ...ethod recommended pada layar pemilihan metode koneksi metode koneksi yang sesuai dipilih secara otomatis tergantung pada lingkungan Anda d Pastikan bahwa layar berikut ini muncul a Ketuk perangkat lun...

Page 26: ...eset c Ketika muncul layar untuk memilih model masukkan nama model pencetak Anda d Pilih Membuat Faks Siap untuk Digunakan Membuka dari petunjuk yang telah diinstal pada komputer Anda Berikut ini adal...

Page 27: ...g di nh ma u cam ra kho i ph n b n ngoa i cu a ma y in 2 a M b que t n p b Tha o b ng di nh ma u cam va v t li u ba o v ra va bo i a b 3 L p H p m c 1 M n p kho a h p m c 2 L y h p m c ma u C ra kho i...

Page 28: ...ra 3 Gi lo na p m c th ng ng va tha o n p lo na p ra 4 t mi ng ng cu a lo na p m c va o trong u na p m c va d ng th ng lo na p m c ng c xu ng 5 Ro t h t m c va o trong bi nh m c Xa c nh n r ng m c a...

Page 29: ...ca p na o ngoa i tr d y ngu n 2 Nh n nu t B T 3 Khi ma n hi nh sau y xu t hi n s du ng nu t va cho n m t ng n ng r i nh n nu t OK 4 N u ma n hi nh sau y xu t hi n cho n qu c gia ho c khu v c r i nh n...

Page 30: ...ta i xu ng Chuy n sang b c trang ti p theo ti p tu c 6 Chu n bi cho k t n i 1 Nh n nu t OK Chu n bi m c b t u Qua tri nh na y m t khoa ng 5 n 6 phu t Chuy n sang b c ti p theo 2 Ki m tra xem ma n hi...

Page 31: ...cu a CD ROM xu t hi n nh p u p va o Msetup4 exe 4 Chuy n sang b c d Khi s du ng Windows 7 b Khi ma n hi nh Pha t T ng AutoPlay xu t hi n nh p Cha y Msetup4 exe Run Msetup4 exe c N u h p thoa i i u kh...

Page 32: ...pha i tra phi tu y theo h p ng v i nha cung c p di ch vu Co th k t n i tr c ti p t i a 5 thi t bi v i ma y in qua k t n i ma ng LAN kh ng d y 2 Ki m tra hi n thi tr n ma y in Ma n hi nh t t khi kh ng...

Page 33: ...cho n Auto Select Conn Method recommended tr n ma n hi nh l a cho n ph ng th c k t n i ph ng th c k t n i thi ch h p se c t ng cho n tu y thu c va o m i tr ng cu a ba n d a m ba o ma n hi nh sau y xu...

Page 34: ...Khi ma n hi nh cho n model xu t hi n nh p t n model cu a ma y in d Cho n Chu n bi s n sa ng fax M t h ng d n s du ng a ca i t trong ma y ti nh Sau y la vi du s du ng Windows 10 a Nh p nu t B t u Star...

Page 35: ...RMC Regulatory Model Code K10472...

Page 36: ...ring Dari browser Dari browser T tri nh duy t T tri nh duy t Truy nh p H ng d n s du ng tr c tuy n T l i t t tr n ma n hi nh n n Dari pintasan desktop Access Online Manual From browser From desktop sh...

Reviews: