background image

6

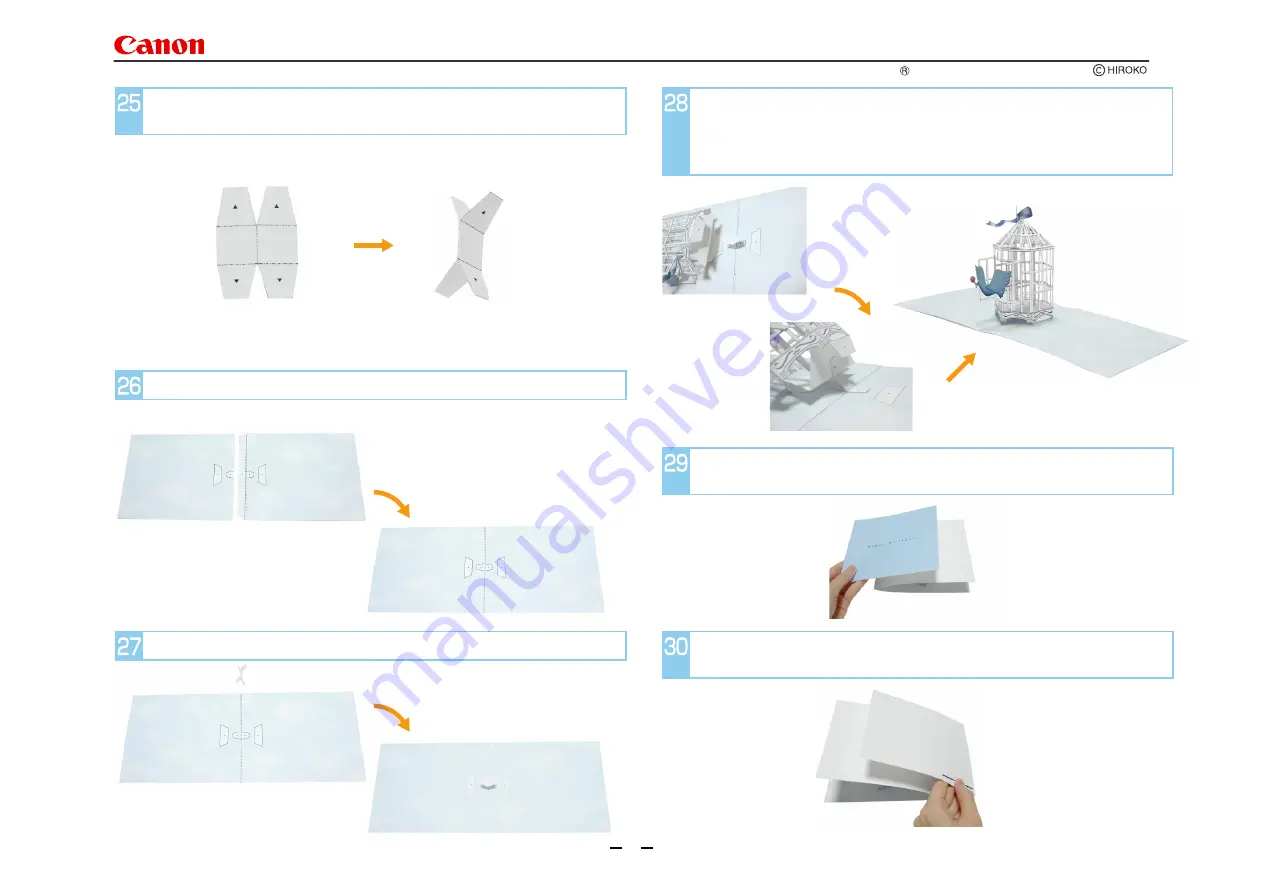
Stick the two sides of the backing sheet together.

Stick support E onto the glue spot in the center of the backing sheet.

Fold support E along the center line and glue together on the inside.

(Be careful not to stick the glue tabs together.)

Stick on a colored paper cover onto half of the rear side of the base 

paper.  Be careful to stick in on in the right direction. 

Assembly Step 29 is the completed card when the cover is stuck on to 

the other half side.

Fold the birdcage and stick the birdcage glue spot onto the backing 

sheet glue spot.  Then, stick on the center of the birdcage floor so that

it enfolds support E.  Finally, folding the backing sheet in the center, 

glue the rest of the birdcage glue spots to the corresponding glue spots 

on the backing sheet.

Pop-up Card (Birdcage) : Assembly Instructions

Canon    is a registered trademark of Canon Inc.

Summary of Contents for PAPER CRAFT Pop-up Card Birdcage

Page 1: ...n is a registered trademark of Canon Inc 1 Caution Glue scissors and other tools may be dangerous to young children so be sure to keep them out of the reach of young children Valley fold dashed and dotted line Make a valley fold Scissors line solid line Cut along the line Cut in line solid line Make a cut Black triangle Glue here Mountain fold dotted line Make a mountain fold Assembly Instructions...

Page 2: ...n by gluing it at the glue spot Fold the roof section to make the ribbon easier to stick on Stick on the vertical bars door matched up with the glue spots in assembly Step 3 and join up both ends of the bars to form a tubular shape Stick the horizontal bars onto to the glue spots on the vertical bars Stick decorative panels to bottom of vertical bars Be careful to apply glue to the correct positio...

Page 3: ...ge door and stick them together Be careful not to get front and back mixed up Line up the bird with the doors that have wing shaped glue spots on them and then stick on the bird Glue the rear sides of the bird together so that they hold the support A in place at the glue spots You will be putting flowers etc into the bird s beak later in the assembly so avoid putting any glue near there at this st...

Page 4: ...line and glue together on the inside Fold supports C along the fold lines and stick them at the back to form sticks Insert support D from assembly Step 15 through the birdcage door and glue the assembly onto the birdcage at the spots circled in red Glue support D onto the points circled in blue where the vertical and horizontal bars intersect Pop up Card Birdcage Assembly Instructions Canon is a r...

Page 5: ...of from the top of the birdcage so that the assembly straddles support A then glue the roof onto the birdcage bars at the glue spots indicated Fold the birdcage to make the roof easier to stick on Attach assembly Step 19 to the hexagonal roof at the glue spots indicated Paste together the two sides of whatever the bird is to hold in its beak the photograph shows a flower Paste the object into the ...

Page 6: ...eful to stick in on in the right direction Assembly Step 29 is the completed card when the cover is stuck on to the other half side Fold the birdcage and stick the birdcage glue spot onto the backing sheet glue spot Then stick on the center of the birdcage floor so that it enfolds support E Finally folding the backing sheet in the center glue the rest of the birdcage glue spots to the correspondin...

Reviews: