background image

CANON MPC-5500/QSG, Page 8  -  File: 55-QSP8.eps
W. Swanlund                                      June 27, 1998 

8

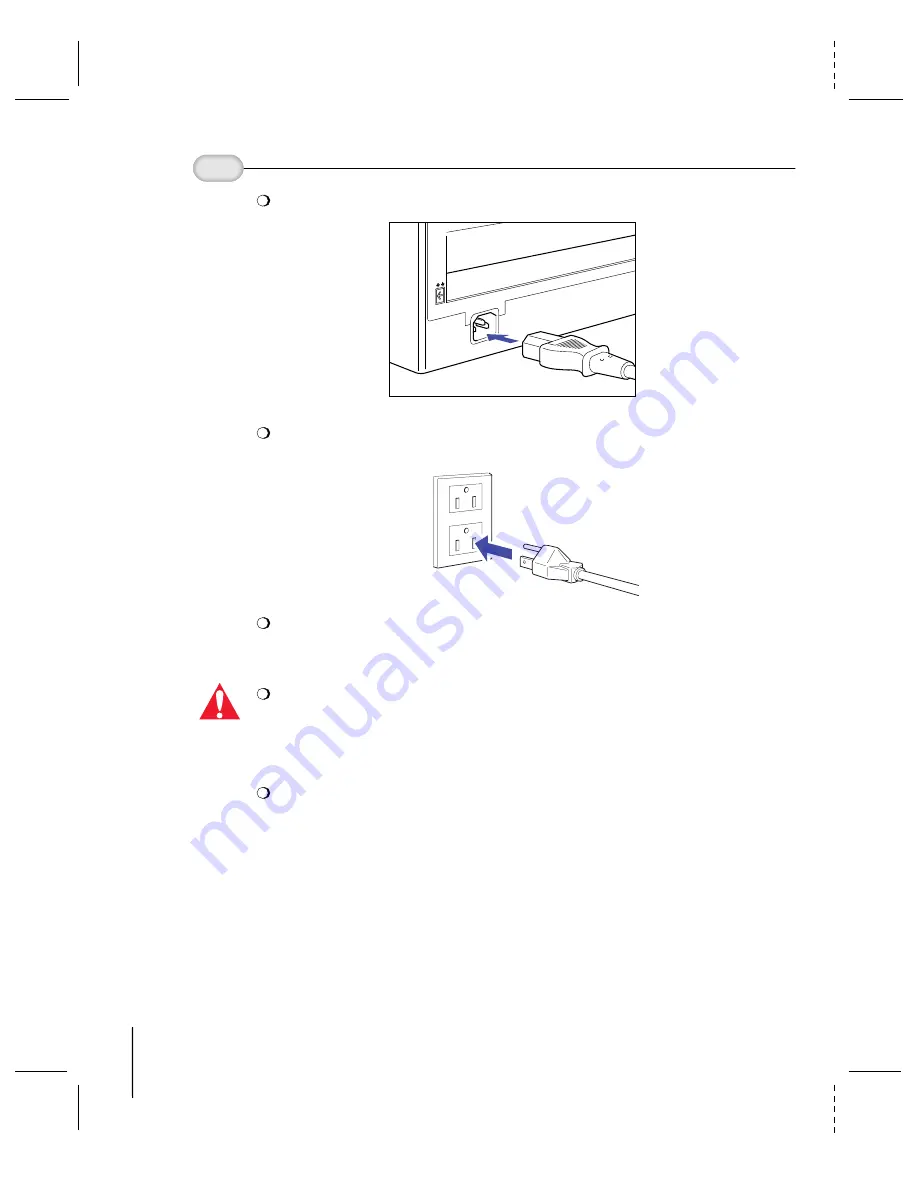
Plug the power cord connector into the back of the unit.

4

Attach the

power cord.

Plug the other end of the power cord into a properly grounded AC outlet
(three-pronged outlet).

The MultiPASS C5500 is equipped with a 3-prong, grounding-type plug 
(the third pin is a grounding pin). This plug will only fit into a grounding-type 
outlet. This is a safety feature. If you are unable to insert the plug into your 
outlet, contact an electrician to replace your outlet (do not use a 3-to-2 adapter). 
Do not defeat the safety purpose of the grounding-type plug.

Do not plug the MultiPASS C5500 into the same outlet as your computer or
into an outlet shared with an appliance such as an air conditioner, electric 
typewriter, or copier. These devices generate electrical noise that may interfere 
with operation of the MultiPASS C5500.

The MultiPASS C5500 has no power switch. The power is on as long as the 
system is plugged in.

Caution

Summary of Contents for MultiPASS C5500

Page 1: ...must follow the steps described in this Quick Start Guide It s a good idea to read the entire Quick Start Guide before you start to set up the MultiPASS C5500 FRONT COVER PAGE 1 Congratulations on you...

Page 2: ...s than 6 6 feet in length is recommended CD ROM drive 2X or better If you do not have a CD ROM drive you can call the Canon Computer Systems Inc Customer Care Center to order the MultiPASS Desktop Man...

Page 3: ...ation card for details CANON MPC 5500 QSG Page 3 File 55 QSP3 eps W Swanlund UPDATE2 August 12 98 Remove all pieces of shipping tape from the unit 3 Remove all pieces of shipping tape from the outside...

Page 4: ...n a level surface with plenty of room to work 1 Attach the sending document feeder Attaching Miscellaneous Items Lift the operator panel and remove the soft piece of styrofoam from the unit s Automati...

Page 5: ...G Page 5 File 55 QSP5 eps W Swanlund CORREX August 12 98 Attach the output tray extension 3 Squeeze the ends of the support and insert them in the slots on the output tray then gently release them Fit...

Page 6: ...in answering machine to the MultiPASS C5500 If you have a separate telephone and a separate answering machine be sure to attach the telephone to the answering machine and then attach the answering mac...

Page 7: ...ant A cable of 6 6 feet or less in length is recommended Align the cable connector with the interface port so the shapes match Gently press the cable connector into the port Secure the cable connector...

Page 8: ...outlet This is a safety feature If you are unable to insert the plug into your outlet contact an electrician to replace your outlet do not use a 3 to 2 adapter Do not defeat the safety purpose of the...

Page 9: ...or high quality color printing Use the BC 22e Photo BJ Cartridge for photo quality color printing Use the BC 20 Black BJ Cartridge for high speed black ink only printing Use the BC 29F Neon BJ Cartrid...

Page 10: ...f the unit so you can install the BJ cartridge If the cartridge holder is not in the center press the CARTRIDGE button on the operator panel Do not move the cartridge holder manually this may damage t...

Page 11: ...ri dge BCl 2 1 Ma de in Jap an Co lor Ink Ca rtri dge BCl 2 1 Ma de in Jap an Blac k Ma de in Jap an Col or BJ Car trid ge BC 21 Ink Ca rtri dg e BCl 2 1 Ma de in Ja pa n Blac k Ink Ca rtri dg e BCl 2...

Page 12: ...ert the BJ cartridge 5 Carefully set the BJ cartridge straight down into the cartridge holder Make sure the cartridge label faces you In k Cartridge BCl 21 Colo r Made in Japan In k C artrid ge B C l...

Page 13: ...ys The MultiPASS C5500 cleans the print head and then displays the date and mode The printer is now in Standby mode Unplug the MultiPASS C5500 ONLY when it is in Standby mode the date and Receive mode...

Page 14: ...C5500 first then tap the stack on a flat surface to even its edges Make sure the right edge of the stack is aligned with the right side of the sheet feeder LIMIT MARK Do not fill the sheet feeder abov...

Page 15: ...es you are required by FCC regulations to include this information every time you send a fax Receive mode During installation you will choose one of these four Receive modes to determine how your Mult...

Page 16: ...the MultiPASS Desktop Manager installed you must remove it See your User s Manual for details 1 Make sure your computer is turned off 2 Be sure the MultiPASS C5500 is plugged in and connected to the...

Page 17: ...click Start and then Run 2 You see this screen 3 Follow the on screen instructions Be sure to wait for Windows to complete each operation Some operations may take awhile if you hear your computer wor...

Page 18: ...tallation Next the Master Installer programs your fax information You see a series of screens on which you specify your Receive mode by responding to various questions See page 15 for details on the d...

Page 19: ...to install TextBridge Plus software Follow the instructions on the screens See your Canon Creative Pro booklet for details The Setup program allows you to continue with or skip installation of Canon C...

Page 20: ...d 3 Confirm that the MultiPASS is configured for the correct parallel port in the Details tab of the Printer Properties In addition confirm that there are no port conflicts in the Device Manager tab o...

Page 21: ...tware Canon Creative Pro is a suite of professional business applications that gives you the power to create and print remarkable presentation documents and effective marketing collateral Professional...

Page 22: ...Help features of Windows You access the Printer Driver in Windows 98 95 in one of the following ways From within any Windows application select the Print or Print Setup command From the Printers fold...

Page 23: ...and operation of your MultiPASS see your User s Manual The Graphics Tab MPC55 DRIVER_4 eps SELECT PRINT QUALITY MODE SELECT FINE MODE SELECT A COLOR MODEL SELECT A PRINT MODEL SELECT IMAGE COLOR MATCH...

Page 24: ...t printer driver using your modem 24 hour Bulletin Board Service Canon Computer Systems Inc offers a full range of customer technical support options including Canon Canada Within Canada 24 hours a da...

Reviews: