1.2 Connecting the Printer to the Computer
(1) Make sure the computer is powered off.
(2) Make sure the fax outlet is pulled out to turn off the power.
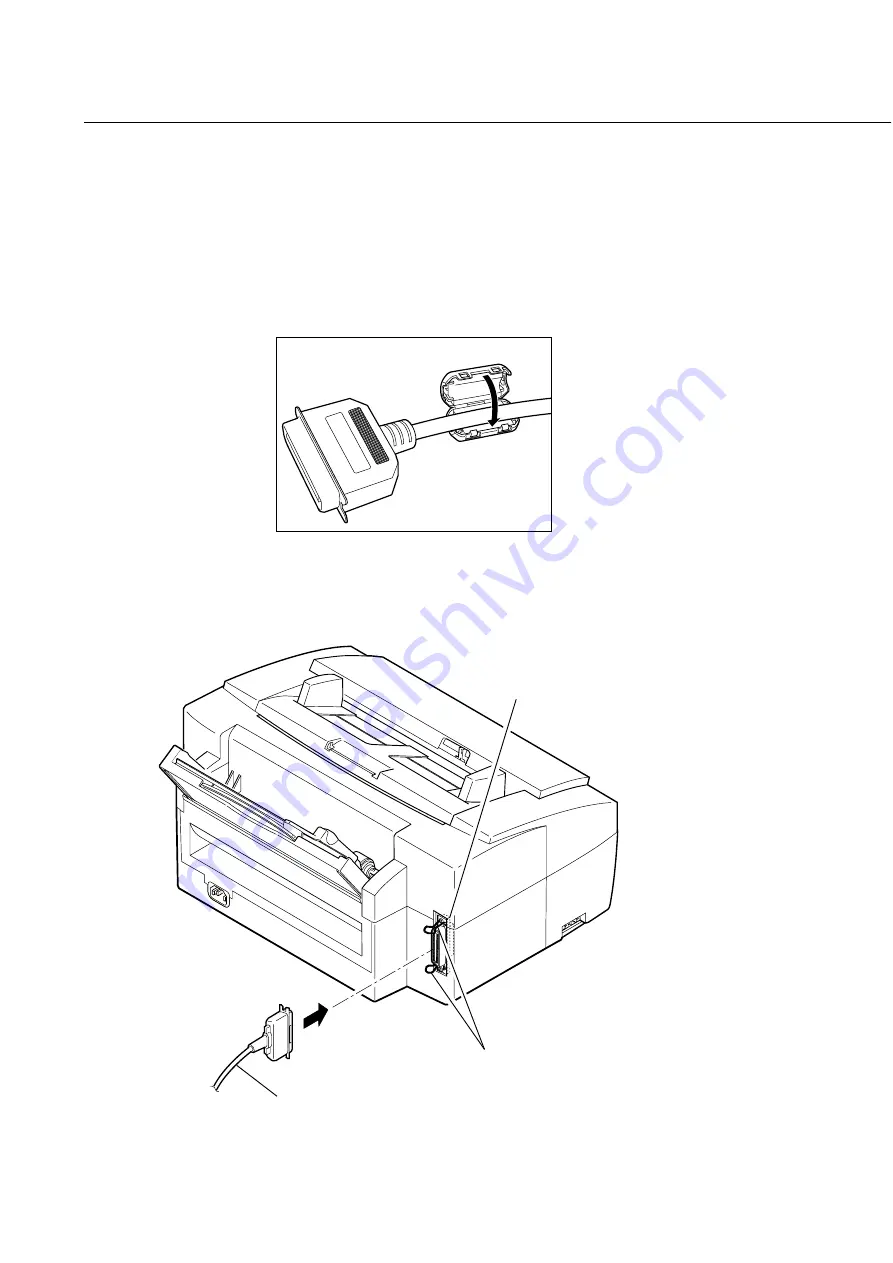
(3) Align the cable connector with the printer's parallel interface connecter so the shapes match. Gently
press the cable connector into the printer's connector.
(4) Secure the cable connector by snapping the two wire clips (located on the printer) into the cable
connector.
(5) Open the ferrite core and attach it to the parallel cable near the end closest to the MultiPASS C50 Unit.
(6) Connect the other end of the interface cable to the parallel port on the computer.
Chapter 4: Appendix
4-3
Parallel interface connector
Connector clips
Interface cable
Figure 4-3 Connecting the Interface Cable
Figure 4-2 Attaching the Ferrite Core
Summary of Contents for MultiPASS C50
Page 5: ...III REVISION HISTORY REVISION CONTENT 0 Original III ...
Page 16: ...XIV This page intentionally left blank ...
Page 17: ...Part 1 Facsimile ...
Page 18: ......
Page 19: ...Chapter 1 General Description ...
Page 20: ......
Page 71: ...Chapter 1 General Description 1 51 Waste Ink absorber Figure 1 23 Waste Ink Absorber ...
Page 78: ...Part 1 Facsimile 1 58 This page intentionally left blank ...
Page 79: ...Chapter 2 Technical Reference ...
Page 80: ......
Page 116: ...Part 1 Facsimile 2 36 This page intentionally left blank ...
Page 117: ...Chapter 3 Maintenance and Service ...
Page 118: ......
Page 143: ...Chapter 3 Maintenance Service 3 25 This page intentionally left blank ...
Page 175: ...Chapter 3 Maintenance Service 3 57 Figure 3 30 Print Pattern Sample ...
Page 189: ...a 2 System dump list Chapter 3 Maintenance Service 3 71 Figure 3 37 System Dump List 1 2 ...
Page 197: ...Chapter 4 Appendix ...
Page 198: ......
Page 216: ...Part 1 Facsimile 4 18 This page intentionally left blank ...
Page 221: ...Part 2 Printer ...
Page 222: ......
Page 223: ...Chapter 1 General Description ...
Page 224: ......
Page 238: ...Part 2 Printer 1 14 This page intentionally left blank ...
Page 239: ...Chapter 2 Technical Reference ...
Page 240: ......
Page 255: ...Chapter 3 Maintenance and Service ...
Page 256: ......
Page 265: ...Chapter 4 Appendix ...
Page 266: ......
Page 270: ...Part 2 Printer 4 4 This page intentionally left blank ...
Page 271: ...0298 SC 2 00 0 ...


