


Advanced Guide
>
Printing from a Computer
>
Printing with the Bundled Application Software
>
Correcting and
Enhancing Photos
> Using the Face Brightener Function
A062
Using the Face Brightener Function
You can brighten dark faces caused by bright background.
Note
You can brighten dark photos caused by bright background automatically by selecting Auto Photo
Fix.
If the correction had not been made sufficiently, applying Face Brightener function is recommended.
Using the Auto Photo Fix Function
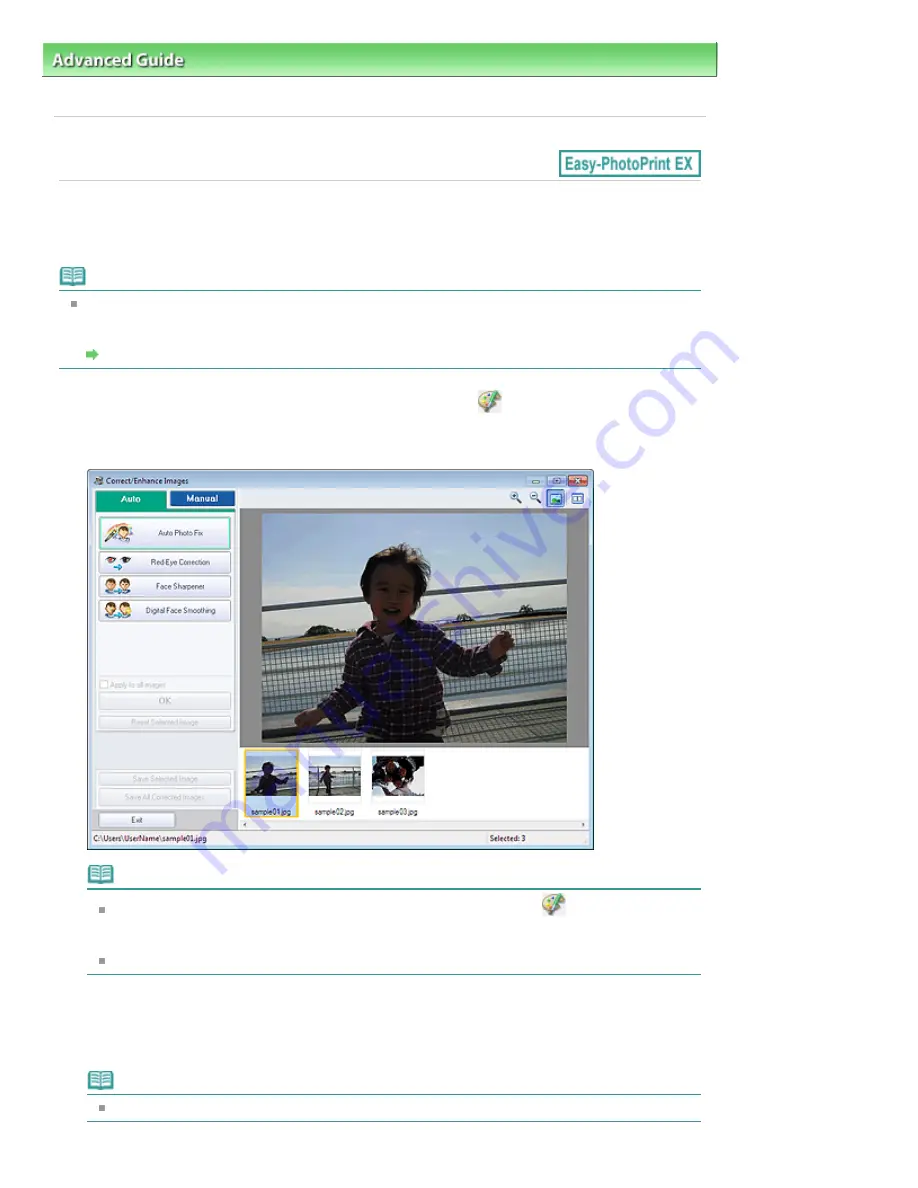
1.
Select photos in the Select Images screen, then click
(Correct/Enhance
Images).
The Correct/Enhance Images window appears.
Note
You can also display the Correct/Enhance Images window by clicking
(Correct/Enhance
Images) in the Layout/Print or Edit screen. In that case, only the image displayed in Preview
can be corrected/enhanced.
See "
Correct/Enhance Images Window
" for details on the Correct/Enhance Images window.
2.
Select the image you want to correct from the thumbnail list in the Correct/Enhance
Images window.
The image appears in Preview.
Note
If only one image is selected, the thumbnail list does not appear below Preview.
Strana 220 z celkového počtu 948
Using the Face Brightener Function
Summary of Contents for MG5100 series
Page 54: ...Na začiatok strany Strana 54 z celkového počtu 948 Tlač fotografií Easy PhotoPrint EX ...
Page 60: ...Na začiatok strany Strana 60 z celkového počtu 948 Tlač webových stránok Easy WebPrint EX ...
Page 73: ...Na začiatok strany Strana 73 z celkového počtu 948 Vkladanie papiera ...
Page 76: ...Na začiatok strany Strana 76 z celkového počtu 948 Vkladanie papiera do kazety ...
Page 89: ...Na začiatok strany Strana 89 z celkového počtu 948 Umiestnenie originálov ...
Page 99: ...Na začiatok strany Strana 99 z celkového počtu 948 Výmena kazety s atramentom ...
Page 108: ...Na začiatok strany Strana 108 z celkového počtu 948 Čistenie tlačovej hlavy ...
Page 178: ...See Help for details on the Edit screen Page top Strana 178 z celkového počtu 948 Editing ...
Page 182: ...Page top Strana 182 z celkového počtu 948 Printing Stickers ...
Page 194: ...Page top Strana 194 z celkového počtu 948 Selecting the Paper and Layout ...
Page 198: ...Page top Strana 198 z celkového počtu 948 Editing ...
Page 262: ...Page top Strana 262 z celkového počtu 948 Cropping Photos Photo Print ...
Page 266: ...Page top Strana 266 z celkového počtu 948 Printing an Index ...
Page 272: ...Page top Strana 272 z celkového počtu 948 Opening Saved Files ...
Page 276: ...Page top Strana 276 z celkového počtu 948 Changing Layout ...
Page 284: ...Page top Strana 284 z celkového počtu 948 Replacing Photos ...
Page 288: ...Page top Strana 288 z celkového počtu 948 Cropping Photos ...
Page 296: ...Page top Strana 296 z celkového počtu 948 Adding Text to Photos ...
Page 308: ...Page top Strana 308 z celkového počtu 948 Setting a Page Size and Orientation ...
Page 315: ...border before printing Page top Strana 315 z celkového počtu 948 Execute Borderless Printing ...
Page 547: ...Page top Strana 547 z celkového počtu 948 Navigation Mode Screen ...
Page 549: ...Page top Strana 549 z celkového počtu 948 Scan Import Documents or Images Tab ...
Page 590: ...Page top Strana 590 z celkového počtu 948 Send via E mail Dialog Box ...
Page 597: ...Page top Strana 597 z celkového počtu 948 Correct Enhance Images Window ...
Page 613: ...Page top Strana 613 z celkového počtu 948 Save Dialog Box ...
Page 688: ...Related Topic Scanning in Basic Mode Page top Strana 688 z celkového počtu 948 Basic Mode Tab ...
Page 711: ...Page top Strana 711 z celkového počtu 948 Scanner Tab ...
Page 788: ...Page top Strana 788 z celkového počtu 948 Bluetooth settings Screen ...
Page 814: ...Page top Strana 814 z celkového počtu 948 Changing the Print Options ...
Page 860: ...Na začiatok strany Strana 860 z celkového počtu 948 Papier sa správne nepodáva ...
Page 932: ...Page top Strana 932 z celkového počtu 948 Installing the MP Drivers ...
Page 942: ...Page top Strana 942 z celkového počtu 948 Restrictions on Printer Sharing ...
Page 946: ...Page top Strana 946 z celkového počtu 948 Using Easy PhotoPrint EX ...


