


feed position differs depending on
Media Type
. If
Media Type
is set to something other than
plain paper, it cannot be fed from the cassette (main tray).
• If printing paper such as photo paper and postcards that cannot be printed on both sides,
uncheck the
Two-Sided
checkbox.
Note
• Use the Print dialog to set general print settings such as the layout and the print sequence.
For information about print settings, refer to macOS help.
7.
Click
The printer prints according to the specified settings.
Important
• If you are performing large-format printing, make sure that there is plenty of remaining ink.
• If you set a custom paper size in
Paper Size
and set it to a length longer than the specified length,
the data will be printed with the "Media Type: Plain Paper, Print Quality: Standard" setting.
Note
• It can take the Wi-Fi a few minutes to get connected after the printer turns on. Print after checking
that the printer is connected to the network.
• You cannot print if Bonjour settings of printer are disabled. Check
LAN
settings of printer and enable
Bonjour settings.
• Refer to "Cannot Print Using AirPrint" for printing problems.
• The display of the settings screen may differ depending on the application software you are using.
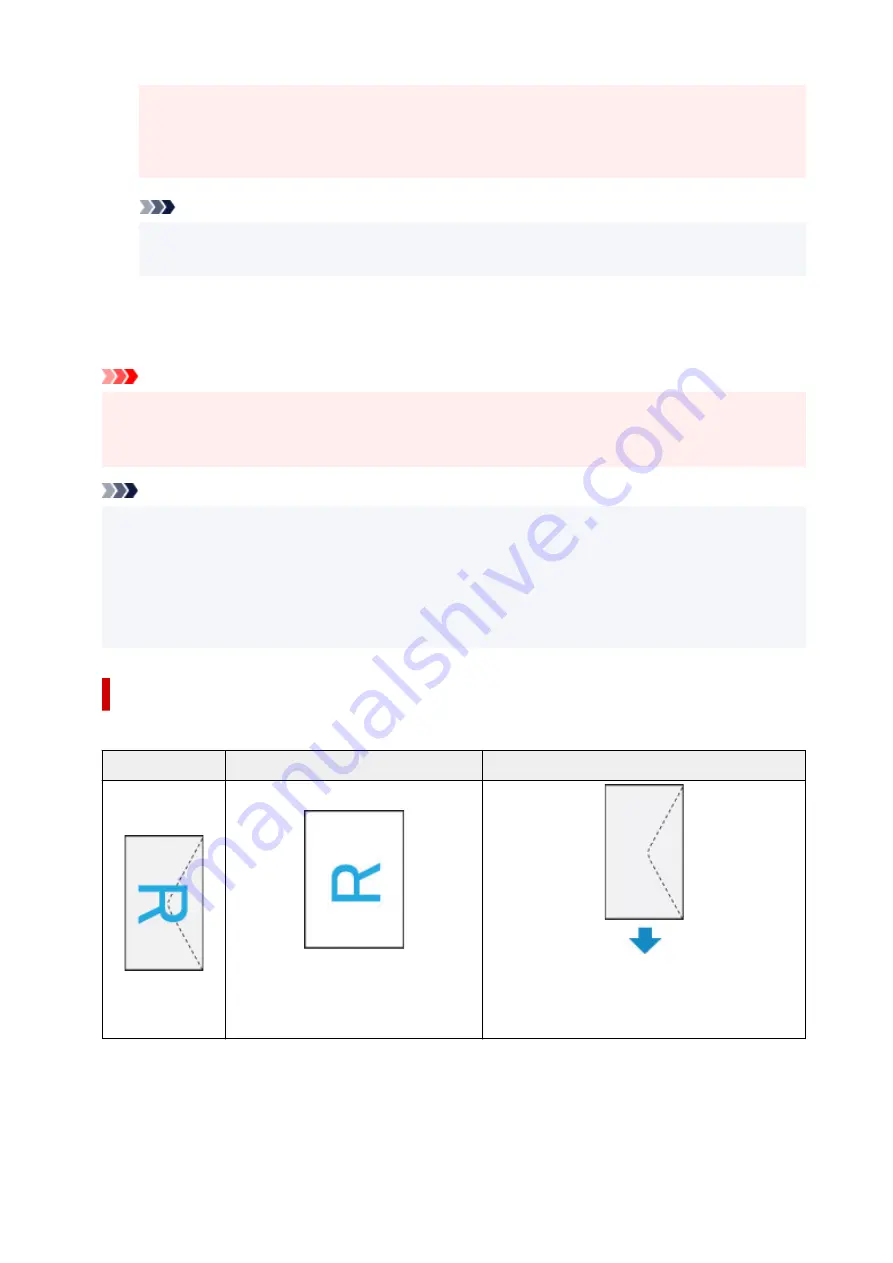
Printing of Envelopes
For printing on the envelope from Mac, refer to the following.
Print result image
Orientation of print data
Orientation of loading envelope
The print data is rotated by 180 degrees
against the print result image.
Load the envelope in vertically with the address side
facing up so that the folded flap of the envelope will
be faced down on the right side.
233
Summary of Contents for MAXIFY GX6021
Page 1: ...GX6000 series Online Manual English ...
Page 85: ...Inserting a USB Flash Drive Inserting a USB Flash Drive Removing a USB Flash Drive 85 ...
Page 88: ...Refilling Ink Tanks Refilling Ink Tanks Checking Ink Level Ink Tips 88 ...
Page 100: ... For macOS Adjusting Print Head Position 100 ...
Page 113: ...14 When confirmation message appears select OK 113 ...
Page 129: ...129 ...
Page 132: ...Safety Safety Precautions Regulatory Information WEEE EU EEA 132 ...
Page 157: ...157 ...
Page 160: ...Main Components and Their Use Main Components Power Supply Using Touch Screen 160 ...
Page 161: ...Main Components Front View Rear View Inside View Operation Panel 161 ...
Page 178: ...Use to view lists of items or move sliders 178 ...
Page 185: ...For more on setting items on the operation panel Setting Items on Operation Panel 185 ...
Page 241: ...Printing Using Canon Application Software Easy PhotoPrint Editor Guide 241 ...
Page 266: ...Note To set the applications to integrate with see Settings Dialog 266 ...
Page 268: ...Scanning Multiple Documents at One Time from the ADF Auto Document Feeder 268 ...
Page 270: ...Scanning Tips Positioning Originals Scanning from Computer 270 ...
Page 291: ...If the problem is not resolved click here and redo setup 291 ...
Page 302: ...Other Network Problems Checking Network Information Restoring to Factory Defaults 302 ...
Page 334: ...Scanning Problems macOS Scanning Problems 334 ...
Page 335: ...Scanning Problems Scanner Does Not Work Scanner Driver Does Not Start 335 ...
Page 348: ...Errors and Messages When Error Occurred Message Support Code Appears 348 ...
Page 371: ...5 Attach rear cover Push in the rear cover until it is closed completely 371 ...


