background image

14

2. Installation and Connections

 Making Connections

NOTE: When using with a notebook PC, be sure to connect the projector and notebook PC while the projector is in standby 

mode and before turning on the power to the notebook PC.

In most cases the output signal from the notebook PC is not turned on unless connected to the projector before being powered 

up.

*  If the screen goes blank while using your remote control, it may be the result of the computer's screen-saver or power man-

agement software.

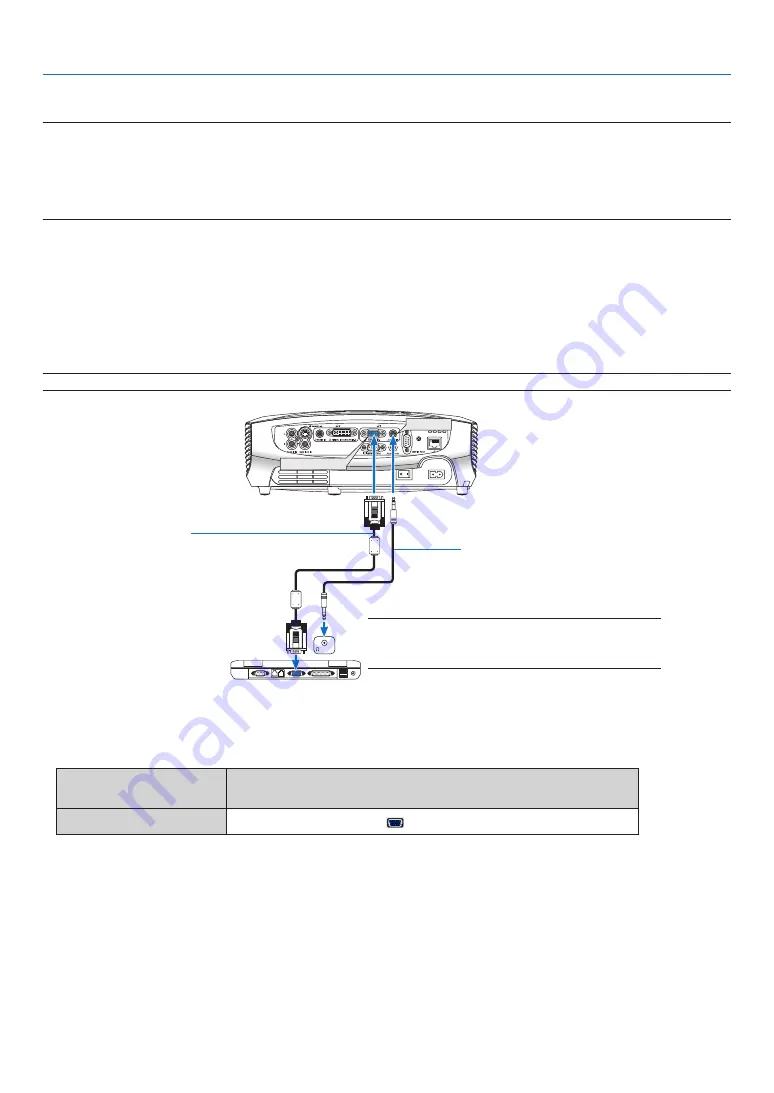
Connecting Your PC or Macintosh Computer

Enabling the computer’s external display

Displaying an image on the notebook PC’s screen does not necessarily mean it outputs a signal to the projector.
When using a PC compatible laptop, a combination of function keys will enable/disable the external display.
Usually, the combination of the ‘Fn” key along with one of the 12 function keys gets the external display to come 
on or off. For more details, refer to your computer’s owner’s manual.

NOTE: The ANALOG IN-1 and DIGITAL IN/ANALOG IN-2 connectors are supported by Plug & Play.


ANALOG IN-1

AUDIO IN 

AUDIO IN 

DIGITAL IN/

ANALOG IN-2

PHONE

PHONE

iBM Vga or Compatibles (notebook 
type) or Macintosh (notebook type)

Vga cable (supplied)

to mini d-sub 15-pin connector on the 
projector. it is recommended that you use 
a commercially available distribution am-
plifier if connecting a signal cable longer 
than the cable supplied.

NOTE: For older Macintosh, use a commercially avail-
able pin adapter (not supplied) to connect to your Mac’s 
video port.

stereo mini-plug audio cable 
(not supplied)

•  Select the input name for its appropriate input connector after turning on the projector.

Input connector

Use the INPUT button on the projector cabinet or the remote 

control to select the appropriate input from the menu.

ANALOG IN-1

 Computer 1

Summary of Contents for LV-7285

Page 1: ...MULTIMEDIA PROJECTOR LV 7385 LV 7380 LV 7285 LV 7280 LV 8310 LV 8215 User s Manual ...

Page 2: ... provided The information should be read carefully to avoid problems WARNING TO PREVENT FIRE OR SHOCK DO NOT EXPOSE THIS UNIT TO RAIN OR MOISTURE DO NOT USE THIS UNIT S PLUG WITH AN EXTENSION CORD OR IN AN OUTLET UNLESS ALL THE PRONGS CAN BE FULLY INSERTED DO NOT OPEN THE CABINET THERE ARE HIGH VOLTAGE COMPONENTS INSIDE ALL SERVICING MUST BE DONE BY QUALIFIED SERVICE PERSONNEL Machine Noise Inform...

Page 3: ...of Part 15 of FCC Rules Do not make any changes or modifications to the equipment unless otherwise specified in the instructions If such changes or modifications should be made you could be required to stop operation of the equipment Canon U S A Inc One Canon Plaza Lake Success NY 11042 U S A Tel No 516 328 5600 Canadian Radio Interference Regulations This Class B digital apparatus complies with C...

Page 4: ...Open windows and doors for ventilation If you inhale the gas or the shards of the broken lamp enter your eyes or mouth consult the doctor immediately If a lamp explodes its shards may scatter inside the projector Ask the Canon service representa tive to clean and check the inside of the projector and replace the lamp DISPOSAL OF WASTE LAMP Dispose of the mercury lamp of the projector according to ...

Page 5: ...tained resulting in poor picture Do not use the projector in a place where the temperature becomes very high or low Operating temperature 5 C to 40 C Storage temperature 10 C to 50 C Quiet mode selected automatically at 95 F to 104 F 35 C to 40 C Place the projector in a horizontal position The tilt angle of the projector should not exceed 10 degrees nor should the projector be installed in any wa...

Page 6: ...led into the projector or if it has been exposed to rain or water If the projector does not operate normally when you follow the instructions described in this user s manual If the projector has been dropped or the cabinet has been damaged If the projector exhibits a distinct change in performance indicating a need for service Disconnect the power cord and any other cables before carrying the proj...

Page 7: ...erent types of batteries together Dispose of used batteries according to your local regulations About High altitude mode Set Fan mode to High altitude when using the projector at altitudes approximately 5500 feet 1600 meters or higher See page 63 Using the projector at altitudes approximately 5500 feet 1600 meters or higher without setting to High altitude can cause the projector to overheat and t...

Page 8: ...80 11 Throw Distance and Screen Size 11 Selecting a Location LV 8310 LV 8215 12 Throw Distance and Screen Size 12 Making Connections 14 Enabling the computer s external display 14 Connecting Your PC or Macintosh Computer 14 When Viewing a DVI Digital Signal 16 Connecting an External Monitor 18 Connecting Your Audio Video Equipment with Component Output 19 Connecting Your Audio Video Equipment with...

Page 9: ...tions Functions Input 51 Menu Descriptions Functions Adjustment 52 Menu Descriptions Functions Setup 59 Menu Descriptions Functions Information 66 Menu Descriptions Functions Reset 68 6 Maintenance 69 Cleaning or Replacing the Filter 69 Cleaning the Cabinet and the Lens 70 Replacing the Lamp 71 7 Appendix 74 Troubleshooting 74 Specifications 77 Cabinet Dimensions 79 Pin Assignments of D Sub ANALOG...

Page 10: ...l box and packing materials if you ever need to ship your projector Projector Lens cover AC power cord VGA cable 7N520077 Soft case Q u i c k S t a r t G u i d e I m p o r t a n t I n f o r m a t i o n CD ROM User s manual Quick Start Guide Important Information 1 Introduction Remote control Batteries AAA 2 DVI to VGA adapter Warranty ...

Page 11: ...s of CO2 emission reduction kg when the projector s Lamp mode is set to Quiet mode The amount of CO2 emission reduction will be displayed in the confirmation mes sage at the time of power off and in the Information of the on screen menu Less than 1W in standby condition with energy saving technology Selecting Power saving for Standby mode from the menu can put the projector in power saving mode th...

Page 12: ...ed trademarks or trademarks of Microsoft Corpo ration in the United States and or other countries MicroSaver is a registered trademark of Kensington Computer Products Group a division of ACCO Brands Other product and company names mentioned in this user s manual may be the trademarks or registered trademarks of their respective holders Comparative Table of Main Features The main features vary depe...

Page 13: ...page 23 Main Power Switch When you plug the supplied power cord into an active wall outlet and turn on the Main Power the POWER indicator turns orange and the projector is in standby mode See page 24 Terminal Panel See page 6 Monaural Speaker 7W Rear This security slot supports the MicroSaver Security System Ventilation outlet Heated air is exhausted from here Do not block this vent Troubles or fi...

Page 14: ...ually it indicates that the lamp mode is set to Quiet See the LAMP In dicator section on page 74 for more details This indicator lights green for about 90 seconds im mediately after the projector is powered on 5 INPUT Button Selecting from INPUT List Press and quickly release the INPUT button to dis play the INPUT list Each time the INPUT button is pressed the input source will change To display t...

Page 15: ... this jack to output sound to your audio video equipment from the currently selected source Output sound level can be adjusted in accordance with the sound level of the internal speaker Note that this cannot be used as a headphone jack When audio equipment is connected the projector speaker is disabled When a cable mini plug is inserted into this jack both the right and left audio signals are not ...

Page 16: ...to dis play the INPUT list Each time the INPUT button is pressed the input source will change Detecting the Signal Automatically Press and hold the INPUT button for a minimum of 2 seconds the projector will search for the next available input source See page 26 6 AUTO PC Button Use this button to adjust an analog RGB source for an optimal picture See page 34 7 ASPECT Button Press this button once ...

Page 17: ...the same way as the BACK button on the cabinet See page 5 13 VOL Button Press to increase the volume and to de crease it See page 34 14 D ZOOM Button Use this button to adjust the image size up to 400 The image is magnified about the center of the screen See page 37 15 FREEZE Button This button will freeze a picture Press again to re sume motion See page 37 ...

Page 18: ...y and slide the battery cover off 2 Remove both old batteries and install new ones AAA Ensure that you have the batteries po larity aligned correctly 3 Slip the cover back over the bat teries until it snaps into place Do not mix different types of batter ies or new and old batteries Remote sensor on projector cabinet 7m 22 feet The infrared signal operates by line of sight up to a distance of abou...

Page 19: ...t first Set up a screen and the projector See page 11 12 Connect your computer or audio video equipment to the projector See pages 14 16 17 18 19 20 21 22 Connect the supplied power cord See page 23 NOTE Ensure that the power cord and any other cables are disconnected before moving the projector When moving the projec tor or when it is not in use cover the lens with the lens cover 1 3 2 To the wal...

Page 20: ...o the screen The sizes in the above table have been obtained assuming that the aspect ratio is 4 3 They may vary from the actual sizes depending on the type of the projected image Screen size W H cm 21 43 32 25 51 38 30 61 46 40 81 61 60 122 91 80 163 122 100 203 152 150 305 229 180 366 274 200 406 305 250 508 381 300 610 457 Projection distance Zoom max 0 8 m 2 6 0 9 m 3 0 1 2 m 3 9 1 9 m 6 2 2 5...

Page 21: ... 82 83 The sizes in the above table have been obtained assuming that the aspect ratio is 16 9 They may vary from the actual sizes depending on the type of the projected image Screen size W x H cm 21 45 x 28 25 54 x 34 30 65 x 40 40 86 x 54 60 129 x 81 80 172 x 108 100 215 x 135 150 323 x 202 180 388 x 242 200 431 x 269 250 538 x 337 300 646 x 404 Projection distance Zoom max 0 8 m 2 6 1 0 m 3 2 1 ...

Page 22: ...lf Only use your projector on a solid level surface If the projector falls to the ground you can be injured and the projector severely damaged Do not use the projector where temperatures vary greatly The projector must be used at temperatures between 41 F 5 C and 104 F 40 C Quiet mode selected automatically at 95 F to 104 F 35 C to 40 C Do not expose the projector to moisture dust or smoke This wi...

Page 23: ...ually the combination of the Fn key along with one of the 12 function keys gets the external display to come on or off For more details refer to your computer s owner s manual NOTE The ANALOG IN 1 and DIGITAL IN ANALOG IN 2 connectors are supported by Plug Play ANALOG IN 1 AUDIO IN AUDIO IN DIGITAL IN ANALOG IN 2 PHONE PHONE IBM VGA or Compatibles Notebook type or Macintosh Notebook type VGA cable...

Page 24: ...is played back via a commercially available scan converter This is because the projector will process a video signal as a computer signal at the default setting In that case do the following When an image is displayed with the lower and upper black portion of the screen or a dark image is not displayed correctly Project an image to fill the screen and then press the AUTO PC button on the remote co...

Page 25: ...en re connected an image may not be correctly displayed Should this happen restart your PC NOTE Use a DVI cable or the one compliant with the DDWG Digital Display Working Group DVI Digital Visual Interface revision 1 0 standard The DVI cable should be within 5 m 196 long Both single and dual types of DVI cable can be used The DVI DIGITAL connector accepts VGA 640x480 SVGA 800x600 1152x864 XGA 1024...

Page 26: ...so may cause damage to the connector of the projector Select the input name for its appropriate input connector after turning on the projector Input connector Use the INPUT button on the projector cabinet or the remote control to select the appropriate input from the menu ANALOG IN 1 Computer 1 DIGITAL IN ANALOG IN 2 Computer 2 Analog IBM PC or Compatibles Desktop type or Macintosh Desktop type IB...

Page 27: ... NOTE Daisy chain connection is not possible NOTE The signal from the DIGITAL IN ANALOG IN 2 connector cannot be output from the MONITOR OUT connector When audio equipment is connected the projector speaker is disabled Use an audio cable without a built in resistor Using an audio cable with a built in resistor turns down the sound VGA cable supplied VGA cable not supplied Stereo mini plug audio ca...

Page 28: ...ning on the projector Input connector Use the INPUT button on the projector cabinet or the remote control to select the appropriate input from the menu ANALOG IN 1 Computer 1 DIGITAL IN ANALOG IN 2 Computer 2 Analog NOTE Refer to your DVD player s owner s manual for more information about your DVD player s video output requirements Connecting Your Audio Video Equipment with Component Output Use au...

Page 29: ... projector Input connector Use the INPUT button on the projector cabinet or the remote control to select the appropriate input from the menu VIDEO IN VIDEO S VIDEO IN S VIDEO NOTE The AUDIO IN L MONO and R jacks RCA are shared between the Video and S Video inputs NOTE Refer to your audio video equipment s owner s manual for more information about your equipment s video output re quirements NOTE An...

Page 30: ...DVI digital cable Optional LV CA29 HDMI to DVI cable not supplied DVI connector HDMI connector Select the input name for its appropriate input connector after turning on the projector Input connector Use the INPUT button on the projector cabinet or the remote control to select the appropriate input from the menu DIGITAL IN ANALOG IN 2 Computer 2 Digital NOTE An image may not be displayed depending...

Page 31: ...to specify the Network Settings and the Alert Mail Settings for the projector over a LAN To use a LAN connection you are required to assign an IP address to the projector on the PROJECTOR NETWORK SETTINGS screen of the web browser on your computer For setting see page 43 44 45 46 Example of wired LAN connection Server Hub LAN cable not supplied NOTE Use a Category 5 or higher LAN cable ...

Page 32: ... to the On position I the projector will go into standby mode When in standby mode the POWER indicator will light orange and the STATUS indicator will light green to show that Normal mode is selected for Standby mode Make sure that the prongs are fully inserted into both the AC IN and the wall outlet To wall outlet CAUTION Do not try to touch the ventilation outlet on the left front when seen from...

Page 33: ... control for about 1 second The STATUS indicator goes off and the POWER indica tor starts blinking When the POWER indicator turns a steady green and the projector is ready to use Less than 4 seconds after turning on the power the projector is ready to display PC or video images Quick Start The quick start time is only when Standby mode is set to Normal in the on screen message If the projector is ...

Page 34: ...play the image When the Lamp mode is set to Quiet the LAMP indicator will light green If one of the following things happens the projector will not turn on If the internal temperature of the projector is too high the projector will not turn on to protect the internal system Please wait for the projector s internal components to cool down When the lamp reaches its end of usable life the projector w...

Page 35: ...e INPUT button is pressed the input source will change as follows Computer 1 Computer 2 Digital Analog VIDEO S VIDEO To display the selected source allow 1 second to elapse Detecting the Signal Automatically Press and hold the INPUT button for a minimum of 2 seconds the projector will search for the next available input source Each time you press and hold the INPUT button for a minimum of 2 second...

Page 36: ...2 4 Press the button six times to select Default Source Select and press the OK button The Default Source Select screen will be displayed See page 65 5 Select a source as the default source and press the OK button 6 Press the BACK button a few times to close the menu 7 Restart the projector The source you selected in step 5 will be projected TIP When the projector is in Standby mode applying a com...

Page 37: ...ty Finely adjusting the size of an image Zoom See page 29 Adjusting the focus Focus See page 29 Adjusting the throw angle the height of an image Adjusting the Tilt Foot See page 30 Adjusting the left and right tilt of an image Adjusting the left and right tilt of an image Rear foot See page 30 Adjusting the keystone correction Correcting Keystone Distortion See page 32 33 Keystone correction can b...

Page 38: ...29 3 Projecting an Image Basic Operation Focus Use the FOCUS ring to obtain the best focus Zoom Use the ZOOM lever to adjust the image size on the screen ...

Page 39: ...stment for the front of the projector Rotate the rear foot to the desired height in order to square the im age on the projection surface CAUTION Do not use the tilt foot for purposes other than originally intended Misuses such as using the tilt foot to carry or hang from the wall or ceiling the projector can cause damage to the projector Adjusting the left and right tilt of an image Rear foot 1 Re...

Page 40: ...MENU button The menu will be displayed 2 Press the button to select Setup and press the OK button The General tab will be highlighted 3 Press the button The Auto keystone will be highlighted 4 Press the OK button to display the Auto keystone screen 5 Press the or button to select Off and press the OK button 6 Press the MENU button The menu will be closed NOTE Vertical distortions between offset an...

Page 41: ...the projector will cause your manual keystone adjustments to return to 0 To save your manual keystone adjustments first turn off Auto keystone and then turn on Keystone save See page 59 NOTE Auto and Manual Keystone correction angle could be less than 30 degrees depending on the signal and or aspect ratios Using keystone correction can cause the image to be slightly blurred because the correction ...

Page 42: ...the MENU button The menu will be displayed 2 Press the button to select Setup and press the OK or button 3 Press the button to select Keystone adjustment from the General tab 4 Press the or button Adjust so that the image is rectangular 5 Press the MENU button The menu will be closed ...

Page 43: ...ss talk This is evident when part of your image appears to be shimmering This adjustment may be necessary when you connect your computer for the first time NOTE Some signals may not be displayed correctly or take time The Auto PC adjustment function does not work for component video and DVI digital signals If the Auto PC adjustment operation cannot optimize the RGB signal try to adjust Horizontal ...

Page 44: ...s turned on and while the POWER indicator is blinking green Doing so could cause premature lamp failure 2 Press the POWER button again The projector turns off and goes into standby mode When in standby mode the POWER indicator will light or ange the cooling fans stop at the same time and the STA TUS indicator will light green 3 Turn off the Main Power switch The POWER indicator will go out The pro...

Page 45: ...moved 4 Cover the lens with the lens cover 5 Put the projector and its accessories in the supplied soft case NOTE When placing the projector in the soft case retract the tilt feet and the rear feet Failure to do so may case damage to the projector CAUTION Use caution when putting the projector in the soft case immediately after the projector has been operating The projector cabinet is hot 3 Projec...

Page 46: ...an enlarge the picture up to 400 percent NOTE The maximum magnification may be less than four times depending on the signal To do so 1 Press the D ZOOM button to magnify the picture To move the magnified image use the button 2 Press the button The area of the magnified image will be moved 3 Press the D ZOOM button Each time the D ZOOM button is pressed the image is reduced NOTE The image will be e...

Page 47: ... screen Select Setup Menu Eco message On See page 60 61 The lamp life remaining and lamp hours used can be checked in Usage time Select Information Usage time See page 66 The projector will only operate in the Quiet mode for 90 seconds immediately after the lamp is turned on The lamp condition will not be affected even when Lamp mode is changed If there is no signal for about one minute the projec...

Page 48: ... reduction between the time of changing to Quiet mode immediately after the time of power on and the time of power off The Carbon sav ings Session message will be displayed in the Push POWER button again to turn off power Carbon savings Session 23 220 g CO2 message at the time of power off TIP The formula as shown below is used to calculate the amount of CO2 emission reduction Amount of CO2 emissi...

Page 49: ... Password function 1 Press the MENU button The menu will be displayed 2 Press the button twice to select Setup and press the button or the OK button to select General 3 Press the button twice to select Installation 4 Press the button three times to select Password and press the OK button The Off On menu will be displayed 5 Press the button to select On and press the OK button The Password screen w...

Page 50: ...h to the On position I 2 Press and hold the POWER button for about 1 second The projector will be turned on and display a message to the effect that the projector is password protected 3 Press the MENU button The Password screen will be displayed 4 Enter your password in the Password screen and press the OK button You can view the projected image NOTE The password disable mode is maintained until ...

Page 51: ... the OK button The Off On menu will be displayed 3 Select Off and press the OK button The Password Confirmation screen will be displayed 4 Type in your password and press the OK button When the correct password is entered the Password function will be disabled NOTE If you forget your password contact your dealer 4 Convenient Features ...

Page 52: ... Setting http 192 168 0 10 index html Alert Mail Setting http 192 168 0 10 lanconfig html TIP The default IP address is 192 168 0 10 NOTE If the PROJECTOR NETWORK SETTINGS screen does not appear in the web browser press the Ctrl F5 keys to refresh your web browser or clear the cache The display s or button s response can be slowed down or operation may not be accepted depending the settings of you...

Page 53: ...AN SUBNET MASK Set your subnet mask number of the network connected to the projector when DISABLE is selected for DHCP DEFAULT GATEWAY Set your default gateway of the network connected to the projector when DISABLE is se lected for DHCP DNS PRIMARY Set your primary DNS settings of the network connected to the projector DNS SECONDARY Set your secondary DNS settings of the network connected to the p...

Page 54: ...on the Alert Mail feature Checking DISABLE will turn off the Alert Mail feature SENDER S ADDRESS Type in the senders address Up to 60 alphanumeric and symbols characters can be used SMTP SERVER NAME Type in the SMTP server name to be connected to the projector Up to 60 alphanumeric characters can be used RECIPIENT S ADDRESS 1 to 3 Type in your recipient s address Up to 60 alphanumeric and symbols ...

Page 55: ...l name Serial number Lamp counter Filter cleaning Please clean filter Information Model name Serial number Filter counter Lamp counter Lamp cover error The lamp cover is not installed properly Check and re attach it if necessary Information Model name Serial number Lamp counter Cooling fan error The cooling fan has stopped Information Model name Serial number Lamp counter Lamp error The lamp will ...

Page 56: ...r cabinet to select the item you want to adjust or set You can use the buttons on the remote control or the projector cabinet to select the tab you want 5 Press the OK button on the remote control or the projector cabinet to display the submenu window 6 Adjust the level or turn the selected item on or off by using the buttons on the remote control or the projector cabinet Changes are stored until ...

Page 57: ... page to the front Available buttons Indicates currently available buttons on the projector cabinet or the remote control Solid triangle Indicates further choices are available A highlighted triangle indicates the item is active Key symbol Indicates the Key Lock is enabled Thermometer symbol Indicates the lamp is forcibly being cooled down because the internal temperature is too high High altitude...

Page 58: ...10 Wide zoom True size Auto LV 8310 LV 8215 Auto 4 3 16 9 15 9 16 10 Let terbox True size D image shift 0 Not available on LV 8310 LV 8215 Setup General Auto keystone On Off On Keystone adjustment Keystone save Off Off On Screen color Off Off Whiteboard Greenboard Greenboard Gray Light yellow Light green Light blue Sky blue Light rose Pink Lamp mode Normal Normal Quiet Closed caption Off Off Capti...

Page 59: ...t power on AC Off Off On Direct power on Comp1 Off Off On Power management Off Off 0 05 0 10 0 20 0 30 Default source select Last Last Auto Computer 1 Computer 2 Digital Com puter 2 Analog VIDEO S VIDEO Information Usage time Remaining lamp time Lamp counter Filter counter Total carbon savings Input Input signal Source index Horizontal frequency Vertical frequency Input signal type RGB COMPONENT V...

Page 60: ...gnal Computer 2 Digital Analog Selects the computer connected to your DIGITAL IN ANALOG IN 2 connector NOTE When the component input signal is connected to the DIGITAL IN ANALOG IN 2 connector select Computer 2 Analog VIDEO Selects what is connected to your VIDEO input audio video equipment S VIDEO Selects what is connected to your S VIDEO input audio video equipment NOTE A frame may freeze for a ...

Page 61: ... option allows you to adjust neutral tint for yellow cyan or magenta There are five factory presets optimized for various types of images you can set user adjustable settings Standard Select this to project an image with a similar quality to that of the original image An image is projected with a high regard for reproduction of white Presentation Select this to project an image with a similar qual...

Page 62: ...tions other than Off when a Video or S Video input is selected Adjusting White Balance Brightness RGB Contrast RGB This allows you to adjust the white balance Brightness for each color RGB is used to adjust the black level of the screen Contrast for each color RGB to adjust the white level of the screen Adjusting Brightness Contrast Sharpness Color level and Color balance You can adjust brightness...

Page 63: ...ding that might appear This function adjusts the clock frequencies that eliminate the horizontal banding in the image This adjustment may be necessary when you connect your computer for the first time Tracking Use this item to adjust the clock phase or to reduce video noise dot interference or cross talk This is evident when part of your image appears to be shimmering Use Tracking only after the C...

Page 64: ...memory for the current signal The next time you project the signal with the same resolution horizontal and vertical frequency its adjustments will be called up and applied To delete adjustments stored in memory from the menu you select Reset Current signal or All data and reset the adjustments Selecting Overscan Percentage Overscan Select overscan percentage 0 5 and 10 for signal Projected image O...

Page 65: ...t ratio 15 9 The image is displayed in 15 9 aspect ratio 16 10 The image is displayed in 16 10 aspect ratio Wide zoom LV 7385 LV 7380 LV 7285 LV 7280 The image is stretched left and right Parts of the displayed image are cropped at the left and right edges and therefore not visible Letterbox LV 8310 LV 8215 The image of a letterbox signal is stretched equally in the horizontal and vertical direc t...

Page 66: ...the appro priate aspect ratio is automati cally determined Video signal Aspect ratio of incoming signal 4 3 Letterbox Squeeze Sample image when the aspect ratio is automatically determined NOTE To display a letterbox signal properly select Letterbox NOTE To display a squeezed signal properly select 16 9 TIP Image position can be adjusted vertically using D image shift when the 16 9 15 9 or 16 10 a...

Page 67: ...ition of Image D image shift not available on LV 8310 LV 8215 When 16 9 15 9 or 16 10 is selected in Aspect the image is displayed with black borders on the top and bot tom You can adjust the vertical position from the top to the bottom of the black area ...

Page 68: ...u can correct vertical distortion manually Saving Vertical Keystone Correction Keystone save This option enables you to save your current keystone settings Off Does not save current keystone correction settings On Saves current keystone correction settings Saving your change once affects all sources The changes are saved when the projector is off Selecting Wall Color Correction Mode Screen color T...

Page 69: ...sed caption is not available under the following conditions when messages or menus are displayed when an image is magnified frozen or muted Selecting Menu Language Language You can choose one of 21 languages for the on screen menu Menu Selecting Menu Color Color select You can choose between two color modes for menu color Color and Monochrome Turning On Off Input Display Input OSD This option turn...

Page 70: ...Selecting Interval Time for Filter Message Filter message The projector has a feature that informs you of the timing for cleaning the filters This item allows you to select the time preference between displaying the message for cleaning the filters Clean the filter when you get the message Please clean filter See page 69 Five options are available Off 100 H 200 H 500 H 1000 H 1500 H The default se...

Page 71: ...ill not affect the remote control or PC control functions When the cabinet buttons are disabled pressing and holding the BACK button on the projector cabinet for about 10 seconds will change the setting to enable TIP The Key lock icon will be displayed at the top right of the menu when Key lock is enabled Enabling Password Password This feature turns on or off the Password function Unless the corr...

Page 72: ...ion allows you to select three modes for fan speed Auto High and High altitude Auto The built in fans automatically run at a variable speed according to the internal temperature High The built in fans run at a fixed high speed High altitude The built in fans run at a high speed Select this option when using the projector in places at 5500 ft 1600 m or higher When you wish to cool down the temperat...

Page 73: ...385 LV 7380 LV 7285 or LV 7280 In this case select Off Enabling the deinterlace Progressive Turns on or off the deinterlace function for a telecine signal Off Select this option if there is any jitter or artifacts in video On Default standard setting NOTE This feature is not available for RGB and HDTV signals Enabling Key Sound and Error Sound Beep This feature turns on or off the keypad sound or ...

Page 74: ...to the ANALOG IN 1 connector when a Sync on Green RGB signal or composite sync signal is applied Once Direct power on Comp1 is turned on Power saving mode cannot be selected Power saving mode will not take effect regardless of whether it is selected for Standby mode To enable the Direct power on Comp 1 after turning off the projector wait 3 seconds and input an analog RGB signal If an analog RGB s...

Page 75: ... reaches 0 the Replace with the new lamp message will be displayed Re place with the new lamp See page 71 for lamp replacement The message for lamp replacement will be displayed under the following conditions one minute after the projector has been powered on when the POWER button on the projector cabinet or on the remote control is pressed To cancel the message press any button on the projector c...

Page 76: ...ource index Horizontal frequency Vertical frequency Input signal type Video type Sync type Sync polarity Scan type Wired LAN Projector name IP address Subnet mask Gateway address MAC address Version Model Serial number Firmware version Data version ...

Page 77: ...T MASK and GATEWAY to the default settings Clearing Lamp Hour Meter Lamp counter Resets the lamp clock back to zero Selecting this option displays submenu for a confirmation Select Yes and press the OK button NOTE Elapsed time of the lamp use will not be affected even when Reset is done from the menu NOTE The projector will turn off and go into standby mode when you continue to use the projector f...

Page 78: ...he Filter The air filter keeps dust and dirt from getting inside the projector and should be frequently cleaned If the filter is dirty or clogged your projector may overheat NOTE The message for filter cleaning will be displayed for one minute after the projector is turned on or off To cancel the message press any button on the projector cabinet or the remote control CAUTION Turn off the projector...

Page 79: ...r cover 2 locations Insert the filter cover until you feel click 4 Clear the filter hours used To reset the filter usage time from the menu select Reset Filter counter See page 68 for resetting the filter usage time NOTE Do not wash the filter with soap and water Soap and water will damage the filter membrane Before replacing the filter remove dust and dirt from the projector cabinet Keep out dust...

Page 80: ...use an unwanted shadow and poor picture quality The projector will turn off and go into standby mode when you continue to use the projector for another 100 hours after the lamp has reached the end of its life If this happens be sure to replace the lamp If you continue to use the lamp after the lamp reaches the end of its life the lamp bulb may shatter and pieces of glass may be scattered in the la...

Page 81: ...electrical shock Do not attempt to circumvent this interlock 2 Remove the lamp by holding it Interlock 1 Remove the lamp cover There are two locks on the left and right sides 1 Use the tip of the flathead screwdriver to push and release one lock 2 Do this for the other lock 3 Slowly pull the lamp cover in the direction of the arrow and lift it CAUTION Make sure that the lamp is cool enough to befo...

Page 82: ...ontrol for 10 seconds to reset the lamp clock back to zero When the lamp time clock is reset to zero the LAMP indicator goes out 4 Reattach the lamp cover 1 Insert three tabs into three grooves 2 Push down both ends of the lamp cover until you feel click 3 Install a new lamp 1 Insert a new lamp until the lamp is plugged into the socket CAUTION Do not use a lamp other than the replacement lamp LV L...

Page 83: ...5 sec Off Auto iris error The Auto iris function is not working properly LV 7285 and LV 7280 Contact your dealer Green Re firing the lamp The projector is re firing Wait for a moment Steady light Green Standby Normal for Standby mode Orange Key lock is on You have pressed cabinet button when Key lock is on See page 62 LAMP Indicator Indicator Condition Projector Condition Note Off Normal Blinking ...

Page 84: ...erature of the projector by selecting High for Fan mode See page 63 Color tone or Color balance is unusual Check if an appropriate color is selected in Screen color If so select an appropriate option See page 59 Adjust Color balance in Adjustment See page 53 Image isn t square to the screen Reposition the projector to improve its angle to the screen See page 28 Use the Keystone correction function...

Page 85: ...PC s LCD screen when the projector display is in use Each notebook PC has a different way of deactivate reactivate the local LCD screens as described in the pre vious step Refer to your computer s documentation for detailed information Image displayed is incorrect when using a Macintosh When using a Macintosh with the projector set the DIPswitch of the Mac adapter not supplied with the projec tor ...

Page 86: ...orrection 30 Vertical Auto keystone Effective pixels are more than 99 99 Compliance with ISO21118 2005 The value is measured when Auto iris is set to On Electrical LV 7385 LV 7380 LV 7285 LV 7280 LV 8310 LV 8215 Inputs 1 RGB Component D Sub 15 Pin 1 RGB Digital Analog DVI 29 P HDCP 4 supported 1 S Video DIN 4 Pin 1 Video RCA 1 L R RCA Audio 2 Stereo Mini Audio Outputs 1 RGB D Sub 15 Pin 1 Stereo M...

Page 87: ...sarily mean the projector is not functioning properly With the implementation of HDCP there may be cases in which certain content is protected with HDCP and might not be displayed due to the decision intention of the HDCP community Digital Content Protection LLC Mechanical LV 7385 LV 7380 LV 7285 LV 7280 LV 8310 LV 8215 Installation Orientation Front Rear Ceiling mounted Rear Ceiling mounted Dimen...

Page 88: ...79 7 Appendix Cabinet Dimensions Lens center Lens center Unit mm inch 80 3 2 317 12 5 336 13 2 115 4 5 55 2 2 ...

Page 89: ... 14 13 6 5 4 3 2 10 7 9 8 7 Appendix Pin No RGB Signal Analog YCbCr Signal 1 Red Cr 2 Green or Sync on Green Y 3 Blue Cb 4 Ground 5 Ground 6 Red Ground Cr Ground 7 Green Ground Y Ground 8 Blue Ground Cb Ground 9 No Connection 10 Sync Signal Ground 11 No Connection 12 Bi directional DATA SDA 13 Horizontal Sync or Composite Sync 14 Vertical Sync 15 Data Clock ...

Page 90: ...3 60 0 WXGA 1440 900 55 9 59 9 UXGA 1600 1200 75 0 60 0 1600 1200 81 3 65 0 1600 1200 87 5 70 0 1600 1200 93 8 75 0 MAC13 640 480 35 0 66 7 MAC16 832 624 49 7 74 6 MAC19 1024 768 60 2 74 9 MAC21 1152 870 68 7 75 1 MAC 1280 1024 64 3 60 4 1280 1024 69 9 65 2 1280 1024 78 4 73 7 HDTV 1080i 60 1920 1080 33 8 60 0 1080i 50 1920 1080 28 1 50 0 720p 1280 720 45 0 60 0 DVD 480i 720 480 15 7 59 9 576i 720...

Page 91: ... 123 264 165 140 285 213 4 4m 14 4 5 2m 17 1 180cm 5 9 33cm 1 1 132 285 178 150 305 229 4 7m 15 4 5 6m 18 4 193cm 6 3 36cm 1 2 142 305 191 160 325 244 5 0m 16 4 6 0m 19 7 206cm 6 8 38cm 1 3 151 325 203 170 345 259 5 3m 17 4 6 4m 21 0 219cm 7 2 41cm 1 3 160 345 216 176 358 268 5 5m 18 0 6 6m 21 7 226cm 7 4 42cm 1 4 166 358 224 180 366 274 5 6m 18 4 6 8m 22 3 231cm 7 6 43cm 1 4 170 366 229 190 386 2...

Page 92: ...8 2 172cm 5 6 16cm 0 5 124 251 188 150 323 202 5 0m 16 3 6 0m 19 5 184cm 6 0 18cm 0 6 132 269 202 160 345 215 5 3m 17 4 6 4m 20 9 197cm 6 4 19cm 0 6 141 287 215 170 366 229 5 6m 18 4 6 8m 22 2 209cm 6 9 20cm 0 7 150 305 229 176 379 237 5 8m 19 1 7 0m 23 0 216cm 7 1 21cm 0 7 155 316 237 180 388 242 6 0m 19 5 7 2m 23 5 221cm 7 3 21cm 0 7 159 323 242 190 409 256 6 3m 20 6 7 6m 24 8 233cm 7 7 22cm 0 7...

Page 93: ... 02H 03H 00H 00H 02H 01H 01H 09H INPUT SELECT Computer 2 Digital 02H 03H 00H 00H 02H 01H 1AH 22H INPUT SELECT Computer 2 Analog 02H 03H 00H 00H 02H 01H 02H 0AH INPUT SELECT VIDEO 02H 03H 00H 00H 02H 01H 06H 0EH INPUT SELECT S VIDEO 02H 03H 00H 00H 02H 01H 0BH 13H BLANK ON 02H 10H 00H 00H 00H 12H BLANK OFF 02H 11H 00H 00H 00H 13H SOUND MUTE ON 02H 12H 00H 00H 00H 14H SOUND MUTE OFF 02H 13H 00H 00H ...

Page 94: ...rence always sometimes How often _____________________ other __________________ Power No power POWER indicator does not light green See also STATUS Indicator Power cord s plug is fully inserted into the wall outlet Main power switch is pressed to the ON position Lamp cover is installed correctly Lamp counter lamp operation hours was cleared after lamp replacement No power even though you press and...

Page 95: ...number Length inch m Distribution amplifier Model number Switcher Model number Adapter Model number Projector PC Audio video equipment Installation environment Screen size inch Screen type White matte Beads Polarization Wide angle High contrast Throw distance feet inch m Orientation Ceiling mount Desktop Power outlet connection Connected directly to wall outlet Connected to power cord extender or ...

Page 96: ...8305 Dietlikon Switzerland CANON GMBH Zetschegasse 11 A 1230 Wien Austria CANON España S A C Joaquín Costa 41 28002 Madrid Spain CANON PORTUGAL S A Rua Alfredo da Silva 14 Alfragide 2610 016 Amadora Portugal CANON Belgium N V S A Berkenlaan 3 1831 Diegem Mechelen Belgium CANON Netherland NV Neptunusstraat 1 2132 JA Hoofddorp The Netherlands CANON LUXEMBOURG S A Rue des Joncs 21 L 1818 Howald Luxem...

Reviews: