Canon iPF650 - imagePROGRAF Color Inkjet Printer Install Manual Download Page 4

4

b

a

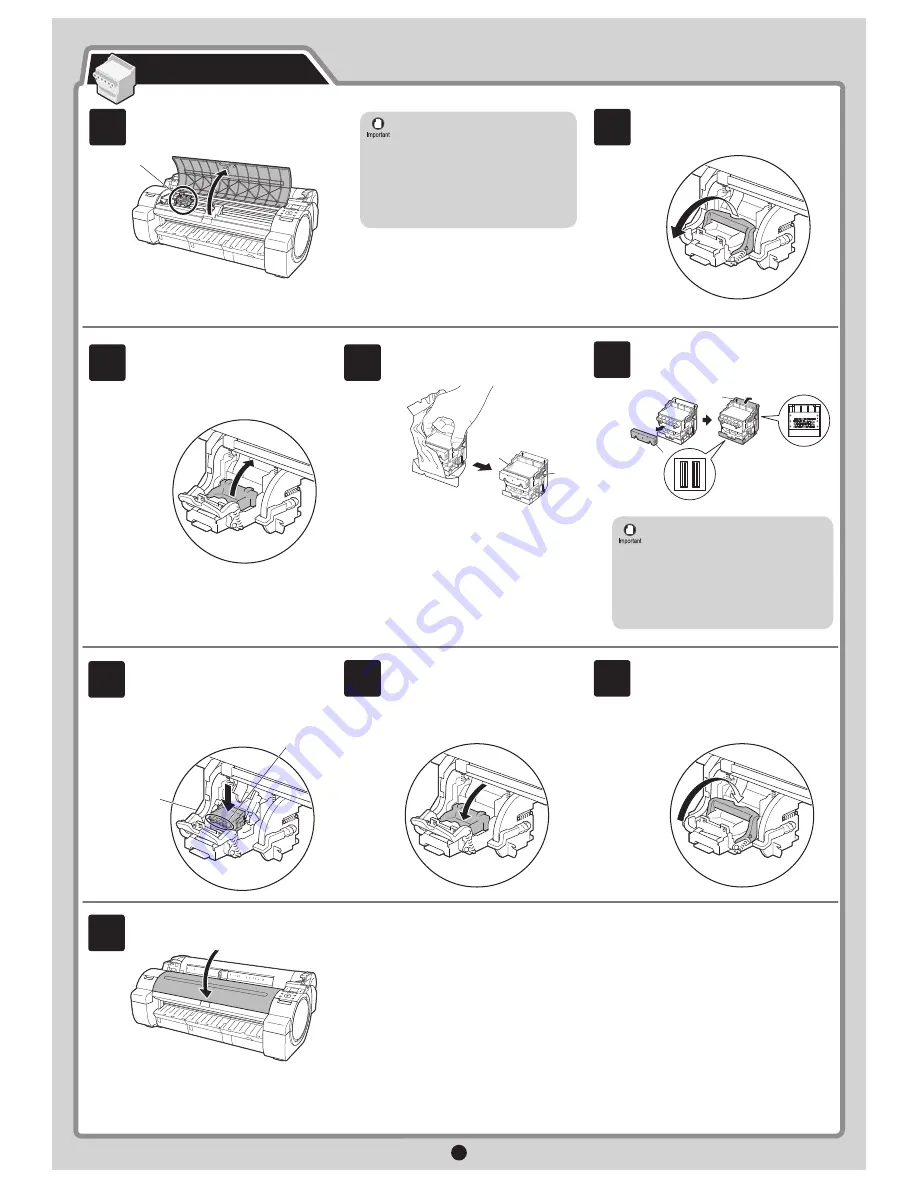
Push the  printhead 

fi

 xer lever    all the way 

back. 

Pull the  printhead 

fi

 xer cover    down toward 

the front to lock the  printhead    in place. 

Insert the  printhead    into the carriage (b) 

with the ink holes (a) facing away from the 

printer as shown in the 

fi

 gure. Carefully 

push the printhead 

fi

 rmly into the carriage 

(b), ensuring that the part covered by 

the protective part does not touch the 

carriage. 

6

7

8

Close the  top cover   . 

9

Next, install the printhead. 

Install the Printhead

When installing the printhead, do not 

move the carriage (a) from the position 

shown in the 

fi

 gure. 

If you move the carriage (a), a warning 

noise sounds and the printhead cannot 

be installed. 

If you have moved the carriage (a), 

close the top cover. The carriage (a) 

moves to the position shown in the 

fi

 gure. 


Open Upper Cover

    is shown on the 

display screen. As instructed, open the  top 

cover   . 

 Instructions on     printhead    replacement are 

shown on the display screen. 

Pull the  printhead 

fi

 xer lever    forward all 

the way to open it completely. 

1

2

a

Remove the orange protective part (a). 

To remove orange protective part (b), 

push the grip (c) as you remove the 

part

5

• Do not reattach the protective part after 

removing it. Dispose of these materials 

according to local regulations. 

Never touch the parts covered by the 

protective part. This may damage the 

printhead and affect printing quality. 

The printhead contains ink, so be careful 

not to spill it once the protective part is 

removed. 

Lift the  printhead 

fi

 xer cover    to open it 

fully. 

Hold the  printhead    by the grips (a) as you 

remove it from the pouch. 

a

a

3

4

a

b

c

Summary of Contents for iPF650 - imagePROGRAF Color Inkjet Printer

Page 1: ...ontaining the following information Instructions on basic operation Troubleshooting tips and maintenance procedures 1 2 3 The User Manuals CD ROM User Manual includes the following information Printer...

Page 2: ...printer s carrying handles and place the printer on a table or other flat location When moving the printer firmly grasp the carrying handles Holding the printer at other positions is dangerous and ma...

Page 3: ...the pouch and remove the ink tank Insert the ink tank into the holder facing as shown with the ink holes down Load all six ink tanks Install the Ink Tanks When the following screen appears use the an...

Page 4: ...arriage a close the top cover The carriage a moves to the position shown in the figure Open Upper Cover is shown on the display screen As instructed open the top cover Instructions on printhead replac...

Page 5: ...lease lever forward Printer setup is now complete For how to load roll paper refer to the Basic Guide 1 to the User Manual installed at Install the Printer Driver and the User Manual or to the instruc...

Page 6: ...e printer as instructed during installation of the relevant printer driver If you connect the USB cable before installing the printer driver the printer driver may not be installed correctly To choose...

Page 7: ...printer driver settings take effect after the computer restarts This completes printer driver installation An iPFxxxx Support desktop icon is created after installation iPFxxxx represents the printer...

Page 8: ...installation process Also enter your preferred name for the printer in Device Name and the installation location in Printer Location under Information About Printer to Configure as desired The install...

Page 9: ...after 255 Pressing decreases the value by one However 255 comes after 0 Holding down either the or keys continually increases or decreases the value 3 Press OK once you have finished Press Menu Press...

Page 10: ...onnected to the network are labeled Available in IP Address Status If the printer you want to use is not displayed in the list of printers select Specify the IP address of available printers in the ne...

Page 11: ...ver 2008 5 After reading the license agreement click Yes 3 4 MEMO In the Select Country or Region of Use window select the country or region of use and click Next Confirm that the required installatio...

Page 12: ...iPFxxxx Support desktop icon is created after installation iPFxxxx represents the printer model Next follow steps 12 16 on page 7 to install the User Manual 10 In the Finish window select Restart my c...

Page 13: ...k connections such as Bonjour or IP Be sure to log in as a user with administrative rights when installing the printer driver Insert the provided User Software CD ROM for your operating system in the...

Page 14: ...inue The printer driver additional printer driver features ICC Profiles and the Media Configuration Tool are now installed Click OK Click Quit Click Next Select the printer to setup and click Next Thi...

Page 15: ...ree Store Accessories in the Pockets Use the manual pocket to store the Basic Guide which includes descriptions of basic printer operations routine maintenance and troubleshooting tips so you can refe...

Page 16: ...ted color in the printer The loaded paper is crooked Install the printhead see steps 1 9 on page 4 Could not detect paper size Push release lever back Pull out the cut sheet The paper is loaded in the...

Reviews: