


Chapter 1
1-31
[Paper Details]
T-1-15
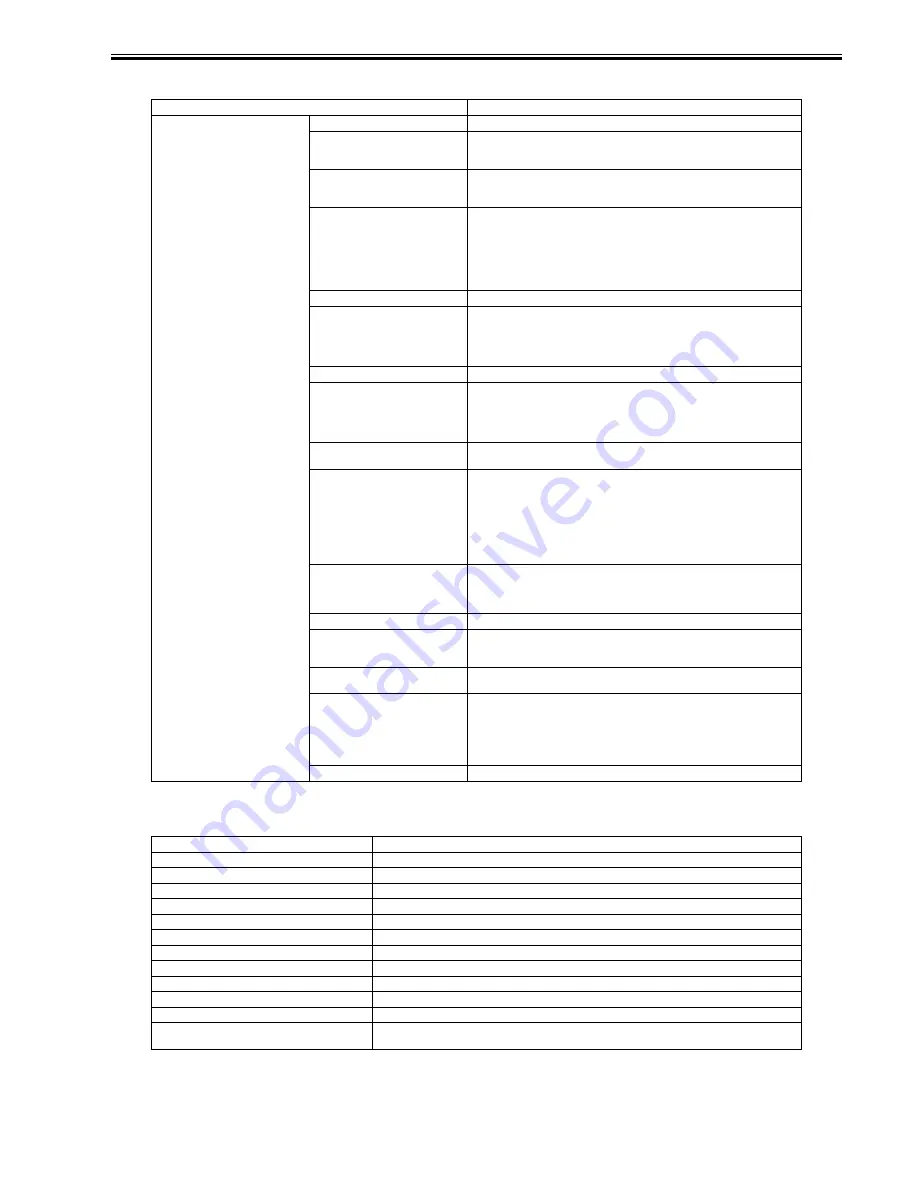
[GL2 Settings]
T-1-16
Setting Item
Description, Instructions
(The paper type is displayed here.)
[Roll DryingTime]
Specify the time to wait for the ink to dry for each sheet.
[Scan Wait Time]
Specify the time to wait for the ink to dry between each scan in bidirectional printing,
in consideration of how quickly the paper absorbs ink. Note that printing will take
longer if you specify a wait time.
[Feed Priority]
Specify exact paper feeding, if desired. Normally, select Automatic . Choose Print
Length if you prefer to feed the paper an exact amount. However, note that choosing
Print Length may result in slight banding in the direction of Carriage scanning.
[Adjust Length]
Displayed if Feed Priority is Print Length .
Adjustment relative to the amount of stretching or shrinkage of the current paper.
For paper that tends to stretch, increase the feed amount by setting the adjustment
value . For paper that tends to shrink, decrease the feed amount by setting
the adjustment value toward -.
The setting for the amount of paper stretching or shrinkage is relative. If you access
it again later, it will be displayed as 0.00 %.
[Head Height]
Adjust the Printhead height.
[Skew Check Lv.]
If you print on Japanese Paper Washi or other handmade paper that has an irregular
width, choose Loose for a higher skew detection threshold, or choose Off to disable
skew detection. However, if paper is loaded askew when detection is Off , note that
paper jams or Platen soiling may occur.
If strict skew detection is required, choose High Accuracy.
[VacuumStrngth]
Specify the level of suction that holds paper against the Platen .
[NearEnd RollMrgn]
Specify a margin at the leading edge of roll paper to ensure better printing quality at
the leading edge.
Note that if you choose 3 mm , it may lower the printing quality at the leading edge
and affect feeding accuracy. The printed surface may be scratched, and ink may
adhere to the the leading edge.
[Cut Speed]
Choose the cutting speed. For media such as film that are more likely to generate
debris when cut, choose Fast to reduce the amount of debris.
[Trim Edge First]
If a roll is loaded, the end of the paper will be cut.
Choose Forced to have 40 mm (1.6 in) cut off the leading edge of the roll, ensuring
a straight edge, after you load the roll. Scraps are then removed.
When Automatic is selected, if the left and right side of the leading edge of the roll
are uneven (by 3 mm [0.12 in] or more), the edge is cut an amount relative to the
slant to ensure a straight edge after you load the roll. Scraps are then removed.
If the unevenness is less than 3 mm or if No Cutting is selected, the edge is not cut
and scraps are not removed.
[Cutting Mode]
Specify if the Cutter Unit is used for cutting.
Choose Automatic to have roll paper cut automatically after printing. If you choose
Eject , the paper will not be cut after printing. Instead, a line will be printed at the
cut position.
[Bordless Margin]
Adjust the margin during borderless printing.
[CutDustReduct.]
Choose On to reduce the amount of debris generated when cutting film and similar
media by printing a line at the cut position. This option reduces the amount of debris
given off after cutting.
[Manual Feed]
Choose how the paper is supplied, Top for printing from the Tray or Front for
printing from the Front Paper Feed Slot .
[NearEnd Sht Mrgn]
Specify a margin at the leading edge of sheets to ensure better printing quality at the
leading edge.
Note that if you choose 3 mm , it may lower the printing quality at the leading edge
and affect feeding accuracy. The printed surface may be scratched, and ink may
adhere to the the leading edge.
If you have selected 20 mm , the test print sheet may not be printed completely.
[Return Defaults]
Choose Yes to restore Med.Detail Set. to the factory default values.
Setting Item
Description, Instructions
[GL2 Replot]
Reprint the last printed page stored in the printer.
[GL2 BufferClear]
Delete the last printed page stored in the printer.
[Color Mode]
Choose the color mode.
[Print Quality]
Choose the print quality.
[Input Resolution]
Select [600dpi] or [300dpi] as the print resolution.
[Media Source]
Select the method of feeding paper when using the HP-GL/2 for printing.
[Conserve Paper]
Print using paper sparingly.
[End Point Shape]
Select [Software] or [Round] as the shape of the line end.
[Smoothing]
Select whether to print an arc with a smooth curve or polygon.
[Line Width]
Select the printing line width for the data for which a line width is not specified.
[ThickenFineLines]
Choose On to print the thin line clearly.
[AdjustFaintLines]
Choose On if the colored of thin line is printed different from other figure. However, it is a possibility to the
thin lines become interrupted lines according to the some colors.
Summary of Contents for iPF605 - imagePROGRAF Color Inkjet Printer
Page 1: ...Aug 13 2008 Service Manual iPF600 series iPF605 ...
Page 2: ......
Page 6: ......
Page 11: ...Chapter 1 PRODUCT DESCRIPTION ...
Page 12: ......
Page 14: ......
Page 31: ...Chapter 1 1 17 1 5 7 Inside 0016 8159 F 1 23 1 Maintenance cartridge Absorbs excess ink 1 ...
Page 57: ...Chapter 1 1 43 ...
Page 58: ......
Page 59: ...Chapter 2 TECHNICAL REFERENCE ...
Page 60: ......
Page 111: ...Chapter 3 INSTALLATION ...
Page 112: ......
Page 114: ......
Page 135: ...Chapter 4 DISASSEMBLY REASSEMBLY ...
Page 136: ......
Page 138: ......
Page 198: ......
Page 199: ...Chapter 5 MAINTENANCE ...
Page 200: ......
Page 202: ......
Page 207: ...Chapter 6 TROUBLESHOOTING ...
Page 208: ......
Page 210: ......
Page 228: ......
Page 229: ...Chapter 7 SERVICE MODE ...
Page 230: ......
Page 232: ......
Page 254: ......
Page 255: ...Chapter 8 ERROR CODE ...
Page 256: ......
Page 258: ......
Page 267: ...Aug 13 2008 ...
Page 268: ......


