58
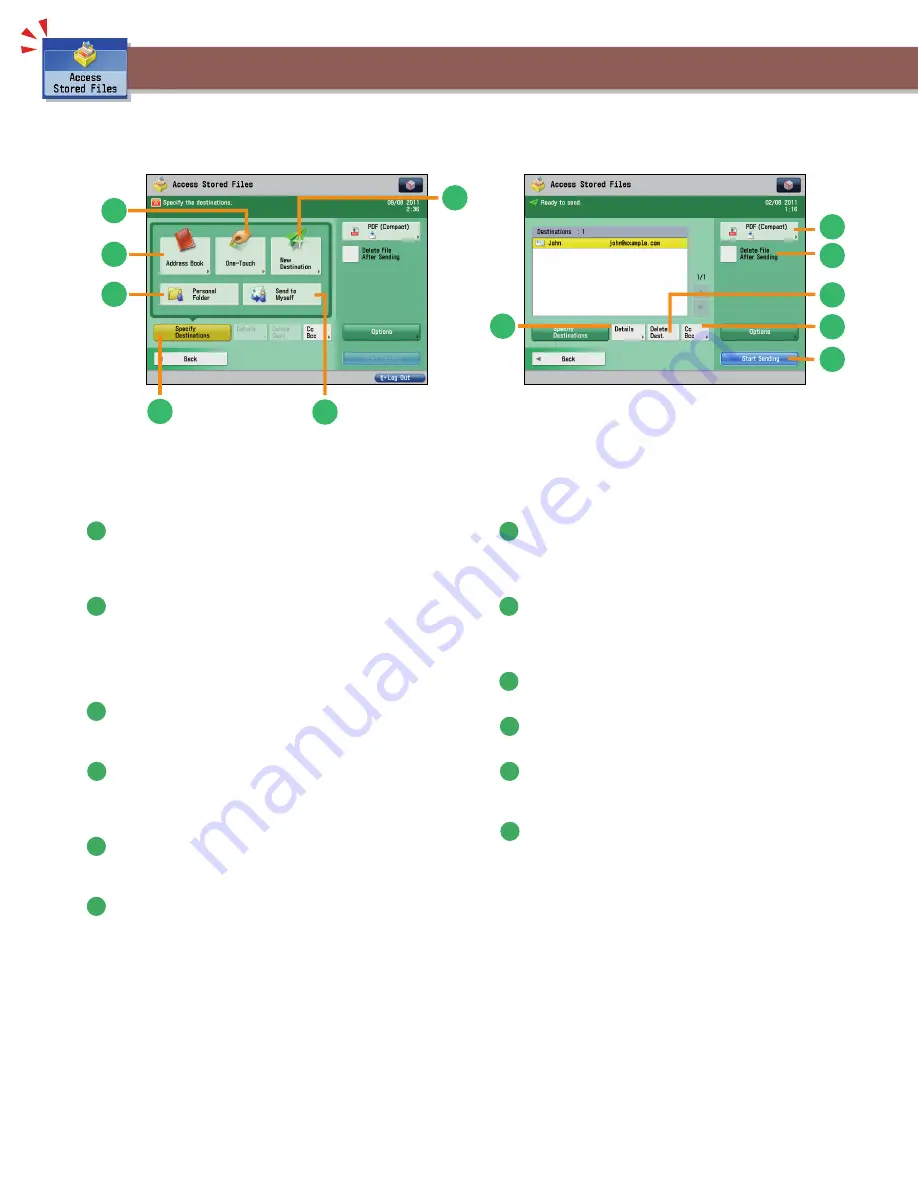
Things You Can Do with the Access Stored Files Functions (Send)
This section describes things you can do when sending a fi le stored in a mail box, and the modes available on the [Options] screen. Select the
fi le that you want to send from the list of stored fi les, press [Send], and the following screen is displayed. An optional product is required to
use the Fax function.
4
5
9
11
12
10
7
1
2
3
8
6
Send Basic Features Screen (Access
Stored Files)
1
[Address Book]
Press to select a destination from the Address Book. You can
also register frequently used e-mail, I-fax, fi le server, or fax
destinations in the Local Address Book.
2
[One-Touch]
If a frequently used destination is stored in a one-touch
button, you can specify the destination quickly. Press [To
Remote Add. Book] to specify destinations registered in the
one-touch buttons of a server machine by accessing from a
client machine on the network.
3
[New Destination]
This mode enables you to specify a new destination not stored
in the Address Book or one-touch buttons.
4
[Send to Myself]
You can specify your own e-mail address as the destination.
The administrator can restrict general users to send e-mail
only to their addresses.
5
[Specify Destinations]
Press to display the methods for specifying destinations or the
destination list.
6
[Personal Folder]
You can specify your personal folder as the destination. You
need to specify settings before using personal folders. The
administrator can restrict destination for fi le transmission to
the operator’s personal folder.
Screen for Specifying the Destination
(Access Stored Files)
7
[Details]
You can check the detailed information for the destination
selected from the address list. You can also change a new
destination.
8
File Format
If you are sending to an e-mail address or fi le server, you
can specify the fi le format. You can select from PDF, XPS,
OOXML(pptx, docx), JPEG, or TIFF.
9
[Delete File After Sending]
Press to delete certain pages from a fi le.
10
[Delete Dest.]
Press to delete a destination displayed in the destination list.
11
[Cc Bcc]
Press to specify e-mail address destinations for the Cc and Bcc
addresses.
12
[Start Sending]
Press to start sending.
Summary of Contents for imageRUNNER ADVANCE C7260
Page 8: ...8 MEMO ...
Page 26: ...26 MEMO ...
Page 64: ...64 MEMO ...
Page 234: ...234 3 Open the top cover of the finisher 4 Open the delivery guide 5 Remove any jammed paper ...
Page 265: ...265 Troubleshooting MEMO ...
Page 299: ......


