background image

Cleaning/T

roubleshooting

Q

29


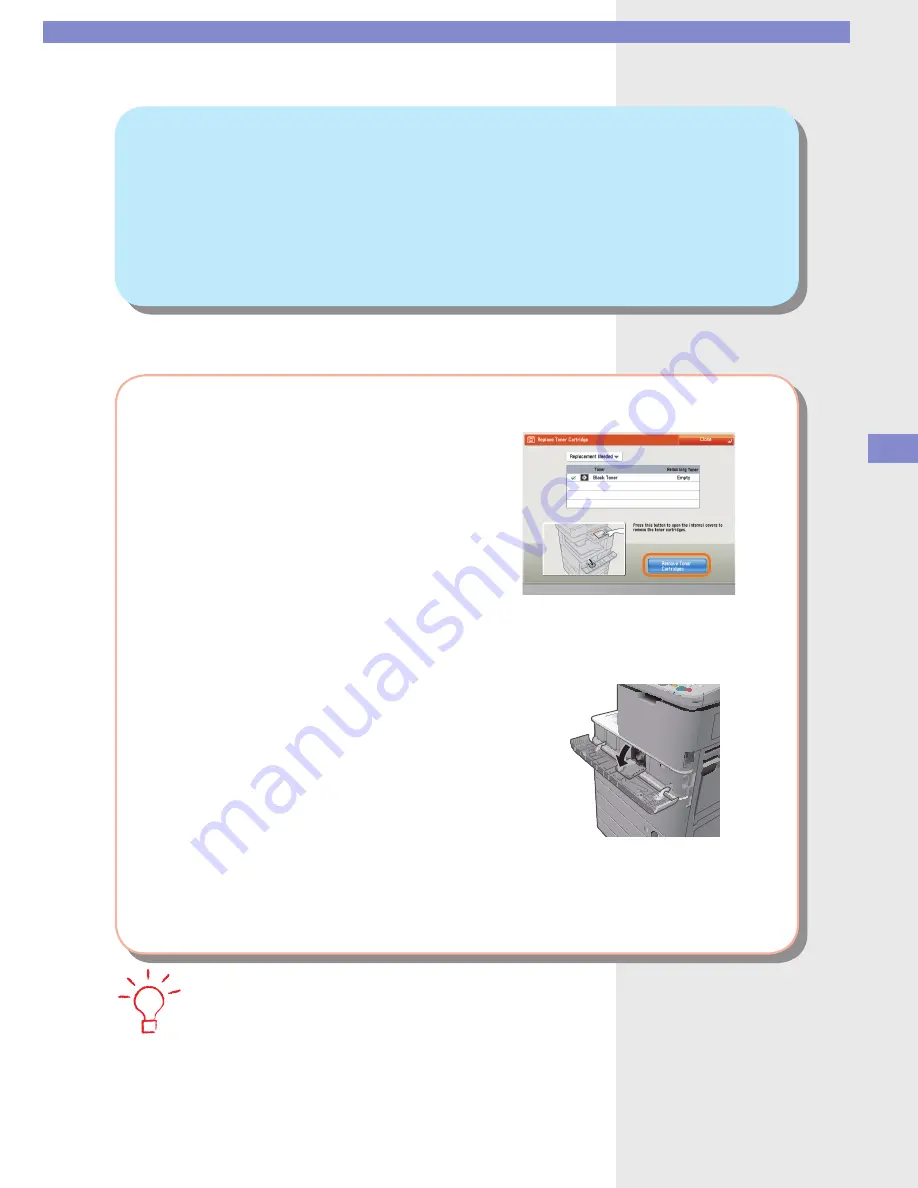
I cannot remove the toner cartridge after the toner 
replacement cover is opened. 

A


Check the touch panel display. The following screen is displayed. 

To remove the toner cartridge:

Press [Remove Toner Cartridges] 

 the inner cover for the toner to replace opens 

 follow the instructions 

on the touch panel display to remove the toner cartridge. 

Black Toner Cartridge

For more information on replacing the toner cartridge, see the Maintenance Guide or e-Manual > Maintenance. 

Summary of Contents for IMAGERUNNER ADVANCE C5051

Page 1: ...ENG Store this guide next to the machine for future reference Frequently Asked Questions...

Page 2: ...and name be displayed 14 Changing the Settings Q12 Can I change the language displayed on the touch panel display 15 Q13 Can I change the screen or the order that the functions are displayed on the to...

Page 3: ...urred How do I solve this problem 34 Q32 Numbers such as 009 and 850 are displayed on the touch panel display What does this mean 35 Q33 I cannot print from the computer Did the machine malfunction 36...

Page 4: ...job A You can temporarily stop the current copy job and give priority to a rush copy by using the Interrupt mode To set Press Copy Interrupt set the desired copy mode You can scan the original even if...

Page 5: ...twork ScanGear Driver in your computer and then switch the network scan function to online To Install the Driver Install using the UFR II User Software CD ROM that comes with the machine To Switch the...

Page 6: ...Originals mode The Different Size Originals mode enables you to copy or scan different size originals with the same widths 11 x 17 and LTR or LGL and STMT etc or different widths 11 x 17 and LGL or LT...

Page 7: ...from A You can send an e mail from Scan and Send on the Main Menu screen To set Press Scan and Send New Destination E Mail enter the e mail address press OK If frequently used e mail addresses are sto...

Page 8: ...sing the Stamp mode Position at which stamp is applied Position at which stamp is applied Vertical Placement Horizontal Placement To set Press Scan and Send or Fax Options Finished Stamp OK After the...

Page 9: ...Address Book Register New Destination select type of destination enter necessary items press OK Storing from the Touch Panel Display Press Scan and Send or Fax Address Book Register Register New Dest...

Page 10: ...click OK OK For Windows 2000 right click the new folder press Sharing Share this folder Permissions delete everyone and add the users you want to authorize access select Allow for Full Control click...

Page 11: ...art Searching specify the file server confirm the settings press OK Specifying the File Server by Browsing Press Scan and Send New Destination File from the protocol drop down list press Windows SMB p...

Page 12: ...ess Book Start Export specify the location to store the file The key names may differ depending on the type of the model you are using Importing the Address Book Press Settings Registration Management...

Page 13: ...gistration Preferences Network TCP IP Settings select IPv4 Settings or IPv6 Settings Use IPv4 or Use IPv6 On press IP Address Settings IPv4 or Manual Address Settings IPv6 Starting the Remote UI Run t...

Page 14: ...the file server Confidential Fax Inbox Forward To set Press Settings Registration Function Settings Receive Forward Common Settings Forwarding Settings Register specify the forwarding conditions press...

Page 15: ...ce 001 001 Date Time I Fax Address or Fax Number Page Number Destination Name FAX 404 XXX XXXX CANON SALES Sender s Name TTI Sender Information Registering the Sender s Name Press Settings Registratio...

Page 16: ...Other To set Press Settings Registration Preferences Display Settings Language Keyboard Switch On Off On OK Language Keyboard Switch select the language to display press OK If you press on the Main M...

Page 17: ...or the layout from Main Menu Button Display Settings in Setting the Default Display That Appears after the Machine Is Turned ON Press Settings Registration Preferences Display Settings Default Screen...

Page 18: ...Features screen If the Black mode is set as the default settings you can reduce the printing cost Color Selection Full Color Color Selection Black To set Changing the Color Mode to the Black Mode Pres...

Page 19: ...d Basic Features screen A You can store the current settings as the default settings from on the Scan and Send Basic Features screen Before Change After Change To set Specify the scan settings and the...

Page 20: ...n is displayed By entering the number again you can reduce the risk of transmission error To set Press Settings Registration Function Settings Send Fax Settings Confirm Entered Fax Number On OK To per...

Page 21: ...you are using This section describes the default settings of the Windows Printer Driver To set On the Start menu click Control Panel Printer right click the printer icon click Printing Preferences sp...

Page 22: ...een for the next document is displayed By canceling the Job Build setting the screen is not displayed Scan Screen for Next Document To set Press Copy Options Job Build cancel the settings The Job Buil...

Page 23: ...time until the files are automatically erased to 0 none 1 2 3 6 12 hours 1 2 3 7 30 days The default setting is 3 days To set Press Settings Registration Function Settings Store Access Files Mail Box...

Page 24: ...egister PIN Register enter the Department ID and password press OK Setting the Page Limits Press Settings Registration Management Settings User Management Department ID Management On Register PIN Regi...

Page 25: ...ode The maximum number of sheets including cover sheets that can be saddle stitched is 16 sheets 14 to 20 lb bond 52 to 81 g m2 10 sheets 22 to 28 lb bond 82 to 105 g m2 If the number of sheets is mor...

Page 26: ...ppearing on the copies by using Background Density Original Copy To set Press Copy Options Density Background Density Auto or Adjust If Auto is pressed the exposure of the original image on the revers...

Page 27: ...ment before sending To set the Type of Originals and Exposure Settings Press Fax Options specify the settings for Original Type or Density Text Photo Mode Photo Mode Text Mode To view the Preview Sett...

Page 28: ...olor of the image from Auto Adjust Gradation Cleaning the Inside of the Machine Press Settings Registration Adjustment Maintenance Maintenance Clean Inside Main Unit Start Automatic Gradation Adjustme...

Page 29: ...on the reverse side of the preprinted paper To set Load the side to print on facing down into the Multi Purpose Tray select the paper size press Next select the paper type press 2nd Side of 2 Sided P...

Page 30: ...the output tray from Output Tray Settings in Settings Registration C B A To set Press Settings Registration Function Settings Common Paper Output Settings Output Tray Setting specify the priority ord...

Page 31: ...nvelopes on a level surface and press all the way around the envelopes by hand to remove any air inside Open the Multi Purpose Tray adjust the slide guides and then load the envelopes as shown below L...

Page 32: ...Bond Tab Envelope Tab paper is available only when optional equipment is attached to the Paper Drawer 2 Envelope is available only when the Envelope Feeder Attachment is attached to the Paper Drawer 2...

Page 33: ...e following screen is displayed To remove the toner cartridge Press Remove Toner Cartridges the inner cover for the toner to replace opens follow the instructions on the touch panel display to remove...

Page 34: ...finisher are as follows Product Name Stamp Ink Cartridge C1 Notes for the feeder Product Name Staple Cartridge D2 D3 Notes for the Booklet Finisher C1 Product Name Staple J1 Notes for the Inner Finis...

Page 35: ...do I solve this problem Q31 A How to clear the paper jam appears on the touch panel display Follow the instructions to clear the paper jam Fixing Unit Inside the Main Unit Feeder If the problem is not...

Page 36: ...ob or operation did not complete successfully This is displayed on the Details screen from Log on the Status Monitor Cancel screen Perform the necessary procedures by referring to the cause and remedy...

Page 37: ...he network cable disconnected Is it possible that there is a network trouble problem Hub Ethernet Cable Is the machine turned ON Is there a paper jam or a toner shortage Did you exceed the maximum num...

Page 38: ...eRUNNER you needed to press and hold the control panel power switch for more than three seconds before the machine goes to the Shutdown mode However for the imageRUNNER ADVANCE you just need to push t...

Page 39: ...the Auto Sleep mode is set If the touch panel display is turned OFF Press the control panel power switch To change the Auto Sleep Time Press Settings Registration Preferences Timer Energy Settings Aut...

Page 40: ...de To check from the Status Monitor Cancel screen Press Status Monitor Cancel Send Log check that the sent job is listed To receive send result via e mail Press Fax Options Job Done Notice specify the...

Page 41: ...ob may have intermixed with another user s output To check Press Status Monitor Cancel Copy Print Log select the job type to display and check the log When printing from the computer you can set a pas...

Page 42: ...ion Platform and is a software platform for the Canon multitasking machines You can expand the functions or customize them by installing the MEAP application from the computer to the multitasking mach...

Page 43: ......

Page 44: ...erlands See http www canon europe com for details on your regional dealer CANON LATIN AMERICA INC 703 Waterford Way Suite 400 Miami Florida 33126 U S A CANON AUSTRALIA PTY LTD 1 Thomas Holt Drive Nort...

Reviews: