background image

28

If Y

ou C
an

no

t S

en

d/

Fo

rw

ard F
ax

es

Scan/Fax Cannot Be Performed Successfully

If no faxes can be sent

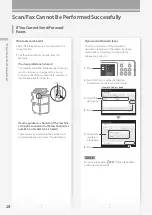
Check if the telephone line is not connected to a 
wrong location.

1.

 Call the destination fax number from this 

machine.

If no beep (dial tone) is heard

The modular cable (the telephone line for faxing) 
is not connected or is plugged into a wrong 
connector. Check the modular cable, and plug it 
into the appropriate connector.

LINE 1

If audio guidance is heard or if the machine 

cannot be connected to the destination fax 

number (no fax dial tone is heard)

There may be a problem with the destination or 
your telephone carrier. Contact the destination.

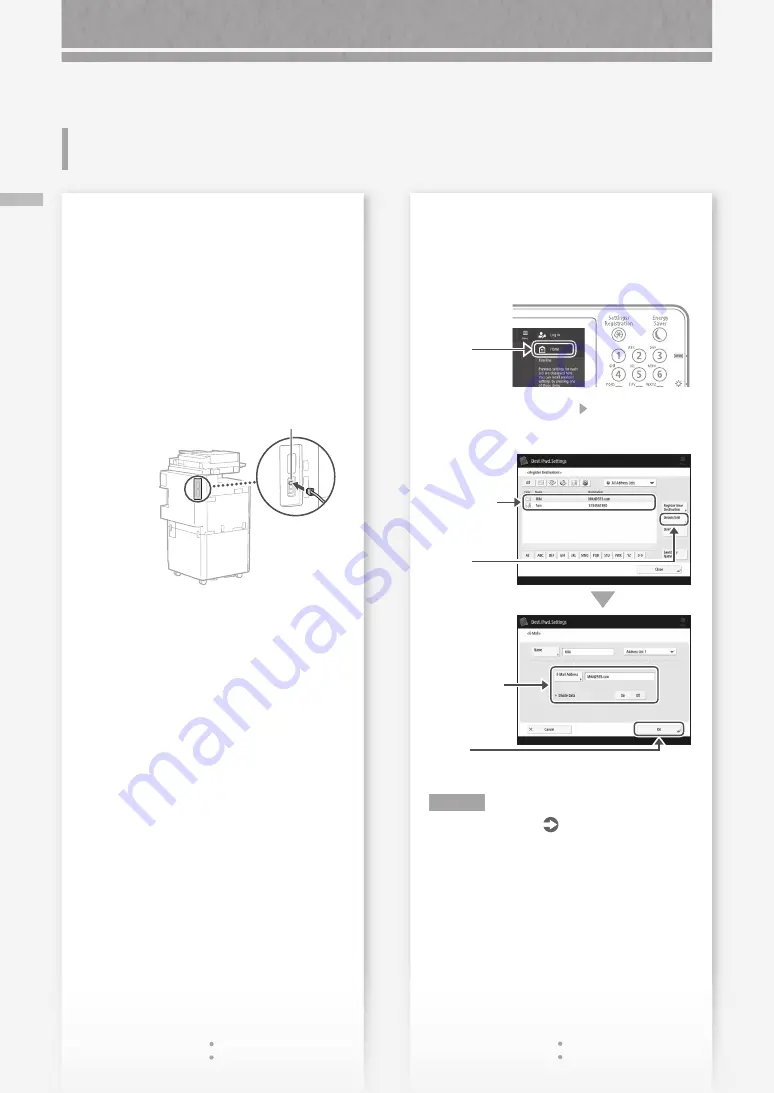
If you cannot forward faxes

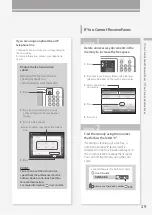
Check the information of the forwarding 
destination registered to the address book/one-
touch buttons. If anything is wrong with the 
information, correct it.

1.

 Press

2.

 Press [Dest./Fwd. Settings]   [Register 

Destinations] on the touch panel display.

5.

 Change the 

registered 

information.

6.

 Press

4.

 Press

3.

 Select the 

destination.

Example: Address book

N O T E

For more information    

P.27

 "Editing the address 

book/one-touch buttons"

If You Cannot Send/Forward 

Faxes

Summary of Contents for imageRUNNER ADVANCE C356iF III

Page 1: ...What is Your Question FAQ Guide English P 3 Espa ol P 51...

Page 2: ......

Page 3: ...fore operating this product P 40 After you finish reading this guide store it in a safe place for future reference The information in this document is subject to change without notice You can access c...

Page 4: ...and Send 26 Stopping Scanning Faxing 26 Scanned Documents Cannot Be E Mailed 27 If You Cannot Send Forward Faxes 28 If You Cannot Receive Faxes 29 The Machine Does Not Operate P 6 Scan Fax Cannot Be...

Page 5: ...ting Results Are Not Satisfactory P 16 Loading Paper or Paper Settings Cannot Be Done Successfully Illustrated Index P 36 Appendix P 40 You Can Consult the User s Guide 49 If You Notice a Search Numbe...

Page 6: ...urn the main power ON check the power plug Main power indicator Note that the power plug or outlet may be different in shape depending on the region Check 3 Is lit Press this to cancel the Sleep mode...

Page 7: ...to be processed 2 Check that the main power indicator has turned off 3 Press the power switch again Download the printer driver again N OT E For more information P 31 Solution 1 Solution 2 The Machin...

Page 8: ...hen loading paper of 11 3 4 298 5 mm or smaller in size place the A5 A6 Attachment back into the dedicated storing space inside the paper drawer 3 First fan the paper stack well and then load it Make...

Page 9: ...ropriate basis weight 2 Press OK 6 Press OK Press Select the paper source 1 Check the paper size 1 Select the paper type 0YAS 0KU Hardware Specifications How to use the search number P 49 For availabl...

Page 10: ...when loading large sized paper 3 First fan the paper stack well align the edges on a flat surface and then load it Make sure that this line is not exceeded The print side face down 4 If the paper typ...

Page 11: ...de of printed paper 1 Load paper in the multi purpose tray the print side face down 2 In the Paper Type selection screen press 2nd Side of 2 Sided Page CAUTION For this operation paper can only be loa...

Page 12: ...Example When printing on LTR size paper Orientation Printing result Paper Drawer Multi Purpose Tray Co Ltd Paper Drawer Logo Paper C o t d L Multi Purpose Tray A B C Co Ltd Co Ltd ABC Co Ltd N OT E Wh...

Page 13: ...ont side face up and for the multi purpose tray load them the front side face down For the loading orientation see the table below Paper Drawer Multi Purpose Tray Yougatanaga 3 Multi Purpose Tray Naga...

Page 14: ...urpose tray 0YAS 02F Making Settings for Custom Size Envelopes User s Guide How to use the search number P 49 Press Select the type of envelopes When loading envelopes in the paper drawer 1 Attach the...

Page 15: ...oes not exceed the height limit mark The front side of the envelopes face up Paper Envelope ISO C5 3 Insert the paper drawer into the machine 4 5 Press Preferences Paper Settings Paper Settings on the...

Page 16: ...e tray Solution The paper may have absorbed moisture Replace it with paper that has not absorbed moisture Perform gradation adjustment 1 Press 2 Press Adjustment Maintenance Adjust Image Quality Auto...

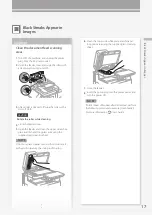
Page 17: ...the upper side white plate and thin and long glass area using the supplied glass cleaning sheet N OT E Do not use glass cleaner or an alcohol solution etc as they will strip away the stain proof coati...

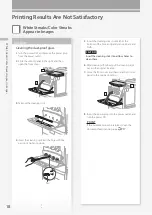
Page 18: ...tick into the hole with the pad on its tip facing down Pad Solution 5 Insert the cleaning stick in until it hits the bottom of the hole and gently move it back and forth CAUTION Insert the cleaning st...

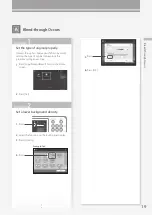
Page 19: ...he copy result setting the type of original can improve the problem giving a neat copy 1 Press Copy Prevent Bleed Thru on the Home screen 2 Press Yes Set a lower background density 1 Press 2 Select th...

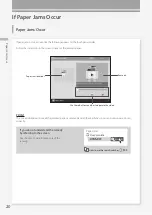
Page 20: ...Paper jam locations Use these buttons and bar to operate the video POINT The screen disappears once all the jammed paper is removed and all the machine s covers and drawers are closed correctly If you...

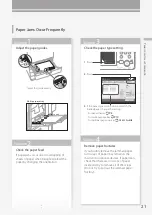
Page 21: ...forcibly remove the jammed paper torn scraps of paper may remain in the main unit or optional devices If paper tears check that there are no scraps of paper inside and try to remove all of the scraps...

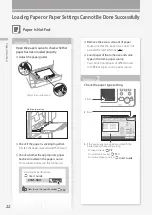
Page 22: ...available paper see the following 0YAS 0KU Hardware Specifications User s Guide How to use the search number P 49 Solution 1 Remove the excess amount of paper Make sure that the paper stack does not...

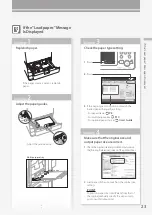
Page 23: ...loaded paper change the setting For paper drawer P 8 For multi purpose tray P 10 For optional paper sources User s Guide 1 Press Make sure that the original size and output paper size are correct 1 Ch...

Page 24: ...orrect orientation and correct printing side Paper Drawer The print side face up Multi Purpose Tray The print side face down N OT E For optional paper sources User s Guide 2 If the check result indica...

Page 25: ...direction 2 In the Printing Preferences screen of the driver set Orientation for the direction selected in step 1 3 While viewing the preview image make settings in the order of Page Layout Page Order...

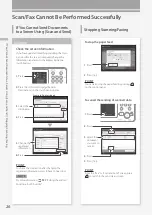
Page 26: ...ister Destinations on the touch panel display 6 Press 4 Press 3 Select the destination 5 Change the registered information Example Address book POINT To check the connection after changing the registe...

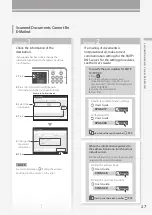
Page 27: ...ect communication settings for the SMTP DNS server For the setting procedures see the User s Guide To specify the port number for SMTP TX POP RX 1 Press 2 On the touch panel display press Function Set...

Page 28: ...f the machine cannot be connected to the destination fax number no fax dial tone is heard There may be a problem with the destination or your telephone carrier Contact the destination If you cannot fo...

Page 29: ...using the error code 0YAS 0K2 Countermeasures for Each Error Code User s Guide How to use the search number P 49 Solution 1 Solution 2 If you are using an optical line or IP telephone line Communicati...

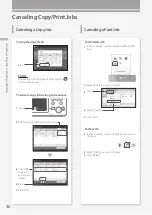
Page 30: ...To cancel a copy job waiting to be output 4 Press 2 Select Copy from the drop down list 3 Select the copy job you want to cancel 1 Press 5 Press Yes For Windows OS 1 In the computer screen double cli...

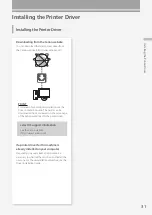
Page 31: ...n see the Driver Installation Guide The Guide can be downloaded from or viewed on the same page of the Canon website as for the printer driver Latest OS support information See the Canon website http...

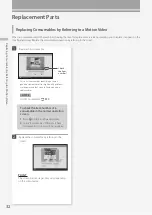
Page 32: ...screen 1 Prepare the consumable Check the item number This is an item number identifying a Canon genuine consumables For high quality printouts we recommend that you use Canon genuine consumables N O...

Page 33: ...e the search number P 49 CAUTION Avoid storing toner cartridges vertically Store toner cartridges in a cool place not exposed to direct sunlight A preferable environment is one where temperature is no...

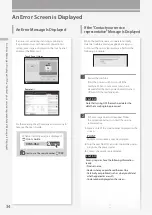
Page 34: ...ppear follow the procedure below to contact the service representative 1 Make a note of the code number displayed on the screen POINT Multiple code numbers may be displayed 2 Turn the machine OFF and...

Page 35: ...e machine enters the limited functions mode When the problem is resolved the Call service representative message disappears in the screen at the bottom left POINT When you select a restricted function...

Page 36: ...is described The illustrations assume that the machine is equipped with the Cassette Feeding Unit AK Main Unit Paper size label P 8 Attach the paper size label so that it aligns with the cassette numb...

Page 37: ...ch P 7 Multi purpose tray P 10 Tray extension Paper guides A5 A6 Attachment only usable in the standard paper drawer P 8 Paper guides Paper drawer P 8 Envelope Feeder Attachment only usable in the sta...

Page 38: ...the Home screen 3 Touch panel display P 6 Displays the settings screen and messages Touch the panel to perform setting and other operations 4 Timeline Displays a log for settings specified in Copy Sca...

Page 39: ...is an error in the machine When the Error indicator maintains a steady red light contact your local authorized Canon dealer 9 Main Power indicator P 6 Lights when the power is turned ON 10 Start key P...

Page 40: ...xtended use or long production runs in poorly ventilated rooms To maintain a comfortable working environment it is recommended that the room where the machine operates be appropriately ventilated Also...

Page 41: ...O LASER DI CLASSE 1 PRODUCTO L SER DE CLASE 1 APARELHO A LASER DE CLASSE 1 LUOKAN 1 LASER TUOTE LASERPRODUKT KLASS 1 The laser beam can be harmful to human bodies Since radiation emitted inside the pr...

Page 42: ...ic safety precautions should always be followed to reduce the risk of fire electric shock and injury to persons including the following 1 Do not use this product near water for example near a bath tub...

Page 43: ...ded by the telephone company Connection to party lines is subjected to state tariffs In Case of Equipment Malfunction Should any malfunction occur which cannot be corrected by the procedures described...

Page 44: ...t to make such connections themselves but should contact the appropriate electric inspection authority or electrician as appropriate NOTE This equipment complies with the Canadian ICES 003 Class A lim...

Page 45: ...via the internet You can read more about iWR in Canon published materials available from your dealer or on the web sites of Canon USA www usa canon com or Canon Canada www canon ca iWR will only colle...

Page 46: ...IES ARE DISCLAIMED AND THAT NO CANON SELLER OR CANON AFFILIATE IS RESPONSIBLE FOR ANY INJURY TO YOUR NETWORK OR TO DATA OR DEVICES NOT SUPPLIED BY A CANON SELLER You will be responsible for network se...

Page 47: ...numbers have been defaced removed or altered ANY SOFTWARE THAT IS DISTRIBUTED WITH THE PRODUCT AND HAS AN ASSOCIATED END USER AGREEMENT IS LICENSED WARRANTED AND PROVIDED ACCORDING TO THE TERMS OF THA...

Page 48: ......

Page 49: ...me at all You can search through the User s Guide by the search number If you notice a search number in a topic in this guide you are reading Search number Example ABCD 123 Setting the network environ...

Page 50: ......

Page 51: ...ntes de utilizar este producto P 88 Al acabar de leer esta gu a gu rdela en un lugar seguro para futuras consultas La informaci n de este documento puede ser modificada sin previo aviso En canon com o...

Page 52: ...idor empleando Leer y enviar 74 Parar de escanear enviar por fax 74 No se pueden enviar por correo electr nico los documentos escaneados 75 Si no puede enviar reenviar faxes 76 Si no puede recibir fax...

Page 53: ...6 La tinta traspasa el papel 67 Losresultadosdeimpresi n nosonsatisfactorios P 64 No se puede cargar papel o configurar las opciones de papel correctamente ndice ilustrado P 84 Ap ndice P 88 Puede con...

Page 54: ...n principal compruebe el enchufe Indicador de alimentaci n principal Tenga en cuenta que el enchufe o la toma de corriente pueden tener formas diferentes dependiendo de la regi n Compruebe 3 Est encen...

Page 55: ...rocesados 2 Compruebe si el indicador de alimentaci n principal se ha apagado 3 Vuelva a pulsar el interruptor de alimentaci n Vuelva a descargarse el controlador de impresora NOTA Para obtener m s in...

Page 56: ...asete Cuando cargue papel de tama o 298 5 mm o inferior guarde el accesorio para A5 A6 en el espacio habilitado dentro del casete 3 Primero ventile bien la pila de papel y luego c rguela Aseg rese de...

Page 57: ...e Seleccione el origen del papel 1 Compruebe eltama odel papel 1 Seleccione eltipode papel Buscar 0YAS 0KU Especificaciones de hardware C mo utilizar el n mero de b squeda P 94 Consulte aqu el papel d...

Page 58: ...pel de gran tama o 3 Primero ventile bien la pila de papel alinee los bordes sobre una superficie plana y a continuaci n c rguela Aseg rese de no superar esta l nea La cara de impresi n hacia abajo 4...

Page 59: ...de papel impreso 1 Cargue papel en la bandeja multiuso con la cara de impresi n hacia abajo 2 En la pantalla de selecci n Tipo de papel pulse 2 cara hoja a doble cara ATENCI N Para esta operaci n solo...

Page 60: ...impresos Ejemplo Al imprimir en papel de tama o LTR Orientaci n Resultado de impresi n Casete Bandeja multiuso C o t d L Bandeja multiuso A B C Co Ltd Co Ltd Co Ltd ABC Co Ltd NOTA Al copiar en papel...

Page 61: ...nverso hacia arriba y en la bandeja multiuso c rguelos con el anverso hacia abajo Consulte en la tabla siguiente la orientaci n en que deben ser cargados Casete Bandeja multiuso Yougatanaga 3 Bandeja...

Page 62: ...ustes de opciones para sobres de tama o personalizado Gu a de usuario C moutilizareln merodeb squeda P 94 Pulse Seleccione el tipo de sobre Al cargar sobres en el casete 1 Acople el Accesorio del alim...

Page 63: ...re la marca de l mite de altura El anverso de los sobres hacia arriba Papel Sobres ISO C5 3 Introduzca el casete en el equipo 4 5 Pulse Preferencias Opciones de papel Opciones de papel en la pantalla...

Page 64: ...la gu a exactamente Bandeja multiuso Soluci n El papel puede haber absorbido humedad Sustit yalo por papel que no haya absorbido humedad Realice el ajuste de gradaci n 1 Pulse 2 Pulse Ajuste Mantenim...

Page 65: ...parte superior y el rea de cristal estrecha y alargada usando la hoja de limpieza del cristal que acompa a al equipo NOTA No utilice limpiacristales o una soluci n con alcohol o similar ya que estas...

Page 66: ...ia abajo Esponja Soluci n 5 Introduzca la varilla de limpieza hasta el fondo del agujero y mu vala despacio hacia adelante y atr s ATENCI N Introduzca la varilla de limpieza por cada uno de los cuatro...

Page 67: ...ultante establecer bien el tipo de original puede resolver el problema y se obtendr una copia limpia 1 Pulse Copia Evitar transparencia en la pantalla Inicio 2 Pulse S Establezca una densidad de fondo...

Page 68: ...de atascos de papel Utilice estos botones y la barra para controlar el v deo PUNTO La pantalla desaparece cuando el papel atascado se retira y se cierran correctamente todas las tapas y casetes del e...

Page 69: ...apel Si intenta retirar el papel atascado a la fuerza el papel puede romperse y alg n trozo puede quedarse en el equipo Acceda a todos los puntos donde se ha atascado el papel y retire los posibles tr...

Page 70: ...papel disponible Buscar 0YAS 0KU Especificaciones de hardware Gu a de usuario C moutilizareln merodeb squeda P 94 Soluci n 1 Retire la cantidad sobrante de papel Aseg rese de que la pila de papel no e...

Page 71: ...n el casete P 56 En la bandeja multiuso P 58 En or genes de papel opcionales Gu a de usuario Aseg rese de que el tama o del original y el tama o del papel de impresi n son correctos 1 Compruebe el tam...

Page 72: ...andeja multiuso La cara de impresi n hacia abajo NOTA En or genes de papel opcionales Gu a de usuario 2 Si el resultado de la comprobaci n indica que el papel no est bien cargado vuelva a cargarlo cor...

Page 73: ...talla Preferencias de impresi n del controlador establezca Orientaci n en la direcci n seleccionada en el paso 1 3 Al ver la imagen de vista preliminar configure las opciones en este orden Formato de...

Page 74: ...reenv Guardar destinos en la pantalla t ctil 6 Pulse 4 Pulse 3 Seleccione el destino 5 Cambie la informaci n registrada Ejemplo Libreta de direcciones PUNTO Para comprobar la conexi n tras cambiar la...

Page 75: ...ectas para el servidor SMTP DNS Para ver los procedimientos de configuraci n consulte la Gu a de usuario Para especificar el n mero de puerto para SMTP TX POP RX 1 Pulse 2 En la pantalla t ctil pulse...

Page 76: ...equipo no puede conectarse al n mero de fax de destino no se oye ning n tono de marcaci n de fax Es posible que haya alg n problema con el destino o la compa a telef nica P ngase en contacto con el d...

Page 77: ...s para los c digos de error Gu a de usuario C moutilizareln merodeb squeda P 94 Soluci n 1 Soluci n 2 Si utiliza una l nea de fibra ptica o de telefon a a trav s de IP Pueden producirse errores de com...

Page 78: ...bajo de copia a la espera de realizarse 1 Pulse 4 Pulse 2 Seleccione Copia en la lista desplegable 3 Seleccione el trabajo de copia que desea cancelar 5 Pulse S Para el SO Windows 1 En la pantalla del...

Page 79: ...la Gu a de instalaci n del controlador Dicha gu a puede descargarse de la misma p gina del sitio web de Canon que el controlador de impresora o bien consultarse all Informaci n m s reciente de asisten...

Page 80: ...n mero de art culo Se trata de un n mero de art culo que identifica un consumible original de Canon Para conseguir una alta calidad de impresi n se recomienda utilizar consumibles originales de Canon...

Page 81: ...as Gu a de usuario C moutilizareln merodeb squeda P 94 ATENCI N Evite almacenar los cartuchos de t ner verticalmente Guarde los cartuchos de t ner en un lugar fresco no expuesto a la luz solar directa...

Page 82: ...o a continuaci n para ponerse en contacto con el representante del servicio t cnico 1 Apunte el n mero de c digo que aparece en la pantalla PUNTO Pueden aparecer varios n meros de c digo 2 Apague el e...

Page 83: ...modo de funciones limitadas Cuando se haya solucionado el problema desaparecer de la pantalla el mensaje Llame al servicio t cnico en la esquina inferior izquierda PUNTO Al seleccionar una funci n re...

Page 84: ...asumen que el equipo cuenta con la Cassette Feeding Unit AK Cassette Feeding Unit AK Unidad principal Coloque la etiqueta de tama o de papel de tal forma que quede alineada en horizontal con el indic...

Page 85: ...del papel Interruptor de alimentaci n P 55 Bandeja multiuso P 58 Gu as del papel Casete P 56 Accesorio del alimentador de sobres solo se puede utilizar en el casete est ndar P 62 Accesorio para A5 A6...

Page 86: ...alla t ctil P 54 Muestra la pantalla de opciones y mensajes Toque el panel para configurar opciones y otras operaciones 4 Historial Muestra un registro con las opciones que se han especificado en Copi...

Page 87: ...e ilumina si hay un error en el equipo Si el indicador de Error se queda encendido fijo en rojo p ngase en contacto con su distribuidor autorizado local de Canon 9 Indicador de alimentaci n principal...

Page 88: ...el uso normal que no son perjudiciales para la salud No obstante podr an ser percibidas durante el uso prolongado o durante los ciclos de producci n largos en salas mal ventiladas Para que el entorno...

Page 89: ...de energ a Pulse Ahorro de energ a como medida de seguridad cuando no vaya a utilizar el equipo durante un per odo de tiempo prolongado por ejemplo por la noche Asimismo apague el interruptor de alime...

Page 90: ...l t ner y otros consumibles fuera del alcance de los ni os peque os En caso de ingesti n de estos productos consulte inmediatamente a un m dico Si el t ner entrara en contacto con la piel o la ropa l...

Page 91: ...comunica con el extranjero NOTA Canon recomienda una l nea individual de acuerdo con la normativa del sector es decir tel fonos 2 500 tonos o 500 marcaci n rotatoria por pulsos Podr utilizarse una ext...

Page 92: ...un tel fono multil nea pulsos tonos o rotatoria 2 Solicite una toma modular CA11A que deber ser instalada por la compa a telef nica Si la toma CA11A no se encuentra presente no se podr efectuar la ins...

Page 93: ...ows Windows Vista Windows Server Internet Explorer Excel y Power Point son marcas registradas o marcas comerciales de Microsoft Corporation en los Estados Unidos y o en otros pa ses Otros nombres de p...

Page 94: ...ro de b squeda Si ve un n mero de b squeda en un tema de esta gu a que est leyendo Abrir la Gu a de usuario 1 Entre en el sitio web de manuales en l nea canon com oip manual 2 Seleccione la gu a de us...

Page 95: ......
Page 96: ...The Netherlands See http www canon europe com for details on your regional dealer CANON AUSTRALIA PTY LTD Building A The Park Estate 5 Talavera Road Macquarie Park NSW 2113 Australia CANON CHINA CO LT...

Reviews: