Canon imagePROGRAF iPF760 Setup Manual Download Page 3

3

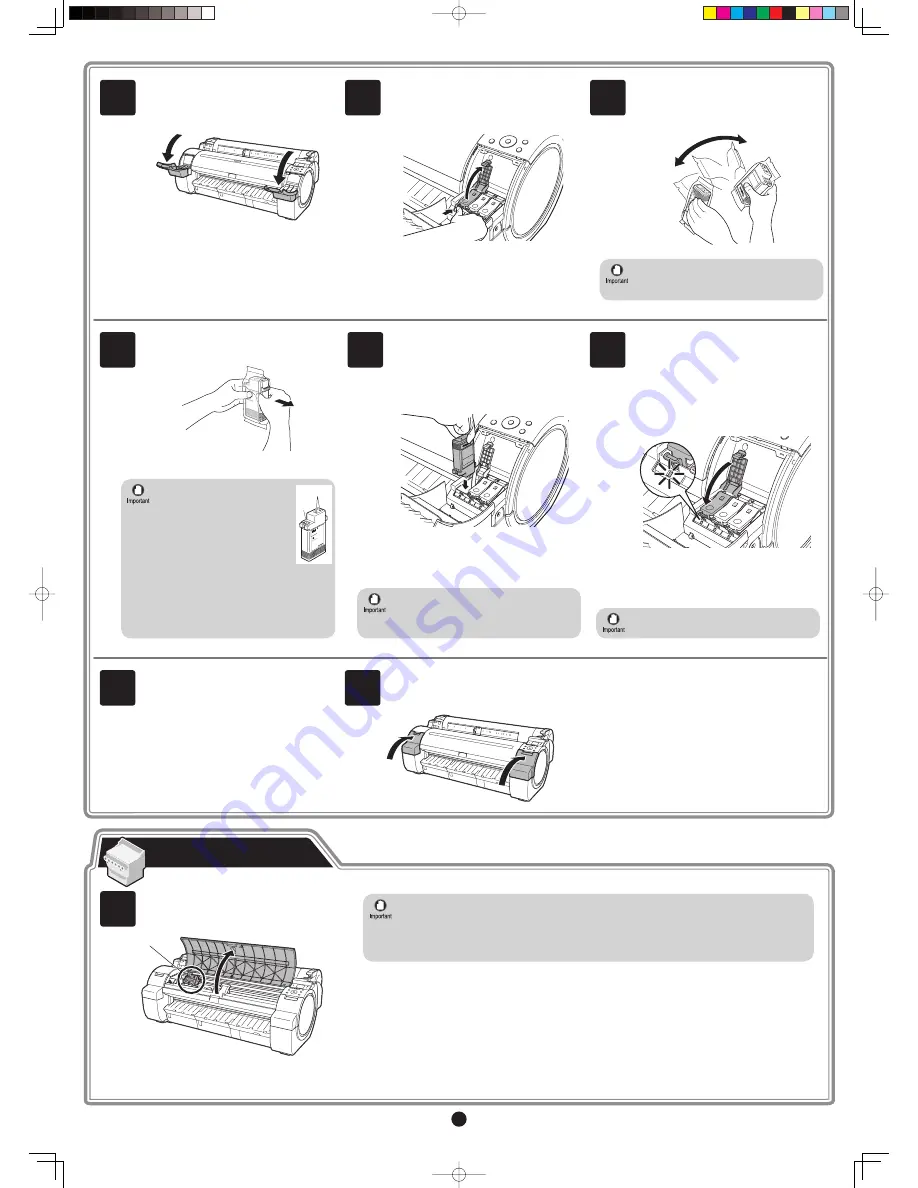
Repeat steps 5 to 9 to install all of the  ink 

tanks   . 

Close the  ink tank cover   . 

10

11

Never touch the ink holes (a) 

or metal contacts (b). Touching 

these parts may cause stains, 

damage the  ink tank   , and affect 

print quality. 

Avoid dropping the  ink tank    after 

removing it from the pouch.Otherwise, 

ink may leak and cause stains. 

Do not remove and shake  ink tanks    that 

have already been installed in the printer 

because ink may leak out. 

a

b

If the  ink tank    does not 

fi

 t in the holder, 

make sure the color of the  ink tank lock 

lever    matches the color of the  ink tank   , and 

check the orientation of the  ink tank   . 

8

9

7

If the  ink lamp    is not lit, repeat steps 5, 8, 

and 9. 

Close the ink tank lock lever until it clicks 

into place. Make sure the ink lamp is lit in 

red. 

Open the pouch and remove the  ink tank   .

Insert the  ink tank    into the holder facing 

as shown, with the ink holes down. 

4

5

6

Failure to shake  ink tanks    may result in 

reduced print quality because ink ingredients 

have settled on the bottom of the tank. 

Instructions on ink tank installation 

are shown on the display screen. As 

instructed, grab the handle on the  ink tank 

cover    to open it. 

While pressing the stopper of the  ink tank 

lock lever    inwards, open the  ink tank lock 

lever    upwards. 

Shake the  ink tanks    gently 1 to 2 times 

before opening the pouch. 

Next, install the printhead. 

Install the Printhead

When installing the printhead, do not move the carriage (a) from the position shown in the 

fi

 gure. 

If you move the carriage (a), a warning noise sounds and the printhead cannot be installed. 

If you have moved the carriage (a), close the top cover. The carriage (a) moves to the position 

shown in the 

fi

 gure. 


Open Upper Cover

    is shown on the 

display screen. As instructed, open the  top 

cover   . 

 Instructions on     printhead    replacement are 

shown on the display screen. 

1

a

Summary of Contents for imagePROGRAF iPF760

Page 1: ...refer to the documentation for instructions on operation and maintenance Daily operation Detailed instructions The Basic Guide contains the following information Printer operating instructions Printer...

Page 2: ...support rod to the position a before closing the output stacker and unlocking the 4 casters Failure to do so may lead to scratched flooring damage to the basket cloth and injury After you have moved t...

Page 3: ...e ink tank into the holder facing as shown with the ink holes down 4 5 6 Failure to shake ink tanks may result in reduced print quality because ink ingredients have settled on the bottom of the tank I...

Page 4: ...tains ink so be careful not to spill it once the protective part is removed Lift the printhead fixer cover to open it fully Hold the printhead by the grips a as you remove it from the pouch a a 3 4 a...

Page 5: ...ks and printhead In addition printheads are cleaned to keep the printer in optimal condition This may cause the maintenance cartridge capacity indicator to drop to about 80 but this is not a problem w...

Page 6: ...een may be displayed during installation depending on the security settings of your computer Select Deactivate the block and click Next You can print from Windows via USB or TCP IP network connections...

Page 7: ...14 The printer driver settings take effect after the computer restarts This completes printer driver installation An iPFxxxx Support desktop icon is created after installation iPFxxxx represents the...

Page 8: ...is on Turn the computer on and insert the provided User Software CD ROM for your operating system in the CD ROM drive 3 Perform procedures of steps 2 8 on page 6 When searching the available printer...

Page 9: ...4 Enter the IP address MEMO How to enter IP addresses 1 Press the and keys to select a field for inputting values 2 Use the and keys to input values Pressing increases the value by one Pressing decre...

Page 10: ...M drive User Software 2 On the desktop double click the CD ROM icon and then the iPF Printer Setup icon 3 If the following screen is displayed enter the user name and password of a user with administr...

Page 11: ...the USB cable into the Ethernet port 16 16 Select the printer to setup 20 Click Finish MEMO To register another printer click Continue Registration and repeat steps 17 to 19 21 Click OK MEMO If the sa...

Page 12: ...r and the User Manual Responding to Messages No printhead Install printhead No ink tank loaded Check ink tank Load or reload the ink tank see steps 4 11 on page 3 The printhead is not installed Messag...

Reviews: