background image

13

Set the Machine for Receiving Faxes

(MF6550/MF6560/MF6580 Only)

Select the Receive Mode that Suits Your Needs

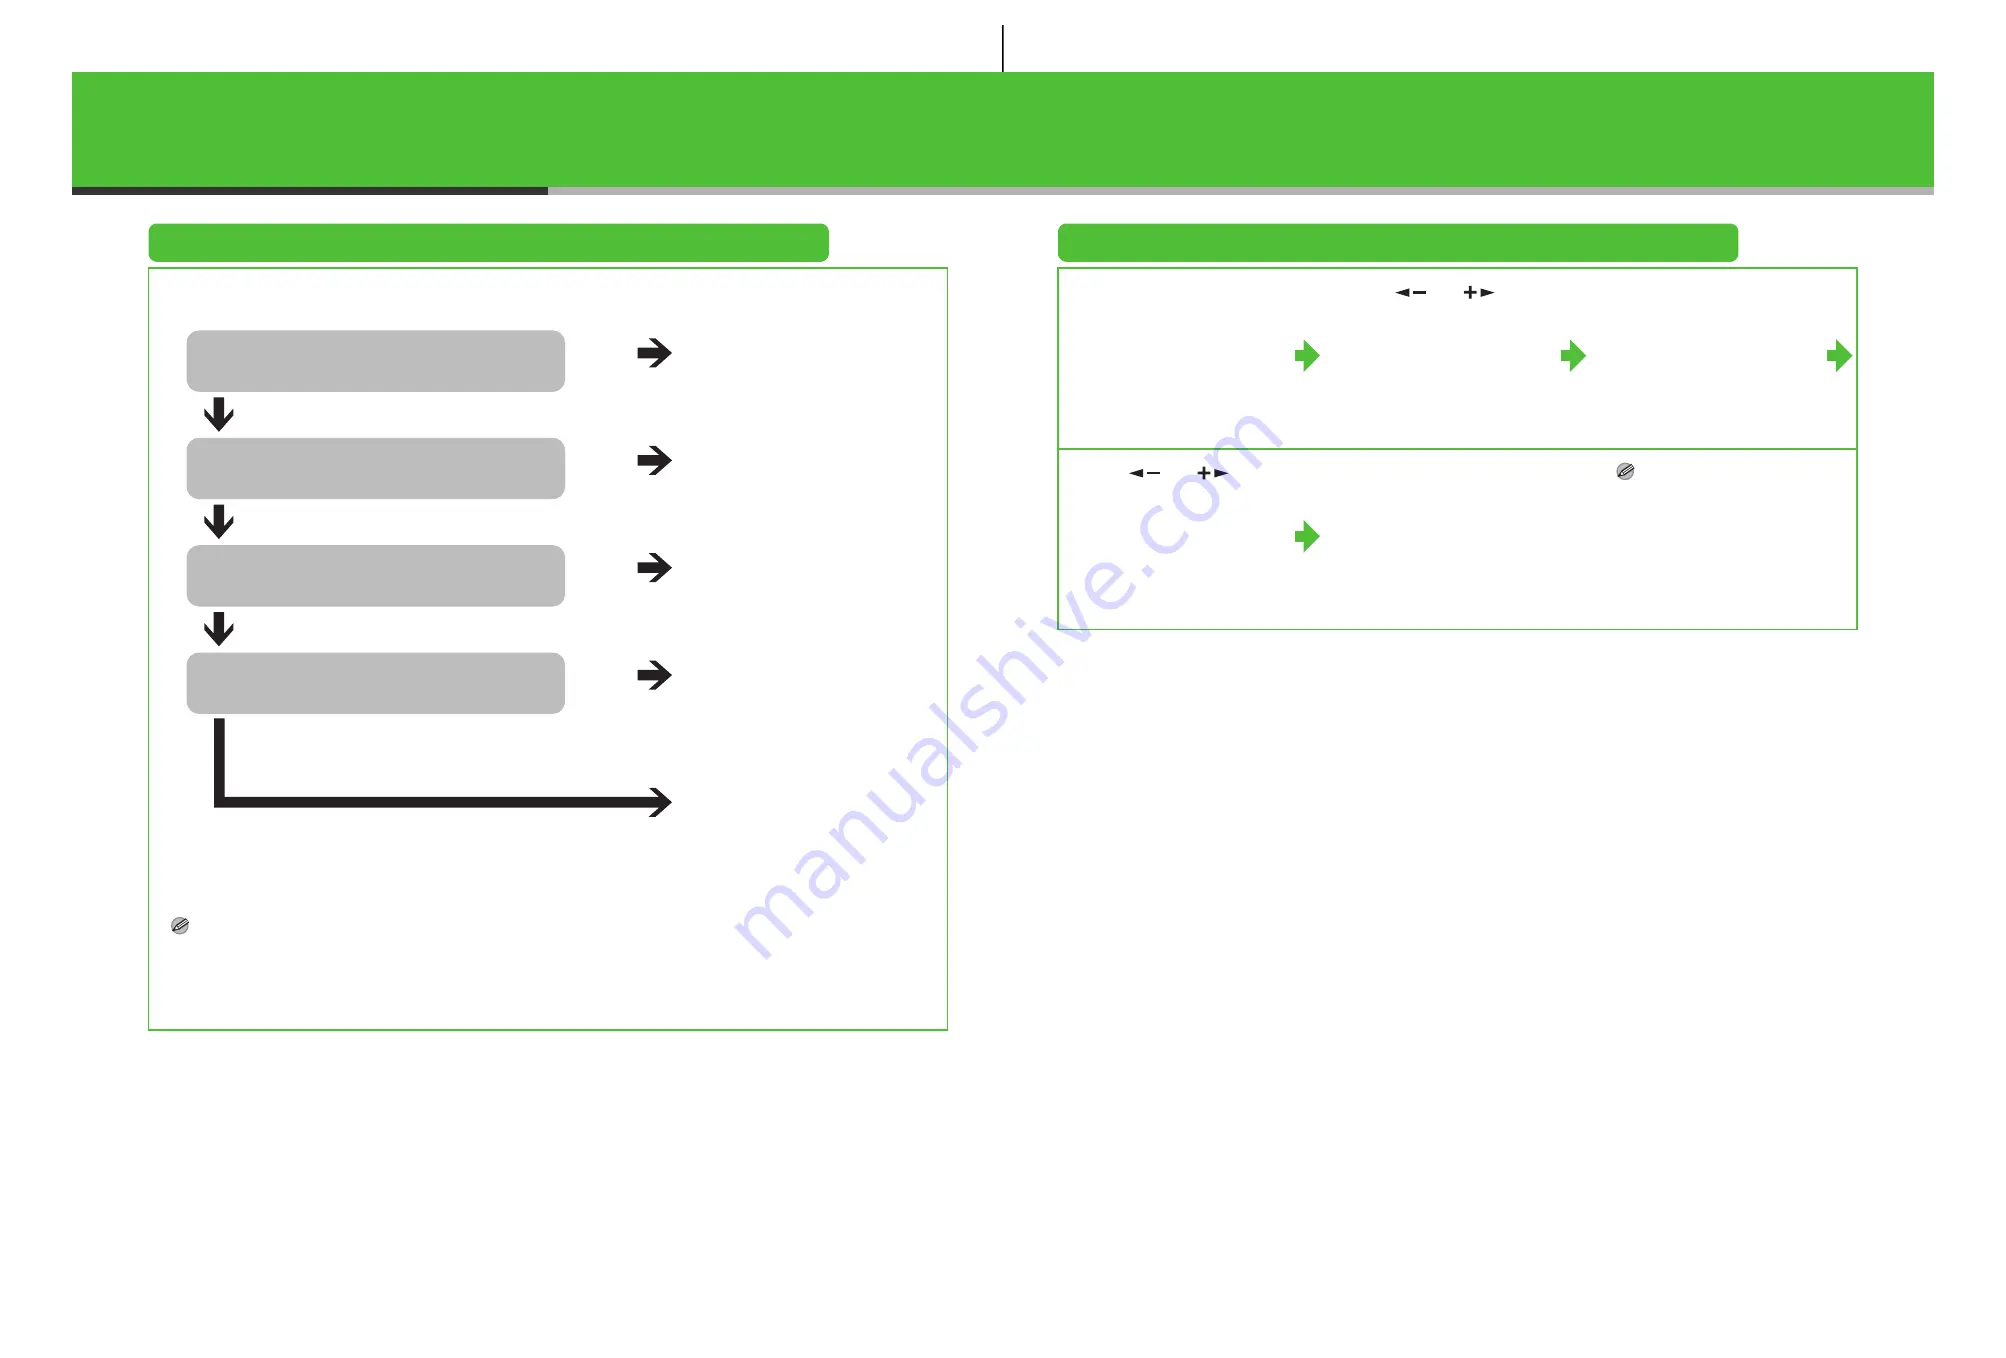
Follow the chart below to determine the correct receive mode for your needs.

NOTE

– The answering machine must be connected directly to the machine for <AnsMode> to work.
– An external telephone must be connected to the machine for <FaxTel>, <Manual> or <DRPD> to work.
– Voice mail is not supported with <AnsMode>.
– The <DRPD> mode requires subscription to a DRPD (Distinctive Ring Pattern Detection) service. Contact your telephone 

company for availability.

Do you intend to use the machine to 
receive voice calls?

No

<FaxOnly>

Answers all calls as faxes.

Do you intend to use an answering 
machine with the machine?     

Yes

<AnsMode>

Receives faxes automatically 
and records voice messages.

Do you intend to receive faxes 
automatically?

No

<Manual>

Does not answer any calls.
You have to manually receive 
faxes.

<FaxTel>

Switches between fax and 
voice calls automatically if a 
telephone is connected to the 
machine.

Yes

No

Yes

Do you subscribe to a DRPD service?

No

<DRPD>

Distinguishes between fax and 
voice calls, if you want to use 
an external phone.

Yes

Set the Receive Mode

1

Press [Additional 
Functions].

2

Use [

] or [

] to 

select <3. FAX 
SETTINGS>, then press 
[OK].

3

Confirm that 
<1. RX MODE> is 
displayed, then press 
[OK].

4

Use [

] or [

] to 

select the receive mode, 
then press [OK].

5

Press [Stop] to return to 
standby mode.

NOTE

For details, see the Advanced 
Guide (in User Software CD).

14

Summary of Contents for imageCLASS MF6500 Series

Page 1: ...ld Germany CANON ITALIA S p A Via Milano 8 20097 San Donato Milanese MI Italy CANON ESPA A S A c Joaqu n Costa 41 28002 Madrid Spain CANON LATIN AMERICA INC 703 Waterford Way Suite 400 Miami Florida 3...

Page 2: ...ure at least two people carry it using the provided hand grips on the left and right sides as seen in the illustration right The machine illustration may differ slightly from your machine Starter Guid...

Page 3: ...idge into the machine with the arrows A on the toner cartridge pointing toward the machine 8 The left edge A and the right side protrusions B C of the toner cartridge should be aligned with the guides...

Page 4: ...it will go CAUTION Be careful not to get your fingers caught NOTE For loading paper in the multi purpose tray see Chapter 3 Print Media in the Basic Guide Set Up the Paper Cassette to Fit the Paper Si...

Page 5: ...eric keys Enter letters and numbers and Move the cursor position Clear Deletes the character at the cursor position or the entire entry if held for more than one second 1 Press Additional Functions 2...

Page 6: ...to enter symbols Press to switch among input modes A Letter uppercase mode a Letter lowercase mode 1 Number mode Press or to move the cursor Press Clear to delete the character at the cursor position...

Page 7: ...keys to enter the unit name up to 24 characters then press OK 8 Press Stop to return to standby mode Set the Telephone Line Type 1 Press Additional Functions 2 Use or to select 3 FAX SETTINGS then pr...

Page 8: ...Answers all calls as faxes Do you intend to use an answering machine with the machine Yes AnsMode Receives faxes automatically and records voice messages Do you intend to receive faxes automatically N...

Page 9: ...0 XP Server 2003 logon as Administrator to install the software Make sure the machine is turned on before connecting the USB cable On the screen shown at each step click on the circled button to proce...

Page 10: ...tic IP addresses using BOOTP and RARP protocols For definitions and an explanation of each please refer to the Advanced Guide 1 Press Additional Functions 2 Use or to select 9 SYSTEM SETTINGS then pre...

Page 11: ...5 rated Cat 5 twisted pair LAN cable A Install Software 1 2 If the MF6500 Series CD ROM Setup screen is not displayed on the Windows desktop double click My Computer Open the CD ROM icon then double...

Page 12: ...11 12 13 14 15 16 17 You have now completed installation 21 22 21...

Page 13: ...Click start on the Windows task bar All Programs Canon MF6500 Series Uninstall Drivers The MF Drivers Uninstaller dialog box appears 2 Click Delete 3 Click Yes Uninstallation proceeds automatically an...

Page 14: ...is located in the list below Context Sensitive Help Context sensitive help displays an explanation of each item in the current dialog box Use one of the following methods to show context sensitive hel...

Page 15: ...AAAA AAAA 1 AAAA AAAA AAAA AAAA 1 AAAA AAAA AAAA AAAA 1 C o l l a t e 2 on 1 Combination Original Frame Erase Book Frame Erase Binding Hole Erase 1 to 2 Sided 2 to 2 Sided 2 to 1 Sided Collate 2 o n 1...

Page 16: ...ld Germany CANON ITALIA S p A Via Milano 8 20097 San Donato Milanese MI Italy CANON ESPA A S A c Joaqu n Costa 41 28002 Madrid Spain CANON LATIN AMERICA INC 703 Waterford Way Suite 400 Miami Florida 3...

Reviews: