background image

7

Connect Power Cord and Turn On the Machine

1

2

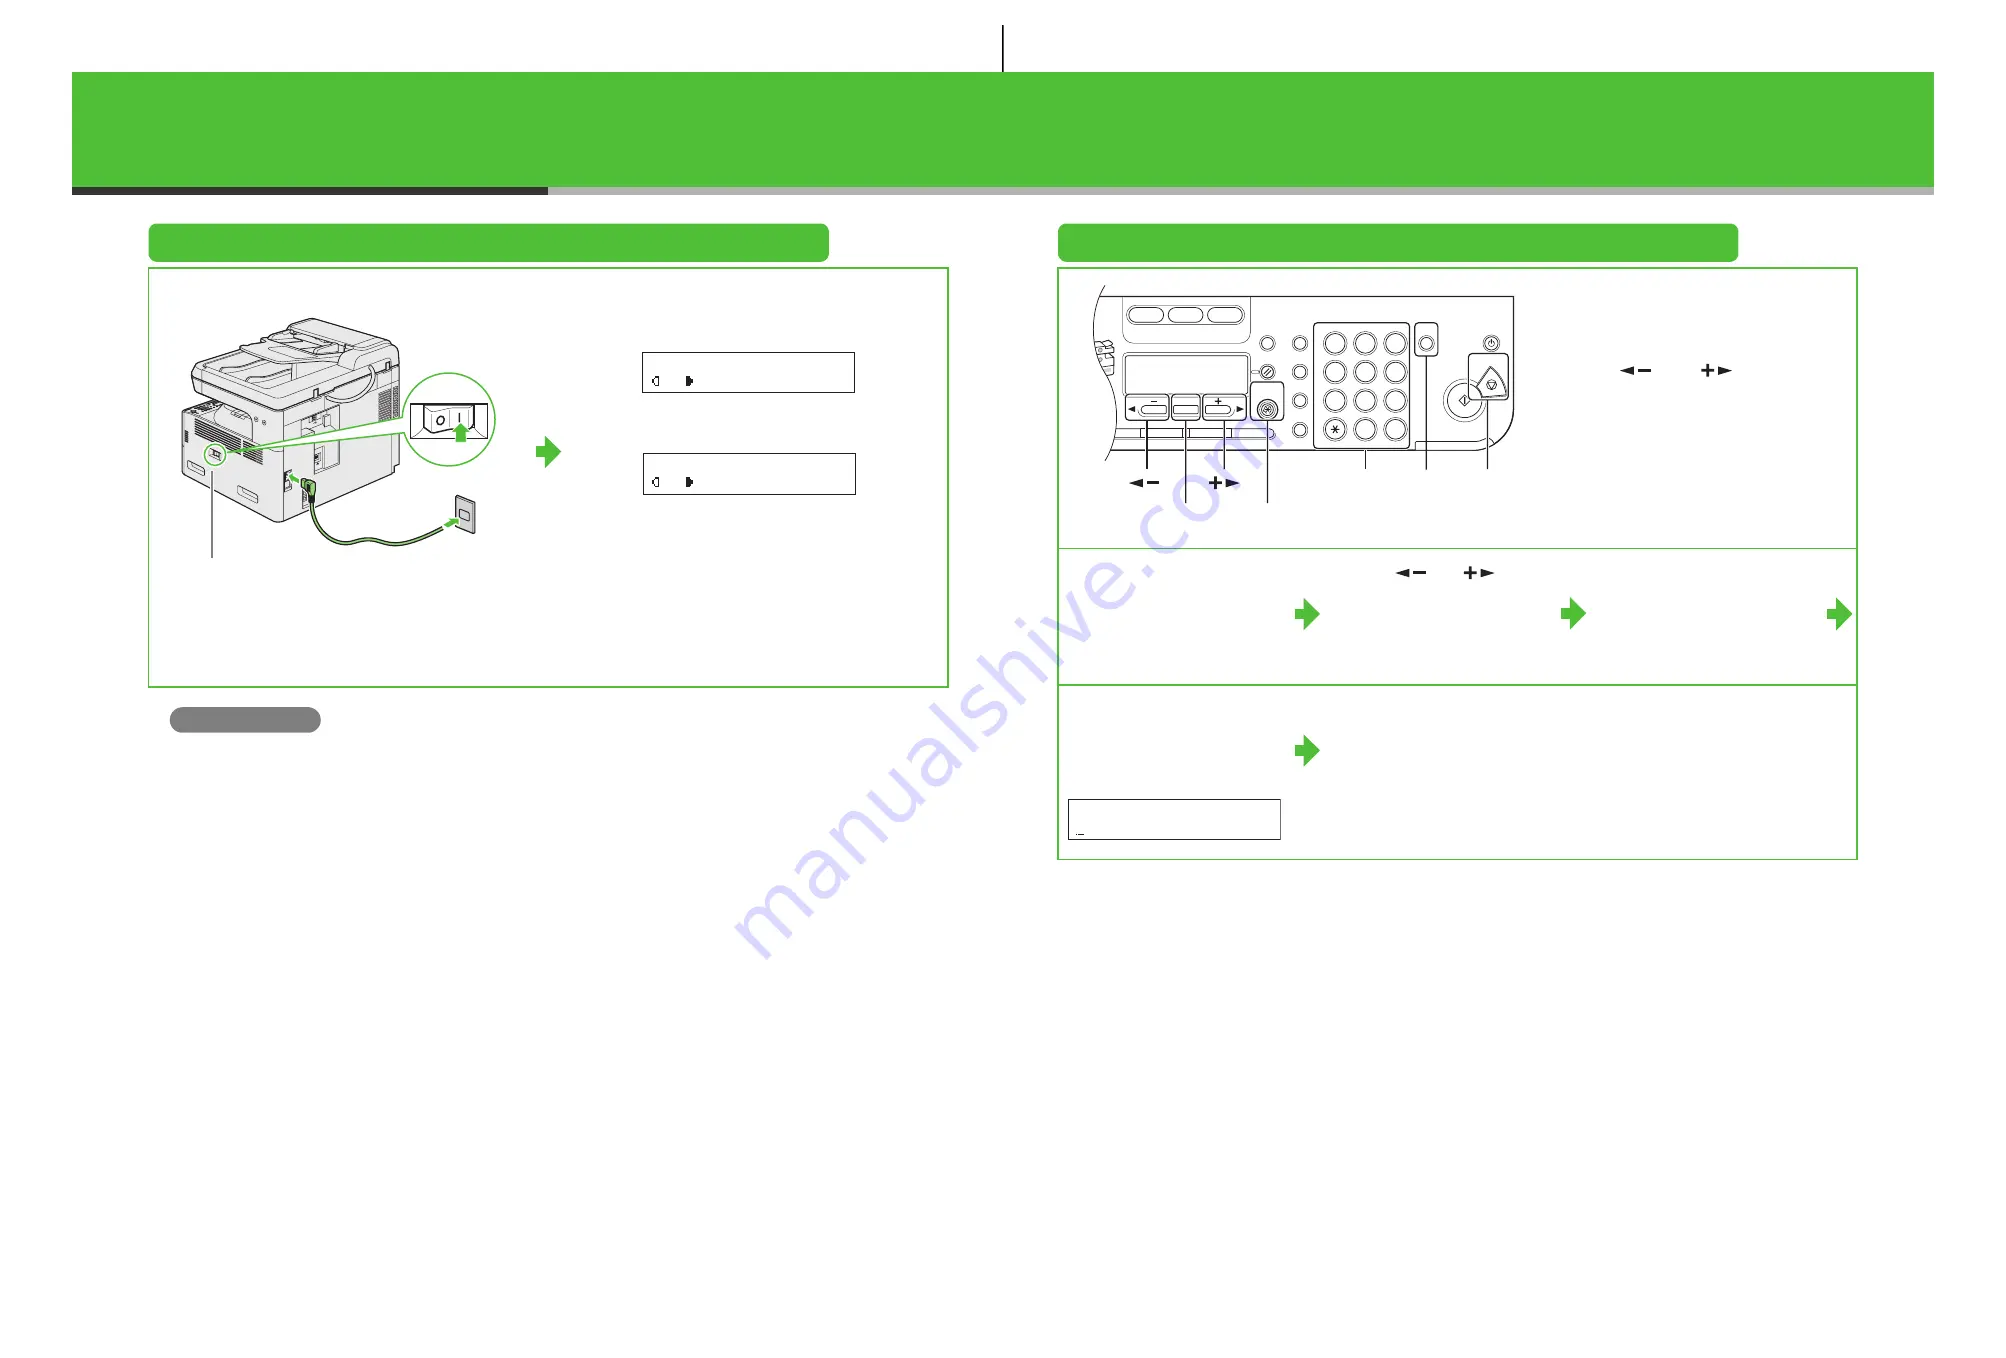
Connect the power cord into the rear socket and the wall 
outlet and press the [I] side of the main power switch to ON.

The machine enters standby mode.

What if...

<CLOSE COVER LEFT COVER> is displayed:

Make sure that the left cover is closed properly.
(See “Install Toner Cartridge,” on p. 3.)

<TONER IS NOT SET INSTALL TONER> is displayed:

Make sure that the toner cartridge is installed properly.
(See “Install Toner Cartridge,” on p. 3.)

Main power switch

1 0 0 %             L T R
          T E X T

A

1 0 0 %     A U T O
          T E X T

A

0 1

0 1

Without optional cassette

With optional cassette

Set the Date and Time

Entering Information
– Numeric keys: Enter letters and 

numbers.

– [

] and [

]: Move the 

cursor position.

– [Clear]: Deletes the character at 

the cursor position, or the entire 
entry if held for more than one 
second.

1

Press [Additional 
Functions].

2

Use [

] or [

] to 

select <6. TIMER 
SETTINGS>, then press 
[OK].

3

Confirm that 
<1. DATE&TIME 
SETTING> is displayed, 
then press [OK].

4

Use the numeric keys to 
enter the date (month/day/
year) and time (in 24-hour 
format), then press [OK].

5

Press [Stop] to return to 
standby mode.

Paper

Select

COPY

FAX

SCAN

Image Quality

Density

Enlarge/Reduce

OK

Two-Sided

System

Monitor

View

Settings

Reset

Collate

GHI

@./

PQRS

Tone

JKL

ABC

TUV

MNO

DEF

Clear

ON/OFF

Stop

Start

Processing/

Data

Error Power

WXYZ

SYMBOLS

Additional

Functions

2 on 1

Frame Erase

1

4

7

2

5

8

0

#

3

C

6

9

[OK]

[Stop]

Numeric Keys

[

]

[

]

[Additional Functions]

[Clear]

Ex.

D A T E & T I M E   S E T T I N G
1 2 / 3 1 / ´ 0 6   1 1 : 1 9  

8

Summary of Contents for imageCLASS MF6500 Series

Page 1: ...ld Germany CANON ITALIA S p A Via Milano 8 20097 San Donato Milanese MI Italy CANON ESPA A S A c Joaqu n Costa 41 28002 Madrid Spain CANON LATIN AMERICA INC 703 Waterford Way Suite 400 Miami Florida 3...

Page 2: ...ure at least two people carry it using the provided hand grips on the left and right sides as seen in the illustration right The machine illustration may differ slightly from your machine Starter Guid...

Page 3: ...idge into the machine with the arrows A on the toner cartridge pointing toward the machine 8 The left edge A and the right side protrusions B C of the toner cartridge should be aligned with the guides...

Page 4: ...it will go CAUTION Be careful not to get your fingers caught NOTE For loading paper in the multi purpose tray see Chapter 3 Print Media in the Basic Guide Set Up the Paper Cassette to Fit the Paper Si...

Page 5: ...eric keys Enter letters and numbers and Move the cursor position Clear Deletes the character at the cursor position or the entire entry if held for more than one second 1 Press Additional Functions 2...

Page 6: ...to enter symbols Press to switch among input modes A Letter uppercase mode a Letter lowercase mode 1 Number mode Press or to move the cursor Press Clear to delete the character at the cursor position...

Page 7: ...keys to enter the unit name up to 24 characters then press OK 8 Press Stop to return to standby mode Set the Telephone Line Type 1 Press Additional Functions 2 Use or to select 3 FAX SETTINGS then pr...

Page 8: ...Answers all calls as faxes Do you intend to use an answering machine with the machine Yes AnsMode Receives faxes automatically and records voice messages Do you intend to receive faxes automatically N...

Page 9: ...0 XP Server 2003 logon as Administrator to install the software Make sure the machine is turned on before connecting the USB cable On the screen shown at each step click on the circled button to proce...

Page 10: ...tic IP addresses using BOOTP and RARP protocols For definitions and an explanation of each please refer to the Advanced Guide 1 Press Additional Functions 2 Use or to select 9 SYSTEM SETTINGS then pre...

Page 11: ...5 rated Cat 5 twisted pair LAN cable A Install Software 1 2 If the MF6500 Series CD ROM Setup screen is not displayed on the Windows desktop double click My Computer Open the CD ROM icon then double...

Page 12: ...11 12 13 14 15 16 17 You have now completed installation 21 22 21...

Page 13: ...Click start on the Windows task bar All Programs Canon MF6500 Series Uninstall Drivers The MF Drivers Uninstaller dialog box appears 2 Click Delete 3 Click Yes Uninstallation proceeds automatically an...

Page 14: ...is located in the list below Context Sensitive Help Context sensitive help displays an explanation of each item in the current dialog box Use one of the following methods to show context sensitive hel...

Page 15: ...AAAA AAAA 1 AAAA AAAA AAAA AAAA 1 AAAA AAAA AAAA AAAA 1 C o l l a t e 2 on 1 Combination Original Frame Erase Book Frame Erase Binding Hole Erase 1 to 2 Sided 2 to 2 Sided 2 to 1 Sided Collate 2 o n 1...

Page 16: ...ld Germany CANON ITALIA S p A Via Milano 8 20097 San Donato Milanese MI Italy CANON ESPA A S A c Joaqu n Costa 41 28002 Madrid Spain CANON LATIN AMERICA INC 703 Waterford Way Suite 400 Miami Florida 3...

Reviews: