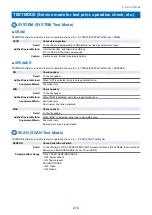
TESTMODE (Service mode for test print, operation check, etc.) > SCAN (SCAN Test Mode)
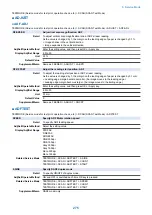
■ ADJUST
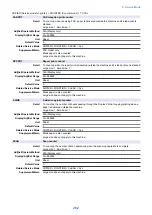
● ADF-ADJ
TESTMODE (Service mode for test print, operation check, etc.) > SCAN (SCAN Test Mode) > ADJUST > ADF-ADJ
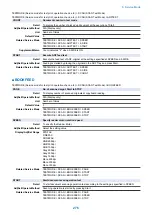
DF-SPEED
Adj vertical scan magnification: ADF
Detail
To adjust vertical scan magnification ratio at ADF stream reading.
As the value is changed by 1, the margin on the leading edge of paper is changed by 0.1 %.
+: Image shrinks in the vertical direction
-: Image expands in the vertical direction
Adj/Set/Operate Method
Enter the setting value, and then press OK or Apply key.
Display/Adj/Set Range
-30 to 30
Unit
0.1 %
Default Value
0
Supplement/Memo
Same as FEEDER > ADJUST > LA-SPD
DF-OFFSET
Adjust the reading start position: ADF
Detail
To adjust the reading start position at ADF stream reading.
As the value is changed by 1, the margin on the leading edge of paper is changed by 0.1 mm.
+: Leading edge margin becomes smaller. (An image moves to the leading edge.)
-: Leading edge margin becomes larger. (An image moves to the trailing edge.)
Adj/Set/Operate Method
Enter the setting value, and then press OK or Apply key.
Display/Adj/Set Range
-30 to 30
Unit
0.1 mm
Default Value
0
Supplement/Memo
Same as FEEDER > ADJUST > DOCST
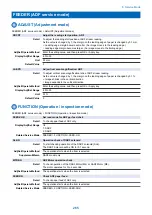
■ ADFTEST
TESTMODE (Service mode for test print, operation check, etc.) > SCAN (SCAN Test Mode) > ADFTEST
SPEED
Specify ADF Motor rotation speed
Detail
To specify ADF feeding speed.
Adj/Set/Operate Method
Select the setting value
Display/Adj/Set Range
STDFAX
FINEFAX
SFINEFAX
RGB 300dpi
RGB 150dpi
Gray 300dpi
Gray 150dpi
Mono 300dpi
Mono 150dpi
Related Service Mode
TESTMODE > SCAN > ADFTEST > 2-SIDE
TESTMODE > SCAN > ADFTEST > COUNT
TESTMODE > SCAN > ADFTEST > START
2-SIDE
Specify DADF duplex mode
Detail
To specify ON/OFF of duplex mode.
Adj/Set/Operate Method
ON and OFF is switched each time OK key is pressed.
Related Service Mode
TESTMODE > SCAN > ADFTEST > SPEED
TESTMODE > SCAN > ADFTEST > COUNT
TESTMODE > SCAN > ADFTEST > START
Supplement/Memo
DADF model only
8. Service Mode
275
Summary of Contents for imageCLASS MF264dw
Page 13: ...Product Overview 1 Product Lineup 6 Features 8 Specifications 9 Parts Name 14 ...
Page 67: ...Consumable Parts Consumable parts are not required in this machine 3 Periodical Service 59 ...
Page 68: ...Periodical Service No periodic services are required to this machine 3 Periodical Service 60 ...
Page 89: ...3 80 mm 80 mm 4 Parts Replacement and Cleaning 81 ...
Page 92: ... If the Fax is not installed 3x 2x 1x 2 60 mm 3 4 Parts Replacement and Cleaning 84 ...
Page 96: ...3 4 Parts Replacement and Cleaning 88 ...
Page 97: ...4 5 4 Parts Replacement and Cleaning 89 ...
Page 105: ...2 3 1x 4 Parts Replacement and Cleaning 97 ...
Page 110: ...5 6 4x 1x 1x 7 4 Parts Replacement and Cleaning 102 ...
Page 115: ...3 4 5 4 Parts Replacement and Cleaning 107 ...
Page 116: ...6 4 Parts Replacement and Cleaning 108 ...
Page 122: ...2 3 4 4 Parts Replacement and Cleaning 114 ...
Page 124: ...1 2 2x 3 4 4 Parts Replacement and Cleaning 116 ...
Page 127: ...2 3 4 2x 1x 5 4 Parts Replacement and Cleaning 119 ...
Page 129: ...3 4 2x 1x 5 6 4 Parts Replacement and Cleaning 121 ...
Page 132: ...5 2x 4 Parts Replacement and Cleaning 124 ...
Page 138: ...2 1x 3 1x 4 4 Parts Replacement and Cleaning 130 ...
Page 140: ... Procedure 1 2 4 Parts Replacement and Cleaning 132 ...
Page 144: ... Procedure 1 2 3 2x 4 Parts Replacement and Cleaning 136 ...
Page 146: ...3 4 4 Parts Replacement and Cleaning 138 ...
Page 147: ...5 4 Parts Replacement and Cleaning 139 ...
Page 153: ...1 2 3 4 4 Parts Replacement and Cleaning 145 ...
Page 155: ...1 2 2x 3 4 4 Parts Replacement and Cleaning 147 ...
Page 158: ...2 3 4 2x 1x 5 4 Parts Replacement and Cleaning 150 ...
Page 160: ...3 4 2x 1x 5 6 4 Parts Replacement and Cleaning 152 ...
Page 163: ...5 2x 4 Parts Replacement and Cleaning 155 ...
Page 166: ...2 2x 1x 1x 3 1x 1x 4 Parts Replacement and Cleaning 158 ...
Page 170: ...2 2x 3 4 2x 4 Parts Replacement and Cleaning 162 ...
Page 173: ...2 3 4 2x 1x 5 4 Parts Replacement and Cleaning 165 ...
Page 175: ...3 4 2x 1x 5 6 4 Parts Replacement and Cleaning 167 ...
Page 178: ...5 2x 4 Parts Replacement and Cleaning 170 ...
Page 183: ...2 4x 4 Parts Replacement and Cleaning 175 ...
Page 188: ... If the Fax is not installed 6 2x 1x 7 3x 8 2x 1x 4 Parts Replacement and Cleaning 180 ...
Page 191: ...4 1x 5 1x 6 3x 4 Parts Replacement and Cleaning 183 ...
Page 199: ... Procedure 1 3x 2x 4 Parts Replacement and Cleaning 191 ...
Page 201: ... If the Fax is not installed 2 4x 3 4 Parts Replacement and Cleaning 193 ...
Page 208: ...4 4 Parts Replacement and Cleaning 200 ...
Page 211: ...3 2x 4 1x 4 Parts Replacement and Cleaning 203 ...
Page 213: ...2 3 4x 4 4 Parts Replacement and Cleaning 205 ...
Page 217: ...3 1x 1x 4 5 2x 6 4 Parts Replacement and Cleaning 209 ...
Page 218: ...7 8 9 4 Parts Replacement and Cleaning 210 ...
Page 223: ...4 4 Parts Replacement and Cleaning 215 ...
Page 228: ...Adjustment 5 Adjustment at Parts Replacement 221 ...
Page 230: ...Troubleshooting 6 Test Print 223 Troubleshooting Items 226 Debug Log 228 Version Upgrade 231 ...
Page 242: ...Error Jam Alarm 7 Overview 235 Error Code 238 Jam Code 241 Alarm Code 243 ...
Page 251: ...Alarm Code This machine does not have any Alarm Code 7 Error Jam Alarm 243 ...
Page 287: ...APPENDICES Service Tools 280 General Circuit Diagram 281 Backup Data 283 ...


