background image

Basic Printing

9

3

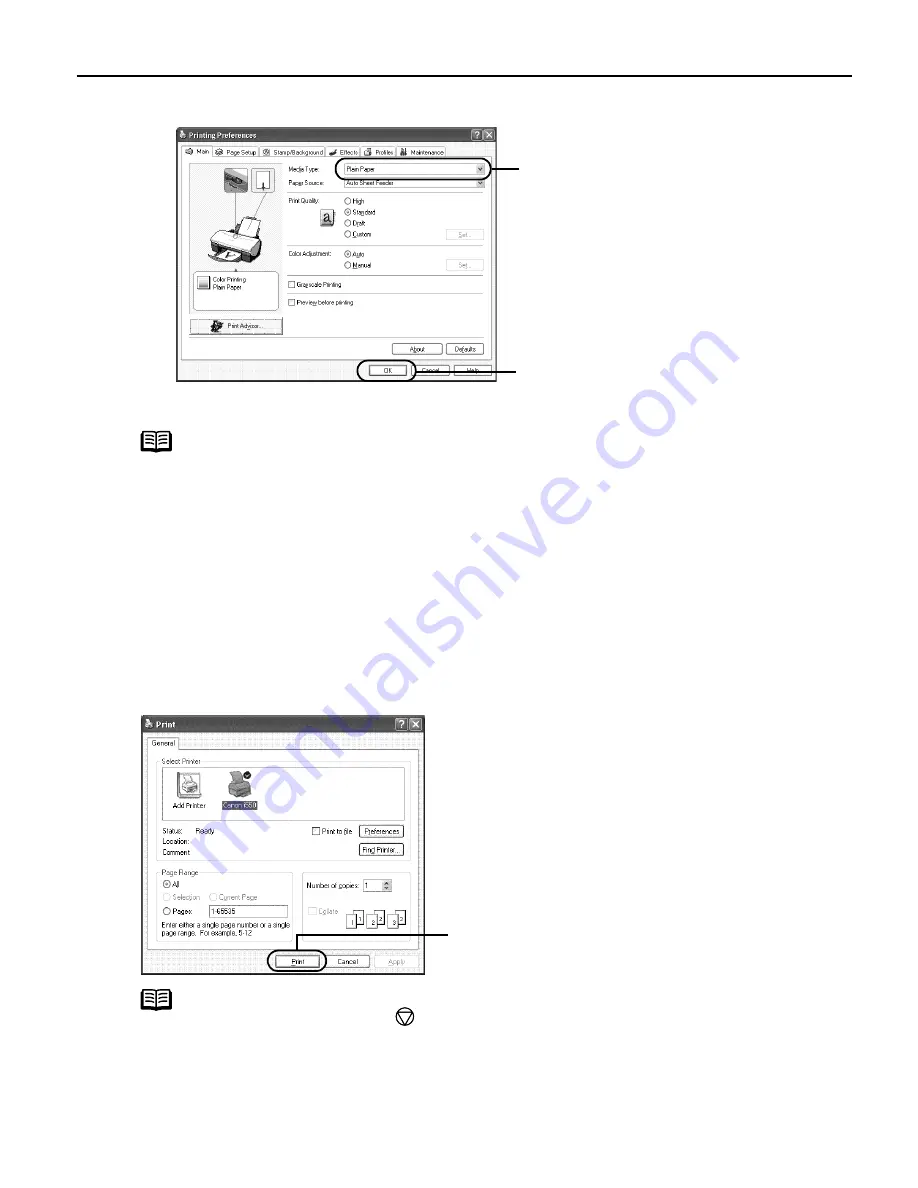
Specify the required settings.

4

Print the Document

Note

z

From the Page Setup tab select the correct document size to 
be printed.

z

To adjust Print Quality settings, select Custom

Custom

Custom

Custom and click Set

Set

Set

Set. 

You can control quality in the Set 

Set 

Set 

Set Print Quality

Print Quality

Print Quality

Print Quality dialog box.

z

For detail about other printer driver functions, refer to the 

User’s Guide

 or Help.

z

Select Preview before printing

Preview before printing

Preview before printing

Preview before printing by clicking the check box. 

This displays a preview screen that allows you to confirm 
the selected printing effects and how your document will 
look when printed. Some applications do not contain the 
function to display the preview.

Note

You can cancel a print job in progress by simply pressing the 

RESUME/CANCEL

RESUME/CANCEL

RESUME/CANCEL

RESUME/CANCEL  

button.

(1)

Click Media Type

Media Type

Media Type

Media Type to select 

the type of media loaded in 
the printer.

(2)

Click OK

OK

OK

OK.

(1) Click Print

Print

Print

Print or OK

OK

OK

OK.

Summary of Contents for i550

Page 1: ...Color Bubble Jet Printer Color Bubble Jet Printer Color Bubble Jet Printer Color Bubble Jet Printer Quick Start Guide Quick Start Guide Quick Start Guide Quick Start Guide...

Page 2: ...uaranteed or warranted and they are not intended to be nor should they be understood to be representation or warranties concerning the products described Specifications are subject to change without n...

Page 3: ...enance Printing Maintenance Printing Maintenance Replacing an Ink Tank 23 When Printing Becomes Faint or Colors are Incorrect 28 Printing the Nozzle Check Pattern 29 Print Head Cleaning 31 Print Head...

Page 4: ...For more information view the i550 User s Guide on the Setup Software User s Guide CD ROM or use the online help in your printer interface While in the printer s Properties window press the F1 key or...

Page 5: ...treated surface Any type of paper with holes such as loose leaf Loading the Print Media In this example description is provided of the steps used to load Plain Paper in your printer For detailed infor...

Page 6: ...the paper thickness lever to the correct position for the media in use Move to the left position for plain paper Move to the right position for envelopes Banner Paper and T Shirt Transfers 1 Open and...

Page 7: ...ic drying times refer to the instructions packaged with your media 1 Insert the paper in the sheet feeder with print side facing up 2 Align the paper stack snug against the right side of the sheet fee...

Page 8: ...Canon media to insure optimal print quality Photo quality media Photo Paper Pro Photo Paper Plus Glossy Matte Photo Paper Glossy Photo Paper Glossy Photo Cards High Gloss Photo Film High Resolution Pa...

Page 9: ...r High Resolution Paper Up to 80 sheets Left High Resolution Paper High Gloss Photo Film 1 sheet Left High Gloss Photo Film Glossy Photo Cards Up to 20 sheets Left Glossy Photo Paper 2 T Shirt Transfe...

Page 10: ...d functions listed in Print menus and dialog boxes may vary depending on the software application you are using The steps described in this section are for printing in Windows XP Note In Windows 2000...

Page 11: ...Help z Select Preview before printing Preview before printing Preview before printing Preview before printing by clicking the check box This displays a preview screen that allows you to confirm the se...

Page 12: ...ion software s File File File File menu 4 Click Print Print Print Print Note The menu screens and dialog boxes that appear may vary depending on the software application you are using The steps descri...

Page 13: ...h strong color definition Photo Photo Photo Photo Select when printing documents consisting mainly of photographs and graphics featuring fine color gradation Manual Manual Manual Manual If you select...

Page 14: ...Print Exif 2 2 compatible ImageBrowser Macintosh You can import photographs taken with a digital camera into the computer edit and caption them You can also make a Borderless Printing or Index Print...

Page 15: ...filename extension jpg and jpeg 1 Start Easy PhotoPrint 1 Insert the memory card in the computer This chapter describes only the steps used for printing the photographs stored in the card as an examp...

Page 16: ...he folder containing the digital photographs All photographs in the selected folder are displayed 2 Click the button on the thumbnail of the photograph you want to print and specify the number of copi...

Page 17: ...lick the 2 Paper 2 Paper 2 Paper 2 Paper Selection Selection Selection Selection tab 2 Select the size of the paper you use from Paper Size Paper Size Paper Size Paper Size 3 Select the type of the pa...

Page 18: ...ely than ever before 1 Start ImageBrowser 1 Insert the memory card in the computer This chapter describes the steps used for printing the photographs stored in the card We recommend you consult your m...

Page 19: ...The Layout Options Layout Options Layout Options Layout Options dialog box appears and layout selection wizard starts 3 Enter layout options 2 Click the photograph you want to print 3 Click PRINT PRI...

Page 20: ...u to the Layout Options Layout Options Layout Options Layout Options dialog box 3 Click Page setup Page setup Page setup Page setup 1 Select Borderless Printing Borderless Printing Borderless Printing...

Page 21: ...tographs to print on one page 6 Print the photograph The Print dialog box is displayed 1 Select 1 1 1 1 1 1 1 1 1 1 1 1 from the No No No No of images of images of images of images pull down menu 2 Cl...

Page 22: ...t from the File File File File menu 2 Ensure that Canon i550 is selected Then click Preferences or Properties The Printer Properties Printer Properties Printer Properties Printer Properties dialog box...

Page 23: ...Printer Properties dialog box is opened from within an application For further information about these additional tabs refer to your Windows documentation 1 Click Start and select Control Panel Print...

Page 24: ...basic introduction to the many features offered by your printer driver Note For detailed description of the printer driver functions refer to the User s Guide Printing with Borderless Printing Reducin...

Page 25: ...CI 3eBK Knowing When to Replace Ink Tank If an ink tank needs replacing as soon as printing begins the POWER POWER POWER POWER lamp will change from green to orange and flash four times It is importan...

Page 26: ...nk as soon as possible The ink tank with X symbol is out of ink Replace with a new ink tank Click Cancel Printing Cancel Printing Cancel Printing Cancel Printing to cancel the current print job Press...

Page 27: ...tected When Low Ink is Detected The following message is displayed as soon as a print job starts Indicates ink low Obtain a replacement tank as soon as possible Press the RESUME CANCEL RESUME CANCEL R...

Page 28: ...ush the tab and remove the ink tank 3 Prepare a replacement tank 1 Unpack the new ink tank and pull off the orange tape 2 Remove the orange protective cap from the bottom of the ink tank and discard i...

Page 29: ...re attach the protective cap once you have removed it z Once the protective cap is removed do not touch the open ink port Note z To maintain optimal Print Quality use an ink tank within six months of...

Page 30: ...ure that the ink tank is installed securely z Increase the Print Quality setting in the printer driver settings Note If print head maintenance does not resolve the problem contact the Customer Care Ce...

Page 31: ...directly from the Start menu Opening the Printer Properties dialog box directly from the Start menu on page 21 3 Print the Nozzle Check Pattern 3 When the confirmation message is displayed click OK O...

Page 32: ...Utilities to open the Printer Utility Printer Utility Printer Utility Printer Utility dialog box 3 Print the Nozzle Check Pattern 3 When the confirmation message is displayed click OK OK OK OK See Ex...

Page 33: ...box See Opening the Printer Properties dialog box directly from the Start menu Opening the Printer Properties dialog box directly from the Start menu Opening the Printer Properties dialog box directly...

Page 34: ...the message is displayed click OK OK OK OK 1 Ensure the printer is on 2 Open the Printer Utility Printer Utility Printer Utility Printer Utility dialog box 1 Select Page Setup Page Setup Page Setup P...

Page 35: ...econds Note z Print head cleaning can be performed also from the printer itself Ensure the printer is on Hold down the RESUME RESUME RESUME RESUME CANCEL CANCEL CANCEL CANCEL button until the POWER PO...

Page 36: ...ter Properties dialog box directly from the Start menu Opening the Printer Properties dialog box directly from the Start menu Opening the Printer Properties dialog box directly from the Start menu on...

Page 37: ...nozzles 4 When the message is displayed click OK OK OK OK Important The process takes one or two minutes to complete so simply wait until the POWER POWER POWER POWER lamp stops flashing Note After pri...

Page 38: ...u Opening the Printer Properties dialog box directly from the Start menu Opening the Printer Properties dialog box directly from the Start menu Opening the Printer Properties dialog box directly from...

Page 39: ...tility dialog box 1 Select Page Setup Page Setup Page Setup Page Setup in the File File File File menu 2 Click Utilities Utilities Utilities Utilities to open the Printer Utility Printer Utility Print...

Page 40: ...OK OK Note If this is difficult to pick up the best pattern on Column F pick the setting that procedures the least noticeable vertical white stripes 1 1 1 1 Select Test Print Test Print Test Print Te...

Page 41: ...ng Printer Hardware Troubleshooting Printer Hardware Troubleshooting Printer Hardware Troubleshooting Printer Hardware on page 43 Paper Does Not Feed Properly Paper Does Not Feed Properly Paper Does N...

Page 42: ...CD ROM CD ROM icon Double click the CD ROM CD ROM CD ROM CD ROM icon on your desktop to start installation Installation CD ROM not working properly Confirm that there are no problems with the Setup S...

Page 43: ...rint the nozzle check pattern to check for uneven ink output When a specific color is missing from the nozzle check pattern clean the print head If ink supply is uneven See Print Head Cleaning Print H...

Page 44: ...3 Click the Color Color Color Color icon then drag the Intensity Intensity Intensity Intensity slide bar to set the intensity Paper feed roller is dirty Clean the paper feed roller See Paper Does Not...

Page 45: ...Maintenance Maintenance Maintenance tab and then Start Status Monitor Start Status Monitor Start Status Monitor Start Status Monitor 3 Click Display Print Queue Display Print Queue Display Print Queue...

Page 46: ...Hold the RESUME CANCEL RESUME CANCEL RESUME CANCEL RESUME CANCEL button down and release after the POWER lamp flashes three times then feed the sheet of paper Repeat this operation three times If the...

Page 47: ...Replacing an Ink Tank Replacing an Ink Tank on page 23 Six flashes Indicatesprinthead not installed Install print head If print head is already installed remove the print head and check the contacts f...

Page 48: ...or No X203 Printer driver fault There is a problem with the printer driver Uninstall then reinstall printer driver Refer to the User s Guide for instructions on how to uninstall the printer driver Err...

Page 49: ...lor Printing in Grayscale Reversing the Page Printing Order Printing on Nonstandard Size Paper Reducing the Sound of Printer Operation Registering Printer Driver Settings Printing Media Compatible Med...

Page 50: ...Operating environment Operating environment Operating environment Operating environment Temperature 5 to 35 C 41 to 95 F Temperature 5 to 35 C 41 to 95 F Temperature 5 to 35 C 41 to 95 F Temperature 5...

Page 51: ...ndows 98 Windows 95 15MB Windows Me Windows 98 Windows 95 15MB Windows Me Windows 98 Windows 95 15MB USB operation can only be guaranteed on a PC with pre installed Windows XP Windows 2000 Windows Me...

Page 52: ...ever use the printer if the power cord is bundled or knotted If you detect smoke unusual smells or strange noises around the printer immediately unplug the If you detect smoke unusual smells or strang...

Page 53: ...r at both ends When moving the printer carry the printer at both ends Power supply Power supply Power supply Power supply Never remove the plug by pulling on the cord Never remove the plug by pulling...

Page 54: ...ged to try to correct the interference by one or more of the following measures Reorient or relocate the receiving antenna Increase the separation between the equipment and receiver Connect the equipm...

Page 55: ...by the manufacturer or producer thereof Canon brand items is given by the manufacturer or producer thereof This limited warranty covers all defects encountered in normal use of the Product and does no...

Page 56: ...ASF nearest you 1 800 423 2366 select automated support options If the problem cannot be corrected by using one of the above technical support options repair options are available at the time of your...

Page 57: ...inter Properties dialog box directly from the Start menu 21 Opening the Printer Properties dialog box from your application program 20 P Page Setup 43 Page Setup dialog box 43 Paper feed roller 44 pap...

Reviews: