


0FR4-0LJ
See the following sections.
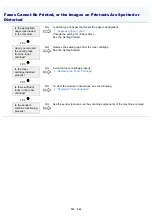
Cannot scan a document.
The scan is too slow.
Cannot scan multiple documents to create a combined multi-page PDF file.
<An error has occurred.> appears on the operation panel. (When scanning from the operation panel)
During scanning, a computer connected to the machine freezes or is disconnected.
In the event that applications installed from the User Software and Manuals DVD-ROM that comes with the machine
are not properly registered in the MF Toolbox.
A different application opens when you want to scan a document.
Scanned images are spotted or distorted.
A scanned image is displayed larger (or smaller) than its actual size on the computer screen.
Cannot scan highlighting marks.
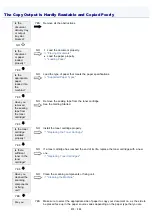
Cannot scan a document.
Refer to the following section:
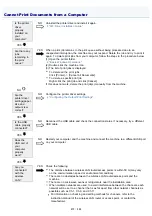
The scan is too slow.
When connecting the wireless LAN router or access point, check the following.
The distance between wireless LAN router and access points is within 50 m (may vary on the communication speed
or environmental condition).
There are no obstacles between the wireless LAN router or access point and the machine.
There are no microwave ovens or refrigerators near the installation area.
When multiple networks are used, to avoid interference between the channels, each network will be set to a channel
that is as far apart from other network channels as possible such as Ch.1, Ch.6, and Ch.11.
For information on checking and setting methods for channels, refer to the instruction manual of the wireless LAN
router or access point, or contact the manufacturer.
If the scan is still slow, turn OFF the machine and wait for at least 10 seconds before turning it back ON.
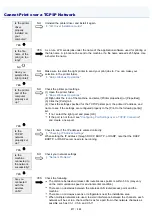
Cannot scan multiple documents to create a combined multi-page PDF file.
Start ScanGear MF, access the Preferences dialog box, and clear the check box next to [Automatically Quit ScanGear
after Scanning] before you perform a scan. When this check box is selected, you can only perform a scan from the platen
glass.
<An error has occurred.> appears on the operation panel. (When scanning from the operation
panel)
Close the MF Toolbox and scan the document again.
During scanning, a computer connected to the machine freezes or is disconnected.
Quit all running applications to increase the memory usage.
Make sure that the machine has sufficient free hard disk space when scanning documents at a high resolution. To scan
Scanning Problems
㻤㻣㻥㻌㻛㻌㻥㻢㻠
Summary of Contents for i-SENSYS MF6180dw
Page 1: ......
Page 46: ...NOTE If you press Menu before you press OK The changes made to the settings are not saved...
Page 49: ...The entry is complete...
Page 57: ......
Page 64: ......
Page 75: ...8 Make sure that the destination you registered is displayed in Members List and click OK...
Page 106: ...6 Press Select Paper Settings to close the Select Paper screen...
Page 118: ...5 Press Menu to close the menu screen...
Page 121: ...5 Press Menu to close the menu screen...
Page 124: ...5 Press Menu to close the menu screen...
Page 129: ...6 Press Menu to close the menu screen...
Page 135: ...6 Press Menu to close the menu screen...
Page 137: ...6 Press Menu to close the menu screen...
Page 147: ...5 Press Menu to close the menu screen...
Page 149: ...Press Menu to close the Menu screen...
Page 151: ...5 Press Menu to close the menu screen...
Page 153: ...5 Press Menu to close the menu screen...
Page 170: ...5 Select Yes using and press OK Printing starts 6 Press Report to close Print Report screen...
Page 176: ...5 Select Yes and press OK Printing begins 6 Press Report to close the Print Reports screen...
Page 178: ...5 Select Yes using and press OK Printing starts 6 Press Report to close Print Report screen...
Page 183: ...0FR4 03J Note that specifications are subject to change without notice Specifications...
Page 194: ...0FR4 041 Supported Document Types Scan Area Document Type...
Page 197: ...0FR4 044 Supported Paper Types Printable Area Paper...
Page 210: ...Check the details 7 Press Status Monitor Cancel to close the screen...
Page 229: ...0FR4 04Y 2 on 1 4 on 1 Copying an ID Card Copying Multiple Documents onto One Sheet N on 1...
Page 242: ...6 Select the size of the original document using or and press OK 7 Press Start...
Page 244: ...5 Press Start...
Page 249: ...Select Yes using and press OK...
Page 277: ...6 Press Start to receive fax es...
Page 315: ...5 Select Apply using or and press OK The changes are saved...
Page 333: ...6 Press Status Monitor Cancel to close the screen...
Page 366: ...To print documents using AirPrint...
Page 372: ...9 Click Finish 10 Click Close 11 Click Apply...
Page 378: ...Printing begins...
Page 388: ...Check the details 7 Press Status Monitor Cancel to close the screen...
Page 390: ...Press Menu to close the menu screen The setup is complete...
Page 395: ...5 Remove the USB memory media 6 Press Status Monitor Cancel to close the screen...
Page 484: ...9 Select Start Sending with or and then press OK The E mail is sent...
Page 502: ...6 Select Apply using or and press OK 7 Press Menu to close the menu screen...
Page 509: ...The scanned file is sent...
Page 523: ...Checking the MAC address of the machine See Checking the MAC Address...
Page 558: ...4 Click Edit in IPv6 Settings 5 Select the IPv6 check box...
Page 565: ...Check the information 6 Press Status Monitor Cancel to close the screen...
Page 577: ...6 Click OK 7 Click Close...
Page 581: ...2 Click Start Software Programs 3 Click Start for Send Function Setting Tool 4 Click Next...
Page 587: ......
Page 589: ...4 Click Edit 5 Specify the required settings as needed and click OK...
Page 594: ...3 Click Store to Shared Folder Settings 4 Register the file server that you use...
Page 596: ...6 Make sure the settings and click Register...
Page 604: ...4 Click Edit in IPv4 Settings 5 Specify DNS settings...
Page 607: ...8 Click OK...
Page 609: ...4 Click Edit in IPv6 Settings 5 Specify DNS settings...
Page 614: ...4 Click Edit in WINS Configuration 5 Specify the WINS settings...
Page 617: ...4 Click Edit in SMB Settings 5 Set NetBIOS Name and Workgroup Name...
Page 624: ...Select MTU Size using or and then press OK 6 Press Menu to close the menu screen...
Page 628: ......
Page 639: ...Press Menu to close the menu screen...
Page 643: ...5 Press Menu to close the menu screen...
Page 661: ...2 Click OK...
Page 664: ...4 Click Generate Key 5 Specify the keys...
Page 668: ...4 Click Register Key and Certificate or Register CA Certificate 5 Click Install...
Page 669: ...6 Click Browse and then specify a file to install 7 Click Start Installation...
Page 673: ......
Page 675: ...4 Click Register Key and Certificate 5 Click Register...
Page 676: ...6 Enter a key name and a password 7 Click OK...
Page 678: ...3 Click Security Settings CA Certificate Settings 4 Click Register CA Certificate 5...
Page 679: ...Click Register...
Page 690: ...4 Click Edit 5 Select the Use IEEE802 1X check box...
Page 691: ...6 Enter a login name 7 Select the Use TLS check box...
Page 695: ...4 Click Edit 5 Select the Use IEEE802 1X check box...
Page 696: ...6 Enter a login name 7 Select either the Use TTLS or the Use PEAP check box...
Page 708: ...3 Select OK enter a user name and PIN and then click OK 4 Click OK 5 Click OK or Print...
Page 734: ...4 Click Edit 5 Specify SNMPv3...
Page 832: ...13 Close the feeder or the platen glass cover gently 14 Place documents in the feeder...
Page 834: ...The machine is ready to print...
Page 861: ...0FR4 0L4 Sending Problems Receiving Problems Fax Problems...
Page 884: ...0FR4 0LR Wired LAN Troubles Wireless LAN Troubles MF6180dw Only Network Problems...
Page 911: ...4 Close the feeder 5 Connect the power cord and turn ON the power switch...
Page 943: ...0FR4 0S6 Basic Windows Operations For Macintosh Users Appendix...
Page 959: ...15 Office Locations Display the contact information for inquiries...
Page 965: ......
Page 1004: ...8 Close the dialog box...
Page 1013: ...The icon is added to the printer folder...
Page 1018: ......
Page 1020: ......


