


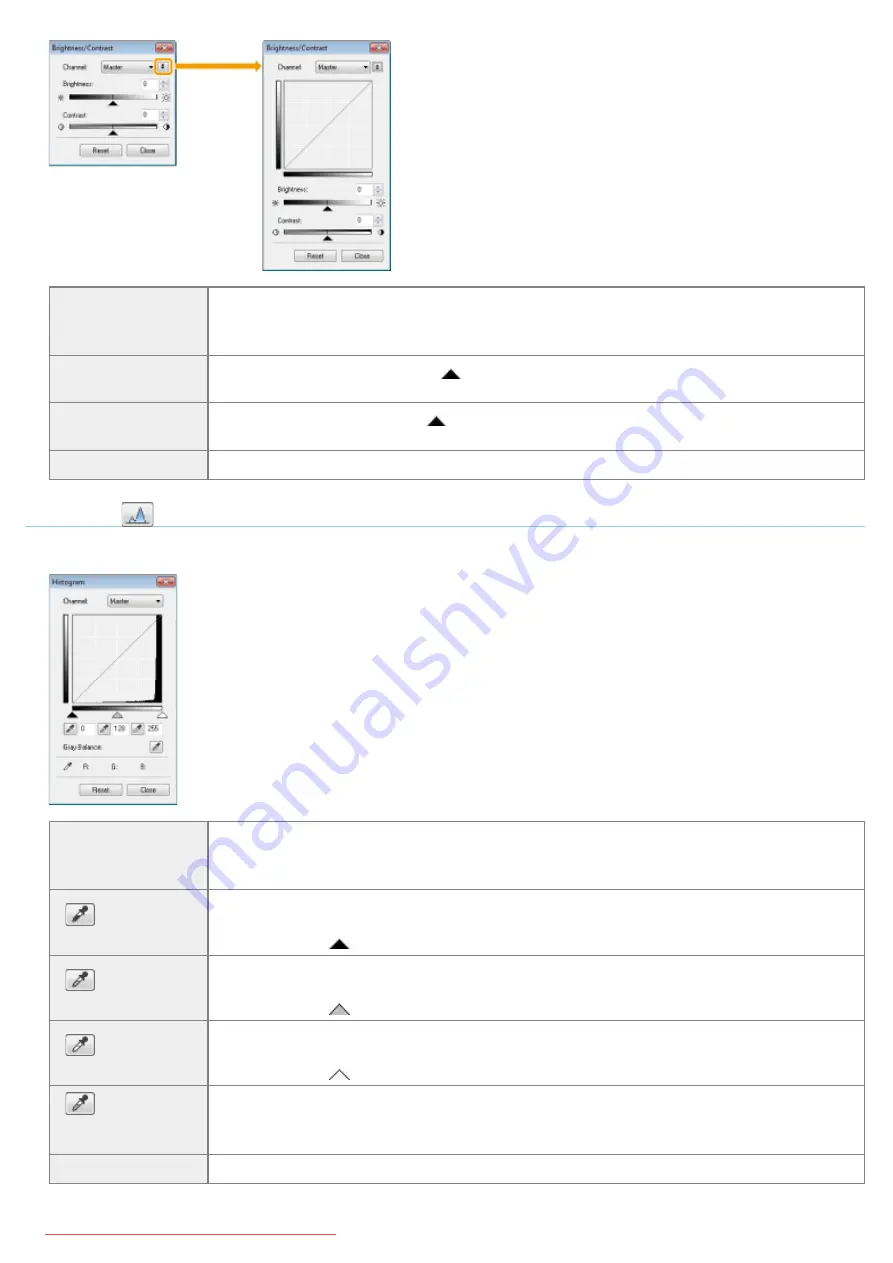
[Channel]
Select a color to adjust either [Red], [Green], or [Blue], or select [Master] to adjust all three
colors together when [Color] is selected in [Color Mode].
When [Grayscale] is selected in [Color Mode], adjust gray color.
[Brightness]
Adjust the brightness by moving [
] on the slider or manually entering values from -127 up to
127.
[Contrast]
Adjust the contrast by moving [
] on the slider or manually entering values from -127 up to
127.
[Reset]
Resets all the current settings to their default values.
Histogram
You can check how much data clusters at which level of the brightness. You can specify the darkest and brightest levels
within an image, cut the levels and expand the middle of the tonal range of the image.
[Channel]
Select a color to adjust either [Red], [Green], or [Blue], or select [Master] to adjust all three
colors together when [Color] is selected in [Color Mode].
When [Grayscale] is selected in [Color Mode], adjust gray color.
[
] (Black-point
eyedropper tool)
Click this button and specify an area which you want to darken the most by clicking in the
preview image (or the selected cropping area). You can also manually enter a value from 0 up
to 245 or move [
] on the slider.
[
] (Mid-point
eyedropper tool)
Click this button and specify an area where you want to make halftone by clicking in the
preview image (or the selected cropping area). You can also manually enter a value from 5 up
to 250 or move [
] on the slider.
[
] (White-point
eyedropper tool)
Click this button and specify an area which you want to lighten the most by clicking in the
preview image (or the selected cropping area). You can also manually enter a value from 10 up
to 255 or move [
] on the slider.
[
] (Gray
Balance eyedropper
tool)
To adjust color images, click this button and specify a point at which gray balance is adjusted
by clicking in the preview image (or the selected cropping area). The gray color in the scanned
image becomes halftone, and other colors are reproduced in their original colors.
[Reset]
Resets all the current settings to their default values.
㻠㻡㻤㻌㻛㻌㻥㻢㻠
Summary of Contents for i-SENSYS MF6140dn
Page 1: ...㻝㻌㻛㻌㻥㻢㻠 Downloaded from ManualsPrinter com Manuals ...
Page 49: ...The entry is complete 㻠㻥㻌㻛㻌㻥㻢㻠 Downloaded from ManualsPrinter com Manuals ...
Page 57: ...㻡㻣㻌㻛㻌㻥㻢㻠 Downloaded from ManualsPrinter com Manuals ...
Page 64: ...㻢㻠㻌㻛㻌㻥㻢㻠 Downloaded from ManualsPrinter com Manuals ...
Page 118: ...5 Press Menu to close the menu screen 㻝㻝㻤㻌㻛㻌㻥㻢㻠 Downloaded from ManualsPrinter com Manuals ...
Page 121: ...5 Press Menu to close the menu screen 㻝㻞㻝㻌㻛㻌㻥㻢㻠 Downloaded from ManualsPrinter com Manuals ...
Page 124: ...5 Press Menu to close the menu screen 㻝㻞㻠㻌㻛㻌㻥㻢㻠 Downloaded from ManualsPrinter com Manuals ...
Page 129: ...6 Press Menu to close the menu screen 㻝㻞㻥㻌㻛㻌㻥㻢㻠 Downloaded from ManualsPrinter com Manuals ...
Page 135: ...6 Press Menu to close the menu screen 㻝㻟㻡㻌㻛㻌㻥㻢㻠 Downloaded from ManualsPrinter com Manuals ...
Page 137: ...6 Press Menu to close the menu screen 㻝㻟㻣㻌㻛㻌㻥㻢㻠 Downloaded from ManualsPrinter com Manuals ...
Page 147: ...5 Press Menu to close the menu screen 㻝㻠㻣㻌㻛㻌㻥㻢㻠 Downloaded from ManualsPrinter com Manuals ...
Page 149: ...Press Menu to close the Menu screen 㻝㻠㻥㻌㻛㻌㻥㻢㻠 Downloaded from ManualsPrinter com Manuals ...
Page 151: ...5 Press Menu to close the menu screen 㻝㻡㻝㻌㻛㻌㻥㻢㻠 Downloaded from ManualsPrinter com Manuals ...
Page 153: ...5 Press Menu to close the menu screen 㻝㻡㻟㻌㻛㻌㻥㻢㻠 Downloaded from ManualsPrinter com Manuals ...
Page 244: ...5 Press Start 㻞㻠㻠㻌㻛㻌㻥㻢㻠 Downloaded from ManualsPrinter com Manuals ...
Page 249: ...Select Yes using and press OK 㻞㻠㻥㻌㻛㻌㻥㻢㻠 Downloaded from ManualsPrinter com Manuals ...
Page 277: ...6 Press Start to receive fax es 㻞㻣㻣㻌㻛㻌㻥㻢㻠 Downloaded from ManualsPrinter com Manuals ...
Page 366: ...To print documents using AirPrint 㻟㻢㻢㻌㻛㻌㻥㻢㻠 Downloaded from ManualsPrinter com Manuals ...
Page 378: ...Printing begins 㻟㻣㻤㻌㻛㻌㻥㻢㻠 Downloaded from ManualsPrinter com Manuals ...
Page 509: ...The scanned file is sent 㻡㻜㻥㻌㻛㻌㻥㻢㻠 Downloaded from ManualsPrinter com Manuals ...
Page 577: ...6 Click OK 7 Click Close 㻡㻣㻣㻌㻛㻌㻥㻢㻠 Downloaded from ManualsPrinter com Manuals ...
Page 587: ...㻡㻤㻣㻌㻛㻌㻥㻢㻠 Downloaded from ManualsPrinter com Manuals ...
Page 607: ...8 Click OK 㻢㻜㻣㻌㻛㻌㻥㻢㻠 Downloaded from ManualsPrinter com Manuals ...
Page 628: ...㻢㻞㻤㻌㻛㻌㻥㻢㻠 Downloaded from ManualsPrinter com Manuals ...
Page 639: ...Press Menu to close the menu screen 㻢㻟㻥㻌㻛㻌㻥㻢㻠 Downloaded from ManualsPrinter com Manuals ...
Page 643: ...5 Press Menu to close the menu screen 㻢㻠㻟㻌㻛㻌㻥㻢㻠 Downloaded from ManualsPrinter com Manuals ...
Page 661: ... 2 Click OK 㻢㻢㻝㻌㻛㻌㻥㻢㻠 Downloaded from ManualsPrinter com Manuals ...
Page 664: ...4 Click Generate Key 5 Specify the keys 㻢㻢㻠㻌㻛㻌㻥㻢㻠 Downloaded from ManualsPrinter com Manuals ...
Page 673: ...㻢㻣㻟㻌㻛㻌㻥㻢㻠 Downloaded from ManualsPrinter com Manuals ...
Page 679: ...Click Register 㻢㻣㻥㻌㻛㻌㻥㻢㻠 Downloaded from ManualsPrinter com Manuals ...
Page 734: ...4 Click Edit 5 Specify SNMPv3 㻣㻟㻠㻌㻛㻌㻥㻢㻠 Downloaded from ManualsPrinter com Manuals ...
Page 834: ...The machine is ready to print 㻤㻟㻠㻌㻛㻌㻥㻢㻠 Downloaded from ManualsPrinter com Manuals ...
Page 965: ...㻝㻌㻛㻌㻣㻢 Downloaded from ManualsPrinter com Manuals ...
Page 1004: ...8 Close the dialog box 㻠㻜㻌㻛㻌㻣㻢 Downloaded from ManualsPrinter com Manuals ...
Page 1013: ...The icon is added to the printer folder 㻠㻥㻌㻛㻌㻣㻢 Downloaded from ManualsPrinter com Manuals ...
Page 1018: ...㻡㻠㻌㻛㻌㻣㻢 Downloaded from ManualsPrinter com Manuals ...
Page 1020: ...㻡㻢㻌㻛㻌㻣㻢 Downloaded from ManualsPrinter com Manuals ...
Page 1031: ... Installing the MF Drivers and MF Toolbox 㻢㻣㻌㻛㻌㻣㻢 Downloaded from ManualsPrinter com Manuals ...


