


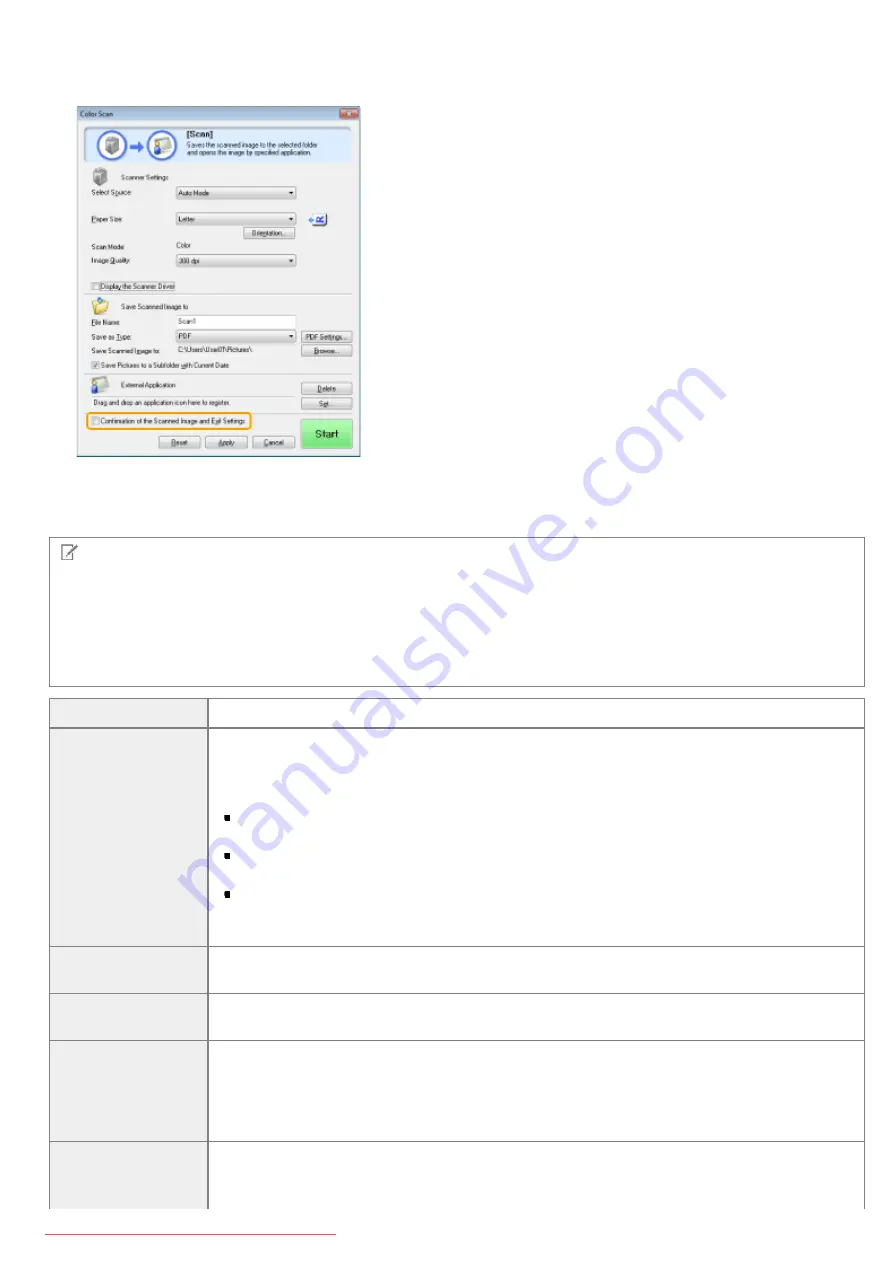
save them.
(1) Select the [Confirmation of the Scanned Image and Exif Settings] ([Confirm the Scanned Image] for the [PDF] button)
check box.
(2) Press [Start].
The scanned image is displayed in the [Scanned Image] dialog box. Refer to the following items to specify a file type
and location to be saved.
NOTE
When scanning using [OCR]
This check box is not available.
When scanning using [PDF]
You can only confirm the scanned image and specify the location to save the image.
[Save as Type]
Specifies the file type for saving the scanned image.
[Exif Settings]
Opens the [Exif Settings] dialog box which enables you to set the Exif information when
[JPEG/Exif] is selected in [Save as Type]. You can attach extra information, such as the
description of the image, the date when the image was scanned, etc., to the JPEG files. Select
a scanned image from the drop-down list to display the image and add information.
[Basic Information]
Displays the information automatically obtained when the image is scanned.
[Advanced Information]
Displays the entered and added information.
[Apply the Same Setting of Input Items Automatically]
If the check box is selected, the same settings as those for the last time are specified for
scanning.
[PDF Settings]
When [PDF], [PDF (Single Page)], [PDF (Multiple Pages)] or [PDF (Add Page)] is selected for
[Save as Type], you can specify advanced file settings.
[Save Scanned
Image to]
Specifies the saving location to save the scanned image.
[Add Scanned
Image to]
When this item appears instead of [Save Scanned Image to], when [PDF (Add Page)] is
selected in [Save as Type], you can select a PDF file to be added to the scanned image.
However, you may only add scanned images to PDF files that have been created using MF
Toolbox. You may not add scanned images to PDF files that have been created using other
applications.
[Save Pictures to a
Subfolder with
Current Date]
Creates a folder with current date in the specified location and saves the scanned images in
this folder.
This option cannot be specified when [Save as Type] is set to [PDF (Add Page)].
㻠㻠㻠㻌㻛㻌㻥㻢㻠
Summary of Contents for i-SENSYS MF6140dn
Page 1: ...㻝㻌㻛㻌㻥㻢㻠 Downloaded from ManualsPrinter com Manuals ...
Page 49: ...The entry is complete 㻠㻥㻌㻛㻌㻥㻢㻠 Downloaded from ManualsPrinter com Manuals ...
Page 57: ...㻡㻣㻌㻛㻌㻥㻢㻠 Downloaded from ManualsPrinter com Manuals ...
Page 64: ...㻢㻠㻌㻛㻌㻥㻢㻠 Downloaded from ManualsPrinter com Manuals ...
Page 118: ...5 Press Menu to close the menu screen 㻝㻝㻤㻌㻛㻌㻥㻢㻠 Downloaded from ManualsPrinter com Manuals ...
Page 121: ...5 Press Menu to close the menu screen 㻝㻞㻝㻌㻛㻌㻥㻢㻠 Downloaded from ManualsPrinter com Manuals ...
Page 124: ...5 Press Menu to close the menu screen 㻝㻞㻠㻌㻛㻌㻥㻢㻠 Downloaded from ManualsPrinter com Manuals ...
Page 129: ...6 Press Menu to close the menu screen 㻝㻞㻥㻌㻛㻌㻥㻢㻠 Downloaded from ManualsPrinter com Manuals ...
Page 135: ...6 Press Menu to close the menu screen 㻝㻟㻡㻌㻛㻌㻥㻢㻠 Downloaded from ManualsPrinter com Manuals ...
Page 137: ...6 Press Menu to close the menu screen 㻝㻟㻣㻌㻛㻌㻥㻢㻠 Downloaded from ManualsPrinter com Manuals ...
Page 147: ...5 Press Menu to close the menu screen 㻝㻠㻣㻌㻛㻌㻥㻢㻠 Downloaded from ManualsPrinter com Manuals ...
Page 149: ...Press Menu to close the Menu screen 㻝㻠㻥㻌㻛㻌㻥㻢㻠 Downloaded from ManualsPrinter com Manuals ...
Page 151: ...5 Press Menu to close the menu screen 㻝㻡㻝㻌㻛㻌㻥㻢㻠 Downloaded from ManualsPrinter com Manuals ...
Page 153: ...5 Press Menu to close the menu screen 㻝㻡㻟㻌㻛㻌㻥㻢㻠 Downloaded from ManualsPrinter com Manuals ...
Page 244: ...5 Press Start 㻞㻠㻠㻌㻛㻌㻥㻢㻠 Downloaded from ManualsPrinter com Manuals ...
Page 249: ...Select Yes using and press OK 㻞㻠㻥㻌㻛㻌㻥㻢㻠 Downloaded from ManualsPrinter com Manuals ...
Page 277: ...6 Press Start to receive fax es 㻞㻣㻣㻌㻛㻌㻥㻢㻠 Downloaded from ManualsPrinter com Manuals ...
Page 366: ...To print documents using AirPrint 㻟㻢㻢㻌㻛㻌㻥㻢㻠 Downloaded from ManualsPrinter com Manuals ...
Page 378: ...Printing begins 㻟㻣㻤㻌㻛㻌㻥㻢㻠 Downloaded from ManualsPrinter com Manuals ...
Page 509: ...The scanned file is sent 㻡㻜㻥㻌㻛㻌㻥㻢㻠 Downloaded from ManualsPrinter com Manuals ...
Page 577: ...6 Click OK 7 Click Close 㻡㻣㻣㻌㻛㻌㻥㻢㻠 Downloaded from ManualsPrinter com Manuals ...
Page 587: ...㻡㻤㻣㻌㻛㻌㻥㻢㻠 Downloaded from ManualsPrinter com Manuals ...
Page 607: ...8 Click OK 㻢㻜㻣㻌㻛㻌㻥㻢㻠 Downloaded from ManualsPrinter com Manuals ...
Page 628: ...㻢㻞㻤㻌㻛㻌㻥㻢㻠 Downloaded from ManualsPrinter com Manuals ...
Page 639: ...Press Menu to close the menu screen 㻢㻟㻥㻌㻛㻌㻥㻢㻠 Downloaded from ManualsPrinter com Manuals ...
Page 643: ...5 Press Menu to close the menu screen 㻢㻠㻟㻌㻛㻌㻥㻢㻠 Downloaded from ManualsPrinter com Manuals ...
Page 661: ... 2 Click OK 㻢㻢㻝㻌㻛㻌㻥㻢㻠 Downloaded from ManualsPrinter com Manuals ...
Page 664: ...4 Click Generate Key 5 Specify the keys 㻢㻢㻠㻌㻛㻌㻥㻢㻠 Downloaded from ManualsPrinter com Manuals ...
Page 673: ...㻢㻣㻟㻌㻛㻌㻥㻢㻠 Downloaded from ManualsPrinter com Manuals ...
Page 679: ...Click Register 㻢㻣㻥㻌㻛㻌㻥㻢㻠 Downloaded from ManualsPrinter com Manuals ...
Page 734: ...4 Click Edit 5 Specify SNMPv3 㻣㻟㻠㻌㻛㻌㻥㻢㻠 Downloaded from ManualsPrinter com Manuals ...
Page 834: ...The machine is ready to print 㻤㻟㻠㻌㻛㻌㻥㻢㻠 Downloaded from ManualsPrinter com Manuals ...
Page 965: ...㻝㻌㻛㻌㻣㻢 Downloaded from ManualsPrinter com Manuals ...
Page 1004: ...8 Close the dialog box 㻠㻜㻌㻛㻌㻣㻢 Downloaded from ManualsPrinter com Manuals ...
Page 1013: ...The icon is added to the printer folder 㻠㻥㻌㻛㻌㻣㻢 Downloaded from ManualsPrinter com Manuals ...
Page 1018: ...㻡㻠㻌㻛㻌㻣㻢 Downloaded from ManualsPrinter com Manuals ...
Page 1020: ...㻡㻢㻌㻛㻌㻣㻢 Downloaded from ManualsPrinter com Manuals ...
Page 1031: ... Installing the MF Drivers and MF Toolbox 㻢㻣㻌㻛㻌㻣㻢 Downloaded from ManualsPrinter com Manuals ...


