background image

2

2

2-8

2-8

Technology > Controls (Reader)

Technology > Controls (Reader)

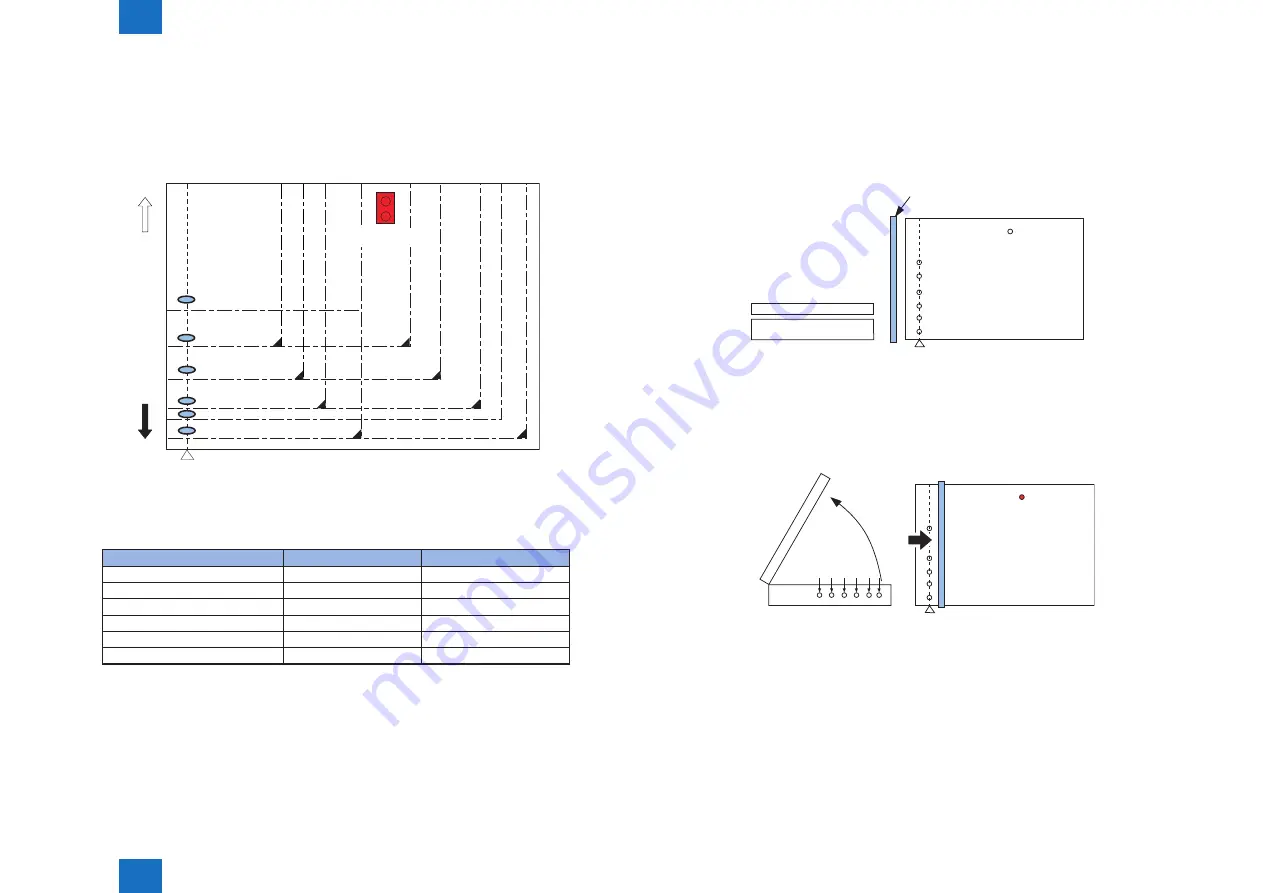
2. Priority on the front sensor
When checking the measurements for main scanning direction, if the absence of an original 
is indicated at the rear while the presence of an original is indicated at the front, the machine 
will give priority to the indication at the front.

B5

Original sensor 1

Position of

detection 1

CCD original 

 detection position

Rear

 side

Front

 side

Position of

detection 2
Position of

detection 3
Position of

detection 4

Position of detection 5
Position of detection 6

In case of B5 size original

Position of detection

Result of detection

Result of


identification

1

Yes

Yes

2

No

Yes

3

Yes

Yes

4

Yes

Yes

5

No

No

6

No

No

F-2-10

T-2-5


Detection Operation Overview

1) Standby state (The following is in case that the AB type, A4R size is set.)

CCD unit: shading position
LED: OFF
Original sensor: OFF


CCD  original detection position

CCD unit


Original sensor

Reader unit

ADF

Position of detection 1

Position of detection 2

Position of detection 3

Position of detection 4

Position of detection 5

Position of detection 6

Copyboard glass

2) ADF opened

CCD unit: moves to original detection position
LED: OFF
Original sensor: OFF

(External 

light)

3) ADF closed

CCD unit: in original detection position
LED: OFF to ON
Original sensor: in original detection operation

•    With the ADF angle at 25 deg or less, the external light is blocked at the original width 

area. Then, the machine determines that the original is absent at the points that the 
external light is detected (external light search operation). When the original mount 
sensor (rear) detects [close], original size detection is started. In this case, B5/B4/A4/
A3 size is eliminated at this point.

•  After external light search, LED is turned ON at main scanning side and the CCD 

F-2-11

F-2-12

Summary of Contents for H1

Page 1: ...6 5 4 3 2 1 Color Image Reader Unit H1 SERVICE MANUAL Rev0 Product Outline Technology Periodic Servicing Parts Replacement and Cleaning Procedure Adjustment Installation Appendix ...

Page 2: ...rmation as the need arises In the event of major changes in the contents of this manual over a long or short period Canon will issue a new edition of this manual The following paragraph does not apply to any countries where such provisions are inconsistent with local law Trademarks The product names and company names used in this manual are the registered trademarks of the individual companies Cop...

Page 3: ...switch closing the front door and closing the delivery unit door which results in supplying the machine with power 2 In the digital circuits 1 is used to indicate that the voltage level of a given signal is High while 0 is used to indicate Low The voltage value however differs from circuit to circuit In addition the asterisk as in DRMD indicates that the DRMD signal goes on when 0 In practically a...

Page 4: ...ally Replaced Parts 2 14 Consumable Parts 2 14 Periodical Servicing 2 14 Action to take when replacing parts 2 14 Major Adjustments 2 14 Troubleshooting 2 14 Basic Configuration DADF 2 15 Component Configuration 2 15 Outline of Electric Circuits 2 15 Drive Configuration 2 15 Sensor Layout 2 16 Outline of Operation Modes 2 16 Outline 2 16 Forward Pickup Delivery Operation 2 16 Forward Pickup Revers...

Page 5: ...umable Parts Requiring Periodic Replacement and Cleaning Points DADF 4 22 Removing the Pickup Roller Unit 4 22 Removing the Separation Pad 4 23 Replacing the Stamp 4 23 Exchanging the Feed Guide 4 24 Clutch Solenoid Motor Fan PCB DADF 4 25 Removing the ADF Motor M1 4 25 Removing the Release Motor M2 4 25 Removing the Pressurization Solenoid SL1 4 26 Pickup Clutch Registration Clutch CL1 CL2 4 26 R...

Page 6: ... img lead edge margin front 5 12 Fine adj of DADF image magnifictn front 5 13 White level adj 5 13 6 Installation How to Utilize This Installation Procedure 6 2 When using the parts included in the package 6 2 Symbols in the Illustration 6 2 Caution During Installation 6 2 Check Items when Turning OFF the Main Power 6 2 Checking the Contents 6 3 Installation Procedure 6 5 Installation Procedure 6 ...

Page 7: ...Safety Precautions Notes Before it Works Serving Points to Note at Cleaning ...

Page 8: ...g to the specified steps and disconnect the power plug CAUTION Do not turn off the power switch when downloading is under way Turning off the main power switch while downloading is under way can disable the machine Points to Note at Cleaning CAUTION When performing cleaning using organic solvent such as alcohol be sure to check that the component of solvent is vaporized completely before assemblin...

Page 9: ...1 1 Product Outline Product Outline Original Exposure System Reader Specifications Reader Names of Parts Reader Features DADF Specifications DADF Names of Parts DADF ...

Page 10: ... Magnification 25 to 400 Main scanning direction Image is processed on main controller PCB 2 Sub scanning direction In book mode speed change by carriage travel image process on main controller PCB 1 In ADF mode original feed speed change image process on main controller PCB 1 Lens ST lens CCD Number of lines 4 R G B B W Number of pixels 7500 x 3 color lines 7500 x 1 B W line Maximum original read...

Page 11: ... sensor S11 Detects CCD home position Copyboard Cover Open Closed Sensor front S12 Ends original size identification with the copy board cover at 5 deg Copyboard Cover Open Closed Sensor rear S13 Detects the copyboard cover open close Starts original size identification with the copy board cover at 30 deg Original Size Sensor 1 S15 Helps identify original size AB INCH AB K A Original Size Sensor 2...

Page 12: ...506 J501 Jack No Description J501 Communication with CCD J502 Communication with main controller PCB J503 Connection to Scanner motor J504 Receives power from the machine printer unit J505 Power supply to DADF J506 Connection to copyboard cover open close sensor and CCD HP sensor J507 Connection to original size sensor 2 J508 Connection to original size sensor 1 J509 Communication with DADF J510 N...

Page 13: ...ocument tray capacity 100 sheets 80g m2 Document processing mode Single sided document processing Double sided document processing Document size recognition Available Standard size Mixed document function Same types of paper can be mixed Equivalent to that in continuous feed mode is assured Different types of paper can be mixed Different types original mixable combination A B type A3 B4R A4 B5 B4 ...

Page 14: ...2 2 Technology Technology Controls Reader Servicing Reader Basic Configuration DADF Controls DADF Work of service DADF ...

Page 15: ...ard toward right B Scanner motor moves backward toward left Light ON LED on CCD unit lights on ON When CCD HP sensor photo interrupter type detects F 2 1 F 2 2 Basic Sequence at Start Key ON ADF mode 1 original Copy start Dust detection control In stream reading End B F F F B F B B F F F F Scanner motor Light ON ON Shading correction Light ON LED CCD HP sensor Dust detection control This is activa...

Page 16: ...us of the copyboard cover F 2 4 Scanner Motor Control 1 Forward movement when scanning an image CCD operation is controlled by the following sensors when scanning the image Start position position Acceleration Original leading edge Normal speed Original trailing edge Deceleration Stop Shift speed Shift distance 1 2 3 4 1 Acceleration area Accelerates until a speed suited to the selected mode is re...

Page 17: ... lines are used at color scan CCD overview 1 Integrated scanning configuration CCD lens light source and mirror are integrated 2 Light source LED 3 Effective number of pixel 7500 pix x 3 color lines 7500 pix x 1 B W line 4 Color filter Colored filter Red Green Blue Optical path from LED The light generated from LED is reflected by an original and by the 5 mirrors And then it is irradiated to the C...

Page 18: ...mirror No 5 Lens Green G line Blue B line Black White B W line F 2 6 F 2 7 Items Description CCD Receives the reflected light that has gone through the lens and converts it into electric signal to output it Lens Collects the light reflected by an original LED light source Light source to expose an original to laser Mirror No 1 5 Return the light T 2 1 ...

Page 19: ...oduction by main controller PCB Operation Magnifications 25 to 50 50 1 to 199 9 200 to 400 Speed change of original reading mm sec 260 260 130 Digital magnification process on the main controller PCB 2 25 to 50 50 1 to 199 9 100 to 200 T 2 2 T 2 3 Detecting the Size of Originals Overview The machine identifies the original size by the combination of measurement result of reflection light from the ...

Page 20: ...urement in main scanning direction the machine checks the presence absence of an original with reference to the CCD output at 2 points near the point of measurement The machine checks if the signal is changed or not from ADF pressure plate open to close at both points of 1A and 1B Change in the signal Yes Change in the signal No Judgment is done by the measurement results of 1A and 1B and it indic...

Page 21: ...AB type A4R size is set CCD unit shading position LED OFF Original sensor OFF CCD original detection position CCD unit Original sensor Reader unit ADF Position of detection 1 Position of detection 2 Position of detection 3 Position of detection 4 Position of detection 5 Position of detection 6 Copyboard glass 2 ADF opened CCD unit moves to original detection position LED OFF Original sensor OFF Ex...

Page 22: ...l detection operation For 2 sec from the original mount sensor front detected close this monitors the changes of output level of each sensor The machine determines that the original is present in the position where the level is not changed The machine identifies the original size by the combination of level changes at 5 points in case of AB type size 5 deg 5 Standby status waiting for start key CC...

Page 23: ...n failed to end normally at the end of the previous job e g ADF opened Main power switch ON Dust detection control STBY WMUP Start key ON 1st SCAN 2nd SCAN Dust detection control Dust detection control F 2 17 Particulars of control At the end of a job dust detection CCD checks the light reflected by the surface of the platen roller of the ADF at the read point to detect the presence absence of dus...

Page 24: ...Overview The functions of image processing system s PCB are described below Main controller PCB Shading correction executed per each job CCD PCB CCD drive analog image process A D conversion A D conversion The machine uses the main controller PCB to process images for every single image line Specific functions are as follows a Main controller PCB Shading correction Color offset correction in sub s...

Page 25: ...ing factors even when the density of the original is uniform 1 Variation in the sensitivity of the CCD among pixels 2 Variation in the intensity of the rod lens array 3 Variation in the intensity of light that goes through the center and surroundings of lens 4 Variation in the intensity of light at the center and surroundings of LED 5 LED deterioration The machine executes shading correction to ev...

Page 26: ... G B MEMO Outstanding point of this CCD unit Corrective values are different by the position in the main scanning There are 12 corrective values in the book scan and 4 values in the ADF scan for the color offset correction The color offset corrections have been made at the factory and all the corrective values have been stored in the service mode In COPIER ADJUST CCD At the beginning of job color ...

Page 27: ...matic adjustment ADF white level adjustment This action is applicable only when the DADF is installed in the host machine The values input of the label included to the new CCD unit Copyboard glass White plate data adjustment Platen board cover white level automatic adjustment ADF white level adjustment This action is applicable only when the DADF is installed in the host machine Stream reading gla...

Page 28: ...as the data used in the service mode is stored in CCD unit CCD PCB ADF driver PCB Clutch Reader controller PCB Motor Sensor Solenoid Fan Main controller PCB2 F 2 24 Drive Configuration CL2 CL1 M1 SL1 SL2 M2 No Part name Content M1 ADF motor Feeds documents M2 Release motor Prevents a document from swaying SL1 Pressurization solenoid Shifts the delivery lower roller after reversal of the dualsided ...

Page 29: ... mode names brief outline of operations ad associated print modes are given in the following table Operation mode name Outline of operation Associated print mode Forward pickup delivery Picks up reads and then delivers a document Single sided document Simplex printing Single sided document Duplex printing Forward feed reverse delivery Picks up reads reverses and delivers a document Double sided do...

Page 30: ...f second document sheet Start of reading of second document sheet End ob job F 2 28 Forward Pickup Reverse Delivery Operation Duplex read operation when two document sheets are placed NOTE This operation is performed for all double sided documents irrespective of whether document widths are the same or different Document To next Pickup and formation of loop of first document sheet Waiting for read...

Page 31: ...sal position Idle feed of first document sheet Removal of idle registration loop of first document sheet and release of re pickup and delivery roller End of reading of reverse side of first document sheet and pressurization of delivery roller F 2 30 To next Start of separation of second document sheet and pressurization of delivery roller Start of reading of top side of second document sheet End o...

Page 32: ... normal print mode the following Three document detection functions are used Function Description Description Document presence absence detection Detects whether there is a document on the Detects whether there is a document on the Document set sensor SR5 Initial document sizeabsence detection Longitudinal direction Detects the length of the document placed on the document pickup tray Document len...

Page 33: ...es are determined by the combination of the ON OFF states of document length sensors the combination of ON OFF states of document width volume and the combination of ON OFF states of A4R LTRR identification sensor SR10 SR7 VR1 SR8 F 2 33 The following table shows the relationship among length detection sensor signals document widths and initial document sizes Document width detection Document leng...

Page 34: ...1 is turning in the reverse direction the document is fed against the stationary registration roller to form a loop because the registration clutch is not driven thus preventing the document from skewing Formation of loop Registration roller F 2 34 F 2 35 Feed The pickup feed motor M1 turns in the reverse direction to drive the registration clutch CL2 thus allowing the registration roller to feed ...

Page 35: ...CL2 operates and the power of the pickup feed motor is transmitted to the registration roller to feed the document Pickup clutch CL1 ADF motor Stopper arm Stopper arm Document Pickup roller Separation pad unit Feed roller F 2 38 Document Reversing Basic Operation There are two types of document reversal operation one that is performed from the top to the reverse side of the document and the other ...

Page 36: ...en reversed Next the document is picked up again and its reverse side is read turning off the pressurization solenoid After this the document is reversed again fed and then delivered S L 2 S L 2 M1 CL2 Reading wait position Read roller 1 M1 Delivery reversal roller Registration roller F 2 40 F 2 41 Document Feeding Delivery Basic Operation After completion of stream reading on the document glass t...

Page 37: ...document trailing edge registration sensor the Release motor is driven to release the read roller 1 lower driven rollers Read roller 1 Release motor HP sensor Release motor Read roller 1 lower rollers M2 M2 F 2 43 F 2 44 Detecting Jams Jams This machine detects document jams using the sensors shown below Document jam check timings are stored in the ROM on the reader controller PCB to check whether...

Page 38: ...er open closed sensor 2 Reader 01 0092 COVER OP Cover open closed sensor SR6 01 0093 COVER OP Cover open closed sensor SR6 01 0094 RESIDUAL Registration sensor Read sensor Delivery reversal sensor SR1 SR2 SR3 01 0095 PICKUP NG Power Supply Power Supply The power supply lines are shown below This machine is powered via two power supply lines 24 V and 12 V from the reader controller PCB The 12 V pow...

Page 39: ... Fan Operation Fan Fan Operation The fan FM1 mounted on this machine always operates at full speed from the time ADF starts to feed paper until paper delivery is completed and exhausts the heat emitted by the ADF driver PCB and pickup feed motor M1 The air flow is shown below FM1 F 2 48 ...

Page 40: ...lation only Refer to page 5 12 Fine adj of DADF image magnifictn front Motor roller Refer to page 5 13 White level adj Platen roller Refer to page 5 13 Caution Carry out all the above adjustments after removing the DADF from the reader unit T 2 15 Periodic Servicing When the parts are reaching the expected service life perform the parts replacement or cleaning etc if needed Item Part name Expected...

Page 41: ...3 3 Periodic Servicing Periodic Servicing List of Work for Scheduled Servicing ...

Page 42: ... registration roller 1 CL 4 Lower registration roller 1 CL 5 Feed guide dust collection tape FL3 2942 1 CR 6 Upper delivery reversal roller 1 CL 7 Lower delivery reversal roller 1 CL Stamp FB5 9410 1 CR 7 000 times User Maintenance White plate pressure plate 1 CL Platen roller 1 CL White sheet 1 CL Various rollers driven rollers CL Various scrapers CL DADF height adjustment AD Stream reading glass...

Page 43: ... and Cleaning Procedure List of Parts Reader External Covers Reader Original Exposure System Reader List of Parts DADF External Covers DADF Main Units DADF Consumable Parts Requiring Periodic Replacement and Cleaning Points DADF Clutch Solenoid Motor Fan PCB DADF ...

Page 44: ...page 4 3 3 Reader rear cover Refer to page 4 3 4 Reader right cover Refer to page 4 3 5 Platen glass Refer to page 4 4 6 ADF scan glass Refer to page 4 5 F 4 1 T 4 1 List of Electrical Components M14 S14 S15 UN4 S13 S12 S11 CCD unit H6 H6 No Name Part No Refer to CCD Unit FM4 9642 Refer to page 4 6 M14 Scanner motor FK3 1343 UN4 Reader Controller PCB FM4 7697 Refer to page 4 11 S11 CCD HP Sensor W...

Page 45: ... Left Cover 1 Remove the reader left cover 2 Screws x2 Removing the Reader Front Cover 1 Open the ADF and remove the Reader Front Cover while pushing the claw at the bottom of the cover 2 Screws 1 Claw F 4 3 F 4 4 Removing the Reader Right Cover 1 Remove the reader right cover 2 Screws x2 Removing the Reader Rear Cover 1 Open the platen cover ADF platen board cover 2 Remove the ADF cable 3 Remove ...

Page 46: ...en glass take care not to touch the following parts with your fingers Glass surface Standard white plate Soils on these parts may cause white black lines on images If they are soiled clean them with a lint free paper moistened with alcohol F 4 8 Processing after replacing the parts Take the action stated below in the service mode CAUTION Be sure to make the white plate data adjustment before ADF w...

Page 47: ...ing servicemode Lv 1 COPIER FUNCTION CCD DF WLVL2 Read the white level in the DF mode stream reading Check the transparency of the glass for stream reading Read both sides of the chart 3 Place a sheet of paper that the user usually uses on the platen glass enter the following servicemode Lv 1 COPIER FUNCTION CCD DF WLVL3 Read the white level in the BOOK mode Check the transparency of the glass for...

Page 48: ...e a sheet of paper that the user usually uses on the DF enter the following servicemode Lv 1 COPIER FUNCTION CCD DF WLVL2 Read the white level in the DF mode stream reading Check the transparency of the glass for stream reading Read both sides of the chart 3 Place a sheet of paper that the user usually uses on the platen glass enter the following servicemode Lv 1 COPIER FUNCTION CCD DF WLVL3 Read ...

Page 49: ...iginal Exposure System Reader Removing the CCD Unit 6 Loosen the screw and then loosen the belt 7 Remove the belt from the hook at the back of the CCD unit F 4 13 F 4 14 CAUTION Do not touch the LED on the CCD unit Do not touch the board part so that there is influence on image F 4 15 8 Remove the CCD unit Cable retainer CCD flexible cable x1 F 4 16 ...

Page 50: ...Lv 1 50 RG Lv 1 50 GB Lv 1 100 RG 2 Lv 1 100 GB 2 Lv 1 50 RG 2 Lv 1 50 GB 2 Lv 1 100 RG 3 Lv 1 100 GB 3 Lv 1 50 RG 3 Lv 1 50 GB 3 3 Enter the value written in the service label inside the reader rear cover COPIER ADJUST ADJ XY Lv 1 ADJ X Lv 1 ADJ Y Lv 1 ADJ S Lv 1 ADJ X MG Lv 1 ADJ Y DF Lv 1 STRD POS FEEDER ADJUST Lv 1 DOCST Lv 1 LA SPEED COPIER ADJUST PASCAL Lv 1 OFST P K T 4 3 COPIER ADJUST CCD ...

Page 51: ... the BOOK mode Check the transparency of the glass for BOOK mode 2 4 Place a sheet of paper that the user usually uses on the DF enter the following servicemode Lv 1 COPIER READER FUNCTION CCD DF WLVL4 Read the white level in the DF mode stream reading Check the transparency of the glass for stream reading Read both sides of the chart 3 Enter the service mode and then select the following Lv 1 COP...

Page 52: ...m Reader Cleaning in the CCD unit Mirror No 1 5 Cleaning in the CCD unit Mirror No 1 5 1 Remove the CCD unit 2 Remove the LED unit 2 screws 2 connectors x1 x2 F 4 18 3 Clean mirror No 1 4 with lint free paper mirror No 4 mirror No 2 mirror No 5 mirror No 3 mirror No 1 4 Clean the mirror No 5 with its dedicated cleaning tool 4 1 Remove the cleaning tool inside the reader unit F 4 19 F 4 20 ...

Page 53: ...oving the Reader Controller PCB 4 2 Dry clean the mirror No 5 with the cleaning tool F 4 21 Removing the Reader Controller PCB NOTE The reader controller PCB does not memorize a reader related service mode Therefore the measures after replacing the PCB are not necessary Procedure 1 Remove the reader rear cover 2 Remove the reader controller PCB 3 flexible cables 4 connectors 6 screws x6 x7 F 4 22 ...

Page 54: ...ving the Reader Assembly Procedure 1 Disconnect the ADF cable 2 Remove the reader left cover 3 Remove the reader right cover 4 Remove the reader rear cover 5 Remove the rear cover 6 Remove the controller cover 7 Remove the reader front cover 8 Remove the operation panel 9 Remove the operation panel fixing plate 8 Screws x8 F 4 23 10 Disconnect the connector of the reader x1 11 Connect the flexible...

Page 55: ...bly Parts Replacement and Cleaning Procedure Original Exposure System Reader Removing the Reader Assembly 12 Attach the grounding plate L R 5 Screws x3 x2 F 4 26 F 4 27 13 Remove the 5 screws from the left side of the host machine x5 14 Remove the 2 screws from the right side of the host machine x2 F 4 28 F 4 29 ...

Page 56: ...ement and Cleaning Procedure Original Exposure System Reader Removing the Reader Assembly Parts Replacement and Cleaning Procedure Original Exposure System Reader Removing the Reader Assembly 15 Remove the reader assembly F 4 30 ...

Page 57: ...ers Rear cover Front cover Feeder cover No Part name Part number Reference 1 Front cover Refer to page 4 18 2 Rear cover Refer to page 4 18 3 Feeder cover Refer to page 4 19 F 4 31 T 4 5 Consumable Parts Requiring Periodic Replacement and Cleaning Points 4 1 3 2 No Part name Part number Reference 1 Pickup roller unit FM3 6892 Refer to page 4 22 2 Separation pad FL3 5538 Refer to page 4 23 3 Stamp ...

Page 58: ...ge 4 25 M2 Release motor Refer to page 4 25 SL1 Pressurization solenoid Refer to page 4 26 SL2 Stamp solenoid CL1 Pickup clutch Refer to page 4 26 CL2 Registration clutch Refer to page 4 26 PCB1 ADF driver PCB Refer to page 4 27 PCB3 TRAY PCB Refer to page 4 28 FM1 ADF Fan Refer to page 4 28 F 4 33 T 4 7 Others Platen roller Left hinge Right hinge Part name Part number Reference Left hinge Refer t...

Page 59: ...r Refer to page 4 29 SR2 Read sensor Refer to page 4 29 SR3 Delivery reversal sensor Refer to page 4 29 SR4 Timing sensor Refer to page 4 32 SR5 Document set sensor Refer to page 4 32 SR6 Cover open closed sensor Refer to page 4 32 SR7 Document length sensor 1 Refer to page 4 33 SR8 A4R LTRR identification sensor Refer to page 4 33 SR10 Document length sensor 2 Refer to page 4 33 SR11 Release moto...

Page 60: ...e Rear Cover External Covers DADF Removing the Front Cover 1 Open the feeder cover 2 Remove the screw x1 3 Open the DADF F 4 36 F 4 37 4 Detach the front cover Screw 2 pcs x2 Removing the Rear Cover 1 Open the feeder cover 2 Move to the back of the host machine and detach the rear cover Screw 2 pcs CAUTION Remove the rear cover with the two claws released x2 F 4 38 F 4 39 ...

Page 61: ...er Parts Replacement and Cleaning Procedure External Covers DADF Removing the Feeder Cover Removing the Feeder Cover 1 Open the feeder cover 2 Open the DADF 3 Detach the front cover Removing the Front Cover page 4 18 4 Close the DADF 5 Remove the feeder cover Screw 1 pc Positioning pin 1 pc x1 F 4 40 ...

Page 62: ... 1 Remove the DADF from the host machine 2 Open the feeder cover 3 Remove the front cover Removing the Front Cover page 4 18 4 Remove the feeder cover Removing the Feeder Cover page 4 19 5 Remove the tray holder Screw 1 pc x1 F 4 41 6 Unload the cable harness from the cable guide Connector 3 pcs Screw 1 pc x3 x1 7 Remove the rear cover Removing the Rear Cover page 4 18 8 Disconnect the nine connec...

Page 63: ...emoving the Feed Unit 10 Remove the ADF motor Removing the ADF Motor M1 page 4 25 11 Remove the left hinge Removing the left hinge page 4 35 12 Remove the harness guide Connector 5 pcs Screw 1 pc x1 x5 13 Remove the pickup clutch registration clutch Pickup Clutch Registration Clutch CL1 CL2 page 4 26 14 Remove the feed unit Screw 7 pcs x7 F 4 45 F 4 46 ...

Page 64: ...ment and Cleaning Points DADF Removing the Pickup Roller Unit Consumable Parts Requiring Periodic Replacement and Cleaning Points DADF Removing the Pickup Roller Unit 1 Open the feeder cover 2 Remove the inner cover from the feeder cover Hook 2 pcs x2 F 4 47 F 4 48 3 Remove the pickup roller unit Resin ring 2 pcs Bearing 2 pcs NOTE When replacing the consumable parts be sure to clear the parts cou...

Page 65: ...x2 NOTE When replacing the consumable parts be sure to clear the parts counter Lv1 COPIER COUNTER DRBL 2 DF SP PD F 4 50 F 4 51 Replacing the Stamp CAUTION If the stamp is floating a jam can occur Be sure to push in the stamp until it clicks 1 Open the feeder cover and separation guide 2 Using tweezers remove the stamp 3 Using tweezers or the like attach a new stamp Be sure to attach the new stamp...

Page 66: ...Procedure Consumable Parts Requiring Periodic Replacement and Cleaning Points DADF Exchanging the Feed Guide Exchanging the Feed Guide 1 Open the DADF 2 Remove the feed guide Screw 2 pcs x2 3 Pell off the release paper of the new feed guide 4 Attach the new feed guide NOTE When replacing the consumable parts be sure to clear the parts counter Lv1 COPIER COUNTER DRBL 2 LNT TAPE1 F 4 53 ...

Page 67: ...ving the ADF Motor M1 1 Open the feeder cover 2 Remove the rear cover Removing the Rear Cover page 4 18 3 Remove the ADF motor unit Connector 1 pc Tension spring 1 pc Screw 3 pcs x3 F 4 54 Removing the Release Motor M2 1 Open the feeder cover 2 Open the DADF 3 Detach the front cover Removing the Front Cover page 4 18 4 Close the DADF 5 Remove the release motor support plate Connector 2 pcs Screw 5...

Page 68: ...egistration Clutch CL1 CL2 Removing the Pressurization Solenoid SL1 1 Open the feeder cover 2 Remove the rear cover Removing the Rear Cover page 4 18 3 Remove the pressurization solenoid Connector 1 pc Screw 2 pcs x2 x1 F 4 57 Pickup Clutch Registration Clutch CL1 CL2 1 Open the feeder cover 2 Remove the rear cover Removing the Rear Cover page 4 18 3 Remove the clutch support plate Connector 2 pcs...

Page 69: ...pc Bearing 1 pc CAUTION Install the pickup clutch with the clutch gear white aligned with the mark W white on the clutch support plate Install the registration clutch with the gear black aligned with the mark B black on the clutch support plate White Black CL1 CL2 W B F 4 59 Removing the ADF Driver PCB 1 Open the feeder cover 2 Remove the rear cover Removing the Rear Cover page 4 18 3 Remove the A...

Page 70: ...g the LED PCB 1 Open the feeder cover 2 Open the DADF 3 Detach the front cover Removing the Front Cover page 4 18 4 Close the DADF 5 Remove the LED PCB Screw 1 pc Connector 1 pc x1 x1 F 4 61 Removing the Fan 1 Open the feeder cover 2 Remove the rear cover Removing the Rear Cover page 4 18 3 Remove the fan Screw 1 pc Connector 1 pc x1 x1 CAUTION Install the fan with the arrow oriented as shown F 4 ...

Page 71: ...rocedure Clutch Solenoid Motor Fan PCB DADF Removing the Sensor SR1 SR2 SR3 Removing the Sensor SR1 SR2 SR3 1 Remove the feed unit Removing the Feed Unit page 4 20 2 Remove the metal plate Screw 3 pcs x3 3 Remove the two timing belts F 4 64 F 4 65 4 Remove the resin ring pulley gear E ring and bearing 5 Remove the gear gear gear and bearing F 4 66 F 4 67 ...

Page 72: ...ing the Sensor SR1 SR2 SR3 Parts Replacement and Cleaning Procedure Clutch Solenoid Motor Fan PCB DADF Removing the Sensor SR1 SR2 SR3 6 While pushing the hook in the direction of the arrow remove the platen roller unit in the direction of the arrow F 4 68 7 Detach the cover Screw 2 pcs x2 F 4 69 ...

Page 73: ...placement and Cleaning Procedure Clutch Solenoid Motor Fan PCB DADF Removing the Sensor SR1 SR2 SR3 8 Remove the read roller 2 Resin ring 1 pc Pulley 1 pc Gear 2 pcs E ring 1 pc Bearing 3 pcs F 4 70 9 Remove the sensor mount Hook 2 pcs Screw 2 pcs x2 Hook 10 Remove the sensor SR1 SR2 SR3 Connector 1 pc SR1 SR2 SR3 x1 F 4 71 F 4 72 ...

Page 74: ...the feeder cover 2 Remove the rear cover Removing the Rear Cover page 4 18 3 Remove the timing sensor Connector 1 pc x1 Removing the Document Set Sensor SR5 1 Open the feeder cover 2 Remove the rear cover Removing the Rear Cover page 4 18 3 Remove the document set sensor Connector 1 pc x1 F 4 73 F 4 74 Removing the Cover Open Closed Sensor SR6 1 Open the feeder cover 2 Remove the rear cover Removi...

Page 75: ... the document tray Screw 3 pcs x3 2 Remove the document length sensor Connector 1 pc x1 SR7 SR10 F 4 76 F 4 77 Removing the A4R LTRR Identification Sensor SR8 1 Detach the cover on the reverse side of the document tray Refer to page 4 33 2 Remove the A4R LTRR Identification Sensor Connector 1 pc Screw 2 pcs SR8 3 2 2 1 x1 x2 CAUTION Install the document width volume with its lower gear groove 1 fi...

Page 76: ...age 4 18 4 Close the DADF 5 Remove the release motor HP sensor Connector 1 pc x1 F 4 79 Removing the Document Width Volume VR1 1 Detach the cover on the reverse side of the document tray Refer to page 4 33 2 Remove the document width volume unit Connector 2 pcs Screw 2 pcs 3 2 2 1 x2 x2 VR1 3 Remove the document width volume Hexagon NUT 1pc Washer 1 pc CAUTION Install the document width volume wit...

Page 77: ...nge CAUTION When install DADF to a host machine after exchange work adjustment of eight items is need 1 Remove the DADF from the host machine 2 Open the feeder cover 3 Removing the Rear Cover Removing the Rear Cover page 4 18 4 Remove the left hinge Screw 6 pcs x6 F 4 81 Removing the Right hinge CAUTION When install DADF to a host machine after exchange work adjustment of eight items is need 1 Rem...

Page 78: ...oving the Platen roller Removing the Platen roller CAUTION When install DADF to a host machine after exchange work adjustment of eight items is need 1 Remove the feed unit Removing the Feed Unit page 4 20 2 Remove the metal plate Screw 3 pcs x3 3 Remove the two timing belts F 4 83 F 4 84 4 Remove the resin ring pulley gear E ring and bearing 5 Remove the gear gear gear and bearing F 4 85 F 4 86 ...

Page 79: ...nt and Cleaning Procedure Clutch Solenoid Motor Fan PCB DADF Removing the Platen roller 6 While pushing the hook in the direction of the arrow remove the platen roller unit in the direction of the arrow F 4 87 7 Remove the Platen roller Resin ring 1 pc Platen roller holder left 1 pc Platen roller holder right 1 pc Screw 2 pcs F 4 88 ...

Page 80: ...5 5 Adjustment Adjustment Overview Reader When replacing parts Reader Overview DADF Adjustment Method DADF ...

Page 81: ... value indicated on the platen glass in the following service mode Lv 1 COPIER ADJUST CCD W PLT X Y Z Input of standard white plate data 2 Enter the service mode and then select the following Lv 1 COPIER FUNCTION CCD DF WLVL1 2 3 4 DF white level adjustment 1 Place a sheet of paper that the user usually uses on the platen glass enter the following servicemode Lv 1 COPIER FUNCTION CCD DF WLVL1 Read...

Page 82: ...Place a sheet of paper that the user usually uses on the platen glass enter the following servicemode Lv 1 COPIER FUNCTION CCD DF WLVL3 Read the white level in the BOOK mode Check the transparency of the glass for BOOK mode 4 Place a sheet of paper that the user usually uses on the DF enter the following servicemode Lv 1 COPIER READER FUNCTION CCD DF WLVL4 Read the white level in the DF mode strea...

Page 83: ...ate data CAUTION Be sure to make the white plate data adjustment before ADF white level adjustment W PLT X W PLT Y W PLT Z F 5 2 2 Perform the following in the service mode Lv 1 COPIER FUNCTION CCD DF WLVL1 2 3 4 DF white level adjustment 2 1 Place a sheet of paper that the user usually uses on the platen glass enter the following servicemode Lv 1 COPIER FUNCTION CCD DF WLVL1 Read the white level ...

Page 84: ...ice mode Lv 1 FEEDER FUNCTION TRY A5R 6 Press OK and register the A5R width b Inch system adjustment 1 Adjust the slide guide to the index LTR 11x17 2 Select the item in the service mode Lv 1 FEEDER FUNCTION TRY LTR 3 Press OK and register the LTR width 4 Adjust the slide guide to the index STMT LTRR LGL 5 Select the item in the service mode Lv 1 FEEDER FUNCTION TRY LTRR 6 Press OK and register th...

Page 85: ...ring installation only Refer to page 5 10 Adjusting the Perpendicularity Hinge Refer to page 5 10 Scan position auto adj in DADF mode Platen roller Refer to page 5 11 Adj img pstn in DADF mode horz scan During installation only Refer to page 5 12 Adj of DADF img lead edge margin front During installation only Refer to page 5 12 Fine adj of DADF image magnifictn front Motor roller Refer to page 5 1...

Page 86: ...a character or mark to identify the printed image direction 10 mm 10 mm 10 mm 10 mm F 5 3 Adjusting the Height of the hinge Pre check Check whether the front and rear document glass spacers provided under the bottom of the DADF are in close contact with the document glass when the DADF is closed Adjustment Procedure When the front or rear side is floating 1 Adjust the left hinge height 2 Adjust th...

Page 87: ... soundproofing sheet stuck on the bottom of the DADF when closing it Protrusions Sheet Document reader Paper Protrusions Document reader Sheet 2 Pulling out the set paper Pull out the paper in the direction of the arrow to check that you feel slight resistance F 5 5 F 5 6 3 Checking the front left height of the DADF Set paper against the protrusions of the stream reading glass in such a manner tha...

Page 88: ...ass If only the rear spacer or both front and rear spacers are floating turn the adjusting screw counterclockwise to bring the rear spacer closer to the glass Lock nut Hinge height adjusting screw F 5 9 Adjust the height of the right hinge 1 If the height is improper adjust it with the right hinge adjusting screw CAUTION Loosen the lock nut before adjustment and tighten it after adjustment Turning...

Page 89: ...Adjust the slide guide to the A5R index 7 Touch OK to register the A5R width 8 Come out of a service mode Inch Configuration Adjustment 1 Start service mode 2 Touch the following notations in sequence to bring up the Adjustment screen LV 1 FEEDER FUNCTION TRY LTR 3 Adjust the slide guide to the LTR 11x17 index 4 Press OK to register the LTR width 5 Press TRY LTRR to highlight 6 Adjust the slide gu...

Page 90: ...een touch the following notations in sequence to bring up the Adjustment screen LV 1 COPIER FUNCTION INSTALL 3 Press STRD POS to highlight 4 Touch OK A press on OK will cause the scanner to start a scan in several seconds the machine will end auto adjustment of the read position and indicate OK CAUTION If the machine fails auto adjustment and indicates NG go through the following 1 Clean the white...

Page 91: ...oward rear If the image is displaced toward front F 5 14 Adj of DADF img lead edge margin front 1 Place the Test Chart in the DADF and make a copy 2 Compare the copy against the Test Chart for the leading edge registration as necessary make the following adjustments 3 On the Service Mode screen touch the following notations to bring up the Adjustment screen LV 1 FEEDER ADJUST 4 Press DOCST to high...

Page 92: ...e level of images made in copyboard cover mode If you omit this adjustment the following will likely occur inappropriate reproduction of background density in images made in stream reading mode wrong speck detection in stream reading mode NOTE This system incorporates a 4 line CCD sensor which is used for two types of white level adjustments a monochromic adjustment and a color adjustment DF WLVL1...

Page 93: ...opyboard glass and place it on the original tray of the DADF 13 Press DF WLVL4 on the touch panel to highlight 14 Press OK The machine executes auto adjustment duplex stream reading When the adjustment ends normally the machine indicates OK on the screen 15 If the color adjustment fails perform steps 9 to 14 again 16 Come out of a service mode ...

Page 94: ...6 6 Installation Installation How to Utilize This Installation Procedure Caution During Installation Check Items when Turning OFF the Main Power Checking the Contents Installation Procedure ...

Page 95: ...n Sound Check Check Visual Check Claw Remove Checking instruction F 6 1 F 6 2 Caution During Installation CAUTION Be sure to lift it flatly After unpacking the reader unit do not dispose of the package but put the reader unit on the center of the package box to perform the operation Weight of the machine is approx 14 4kg NOTE When installing the USB Device Port Unit at the same time perform it aft...

Page 96: ...ed item is not permitted without the permission of the copyright owner YOU MAY BE COMMITTING A CRIMINAL OFFENCE FOR WHICH YOU MAY BE PROSECUTED This list is a guide only and is not a complete listing You should take legal advice if in any doubt FU7 8228 Bonds or other certificates of indebteness Internal Revenue Stamps cancelled or uncancelled Cheques or drafts drawn by Governmental agencies Licen...

Page 97: ...6 6 6 4 6 4 Installation Checking the Contents Installation Checking the Contents 12 Finger Pinch Caution Label 2 1 sheet 13 Hinge Cover 2 pcs ...

Page 98: ...e Installation Procedure Installation Procedure 1 Remove the reader unit CAUTION Do not hold the position of the figure so that the reader small cover comes off 2 Remove packing materials and tapes from the reader unit F 6 13 3 Take out the cable of the printer outward 4 Remove the rear cover 4 Screws 4 Claws x4 x4 F 6 14 F 6 15 ...

Page 99: ... controller cover F 6 16 6 Attach the reader unit on the host machine NOTE Set the left stay with the bosses aligned Put the left stay of the host machine in the inside of the reader rear cover CAUTION Be careful to prevent your finger from being caught in the left stay of the host machine when attaching the reader on the host machine F 6 17 ...

Page 100: ... 7 Fix the left stay while lifting the front side to attach the reader horizontally 4 Screws Binding M4 6 CAUTION Fix the left stay with the bosses aligned Fix the screw with the turn of the illustration x4 F 6 18 8 Fix the 2 reader fixing plates 2 Screws Binding M4 6 x2 9 Open the ADF 10 Disconnect the ADF cable x1 F 6 19 F 6 20 ...

Page 101: ...ocedure 11 Remove the reader rear cover 4 Screws x4 12 Fix the left stay 1 Screw Binding M4 6 x1 F 6 21 F 6 22 13 Remove 2 fixing screws of the CCD unit NOTE As the fixing screws of the CCD unit will be needed when moving the machine be sure to keep them x2 14 Attach the grounding plate L 2 Screws TP M3 6 x2 F 6 23 F 6 24 ...

Page 102: ...ocedure Installation Procedure 15 Attach the grounding plate R 3 Screws TP M3 6 CAUTION Put the gasket of the grounding plate R in the frame x3 F 6 25 16 Connect the flexible cable 2 Connectors x2 17 Connect the connector of the reader to the connector of the host machine 1 Connector x1 F 6 26 F 6 27 ...

Page 103: ...over 2 Screws 1 Claw x2 x1 19 Remove the operation panel from the operation panel fixing plate Bundled in the Host Machine 2 Screws Save the removed screw for later use x2 F 6 28 F 6 29 20 Do it through the cales in the hole of the operation panel fixing plate 21 Fix the operation panel fixing plate 4 Screws Binding M4 6 4 Screws RS tight M3 8 x8 F 6 30 F 6 31 ...

Page 104: ...addle Edge Saddle 23 Attach the following parts to the operation panel 2 Connectors 1 Reuse band 5 Wire saddles 2 Screws Bundled in the Host Machine Wire Saddle x2 x6 Reuse Band x2 Wire Saddle F 6 32 F 6 33 24 Attach the operation panel 2 Screws RS tight M3 8 removed at the step 19 2 Claws x2 x2 25 Attach the reader front cover 2 Screws RS tight M3 8 26 Attach the reader rear cover 4 Screws RS tig...

Page 105: ...eader right cover 2 Screws RS tight M3 8 3 Claws NOTE Put three claws of the cover on hooks of the reader unit x2 x3 F 6 35 28 Attach the reader left cover 2 Screws RS tight M3 8 3 Claws NOTE Put three claws of the cover on hooks of the reader unit x2 x3 29 Affix the included glass cleaning lamp caution label written in your language F 6 36 F 6 37 ...

Page 106: ... Affix the included copy inhibition label written in your language on the same label already pasted as needed 31 Affix the included finger pinch caution label 2 written in your language 32 Close the ADF F 6 38 F 6 39 33 Affix the included finger pinch caution label 1 written in your language 34 Attach the 2 hinge covers F 6 40 F 6 41 ...

Page 107: ...ADF 36 Attach the covers of the host machine removed in previous steps Controller cover no screw Rear cover 4 Screws RS tight M3 8 Tighten the screws in the following order upper left lower left upper right and then lower right 37 Follow the this installation procedure to install the Image Reader Unit H1 and then install from the Installing the Toner Cartridge ...

Page 108: ...Appendix Service Tools General Circuit Diagram Reader Signal Name List DADF General Circuit Diagram DADF ...

Page 109: ...his part is installed in the reader unit Not a service tool Oils and Solvents Name Uses Composition Remarks Alcohol Cleaning e g Glass plastic rubber external covers Fluoride family hydrocarbon Alcohol Surface activating agent Water Do not bring near fire Procure locally Substitute IPA isopropyl alcohol Solvent Cleaning e g Metal oil toner stain Fluoride family hydrocarbon Chlorine family hydrocar...

Page 110: ... 18 17 16 15 14 13 12 11 10 8 7 6 5 4 3 2 1 1 2 3 4 5 6 7 8 10 11 12 13 14 15 16 17 18 9 19 20 21 22 23 24 25 26 27 28 29 30 31 32 33 34 35 36 37 38 39 40 41 42 43 44 45 46 47 48 49 50 COR1 2 3 2 J507 J503 J508 J533 J534 J532 J531 J501 J509 J570A J570C J570B J570 J505 J502 J8133 To ADF To Power Supply PCB J114 J504 J510 UN14 UN48 J506 J513 J512 CCD_FFC_IN GND RA RA RB RB RC RC RCLK RCLK GND LED_PW...

Page 111: ...3 J112 3 4 5 6 1 2 J4 1 2 3 J108 1 2 3 J110 3 2 1 SR10 3 2 1 SR8 7 6 5 4 3 2 1 1 2 3 4 J7 1 2 J80 J80H 1 2 3 J86 J86H 3 2 1 SR1 3 2 1 SR7 1 2 3 J8 1 2 3 J101 1 2 3 VR1 1 2 3 J87 1 2 J6 9 8 2 3 4 5 6 1 7 J2 10 9 8 2 3 4 5 6 1 7 J1 J89H 1 2 3 4 J89 2 1 CL1 1 2 3 4 M2 1 2 3 4 5 J14 J82H J84H 2 1 SL2 3 2 1 SR11 MT4 3 2 1 FM1 1 2 J84 1 2 J85 MT5 1 2 3 J111 1 2 3 4 J88 6 5 4 3 2 1 M1 1 2 J81 1 2 3 J106 ...

Page 112: ...2 BCOM 24V 24V 3 ADF MOT B ADF motor B 4 ADF MOT A ADF motor A 5 ACOM 24V 24V 6 ADF MOT B ADF motor B Jack No Pin No Abbreviated Signal Name Signal Name J5 1 5V 5V 2 GND GND 3 RKMOT HP Release motor HP sensor signal 4 24V 24V 5 STMP SOL Stamp solenoid signal 6 5V 5V 7 SET LED Document detection LED signal 8 Unused Unused J6 1 24V 24V 2 RIKAN_SOL Pressurization solenoid signal J7 1 24V 24V 2 PICK_C...

Reviews: