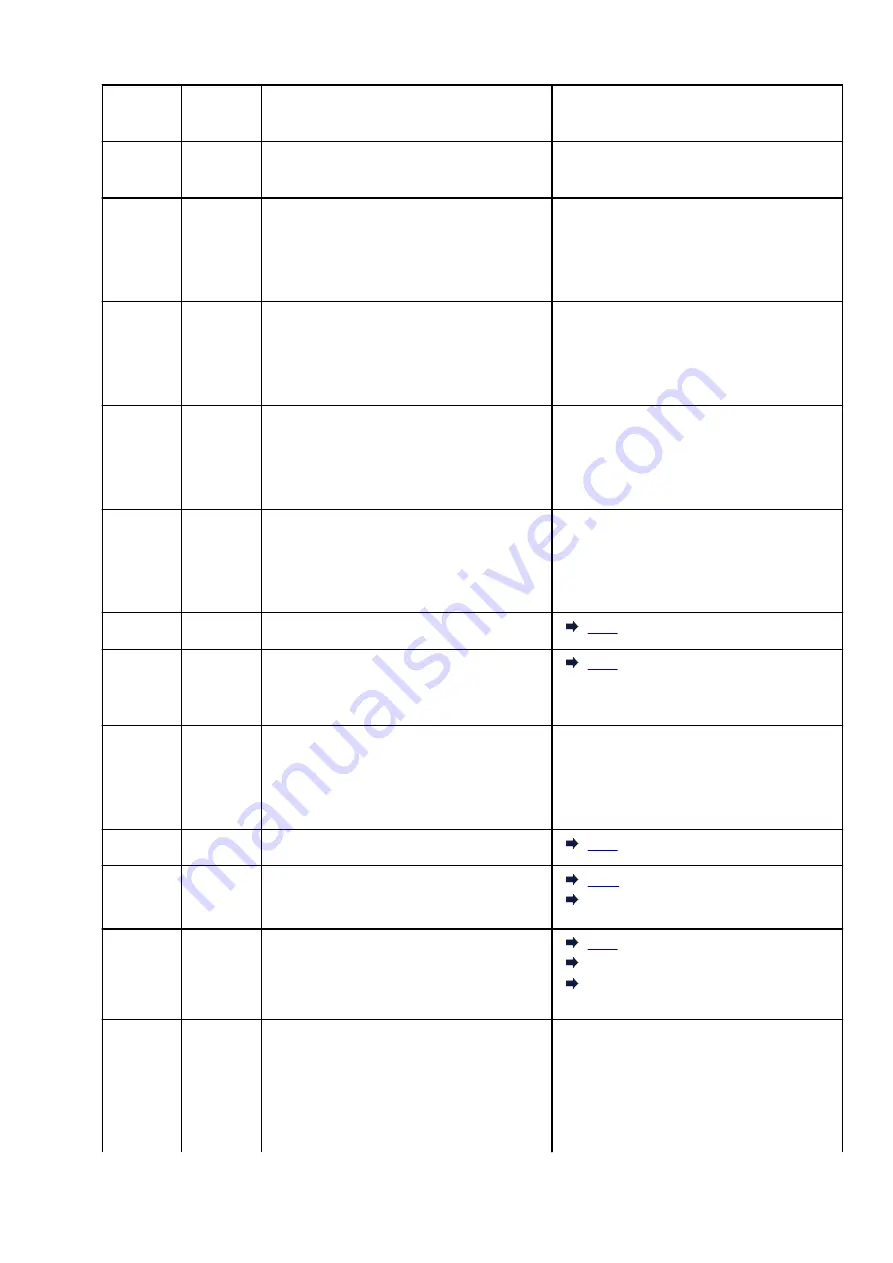
E51
–
Cannot connect to server.
Press the printer's
OK
button to resolve the er-
ror and perform operations after a while.
E52
–
Failed in registering the printer to Google
Cloud Print due to timeout.
Press the printer's
OK
button to resolve the er-
ror.
E53
–
Only information registered to the printer is de-
leted because of failing to connect Google
Cloud Print.
Press the printer's
Black
or
Color
button to re-
solve the error.
Delete registered information of Google Cloud
Print from your computer or smartphone.
E54
–
Only information registered to the printer is de-
leted because of failing to connect IJ Cloud
Printing Center.
Press the printer's
Black
or
Color
button to re-
solve the error.
Delete registered information of IJ Cloud Print-
ing Center from your computer or smartphone.
E55
–
The printer is already registered to IJ Cloud
Printing Center.
Press the printer's
Black
or
Color
button to re-
solve the error.
Delete registered information of IJ Cloud Print-
ing Center and register the printer again.
E56
–
The online service is not available in your re-
gion.
Press the printer's
Black
or
Color
button to re-
solve the error.
Contact the provider for where the online serv-
ice is available.
E57
2900
Scanning print head alignment sheet failed.
E60
1640
The remaining ink level in one of the ink tanks
may have reached the lower limit line shown
on the ink tank.
E62
–
Unexpected error occurred while scanning is in
progress.
Press the printer's
Black
or
Color
button to re-
solve the error.
Change settings and perform operations
again.
P02
5100
Printer error has occurred.
P07
5B00
5B01
Printer error has occurred.
5B01
P08
5200
5205
5206
Printer error has occurred.
5205
5206
P03
P05
P06
P09
5011
5012
5050
5400
5700
Printer error has occurred.
Turn off printer and unplug it.
Plug in the printer again and turn it back on.
If this does not solve the problem, contact your
nearest Canon service center to request a re-
pair.
324
Summary of Contents for G3410
Page 8: ...5012 352 5100 353 5200 354 5B00 355 6000 356 ...
Page 49: ...Handling Paper Originals Ink Tanks etc Loading Paper Loading Originals Refilling Ink Tanks 49 ...
Page 50: ...Loading Paper Loading Plain Paper Photo Paper Loading Envelopes 50 ...
Page 58: ...Loading Originals Loading Originals on the Platen Glass Supported Originals 58 ...
Page 62: ...Refilling Ink Tanks Refilling Ink Tanks Checking Ink Level Ink Tips 62 ...
Page 89: ...Safety Safety Precautions Regulatory Information WEEE EU EEA 89 ...
Page 109: ...Main Components and Their Use Main Components Power Supply Indication of LCD 109 ...
Page 110: ...Main Components Front View Rear View Inside View Operation Panel 110 ...
Page 148: ...Printing Printing from Computer Printing from Smartphone Tablet 148 ...
Page 163: ...Note Selecting Scaled changes the printable area of the document 163 ...
Page 179: ...In such cases take the appropriate action as described 179 ...
Page 217: ...Scanning Scanning from Computer Windows Scanning Using Smartphone Tablet 217 ...
Page 221: ...Note To set the applications to integrate with see Settings Dialog Box 221 ...
Page 231: ...ScanGear Scanner Driver Screens Basic Mode Tab Advanced Mode Tab 231 ...
Page 283: ...Other Network Problems Checking Network Information Restoring to Factory Defaults 283 ...
Page 306: ...Scanning Problems Windows Scanning Problems 306 ...
Page 307: ...Scanning Problems Scanner Does Not Work ScanGear Scanner Driver Does Not Start 307 ...
Page 319: ...Errors and Messages An Error Occurs Message Support Code Appears 319 ...
Page 331: ...For paper jam support codes see also List of Support Code for Error Paper Jams 331 ...


