background image

116 

Š


Additional Information 

played, depending on the battery life. Use the time shown on the screen 
as an approximation.

Regarding the use of non-Canon battery packs

• For your safety, battery packs that are not genuine Canon battery 

packs will not be charged even if you attach them to this camcorder or 
to the optional CG-800 Battery Charger.

• We recommend using genuine Canon 

battery packs bearing the Intelligent 
System mark.

• If you attach to the camcorder battery packs that are not genuine 

Canon battery packs, 

 will appear and the remaining battery time 

will not be displayed.

Memory Card

• We recommend backing up the recordings on the memory card onto 

your computer. Data may be corrupted or lost due to memory card 
defects or exposure to static electricity. Canon shall not be liable for 
lost or corrupted data.

• Do not touch or expose the terminals to dust or dirt.
• Do not use memory cards in places subject to strong magnetic fields.
• Do not leave memory cards in places subject to high humidity and high 

temperature.

• Do not disassemble, bend, drop, or subject memory cards to shocks 

and do not expose them to water.

• Check the direction before inserting the memory card. Forcing a mem-

ory card into the slot if it is not correctly oriented may damage the 
memory card or the camcorder.

• Do not attach any labels or stickers on the memory card.

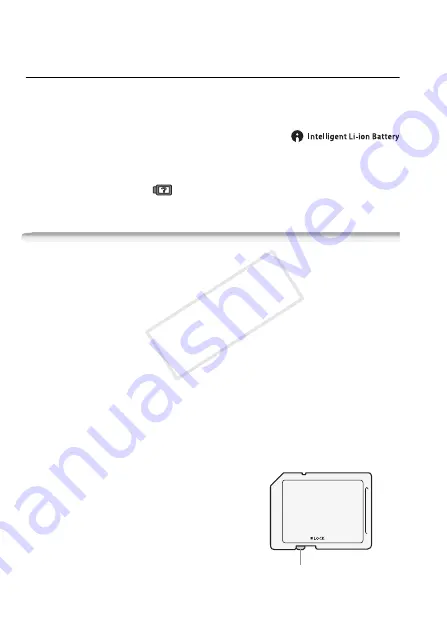
• Secure Digital (SD) memory cards 

have a physical switch to prevent 
writing on the card so as to avoid the 
accidental erasure of the card’s con-
tent. To write-protect the memory 
card set the switch to the LOCK posi-
tion.

LOCK switch

COP

Y

Summary of Contents for FS40

Page 1: ...PUB DIE 0380 000 Instruction Manual Digital Camcorder COPY...

Page 2: ...adio frequency energy and if not installed and use in accordance with the instructions may cause harmful interference to radio communications However there is no guarantee that interference will not o...

Page 3: ...CAUTION TO REDUCE THE RISK OF ELECTRIC SHOCK DO NOT REMOVE COVER OR BACK NO USER SERVICEABLE PARTS INSIDE REFER SERVICING TO QUALIFIED SERVICE PERSONNEL CAUTION RISK OF ELECTRIC SHOCK DO NOT OPEN The...

Page 4: ...ualified service personnel Servicing is required when the apparatus has been damaged in any way such as power supply cord or plug is damaged liquid has been spilled or objects have fallen into the app...

Page 5: ...the antenna is grounded so as to provide some protection against voltage surges and built up static charges Section 810 of the National Electrical Code ANSI NFPA No 70 1984 provides information with r...

Page 6: ...lacement parts are required be sure the service technician has used replacement parts that are specified by Canon or that have the same characteristics as the original part Unauthorized substitutions...

Page 7: ...l are trademarks of Dolby Laboratories Other names and products not mentioned above may be trademarks or registered trademarks of their respective companies This device incorporates exFAT technology l...

Page 8: ...available memory cards 35 When pre recording is activated the camcorder starts recording video continuously into a temporary 3 second memory When you press the button the scene recorded will have star...

Page 9: ...the Position and Brightness of the LCD Screen 25 Basic Operation of the Camcorder 25 Operating Modes 27 Joystick and Joystick Guide 27 Using the Menus 30 First Time Settings 30 Setting the Date and Ti...

Page 10: ...Automatic Exposure and Special Scene Recording Programs 53 Automatic Backlight Correction 54 Advanced Image Stabilization 54 Pre Recording 55 Video Snapshot 56 Digital Effects 57 Manual Exposure Adjus...

Page 11: ...rdings on a Computer 85 Copying Movies to an External Video Recorder 86 Preparing Movies for the Web Additional Information 90 Appendix Menu Options Lists 90 FUNC Menu 92 Setup Menus 98 Onscreen Icons...

Page 12: ...es POINTS TO CHECK Restrictions or requirements regarding the function described Reference page number within this manual Text that applies only to the model shown in the icon The following terms are...

Page 13: ...t available For a detailed explanation refer to Operating Modes 25 The arrow is used to abbreviate menu selections For a detailed explanation on how to use the menus refer to Using the Menus 27 For a...

Page 14: ...CD ROMs The following accessories are supplied with the camcorder XCA 570 Compact Power Adapter incl power cord BP 808 Battery PackW XIFC 300PCU S USB Cable STV 250N Stereo Video CableW Yellow Red Wh...

Page 15: ...se VideoBrowser for managing editing and playing back movies Instruction Manual Music Data CD ROM referred to in this manual as Camcorder Supplemental Disc Instruction Manual The full version instruct...

Page 16: ...on screen display button 62 66 BATT INFO button 101 4 Speaker 43 5 AV OUT terminal 80 81 6 USB terminal 80 81 7 DC IN terminal 19 8 ACCESS indicator 38 73 9 Strap mount 22 A q Grip belt 22 A a Stereo...

Page 17: ...A k FUNC button 28 90 A l play pause button 43 START STOP button 38 S q stop button 43 PLAYLIST button 46 S a VIDEO SNAP video snapshot button 55 S s camera play button 26 S d ON OFF CHG charge indica...

Page 18: ...latch S h Tripod socket 114 S j Memory card slot 34 S k Battery compartment 19 S l Battery compartment cover Memory card slot cover D q Serial number The serial number label is located on the battery...

Page 19: ...e you use a battery pack fully charge it and then use the camcorder until the battery pack is com pletely exhausted Doing so will ensure that the remaining recording time will be displayed accurately...

Page 20: ...C IN terminal 7 Charging will start when the camcorder is turned off If the camcorder was on the green ON OFF CHG indicator will go out when you turn off the camcorder After a moment the ON OFF CHG in...

Page 21: ...C 32 F to 104 F charging will not start Do not connect to the camcorder s DC IN terminal or to the compact power adapter any electrical equipment that is not expressly recom mended for use with this...

Page 22: ...o recycle this battery Preparing the Accessories Fasten the grip belt Adjust the grip belt so that you can reach the zoom lever with your index finger and the button with your thumb To remove the grip...

Page 23: ...el 180 degrees toward the lens Rotating the LCD panel 180 degrees can be useful when you wish to include your self in the picture when recording with the self timer NOTES About the LCD screen The scre...

Page 24: ...ld pressed down for more than 2 seconds Repeat this action to switch the LCD backlight between off normal and on bright NOTES The LCD backlight does not affect the brightness of the recordings Using t...

Page 25: ...ack to mode In either mode you can record movies by pressing or take photos by pressing NOTES In mode menus cannot be accessed but the following settings can be changed in advance FUNC menu Recording...

Page 26: ...gs to match special recording condi tions Playback Press the camera play button to switch the camcorder between camera recording mode and playback mode You can press when the cam corder is off to turn...

Page 27: ...ide will minimize after 2 seconds When the joystick guide is minimized you can still adjust or turn on off the selected function you can also maximize the joystick guide to select another function or...

Page 28: ...ollow the additional operation guides that will appear on the screen such as the icon small arrows etc 4 Press to save the settings and close the menu You can press to close the menu at any time Selec...

Page 29: ...Preparations 29 6 Press You can press to close the menu at any time FUNC FUNC COPY...

Page 30: ...hen you do not use the camcorder for about 3 months the built in rechargeable lithium battery may discharge completely and the date and time setting may be lost In such case recharge the built in lith...

Page 31: ...dless of the language selected Changing the Time Zone Change the time zone to match your location The default setting is New York To set the home time zone When you travel select the icon and select t...

Page 32: ...made by Panasonic Toshiba and SanDisk and SDXC memory cards made by Panasonic and Toshiba Depending on the memory card used it may not be possible to record movies NOTES About the SD Speed Class The S...

Page 33: ...recorders make sure the external device is SDXC compatible After repeatedly recording deleting and editing scenes fragmented memory it will take longer to write data on the memory and recording may s...

Page 34: ...way into the memory card slot until it clicks 4 Close the cover and slide it toward the lens until you hear a click Do not force the cover closed if the memory card is not correctly inserted To remove...

Page 35: ...y in use Initializing the Memory Initialize memory cards when you use them with this camcorder for the first time You can also initialize a memory card or the built in memory only to permanently delet...

Page 36: ...memory will be restored after it is initialized To transfer music files from the supplied Camcorder Supplemental Disc to the memory card Windows users Use the supplied PIXELA s software For details re...

Page 37: ...urchase Eye Fi cards contain the necessary network configuration software Be sure to install the software and complete the required configuration setup before you initialize the Eye Fi card prior to u...

Page 38: ...n recording Press again to pause the recording When you have finished recording 1 Make sure that the ACCESS indicator is off 2 Turn off the camcorder 3 Close the LCD panel IMPORTANT Observe the follow...

Page 39: ...he LCD backlight 24 or adjust the brightness of the LCD screen with the LCD Bright ness setting Selecting the Video Quality Recording Mode The camcorder offers 3 recording modes Changing the recording...

Page 40: ...Zoom Type Description and use Optical 37x The optical magnification ratio of the lens Used for recording movies only when Image Stabilizer is set to Dynamic or when Widescreen is set to Off and for re...

Page 41: ...rd pause mode than when actually recording except when pre recording 54 is activated Quick Start Function When you close the LCD panel with the camcorder on the camcorder enters the standby mode In st...

Page 42: ...ing while a menu is being dis played or while the PHOTO button is pressed down halfway The cam corder may also not enter standby mode if the LCD panel is closed while the memory card slot cover is ope...

Page 43: ...3 Press to begin the playback Playback will start from the scene selected and continue until the end of the last scene recorded To pause stop the playback 1 During playback open the joystick guide 2...

Page 44: ...ecial playback modes To enter the special playback modes use the joystick guide There is no sound during the special playback modes Fast playback Perform the following operation during normal playback...

Page 45: ...ng etc in the playback picture The speed indicated on the screen is approximate Selecting what Recordings to Play Back From the index screen you can use the tabs on the top of the screen to select whe...

Page 46: ...play back the scenes you added to the playlist 67 In the original Movies index screen press NOTES You can press both and to open the Playlist Video Snapshot index screen that contains only those video...

Page 47: ...ex screen The orange selection frame will appear on the first scene recorded on the selected date NOTES You can change on what day to start the week for the calendar display with the Calendar Start Da...

Page 48: ...s way you can easily delete recordings copy recordings to the memory card only or add a number of scenes to the playlist 1 Open the Movies Video Snapshot or Photos index screen You can select the orig...

Page 49: ...on the memory See also Deleting Scenes from the Playlist 68 1 Open the Movies or Video Snapshot index screen You can select the original movies in the built in memory or on the memory card To select i...

Page 50: ...connect the power source or turn off the camcorder Do not change the camcorder s operating mode NOTES Deleting an original scene from the Movies or Video Snapshot index screen also deletes that scene...

Page 51: ...se the Programmed AE recording program the cam corder automatically adjusts the aperture and shutter speed to obtain the optimal exposure for the subject Special Scene Recording Programs Select a Spec...

Page 52: ...e subject being underexposed Beach To record on a sunny beach with out the subject being underexposed Sunset To record sunsets in vibrant col ors Night Scene To record nightscapes with lower noise Low...

Page 53: ...reen Autofocus may not work as well as in other modes In such case adjust the focus manually Fireworks To avoid camcorder blur blur due to the camcorder moving we recommend using a tripod When you tak...

Page 54: ...ppear natural select Standard or Off Pre Recording The camcorder will start recording 3 seconds before you press ensuring you do not miss important shooting opportunities This is especially useful whe...

Page 55: ...the following actions will deactivate the pre recording function Leaving the camcorder without any operation for 5 minutes Pressing or Closing the LCD panel to set the camcorder to standby mode Video...

Page 56: ...eo snapshot is deactivated if the camcorder is switched to playback mode Digital Effects You can preview the digital effect on the screen The icon of the selected digital effect appears Options Defaul...

Page 57: ...ivate the selected effect while recording or in record pause mode For photos Activate the selected effect and then press to record the photo NOTES When you apply a fader not only the picture but also...

Page 58: ...3 Adjust the the brightness of the image as required then hide the joystick guide The exposure adjustment indicator will change to white and the selected exposure will be locked During exposure lock...

Page 59: ...ocus will be locked During focus lock press twice to return the camcorder to autofocus White Balance The white balance function helps you to accurately reproduce colors under different lighting condit...

Page 60: ...ts in the following cases Changing lighting conditions Close ups Subjects in a single color sky sea or forest Under mercury lamps and certain types of fluorescent lights Image Effects You can use the...

Page 61: ...rds with no image enhancing effects Vivid Emphasizes the contrast and color saturation Neutral Tones down the contrast and color saturation Soft Skin Detail Softens the details in the skin tone area f...

Page 62: ...g the LCD panel to set the camcorder to standby mode Selecting the Playback Starting Point If you have a very long scene you may want to start playing back the scene from a certain point You can use t...

Page 63: ...ying Back Recordings Set to Background Music You can play back video snapshot scenes scenes in the playlist and photo slideshows set to background music instead of the original sound using one of the...

Page 64: ...index screen You can select the recordings in the built in memory or on the memory card 2 Open the list of background music tracks 3 Select a music track and press twice Before pressing you can press...

Page 65: ...he built in memory will be restored after it is initialized To transfer music files from the supplied Camcorder Supplemental Disc to the memory card Windows users Use the supplied PIXELA s software Fo...

Page 66: ...icons and displays that appears automat ically but will not remove onscreen displays that were turned on manually for example onscreen markers or the joystick guide Operating modes About the Data Cod...

Page 67: ...ecorded on the date you want to add to the playlist 3 Add the scenes to the playlist When the operation is completed Scene s added to the playlist will be displayed Scenes are added to the playlist on...

Page 68: ...e respective memory 2 Select the scene you want to delete This step is not necessary to delete all scenes 3 Delete the scene If you selected All Scenes you can press to interrupt the operation while i...

Page 69: ...cene you want to divide 3 Press select Divide and press The scene selected will start playing back Pause the playback at the point where you want to divide the scene You can use the following icons to...

Page 70: ...s that are too short less than 3 seconds Scenes that were edited using the supplied PIXELA s software and were then written back to the memory Scenes cannot be divided within 2 seconds from the beginn...

Page 71: ...anent data loss Do not open the memory card slot cover Do not disconnect the power source or turn off the camcorder Do not change the camcorder s operating mode All Scenes Copies all the scenes to the...

Page 72: ...llowing cases you will not be able to copy recordings to the memory card If the memory card slot is open If the LOCK switch on the memory card is set to prevent writing If there is no memory card in t...

Page 73: ...2 Press halfway Once the focus is automatically adjusted the onscreen icon will turn green and one or more AF frames will appear 3 Press fully The ACCESS indicator will flash as the photo is being rec...

Page 74: ...x 14 8 cm 4 x 6 in At the above photo size and quality a 1 GB memory card can hold approximately 1 885 photos However the actual number of photos that can be recorded will vary depending on the subjec...

Page 75: ...ess 3 Select Jump 10 photos or Jump 100 photos 4 Jump the number of photos selected and press IMPORTANT Observe the following precautions while the ACCESS indicator is on or flashing Failing to do so...

Page 76: ...ed music track You can adjust the volume during the slideshow playback Hide the joystick guide if necessary Press to stop the slideshow Deleting Photos You can delete those photos that you are not int...

Page 77: ...elete the photos If you selected an option other than This Photo you can press to interrupt the operation while it is in progress Some photos will be deleted nevertheless Options IMPORTANT Be careful...

Page 78: ...rd T to return to single photo view 2 Open the photo selection screen Copy appears on the screen 3 Select the photo you want to copy and press 4 Select Yes and press to copy the photo 5 Repeat steps 3...

Page 79: ...rk Always verify that Eye Fi cards have been approved in the country region of use See also Using an Eye Fi card 88 NOTES In the following cases you will not be able to copy recordings to the memory c...

Page 80: ...wing connection diagrams the left side shows the terminals on the camcorder and the right side shows for reference only an example of terminals on a connected device 1 USB Terminal Access Open the LCD...

Page 81: ...ection Composite Video Type Analog Quality Standard definition Output only Connect to a standard TV or a VCR with audio video input terminals Change the following settings on the camcorder TV Type acc...

Page 82: ...TV select as the video input the same terminal to which you connected the camcorder Refer to the instruction manual of the connected TV 4 Turn on the camcorder and set it to or mode Play back the mov...

Page 83: ...Installation Guide supplied leaflet and follow the instruc tions in the Software Guide PDF file to install the supplied PIXELA s software Connecting the Camcorder to a Computer 1 Turn on the camcorder...

Page 84: ...mcorder will appear as a new device or drive for example Canon FS40 Use the program of your choice or the standard application built into your computer s operating system to transfer or copy your phot...

Page 85: ...corder or computer Doing so may result in scenes that cannot be played back on the camcorder NOTES Refer also to the computer s instruction manual Depending on the number of photos on the memory card...

Page 86: ...t power adapter Preparing Movies for the Web You can convert your movies into MPEG files that you can easily upload to your favorite video sharing Web sites Create the MPEG files in the camcorder and...

Page 87: ...B cable Connection 81 On the computer Depending on the software you chose to install Transfer Utility SD or VideoBrowser SD will start up automatically 9 Computer Click Web upload Transfer Utility SD...

Page 88: ...fer to Eye Fi s homepage and the instruction manual of the Eye Fi card Please read the IMPORTANT section before using an Eye Fi card 1 Insert your Eye Fi card in the camcorder and make sure there is s...

Page 89: ...effective usage time of the battery pack You can power the camcorder using the compact power adapter so the battery pack will not be consumed While files are being uploaded the camcorder s automatic p...

Page 90: ...ithout a refer ence page are explained after the tables Menu options in boldface indicate default values FUNC Menu FUNC Menu Mode For movies only Setup Menus Menu item Setting options Recording progra...

Page 91: ...nes All Scenes this date This Scene Selected Scenes z z 70 Playlist z Add to Playlist All Scenes this date This Scene Selected Scenes z z 67 Divide z2 69 Move z 68 Delete All Scenes All Scenes this da...

Page 92: ...ormal aspect ratio 4 3 change the TV Type setting accordingly The camcorder retains the last setting used even if you set the cam corder to mode Video Snapshot Length Selects the length of video snaps...

Page 93: ...If a trailing afterimage appears set the slow shutter to Off If camcorder shake warning appears we recommend stabilizing the camcorder for example by mounting it on a tripod Wind Screen The camcorder...

Page 94: ...in order to display the picture in full and in the correct aspect ratio Normal TV TV sets with 4 3 aspect ratio Wide TV TV sets with 16 9 aspect ratio When the TV type is set to Normal TV during the p...

Page 95: ...l shut off after the time selected for the Quick Start setting Quick Start Select whether to activate the Quick Start function 41 when you close the LCD panel in a recording mode and the length of tim...

Page 96: ...icates the name and location of the file on the memory card For example the file name of a photo numbered 101 0107 is IMG_0107 JPG stored under the folder DCIM 101CANON Firmware You can verify the cur...

Page 97: ...ing Estimated figures about available movie recording time and available number of photos are approximate and based on the recording mode currently in use The total space for the built in memory may b...

Page 98: ...8 Automatic backlight correction 53 9 Pre recording 54 A q Memory operation 101 A a Remaining battery time 101 A s While recording during playback Scene counter hours minutes seconds In record pause m...

Page 99: ...ng Playback S q AF frame 73 S a Self timer 61 S s Number of available photos On the memory card In the built in memory only S d Camcorder shake warning 93 S f Focus and exposure lock 73 S g Data code...

Page 100: ...Information Viewing Photos S k Protected photo mark photos on the memory card that were protected using another device S l Current photo Total number of photos D q Photo number 95 D a Date and time of...

Page 101: ...lay the charge status of a battery pack The Intelligent System will display the charge status as a percentage and the remaining recording time in minutes for 5 seconds If the battery pack is exhausted...

Page 102: ...arging it if it is above 40 C 104 F let the battery pack cool down before charging it Charge the battery pack in temperatures between 0 C and 40 C 32 F and 104 F The battery pack is faulty Replace the...

Page 103: ...e subject Focus manually 58 The lens is dirty Clean the lens with a soft lens cleaning cloth 118 Never use tissue paper to clean the lens Changing between recording record pause playback takes longer...

Page 104: ...ing and deleting scenes fragmented memory Save your recordings 83 and initialize the memory card 35 Then transfer the music files first and only then write the video files back to the memory card Musi...

Page 105: ...aining charge of the battery pack is at least 50 of a full charge This is not a mal function The red ON OFF CHG indicator flashes very slowly one flash at 2 second intervals The temperature of the bat...

Page 106: ...t it Memory Card and Accessories Cannot insert the memory card The memory card was not facing the correct direction Turn the memory card over and insert it Cannot record on the memory card The memory...

Page 107: ...computer Try using a card reader to transfer the pho tos on the memory card To transfer the photos in the built in memory copy them to the memory card in advance 78 List of Messages Accessing the memo...

Page 108: ...to copy exceeds the available space on the memory card Delete some recordings on the memory card 49 76 or reduce the number of scenes to copy The memory card already contains the maximum number of sc...

Page 109: ...memory There is a problem with the built in memory Save your recordings 83 and initialize the built in memory using the Complete Initialization option 35 If the problem persists contact a Canon Servi...

Page 110: ...use the computer s Safely Remove Hardware function to end the connection and disconnect the USB cable before using the camcorder To be able to write back scenes and to transfer music files to the camc...

Page 111: ...witch on the memory card is set to prevent accidental erasure Change the posi tion of the LOCK switch Memory card writing error Attempt recovering the data This message will appear the next time you t...

Page 112: ...were protected edited with other devices cannot be deleted with this camcorder Some scenes were recorded using another device and cannot be copied Scenes that were not recorded with this camcorder can...

Page 113: ...0 photos Windows or 1 000 photos Mac OS Disconnect the USB cable and restore the connection after a short while If a dialog box appeared on the computer screen close it Disconnect the USB cable and re...

Page 114: ...near strong electromagnetic fields such as above TVs near plasma TVs or mobile phones Do not point the lens at strong light sources Do not leave the cam corder pointed at a bright subject Do not use...

Page 115: ...loth Long term storage Store battery packs in a dry place at temperatures no higher than 30 C 86 F To extend the battery life of the battery pack discharge it completely before storing it Charge and d...

Page 116: ...ted or lost due to memory card defects or exposure to static electricity Canon shall not be liable for lost or corrupted data Do not touch or expose the terminals to dust or dirt Do not use memory car...

Page 117: ...24 hours with the camcorder off Disposal When you delete movies or initialize the memory only the file alloca tion table is altered and stored data is not physically erased Take the necessary precaut...

Page 118: ...r ature changes suddenly Wipe it with a soft dry cloth Condensation Moving the camcorder rapidly between hot and cold temperatures may cause condensation water droplets to form on its internal sur fac...

Page 119: ...supply between 100 and 240 V AC 50 60 Hz Consult a Canon Service Center for informa tion on plug adapters for overseas use Playback on a TV Screen You can only play back your recordings on TVs compati...

Page 120: ...listed below are described in more detail in the following pages Availability differs from area to area 3 CA 570 Compact Power Adapter 7 IFC 300PCU S USB Cable 5 WS 20 Wrist Strap 8 Memory card 6 STV...

Page 121: ...tery packs with camcorders and chargers compatible with Intelligent System 2 CG 800 Battery Charger Use the battery charger to charge the battery packs It plugs directly into a power outlet without a...

Page 122: ...nd vary according to recording mode and charging recording or playback conditions The effective usage time of the battery pack may decrease when recording in cold surroundings when using the brighter...

Page 123: ...deo Cable 3067A002AA D82 0590 002 Optional Accessories CG 800 Battery Charger 2590B002AA WS 20 Wrist Strap 3118A002AA SC 2000 Soft Carrying Case 9389A001AA IFC 300PCU USB Cable 6906A001AA This mark id...

Page 124: ...16 GB memory card XP mode 3 hr 40 min SP mode 5 hr 30 min LP mode 10 hr 25 min Image Sensor 1 6 inch CCD 680 000 pixels Effective pixels Movies 16 9 advanced zoom1 450 000 W 360 000 T 2 pixels 16 9 o...

Page 125: ...recording movies Terminals AV OUT Terminal 3 5 mm minijack output only Video 1 Vp p 75 unbalanced Audio 10 dBV 47 k load 3 k or less USB Terminal mini B USB 2 0 Hi Speed USB Power Others Power supply...

Page 126: ...4 V DC Operating temperature 0 40 C 32 104 F Battery capacity 890 mAh typical 6 3 Wh 850 mAh minimum Dimensions 30 7 x 23 3 x 40 2 mm 1 2 x 0 92 x 1 6 in Weight 46 g 1 6 oz Weight and dimensions are...

Page 127: ...ws Audio encoding Linear PCM Audio sampling 48 kHz 16 bits 2 channels Minimum length 1 second File extension WAV The music data is saved in the memory under the following folder structure In the built...

Page 128: ...70 Photos 78 D Data code 66 94 Date and time 30 Date format 97 Daylight saving time 31 Time zone 31 Deleting Movies 49 68 Photos 76 Digital effects 56 Dividing scenes 69 E Error messages 107 Eye Fi ca...

Page 129: ...ng to a computer 83 Using external video recorders 85 Searching scenes by date 46 Selecting the memory for playback 45 for recording 35 Self timer 61 Serial number 18 Setup menus 28 92 Slideshow 76 Sn...

Page 130: ...Canon USA shall have no responsibility under this limited warranty for use of the Equipment in conjunction with incompatible peripheral equipment and incompatible software In order to obtain warranty...

Page 131: ...USING THE ALLEGED DAMAGE WITHOUT LIMITING THE FOREGOING YOU ASSUME ALL RISK AND LIABILITY FOR LOSS DAMAGE OR INJURY TO YOU AND YOUR PROPERTY AND TO OTHERS AND THEIR PROPERTY ARISING OUT OF USE MISUSE...

Page 132: ...ish of the Equipment media nor does it apply to Equipment purchased outside Canada If the Equipment contains a hard disk drive Canon Canada recommends that data stored on that drive be duplicated or b...

Page 133: ...2011 CANON INC 30 2 Shimomaruko 3 chome Ohta ku Tokyo 146 8501 Japan PUB DIE 0380 000 COPY...

Reviews: