


Chapter 1
✦
Roadmap to the EOS 50D
7
✦
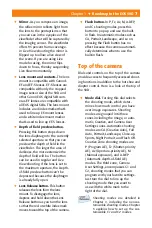
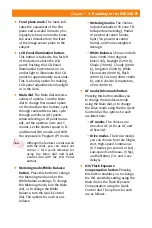
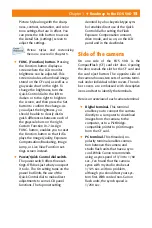
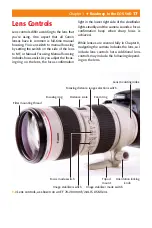
Flash button.
In P, Tv, Av, M, A-DEP,
and C shooting modes, press this
button to pop up and use the built-
in fl ash. In automatic modes such as
CA, Portrait, Landscape, and so on,
pressing the Flash button has no
eff ect because the camera automati-
cally determines when to use the
built-in fl ash.
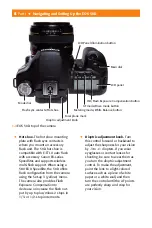
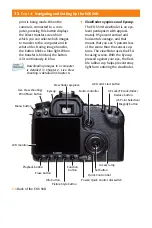
Top of the camera
Dials and controls on the top of the camera
provide access to frequently accessed shoot-
ing functions in addition to the hot shoe and
diopter control. Here is a look at the top of
the 50D.
✦
Mode dial.
Turning this dial selects
the shooting mode, which deter-
mines how much control you have
over image exposures. Shooting
modes are grouped into three
zones including the Image, or auto-
matic, Creative, and Camera User
Settings zones. Automatic shooting
modes are CA (Creative Auto), Full
Auto, Portrait, Landscape, Close-up,
Sports, Night Portrait, and Flash Off .
Creative Zone shooting modes are
P (Program AE), Tv (Shutter-priority
AE), Av (Aperture-priority AE), M
(Manual exposure), and A-DEP
(Automatic depth-of-fi eld AE)
modes. The third zone, Camera
User Settings, encompasses C1 and
C2, shooting modes that you can
program with your favorite settings.
Just turn the dial to line up the
shooting mode that you want to
use with the white mark to the
right of the dial.
Shooting modes are detailed in
Chapter 3, including the noncus-
tomizable shooting modes. Chapter
5 explains how to set up the cus-
tomizable C1 and C2 modes.
✦
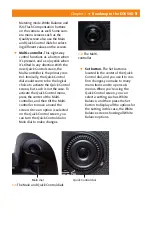
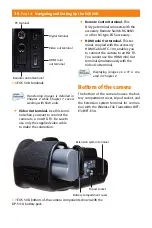
Mirror.
As you compose an image,
the refl ex mirror refl ects light from
the lens to the pentaprism so that
you can see in the eyepiece of the
viewfi nder what will be captured by
the imaging sensor. The viewfi nder
off ers 95 percent frame coverage.
In Live View shooting the mirror is
fl ipped up to allow a live view of
the scene. If you are using Live
mode focusing, the mirror fl ips
down to focus, thereby suspending
Live View momentarily.
✦
Lens mount and contacts.
The lens
mount is compatible with Canon’s
EF and EF-S lenses. EF-S lenses are
compatible with only the cropped
image sensor size of the 50D and
other Canon EOS digital SLR cam-
eras. EF lenses are compatible with
all EOS digital SLRs. The lens mount
includes a red index marker that’s
used to line up EF-mount lenses
and a white index mount marker
that’s used to line up EF-S lenses.
✦
Depth of fi eld preview button.
Pressing this button stops down
the lens diaphragm to the currently
selected aperture so that you can
preview the depth of fi eld in the
viewfi nder. The larger the area of
darkness, the more extensive the
depth of fi eld will be. The button
can be used in regular and Live
View shooting. If the lens is set to
the maximum aperture, the Depth-
of-fi eld preview button can’t be
depressed because the diaphragm
is already fully open.
✦
Lens Release button.
This button
releases the lens from the lens
mount. To disengage the lens,
depress and hold down the Lens
Release button as you turn the lens
so that the red or white index mark
moves toward the top of the camera.
Summary of Contents for EOS 50D
Page 22: ......


