


14
Part I
✦
Navigating and Setting Up the EOS 50D
Control counterclockwise to view
images from last to fi rst, or turn the
dial clockwise to view images from
fi rst taken to last.
✦
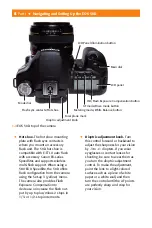
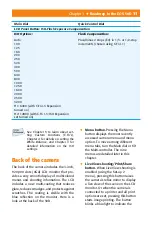
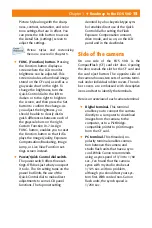
Erase button.
Pressing the Erase
button during image playback dis-
plays options to Cancel or Erase the
currently displayed image as long
as it has not had protection applied
to it. Batches of images can be
erased together by selecting and
check marking images.
✦
Info button.
During shooting,
pressing the Info button displays
the Info screen that details the cur-
rent camera settings including the
shooting mode registered for C1
and C2, color space, White Balance
shift and bracketing settings, color
temperature, auto power off set-
ting, auto image rotation, Red-eye
reduction status, image transfer sta-
tus, free space on the CF card, and
the date and time. When playing
back images, pressing the Info but-
ton one or more times cycles
through four diff erent playback dis-
play modes.
Chapter 2 covers reviewing and
erasing images as well as the diff er-
ent playback and display modes.
✦
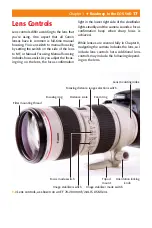
Picture Style button.
Pressing this
button displays the Picture Style
screen where you can choose one
of six preset Picture Styles or three
customizable styles that you can
create and register. A Picture Style
determines how an image is ren-
dered in terms of color, saturation,
and contrast. The Picture Style
screen shows the currently selected
If you set C.Fn III-3 AF-point selec-
tion method to use the Multi-
controller, then you cannot display
the Quick Control screen.
✦
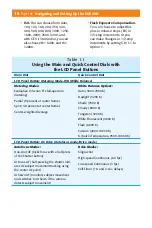
Quick Control dial.
The Quick
Control dial selects a variety of set-
tings if the power switch is set to
the topmost position (the position
above On). The Quick Control dial
selects the second named function
for the buttons above the LCD
panel. When the camera menus are
displayed, turning the Quick Control
dial cycles through the options on
each menu. When shooting, you can
use the Quick Control dial to manu-
ally select an AF point after pressing
the AF-point Selection button.
✦
Setting (Set) button.
Pressing this
button confi rms menu selections,
opens submenu screens, and, on
the Quick Control screen, it opens
function screens from which you
can change settings such as the
ISO, Exposure Compensation, and
Exposure Bracketing.
✦
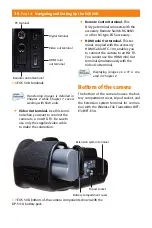
Access lamp.
This light, located to
the lower right of the Quick Control
dial, lights or blinks red when any
action related to taking, recording,
reading, erasing, or transferring
images is in progress. Anytime that
the light is lit or blinking, do not
open the CF card slot door, turn off
the camera, remove the battery, or
jostle the camera.
✦
Playback button.
Pressing this but-
ton when images are stored on the
CF card displays the last captured or
viewed image. To cycle through
images on the card, turn the Quick
Summary of Contents for EOS 50D
Page 22: ......


