background image

1-4

1

2

3

4

Cover/Table of

 Contents

Introduction

Viewing and 
Organizing Images

Editing and 
Exporting Images

Printing Images

Troubleshooting

Index

Internet Function 
and Specifying 
Preferences

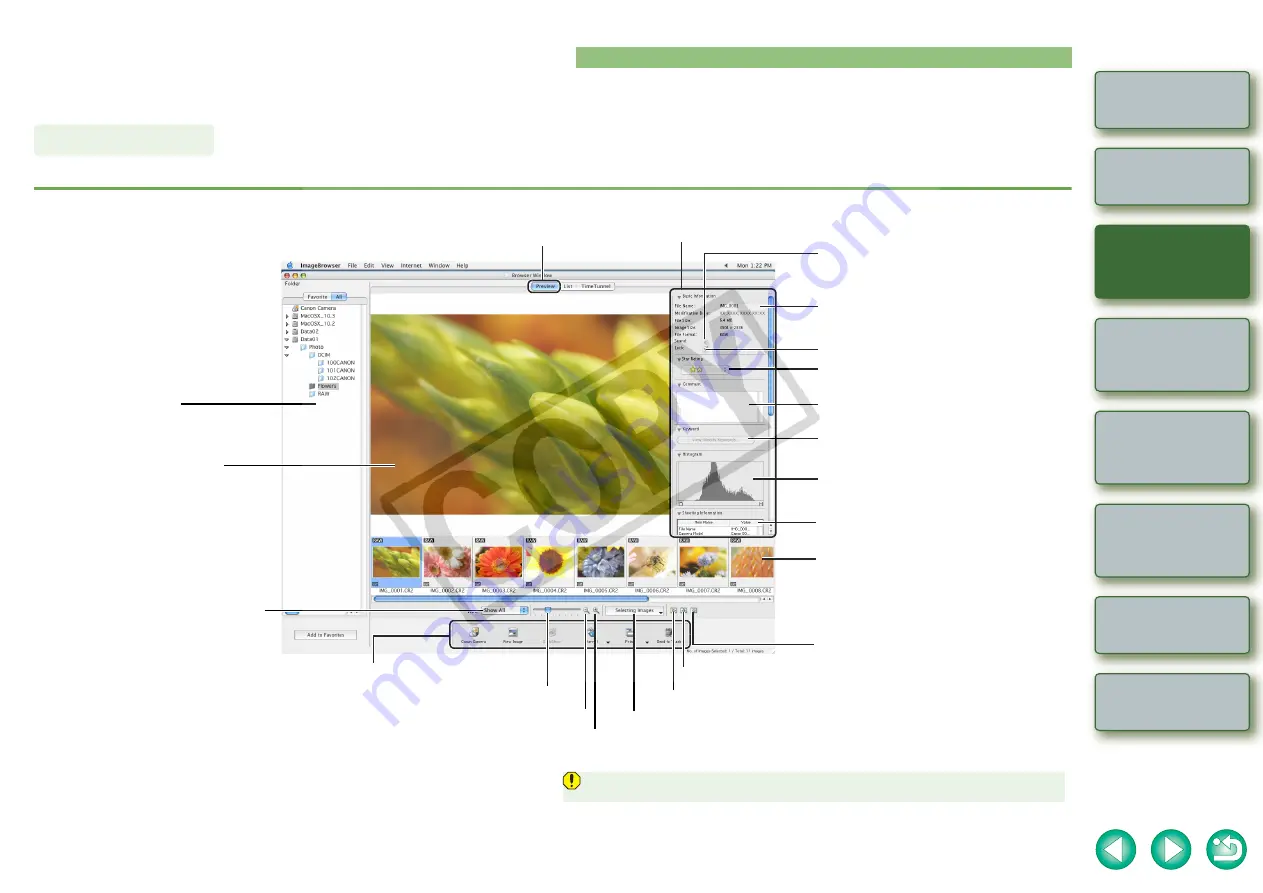
Selecting the Image Display Mode

You can select the image display mode from 3 types (Preview mode, List mode, TimeTunnel mode).
Also, you can display images individually in the viewer window.

You can select an image displayed as a thumbnail and display it individually.

Select the [Preview] tab.

Preview Mode

Image display area

The image selected in the 

thumbnail image display area is 

displayed.

Preview tab

You can change the file name.

You can lock (protect) the image.

You can set a “Rating”.

You can enter comments.

The [Keywords Setting] dialog box appears and you 

can set a keyword.

Displays the histogram (brightness distribution).

Displays the shooting information.

Thumbnail image display area

The images inside the folder selected in the folder 

area are displayed.

If you click an image, the image will be displayed in 

the image display area.

If you double-click an image, the image will be 

displayed in the viewer window 

(p.1-7)

.

Displays the thumbnail image reduced.

You can select or deselect all the images in the thumbnail image display area.

You can display only the images 

that match a “Rating”.

You can show/hide the image information area.

You can show/hide the operating buttons.

You can show/hide the folder area.

Displays the thumbnail image enlarged.

Drag left or right to display the image in the thumbnail image 

display area enlarged or reduced.

Folder area

The images in the selected folder 

are displayed in the thumbnail 

image display area.

When sound is recorded in an image shot with an 

EOS-1D series camera, the name of the sound file is 

displayed. For playback of the sound, select the [File] 

menu 

X

 [Sound] 

X

 [Play].

O

To select multiple images, hold down the <shift> key or <

a

> key and click the images.

O

To select sequential images, click the first image and then hold down the <option> + <shift> 
key and click the last image.

O

You can switch between showing and hiding each item by clicking the [

X

] button in the 

image information area.

You cannot change the file name or edit an image that is locked (protected).

Image information area

Operating buttons 

(p.1-2)


Summary of Contents for EOS 30D - 8.2MP Digital SLR Camera

Page 1: ... INC 2006 Table of Contents Canon Utilities ImageBrowser 5 6 RAW Image Task 2 3 PhotoStitch 3 1 Compatible Image Models EOS 1D Mark II N EOS 5D EOS 1Ds Mark II EOS 30D EOS 1D Mark II EOS 20D EOS 1Ds EOS 10D EOS 1D EOSDIGITALREBELXT 350DDIGITAL EOSDIGITALREBEL 300DDIGITAL EOS D60 EOS D30 Introduction Viewing and Organizing Images Editing and Exporting Images Printing Images Internet Function and Sp...

Page 2: ...IBUTORS AND DEALERS DISCLAIM ALL WARRANTIES EXPRESS OR IMPLIED INCLUDING ANY WARRANTY OF MERCHANTABILITY OR FITNESS FOR A PARTICULAR PURPOSE WITH RESPECT TO THE SOFTWARE NEITHER CANON NOR ANY OF CANON S SUBSIDIARIES DISTRIBUTORS OR DEALERS IS LIABLE FOR ANY DAMAGES HOWSOEVER CAUSED INCLUDING WITHOUT LIMITATION DIRECT CONSEQUENTIAL OR INCIDENTAL LOSS OR DAMAGE INCLUDING LOSS OF PROFITS EXPENSE OR I...

Page 3: ...ffer slightly from the actual software O The content of this Instruction Manual has been reviewed thoroughly However if you should notice any errors or omissions please contact a Canon Service Center O Please note that irrespective of the above mentioned Canon does not take responsibility for the outcome of the operation of the software O Canon and EOS are trademarks of Canon Inc O Macintosh Mac O...

Page 4: ...s are used to indicate items such as menu names button names and window names that appear on the computer screen Click to move to the next page Click to return to previously displayed page O The camera name is shown in the screens as EOS XXX O For how to use the software applications also refer to the Help for each software application O For more information on the restrictions of each software re...

Page 5: ...ay and view 3 types of image lists display an individual image in enlarged view or display images as a slide show p 1 4 to p 1 9 O Images can be easily sorted and classified by single operation renaming of multiple files or with the image organize function p 1 9 to p 1 10 O JPEG images can be edited and then converted or saved using various functions p 2 1 O Images can be exported using various fu...

Page 6: ...equent Use Folder 1 3 Selecting the Image Display Mode 1 4 Preview Mode 1 4 List Mode 1 5 TimeTunnel Mode 1 6 Viewer Window 1 7 View Organize Function 1 8 Viewing the Images as a Slide Show 1 8 Changing the Display Order of the Images 1 9 Setting the Information to be displayed with the Image 1 9 Sorting Images in Folders 1 9 Renaming the Files in a Single Operation 1 10 Searching Images 1 10 Star...

Page 7: ...age in the viewer window p 1 7 You can connect to the internet and send images p 4 2 Menu bar You can perform various operations p 1 8 to p 1 10 p 2 2 to p 2 6 p 4 2 Folder area The images in the selected folder are displayed in the image display area is automatically attached to the folder containing the images downloaded with EOS Utility or CameraWindow MC Add to Favorites button p 1 3 Displays ...

Page 8: ... You can then download images by clicking the Starts to download images button For detailed information on downloading images using a third party card reader refer to Downloading Images Using Your Card reader in the EOS Utility Instruction Manual Select the folder where the images to be displayed are saved The images in the folder are displayed in the main window Displaying Images Handling the Fol...

Page 9: ...lay area If you double click an image the image will be displayed in the viewer window p 1 7 Displays the thumbnail image reduced You can select or deselect all the images in the thumbnail image display area You can display only the images that match a Rating You can show hide the image information area You can show hide the operating buttons You can show hide the folder area Displays the thumbnai...
Page 10: ... then hold down the option shift key and click the last image O To select multiple images hold down the shift key or a key and click the images List Mode Displays the image reduced You can display only the images that match a Rating You can show hide the operating buttons You can select or deselect all the images in a folder Displays the image enlarged Drag left or right to display the image enlar...

Page 11: ... over the image and wait for a while the shooting information of the image will be displayed TimeTunnel Mode The date and time of shooting is displayed Tool panel Folder area The images in the selected folder are displayed in the image display area Image display area The images inside the folder selected in the folder area are displayed You can advance or retract the shot date and time by dragging...

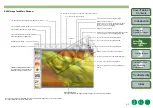
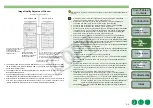
Page 12: ...the window and displayed multiple images you can link the images by making the enlargement ratio and display position of the images the same You can edit the image p 2 1 Displays the next image You can print the image p 3 1 You can display the shooting information and the AF point used at the time of shooting You can process a RAW image and display it You can double click an image to display it in...

Page 13: ... the Help displayed 4Click the OK button The Slide Show Options dialog box closes 5 Click the SlideShow button The slide show begins Viewing the Images as a Slide Show You can quit the slide show by pressing the esc key on the keyboard You can set a Rating If clicked when an image is displayed the image appears selected or deselected in the main window after the slide show ends If clicked when an ...

Page 14: ...ion set is displayed with the image Changing the Display Order of the Images Setting the Information to be displayed with the Image You can sort images into folders by the date and time they were shot or by their Rating 1 Select the images 2Select the File menu X Organize Image X Sort Images The Sort Images dialog box appears 3 Select the method of sorting for the folders and then click the Next b...

Page 15: ...2Select the File menu X Search The Set Search Criteria dialog box appears 3 Specify desired settings O For detailed information select the Help menu X ImageBrowser Help and refer to the help that appears 4Click the Search Now button The search begins and images that match the set conditions are displayed in the Search Results window 5 Click the Finish button The display returns to the main window ...

Page 16: ...e to display it in the viewer window p 1 7 2Click the Edit button and select the edit settings from the menu that appears The dialog box of the selected settings appears 3 Adjust using the dialog box that appears and then click the OK button O For detailed information select the Help menu X ImageBrowser Help and refer to the help that appears O To transfer and edit your image in different image ed...

Page 17: ...Help displayed O You cannot merge RAW images in the PhotoStitch O Merging may not be successful when more than 4 images are merged Rotating Images Merging Images You can specify the same processing parameters for RAW images as for the camera Also you can convert RAW images to JPEG images or TIFF images and save or transfer them to other image editing software as well as attach ICC profiles 1 Selec...

Page 18: ...mage Displays the image enlarged When an image is enlarged the navigator window appears and you can check the enlarged display position and move it by dragging Image display area The image selected in the thumbnail image display area is processed and displayed You can save the adjusted image Toolbar When the image is displayed as an enlargement you can move the display position by dragging the ima...

Page 19: ... are compatible O Tone curve files for the EOS 1Ds and EOS 1D are compatible O Because only the processing parameter settings are changed and they are not added to the RAW image you can change the parameters multiple times or revert to the condition when the image was shot In addition there is hardly any of the image deterioration that accompanies processing parameter changes O When the Preview ch...

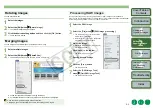
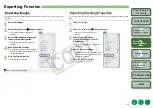
Page 20: ...tings O For detailed information select the Help menu X ImageBrowser Help and refer to the help that appears 5 Click the Finish button The settings are executed You cannot export RAW images Exporting Images You can export as a text file the shooting properties recorded to the image when the shot was taken 1 Select the image 2Select the File menu X Export Images The Write a still image dialog box a...

Page 21: ...on select the Help menu X ImageBrowser Help and refer to the help that appears 5 Click the Finish button The settings are executed You cannot export RAW images Exporting an Image as a Screen Saver You can export a JPEG image as a file for wallpaper for a computer 1 Select the image 2Select the File menu X Export Images The Write a still image dialog box appears 3 Select Export an Image as Wallpape...

Page 22: ...r page 1 Select an image 2Click the Print button and select One Photo per page Print from the menu that appears The One Photo per page Print dialog box appears 3 Specify desired settings O For detailed information select the Help menu X ImageBrowser Help and refer to the help that appears 4Click the Print button The Print dialog box appears 5 Specify desired settings and then click the Print butto...

Page 23: ... printed O For detailed information click the button and refer to the Help displayed Index Printing You can layout images and print them O The settings displayed in the dialog box vary depending on the printer being used 1 Select the images 2Click the Print button and then select Layout Print from the menu that appears The Layout Print dialog box appears 3 Specify desired settings O You can move t...

Page 24: ...leshooting Index Internet Function and Specifying Preferences Internet Function and Specifying Preferences This chapter explains sending images with your e mail software and specifying preferences for ImageBrowser O Click on the item to display its page Internet Function 4 2 Sending an Image by E mail 4 2 Specifying Preferences 4 2 ...

Page 25: ...3 Select either Send without changing the file size or Resize compress and send and then click the Next button The compression settings dialog box appears If you selected Send without changing the file size proceed to step 5 4Specify desired settings and click the Next button 5 Click the Finish button The image is displayed in the browser window and the e mail software is started O Attach E mail I...

Page 26: ...porting Images Printing Images Troubleshooting Index Internet Function and Specifying Preferences Troubleshooting This chapter provides troubleshooting and explains how to uninstall the software O Click on the item to display its page Troubleshooting 5 2 Uninstalling the Software 5 2 Index 5 3 ...

Page 27: ... the Preferences folder as described in the procedures below and then restart the software Open the hard disk drive where the system is saved X the Users folder X Folder for the logged in user X the Library folder X the Preferences folder and then delete the target file For OS X 10 2 double click the hard disk drive where the system is saved X click the Home button X the Library folder to open the...

Page 28: ...ow 1 2 L List Mode 1 5 M Merging Images 2 2 P Panoramic Merging 2 2 Preview Mode 1 4 Printing Images Index Printing 3 2 Layout Printing 3 2 Printing One Photo per Page 3 1 Processing RAW Images 2 2 R RAW Image Task Image Quality Adjustment Window 2 4 RAW Image Task Main Window 2 3 Renaming the Files in a Single Operation 1 10 Rotating Images 2 2 S Searching Images 1 10 Selecting the Image 1 4 1 5 ...

Reviews: