background image

25

Bef

ore Y

ou 
Star

t

1

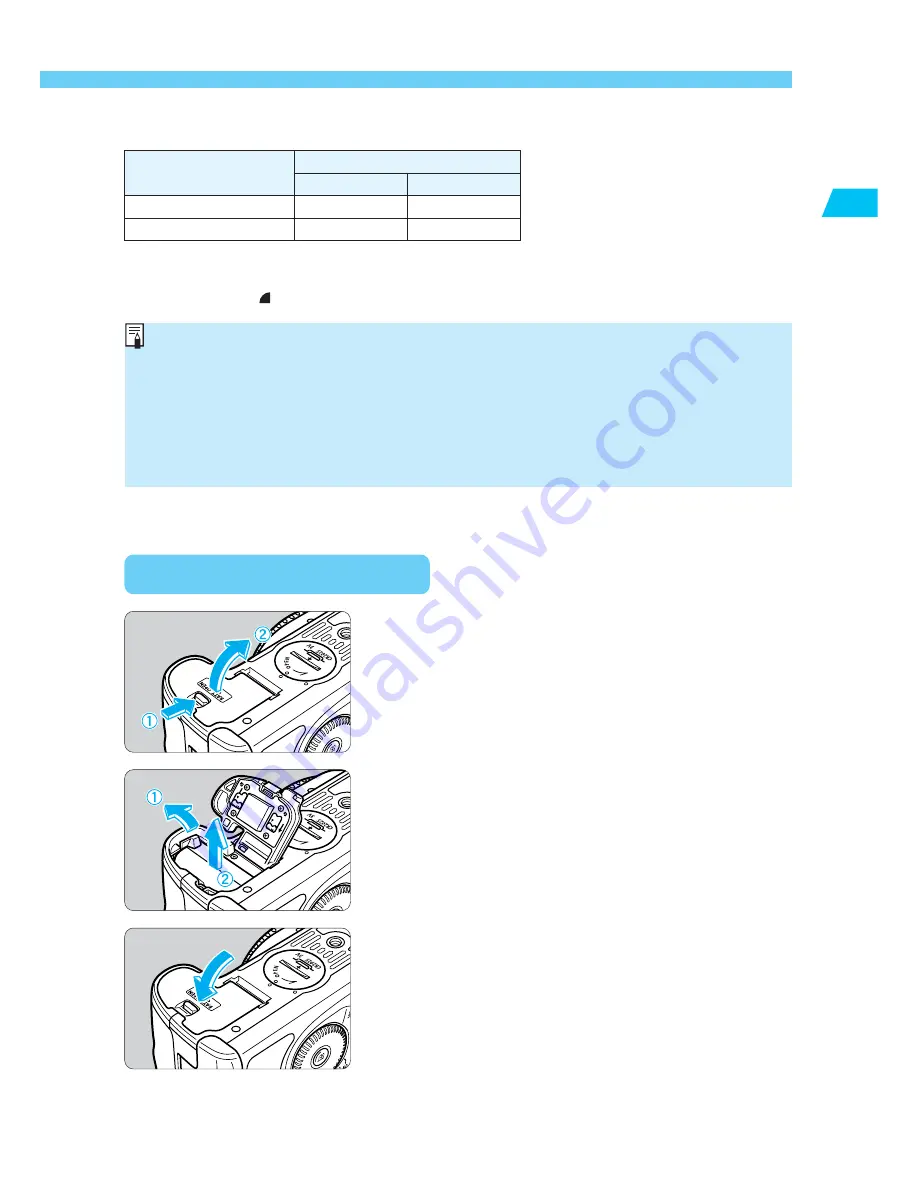
Installing and Removing the Battery

Removing the Battery

Open the battery compartment cover.

Slide the lever in the direction shown by the arrow
in the diagram, and open the cover.

1

Remove the battery pack.

Slide the battery lock lever in the direction shown by
the arrow, and remove the battery.

2

Close the cover.

Press the cover closed until it clicks shut.

3

The number of shots may be less than indicated in some cases, due to differences in
operating conditions.

The number of shots is reduced by frequent use of the LCD monitor.

Holding the shutter button halfway down for long periods to use the AF function
without taking a shot can reduce the number of shots.

Regarding the battery life (number of shots) with Battery Grip BG-ED3
(optional), refer to the BG-ED3’s instructions.

The figures above are based on Canon’s standard testing conditions (w/fully charged
battery, EF 50mm f/1.4 USM lens, image review [

ON

], review time of [

2 sec.

], and image

quality at [

Large

])

Battery Life

Temperature

Shooting conditions

No flash use

50% flash use

Normal (20

°

C/68

°

F)

Approx. 650

Approx. 500

Low (0

°

C/32

°

F)

Approx. 500

Approx. 400

Summary of Contents for EOS 10D Digital

Page 1: ...E INSTRUCTION MANUAL INSTRUCTION MANUAL English Edition E Be sure to read this Instruction Manual before using your camera for the first time Keep this booklet handy for easy reference ...

Page 2: ...cil for Interference by Information Technology Equipment VCCI This device may still cause interference with radio or television reception when placed near such an appliance Test the Camera Before Shooting Before using the camera be sure to test it first Check that the images are properly recorded on the CF card If the camera or CF card is faulty and the images cannot be recorded or read by a perso...

Page 3: ...ou are reading now EOS 10D Software Instructions Explains how to install the software for transferring images from the camera to a personal computer processing RAW images and image processing Battery Pack BP 511 Instructions Warranty card Quick Operation Guide EOS 10D Accessories Introduces major accessories for the EOS 10D No CF card is included Please purchase it separately CF cards made by Cano...

Page 4: ... ISO Speed 49 ISO Speed in the Basic Zone Modes 49 ISO Speed in the Creative Zone Modes 49 Selecting the White Balance 50 White Balance 50 White Balance Settings 51 Custom White Balance 52 Setting the Color Temperature 53 White Balance Auto Bracketing 54 Setting Processing Parameters 56 Selecting a Color Space 58 Selecting sRGB 58 Selecting Adobe RGB 58 File Numbering Methods 59 Continuous Numberi...

Page 5: ...ating an Image 114 Connecting to a TV 115 Image Protection 116 Erasing an Image 117 Erasing a Single Image 117 Erasing All Images 118 Formatting the CF Card 119 Direct Printing 122 Connect the Camera to the Printer 122 Connecting to a Card Photo Printer 122 Connecting to a Canon BJ Printer 124 Printing 125 Printing Options 127 Setting the Quantity 127 Setting the Printing Style 127 Trimming 129 Pr...

Page 6: ...erence to radio or television reception which can be determined by turning the equipment off and on the user is encouraged to try to correct the interference by one or more of the following measures Reorient or relocate the receiving antenna Increase the separation between the equipment and receiver Connect the equipment into an outlet on a circuit different from that to which the receiver is conn...

Page 7: ...first opportunity to consult your camera distributor or Canon Customer Support immediately Stop operating the equipment immediately if it should emit smoke or noxious fumes Failure to do so may result in fire or electrical shock Set the camera s main switch to the OFF position and remove the camera battery or unplug the power cord from the electrical outlet immediately Please consult your camera d...

Page 8: ...ese substances immediately flush with water and seek medical assistance Avoid dropping or subjecting the batteries to severe impacts that could damage the casings This could lead to leakage and injury Do not short circuit the battery terminals with metallic objects such as key holders This could lead to overheating burns and other injuries Use the supplied battery case to transport or store the ba...

Page 9: ...ions or corrupt image data Avoid Condensation Related Problems Moving the equipment rapidly between hot and cold temperatures may cause condensation water droplets to form on its external and internal surfaces You can avoid this by placing the equipment in an airtight resealable plastic bag and letting it adjust to temperature changes slowly before removing it from the bag If Condensation Forms In...

Page 10: ...and interfere with the camera s normal operation 8 If the camera is suddenly brought in from the cold into a warm room condensation may form on the camera and internal parts To prevent condensation first put the camera in a sealed plastic bag Let the camera adjust to the warmer temperature before taking it out of the bag 9 Do not use the camera if condensation forms on it or you could damage it If...

Page 11: ...rd is a precision device Do not drop CF cards or expose them to vibrations Doing so could lose the images recorded on them 2 Do not store or use CF cards near objects that generate magnetic fields such as TVs speakers or magnets or in locations affected by static electricity Doing so could lose the images recorded on the CF card 3 Do not place CF cards in direct sunlight or close to heating applia...

Page 12: ...nal After inserting the CF card close the cover p 28 Recharge the battery Connect the power cord to the battery charger then attach the battery When the charge lamp stops blinking and stays lit the battery is completely charged A full battery charge takes approximately 90 minutes p 22 Load the battery Open the battery compartment cover and slide the battery pack into position until it locks into p...

Page 13: ...lign the red dots on the lens and camera and turn the lens in the direction shown by the arrow in the diagram until it clicks into place p 27 Set the focus mode switch on the lens to AF p 27 4 3 7Turn the switch to p 30 8 Set the Mode Dial to Full Auto p 38 11 Review the image on the LCD monitor The image you just took will be displayed for about 2 sec This display time can also be changed p 43 ...

Page 14: ...lash sync contacts Shutter button 30 Mode dial 18 Lens lock pin Lens mount Contacts 11 Depth of field preview button 85 Built in flash 96 Red eye reduction Self timer lamp 99 77 Strap mount 21 Lens release button 27 Mirror 94 156 Body cap 27 LCD panel illumination button 94 AF mode selection White balance button 64 50 Drive mode selection button ISO speed set button 76 49 Metering mode selection F...

Page 15: ...rap mount 21 Access lamp 29 CF card slot cover CF card slot cover 28 CF card slot accepts card type I and ll 28 CF card eject button 28 LCD monitor 35 Assist button 70 AF point selector Enlarge button 67 111 129 AE lock FE lock button Index Reduce button 92 100 110 111 129 Menu button 32 Info Trimming orientation button 62 109 130 Jump button 112 Playback button 108 Direction switching button 111 ...

Page 16: ...time ISO speed AEB AF point selection CF card full warning CF card error warning No CF card warning Error indicator Cleaning image sensor Shutter speed Busy Charging the built in flash Date time battery level warning Processing Parameters ISO Speed Camera starting Image Recording quality Large Fine Large Normal Medium Fine Medium Normal Small Fine Small Normal RAW White balance Auto Daylight Shade...

Page 17: ... lock AEB in progress Flash ready Improper FE lock warning High speed sync FP flash Exposure level indicator Exposure compensation amount Flash exposure compensation amount AEB level Red eye reduction lamp on indicator Focus confirmation light New laser matte screen CF card full warning CF card error warning No CF card warning Shutter speed FE lock Busy Flash exposure compensation Maximum burst Sh...

Page 18: ...ing in specific situations Portrait p 40 Landscape p 40 Close up p 40 Sports p 41 Night Portrait p 41 Flash off p 41 Mode Dial The Mode Dial is divided into two functional zones 2 2 2 2 2 Creative zone Lets you make a variety of settings Program AE p 80 Shutter priority AE p 82 Aperture priority AE p 84 Manual exposure p 86 Automatic Depth of field AE p 88 Basic zone Image zone Creative zon e Full...

Page 19: ...al DC coupler socket p 26 Plug in cord for DC coupler here DC coupler cord p 26 Power cord p 22 Power cord p 26 DC coupler side Power cord side Battery pack slot 22 The battery pack slips into this slot for recharging Power cord socket p 26 Connect the power cord here Power cord socket p 22 Plug in power cord here AC Adaptor AC E2 DC coupler DR 400 ...

Page 20: ...ntheses p 00 The procedures in these Instructions use a Canon EF 24 85mm f 3 5 4 5 USM lens for reference The descriptions also assume that the menu functions and custom functions are set to the default settings The icons and indicate that the function operates on a timer and remains in effect after the button is released The icons represent 4 6 or 16 seconds respectively In general the pictures u...

Page 21: ...sic opera tion of the EOS 10D camera Attaching the Strap Pass the end of the strap through the strap mount from beneath then back in and out of the strap clasp as shown Pull the strap to make sure it does not slip out of the clasp The eyepiece cover is attached to the strap p 78 Eyepiece cover 1 21 ...

Page 22: ...everse 3 Recharge the battery s When the battery is attached to the charger recharging starts automatically and the red lamp starts blinking s A completely exhausted battery takes about 90 minutes to almost fully recharge The blinking frequency of the red lamp indicates the progress of the recharging s After the battery recharging is almost com pleted the red lamp will stop blinking and remain lit...

Page 23: ...ore using the camera again be sure to recharge the battery The time required to recharge the battery depends on the ambient temperature and battery s power level If operating time is sharply reduced even after charging normally the battery pack may have exceeded its useful life Replace it with a new battery pack The battery pack can operate in temperatures from 0 C to 40 C 32 F to 104 F however fo...

Page 24: ...rt the battery into the camera Make sure the battery pack is facing the right way and insert it into the battery compartment Insert the battery pack until it locks into place 2 Close the cover Press the cover closed until it clicks shut 3 Battery Pack BP 512 can also be used Battery Level Icons The level of charge remaining is shown in three stages when the switch is set to p 30 Charge is sufficie...

Page 25: ... in operating conditions The number of shots is reduced by frequent use of the LCD monitor Holding the shutter button halfway down for long periods to use the AF function without taking a shot can reduce the number of shots Regarding the battery life number of shots with Battery Grip BG ED3 optional refer to the BG ED3 s instructions The figures above are based on Canon s standard testing conditio...

Page 26: ...o the camera Open the cover and lower the covering on the cord hole Insert the DC coupler and fit the cord into the cord hole Check that the cord is placed tightly in the cord hole and slide the DC coupler into the compart ment until it locks into place Push down the cover until it clicks 2 Connect the power cord Connect the power cord to the AC adapter Plug the cord into a power outlet When you a...

Page 27: ...ot operate 3 Remove the front lens cap 4 Lens mount index Detaching the Lens While pressing the lens release button turn the lens as shown by the arrow Turn the lens until the red dot is at the top then detach the lens Since the EOS 10D s image coverage is smaller than the normal 35mm film format the EF lens attached to the camera will have a telephoto effect equivalent to 1 6 times of the marked ...

Page 28: ...card label side the side with the printed mark facing toward the rear of the camera slide the card in the direction of the mark into the slot s The Eject button pops out 2 Close the cover Close the cover and slide it in the direction shown by the arrow until it clicks shut s When you set the switch to the number of remaining shots will be displayed on the LCD panel and in the viewfinder 3 Number o...

Page 29: ...sing after image capture and while the image is being recorded onto the CF card access lamp blinks If you press the or button during this time will be displayed on the LCD monitor If a CF card is used for the first time or is displayed on the LCD panel see Formatting a CF Card on page 119 to format the card Do not use a low capacity CF card If the image file size is large the CF card may not be ab...

Page 30: ...wo levels of shutter button operation are as follows Halfway pressing Pressing the shutter button down halfway activates autofocusing AF and also activates the automatic exposure mechanism and sets the shutter speed and aperture value The exposure the combination of shutter speed and aperture value appears on the LCD panel and in the viewfinder Full pressing This releases the shutter and shoots If...

Page 31: ...ded image etc Operating the Dial 2 Just turn the dial While referring to the LCD panel or viewfinder display turn the dial to set the desired setting Use the dial this way to set the shutter speed and aperture value Operating the Dial 1 Press a button and turn the dial When you press a button its function remains active while a timer runs During this time you can turn the dial and view the setting...

Page 32: ...etails on the various menu settings see Menu Settings on page 139 button LCD monitor Menu Screen Description Menu items related to shooting Menu items related to playing back recorded images Menu items related to basic camera functions Color Red Blue Yellow Setting type Shooting Playback Setup Color coded menu items The menu items are color coded according to the three menu categories The menu ite...

Page 33: ... can be displayed in one of twelve languages p 143 Pressing the button while the menu is displayed switches the menu category to shooting playback or setup in this order The first menu item of the respective category will appear Setting Procedure Display the menu Press the button to display the menu To turn off the menu press the button again 1 Select a menu item Turn the dial to select the item t...

Page 34: ...Brightness Date Time File numbering Language Video system Format Custom Functions C Fn Clear settings Sensor clean Firmware Ver Set 1 Set up 4 min 30 min On Info yy mm dd Français Suomi Svenska Ref page Note Settings and Description Set custom white balance 2800 K 10000 K in 100 K increments Protects the image from erasure Rotate recorded image Order print of recorded image DPOF Plays the images a...

Page 35: ...ngs then press 1 Select Clear all camera settings Turn the dial to select Clear all camera settings then press 2 Clear the settings Turn the dial to select OK then press Press the button to turn off the LCD monitor and exit the menu s The camera s default settings will be as shown below 3 AF mode AF point selection Metering mode Drive mode Exposure compensation AEB Flash exposure compensation Cust...

Page 36: ...ng 1 dpt If the camera s dioptric adjustment still cannot provide a clear viewfinder image using Dioptric Adjustment Lens E 10 types is recommended p 174 To obtain sharp images hold the camera still to minimize camera shake Horizontal shooting Vertical shooting Firmly grasp the camera grip with your right hand and press your both elbows lightly against your body Hold the lens at the bottom with yo...

Page 37: ...nt and shoot In addition to help prevent mistakes caused by operating the camera improperly the buttons do not operate so there is no need to worry about accidental errors Basic Zone modes set all the camera settings automatically All you do is point and shoot 37 Set the Mode Dial to or The shooting procedure is the same as with the Full Automatic Shooting on page 38 2 Basic Zone ...

Page 38: ...y s The AF point that achieves focus will flash briefly At the same time the beeper will sound and the focus confirmation light in the viewfinder will light s The exposure settings will be displayed in the viewfinder and on the LCD panel The number displayed on the left of the focus confirmation light indicates maximum burst for continuous shooting If the CF card is almost full and has room for ni...

Page 39: ...is not at any of the seven AF points see Focusing an Off Center Subject p 65 In the Basic Zone modes except the built in flash will pop up and fire automatically in low light or backlit conditions To retract the flash push it back down For more information on the flash see Using the Built in Flash on page 96 The self timer can also be used p 77 You can set the beep that indicates the subject is in...

Page 40: ...white balance will be set automatically Landscape This is for wide scenic views night scenes etc Using a wide angle lens will further enhance the depth and breadth of the image The AF mode single drive mode metering mode ISO speed and white balance will be set automatically Close up Use this mode to take close up shots of flowers insects etc As much as possible focus the subject at the lens closes...

Page 41: ...f you want to shoot only a night scene without people use the mode instead Tell the subject to keep still even after the flash fires If you also use the self timer p 77 the self timer lamp will flash to indicate that the image was recorded The AF mode single drive mode metering mode ISO speed and white balance will be set automatically Flash off You can disable the flash when you do not want it to...

Page 42: ...lect the desired setting then press s The menu will reappear Press the button to exit the menu and turn off the LCD monitor 2 Shoot s The captured image will be displayed on the LCD monitor The image will be displayed for the number of seconds set with Review time 3 Review On setting Review On Info setting p 109 Shooting information Histogram You can also change the number of seconds the image is ...

Page 43: ...menu will reappear Press the button to exit the menu and turn off the LCD monitor 2 The Hold setting keeps displaying the image until you press the shutter button halfway However if auto power off has been set p 142 the camera will turn off automatically after the auto power off time elapses The Review time takes effect only when the Review setting is On or On Info For continuous shooting the Revi...

Page 44: ...44 ...

Page 45: ...r shooting digital images Image recording quality ISO speed white balance processing parameters color space file numbering and auto rotation For Basic Zone modes only the image recording quality except file numbering auto rotation and camera setting checking will apply in this chapter 3 45 ...

Page 46: ...file size fewer images can be recorded on the CF card Large Normal Records a 6 3 megapixel image with high compression JPEG It saves the JPEG image with a relatively high image quality while enabling more images to be recorded on the CF card Medium Fine Converts the approx 6 30 megapixel image to a 2 80 megapixel image and saves it as a JPEG image via low compression While the JPEG images have med...

Page 47: ...many more images the CF card can record In the mode a JPEG image is also recorded simultaneously and embedded within the RAW image The image recording quality will be memorized in Basic Zone mode and Creative Zone mode respectively To open RAW images with a personal computer or to extract the JPEG image embed ded in the RAW image file you must use the dedicated software For details see EOS 10D Sof...

Page 48: ...tom Functions C Fn then press s The Custom Function screen will appear 1 Select C Fn 08 RAW JPEG rec Turn the dial to select RAW JPEG rec then press 2 Select the image recording quality for the JPEG image Turn the dial to select the desired image recording quality then press Press the button to return to the menu Press the button again to turn off the LCD monitor When the Quality is set to a JPEG ...

Page 49: ... on the LCD panel In the Basic Zone modes will be displayed on the LCD panel 1 Set the ISO speed While looking at the LCD panel turn the dial to set the desired ISO speed To return to shooting press the shutter button halfway 2 In step 2 turning the dial will set the drive mode p 76 The ISO speed is set automatically ISO Normal No flash Varies 100 Varies Varies 400 Varies Varies With built in flas...

Page 50: ...white For example if you have a white object under a lit tungsten light bulb it will look red or orange in the image If it is under fluorescent light it will look greenish To the human eye a white object still looks white regardless of the type of lighting The human eye is highly adaptive to different types of lighting and color temperatures With a film based camera you can attach a color compensa...

Page 51: ...prox 4000 K When flash is used Approx 6000 K First you shoot a white object to be used as the standard for the white balance setting By using the white balance data from this image you can set the optimum white balance p 52 Approx 2000 10000 K You can manually set color temperature for 2800 10000 K in 100 K increments p 53 Approx 2800 10000 K With selected shooting under a low color temperature su...

Page 52: ...n Turn the dial to select Custom WB then press 2 Select an image Turn the dial to select the image captured in step 1 then press s The image s white balance data will be imported After the setting is completed the menu will reappear To exit the menu and turn off the LCD monitor press the button 3 Press the button 4 Select the custom white balance Turn the dial to select 5 For the standard white ob...

Page 53: ...adjust the setting to compensate for the difference between the color temperature meter s reading and the camera s color temperature reading On the menu select Color temp Press the button Turn the dial to select Color temp then press 1 Set the color temperature Turn the dial to select the desired color temperature then press The color temperature can be set from 2800 K to 10000 K in 100 K incremen...

Page 54: ...ng amount then press You can bracket the white balance up to 3 stops in whole stop increments s After the setting is completed the menu will reappear Press the button to exit the menu and turn off the LCD monitor s During white balance bracketing the icon for the current white balance setting will blink s The number of remaining shots displayed on the LCD panel will be one third the normal number ...

Page 55: ...k if the image recording quality is White balance bracketing can be used together with auto exposure bracketing AEB p 90 In this case the three AEB shots will have three white balance bracketed images recorded for each shot Therefore a total of nine images will be recorded on the CF card With C Fn 9 2 3 you can change the white balance bracketing sequence p 148 C Fn 9 1 3 prevents the white balanc...

Page 56: ...ers then press 1 Select Set up Turn the dial to select Set up then press The default parameter settings for Set 1 Set 2 and Set 3 are all 0 Standard 2 Select the Set No Turn the dial to select 1 2 or 3 then press 3 Parameter Contrast Sharpness Saturation Color tone Setting Adjusts the contrast Adjusts the sharpness Adjusts the color saturation Adjusts the color tone Level 1 2 0 1 2 1 2 0 1 2 1 2 0...

Page 57: ...e dial while looking at the LCD panel p 146 Select the parameter Turn the dial to select the parameter then press The parameter selection will change in the following loop 4 Set the parameter Turn the dial to set the parameter then press Each parameter can be set to one of five settings 5 Return to the Parameters menu Press the button twice to return to step 1 Then press 6 Select the Set No that w...

Page 58: ... turn off the LCD monitor The captured images will then be recorded with sRGB 2 With step 2 above select Adobe RGB The image will be recorded with Adobe RGB Selecting Adobe RGB When Adobe RGB has been set the processing parameters cannot be set p 56 All the processing parameter settings will be set to 0 Images captured with Adobe RGB will not be appended with the ICC profile To convert the profile...

Page 59: ...card or after the last captured image s file number whichever is higher On the menu select File numbering Press the button Turn the dial to select File numbering then press 1 Select the file numbering method Turn the dial to select Continuous or Auto reset then press s After the setting is completed the menu will reappear Press the button to exit the menu and turn off the LCD monitor 2 Auto Reset ...

Page 60: ...you should keep a spare CF card on hand If file No 9999 in folder No 999 is created will be displayed on the LCD panel and in the viewfinder and no more images can be recorded even if the CF card still has room Replace the CF card with a new one The file numbers are like the frame numbers on a roll of film For details on file names see Basic Terminology p 161 ...

Page 61: ...the camera s orientation between horizontal and vertical the camera orientation sensor will make a small sound This is not a defect On the menu select Auto rotate Press the button Turn the dial to select Auto rotate then press 1 Set the Auto rotate setting Turn the dial to select On then press s When the setting is completed the menu will reappear Press the button to exit the menu and turn off the...

Page 62: ...he button again to clear the LCD monitor Camera Setting Information For viewing image with shooting information during playback see Image with Shooting Information p 109 Date time p 154 AEB amount p 90 WB BKT amount p 54 Processing parameter setting p 57 Image review p 42 Image review time p 43 Color temperature p 53 ISO speed p 49 Auto rotate p 61 Auto power off time p 142 CF card remaining capac...

Page 63: ...um AF point autofocusing can be executed while you maintain the desired subject framing You can also set the AF mode to suit the subject or intended effect In the Basic Zone modes only AF lock p 65 and manual focusing p 71 apply in this chapter 63 4 First set the switch and switch to ...

Page 64: ...m One Shot AF to AI Servo AF if the subject starts to move Set the lens focus mode switch to AF 1 Turn the Mode dial to a Creative Zone mode 2 Press the button 3 Select the AF mode While looking at the LCD panel turn the dial to select the desired AF mode One Shot AF AI Focus AF AI Servo AF To return to shooting press the shutter button halfway 4 In step 4 turning the dial will set the white balan...

Page 65: ...and point of focus With C Fn 10 1 you can disable the AF point from flashing in red superimposed display when focus is achieved p 149 Focusing an Off Center Subject To focus an off center subject not covered by any of the seven AF points follow the procedure below This technique is called focus lock Focus lock works when the AF mode is set to One Shot AF Aim the AF point over the subject and press...

Page 66: ...bject and predicts the focusing distance immediately before the image is captured This is for obtaining correct focus at the moment of exposure When the AF point selection is automatic the camera first uses the center AF point to focus If the subject moves away from the center AF point focus tracking continues as long as the subject is covered by another AF point The active AF point will not flash...

Page 67: ...nction to help you compose a particular shot quickly Basic Procedure for AF Point Selection Press the button After pressing the button look at the viewfinder or LCD panel and turn the or dial to select the desired AF point Selecting a horizontal AF point Press the button and turn the dial s The selected AF point will shift horizontally Selecting a vertical AF point Press the button and turn the di...

Page 68: ...automatic AF point selection while looking at the LCD panel Manual Selection Display the desired AF point in red To select the AF point see Selecting an AF Point p 67 The selection sequence when the and dial is turned is shown below You can also select the AF point manually while looking at the LCD panel With C Fn 10 1 you can disable the AF point from flashing in red when focus is achieved p 149 ...

Page 69: ...t On the menu select Custom Functions C Fn Press the button Turn the dial to select Cusom Functions C Fn then press s The Custom Function screen will appear 1 Select C Fn 07 AF point registration Turn the dial to select AF point registra tion then press 2 Register the AF point Turn the dial to select the desired AF point then press 4 is automatic AF point selection s The selected AF point will be ...

Page 70: ...ly This is the default method with C Fn 13 0 1 2 Press only the button to switch to the registered AF point p 150 3 Switch to the registered AF point only while pressing the button p 150 When the button is released it will return to the original AF point For the setting procedure see Setting Custom Functions p 145 or see page 69 C Fn 13 1 C Fn 13 2 If C Fn 13 1 2 and C Fn 04 1 3 have been set you ...

Page 71: ...ch to MF or M on older lenses and focus manually p 27 Manual Focusing Set the lens focus mode switch to MF or M on older lenses 1 Focus by turning the lens focusing ring until the subject is in focus in the viewfinder 2 If you press the shutter button halfway during manual focusing the active AF point and the focus confirmation light in the viewfinder will light when focus is achieved If focus can...

Page 72: ...72 ...

Page 73: ...ontinuous and self timer are provided Select the mode which best suits the subject or your creative intentions In the Basic Zone modes the metering mode and drive mode are set automatically Only the self timer setting will apply in this chapter 5 73 First set the switch to Metering mode Evaluative metering Partial metering Center weighted average metering Drive mode Single frame Continuous Self ti...

Page 74: ... to return to shooting Selecting the Metering Mode Press the button 1 The EOS 10D uses three modes for metering Evaluative Partial and Center weighted average The Basic Zone uses evaluative metering In the Creative zone any of the three modes can be selected 2 In step 2 turning the dial will set the flash exposure compensation amount for the built in flash or external Speedlite p 101 ...

Page 75: ...the camera sets the proper exposure During manual focusing evaluative metering is based on the center AF point If the subject brightness and background light level are very different strong backlight or spotlight partial metering is recommended instead Partial Metering This mode is effective when the background is much brighter than the subject due to backlighting etc The metering is weighted at t...

Page 76: ...above figures will apply regardless of the C Fn 08 setting Figures for the continuous shooting speed and maximum burst are based on Canon s standard testing conditions 1 250 sec and faster shutter speeds and ISO 100 Press the button 1 Select the drive mode While looking at the LCD panel turn the dial to set the desired drive mode Single frame Continuous Self timer To return to shooting press the s...

Page 77: ...nuous shooting The maximum burst number will not be displayed when there is no CF card in the camera If you press the shutter button halfway before all the images in the internal memory are transferred to the CF card while the access lamp blinks the image transfer to the CF card will stop temporarily If is displayed in the viewfinder and on the LCD panel wait until the access lamp turns off then r...

Page 78: ...ress the shutter button to start the self timer Doing so prevents the camera from focusing on the subject You can set the beep that indicates the subject is in focus and the beep that indicates the self timer is operating to On or Off p 140 When using the self timer to shoot only yourself lock the focus p 65 on an object at about the same distance as where you will be During self timer or remote c...

Page 79: ...of shooting styles Press the shutter button down halfway and release and a timer will show the exposure setting for approximately 4 seconds on the LCD panel and viewfinder Depth of field preview exposure compensation AEB AE lock and bulb exposures are possible only in Creative Zone modes The functions that can be set in Creative Zone modes are listed in the Function Availability Table p 163 79 6 C...

Page 80: ...r will light s The exposure setting will be displayed in the viewfinder and on the LCD panel If the focus confirmation light in the viewfinder blinks it means focus has not been achieved See When Autofocus Fails p 71 The number displayed to the left of the focus confirmation light indicates the maxi mum burst for continuous shooting When the CF card is almost full and only nine or fewer shots can ...

Page 81: ...ing the program To do this press the shutter button down halfway then turn the dial until the shutter speed or aperture value you want is displayed Program shift is canceled automatically after the image is captured If you are using a flash you cannot shift the program AF mode selection AF point selection Drive mode selection Metering mode selection Program shift Exposure compensation AEB AE lock ...

Page 82: ...slow shutter speed can blur the subject to give the impression of motion stands for time value Set the Mode Dial to 1 Turn the dial to set the desired shutter speed 2 Focus on the subject Press the shutter button down halfway s The aperture value is determined automatically 3 Check the display then shoot If the aperture value is not blinking the exposure is correct Compose the shot then press the ...

Page 83: ...lower shutter speed until the aperture display stops blinking If the lens minimum aperture highest f number like f 22 blinks it indicates overexpo sure Turn the dial to set a faster shutter speed until the aperture display stops blinking Exposure Warnings C Fn 16 1 enables the safety shift feature p 151 In the shutter priority AE mode if a correct exposure cannot be obtained with any aperture set ...

Page 84: ...rture higher f number the clearer the focus will be for both near and far objects wider depth of field is an abbreviation for Aperture value Set the Mode Dial to 1 Turn the dial to set the desired aperture 2 Focus on the subject Press the shutter button down halfway s The shutter speed is determined automatically 3 Check the display then shoot If the shutter speed is not blinking the exposure is c...

Page 85: ...shift feature p 151 If a correct exposure cannot be obtained in the aperture priority AE mode with any shutter speed set by the camera the camera automatically sets a larger or smaller aperture This feature is called safety shift With C Fn 06 1 you can also set the camera so that you can set the aperture value in 1 3 stop increments p 147 With C Fn 03 1 you can fix the shutter speed at 1 200 secon...

Page 86: ...l exposure stands for manual Turn the dial to set the desired shutter speed 2 Set the aperture Turn the switch to then turn the dial to set the desired aperture 3 Focus on the subject Press the shutter button down halfway s The exposure level indicator appears in the viewfinder and on the LCD panel The exposure level icon lets you see how far you are from the standard exposure level 4 Set the Mode...

Page 87: ...press the shutter button down fully 6 This is the reference point for a standard exposure To set it to the standard exposure level set a slower shutter speed or a larger aperture smaller f number To set it to the standard exposure level set a faster shutter speed or a smaller aperture larger f number Exposure level mark With C Fn 06 1 you can set the camera so that you can set the shutter speed or...

Page 88: ...he exposure setting is not blinking a proper exposure will be obtained Compose the shot and press the shutter button fully In the sample image shown in step 2 all three people will be in sharp focus even though they are at different distances from the camera 3 The mode cannot be used if the lens focus mode switch is set to MF or M on older lenses If the aperture value blinks it indicates that the ...

Page 89: ... Dial to any Creative Zone mode except 1 Focus the subject and check the expo sure level Press the shutter button halfway and check the exposure level indicator 2 3 The exposure compensation amount will remain in effect even after you turn the switch to If the standard exposure setting is 1 125 sec and f 5 6 setting the exposure compen sation amount to plus or minus one stop will be the same as se...

Page 90: ...pear Press the button to exit the menu and turn off the LCD monitor s The and AEB level will appear on the LCD panel 2 On the menu select AEB Press the button Turn the dial to select AEB then press 1 AEB range Shoot s The three bracketed shots will be exposed in the following sequence standard exposure decreased exposure and increased exposure s The respective bracketing amount will be displayed a...

Page 91: ...matically if you turn the switch to change lenses have flash ready replace the battery or replace the CF card Neither flash nor bulb exposures can be used in AEB mode If you set mirror lockup with C Fn 12 1 p 149 and then use AEB single frame shooting takes effect even if the drive mode is set to continuous shooting If the drive mode is single frame press the shutter button for each bracketed shot...

Page 92: ...inder 1 Press the button s The icon will light in the viewfinder to indicate that the exposure setting has been locked AE lock Aim the center of the viewfinder over the subject where the exposure is to be locked then press the button Each time you press the button it locks the current exposure setting 2 Compose the shot and shoot Press the shutter button fully 3 If One Shot AF and evaluative meter...

Page 93: ...esired aperture 3 Shoot Press and hold the shutter button down fully s The LCD panel will show the elapsed exposure time from 1 sec to a maximum of 999 sec Exposure continues as long as you hold down the shutter button 4 Since bulb exposures will have more noise than usual the image will look rough or grainy With a fully charged battery a single bulb exposure can be as long as about 2 5 hours By c...

Page 94: ...turn off 2 seconds after shooting If you take a bulb exposure while the panel is illuminated the illumination will turn off immediately The illumination will remain on if you press any button for shooting or the Mode dial In very bright light such as at the beach or ski ground on a sunny day shoot promptly after mirror lockup During mirror lockup do not point the camera lens at the sun The sun s h...

Page 95: ... metering in memory using either the camera s built in flash or any EOS dedicated EX series Speedlite The procedure is as easy as a normal AE shot This chapter explains how to take flash shots with the built in flash and EOS dedicated Speedlite 550EX For details on Speedlite 550EX see the 550EX Instructions booklet 7 95 First set the switch to If necessary also set the switch to ...

Page 96: ...ash exposure compensation This function corrects the flash level in much the same way as the Exposure compensation function The level of compensation can be up to 2 stops in 1 2 stop increments Using the Built in Flash in the Basic Zone In the Basic Zone modes except the built in flash pops up and fires automatically in low light and backlit conditions The following procedure applies to the Full A...

Page 97: ...r speed always use a tripod Select mode to set the shutter speed and the aperture value manually The main subject is exposed properly by the flash The background exposure varies according to the shutter speed and aperture settings The effect is the same as using flash in mode Built in Flash Range ISO Speed Wide angle 24 mm Telephoto 85 mm 100 Approx 1 3 7 m 3 3 12 1 ft Approx 1 2 9 m 3 3 9 5 ft 20...

Page 98: ... flash coverage When a super telephoto lens or fast large aperture lens is attached the built in flash coverage might be obstructed The built in flash s coverage is effective with lens focal lengths as short as 18mm Lens focal lengths shorter than 18mm will result in flash shot having a dark periphery and will be displayed in the viewfinder while the built in flash is being charged E TTL is an abb...

Page 99: ... Flash Using Red eye Reduction When flash is used in a low light environment the subject s eyes may come out red in the image Red eye happens when the light from the flash reflects off the retina of the eyes The camera s red eye reduction feature turns on the red eye reduction lamp to shine a gentle light into the subject s eyes to narrow the pupil diameter or iris A smaller pupil reduces the chan...

Page 100: ...us on the subject you want to lock the flash exposure on 2 Press the button Aim the partial metering circle over the subject where you want to lock the flash exposure then press the button s The Speedlite fires a preflash and records the required flash output for this subject in memory s The icon lights in the viewfinder s The center AF point will flash in red s In the viewfinder the display appea...

Page 101: ...ain in effect even after you turn the switch to In step 2 turning the dial sets the metering mode p 74 With C Fn 06 1 you can set the camera to adjust exposure compensation in 1 3 stop increments p 147 With C Fn 14 1 you can also disable the Auto reduction of fill flash function p 150 Flash Exposure Compensation Flash exposure compensation can be set in the same way as with exposure compensation I...

Page 102: ... FP Flash High speed sync FP or focal plane flash enables flash synchronization with all shutter speeds from 30 sec to 1 4000 sec FE Flash Exposure Lock FE lock obtains and locks the correct flash exposure for any part of the subject This is the flash exposure lock equivalent of AE lock Flash exposure compensation Like normal exposure compensation flash exposure compensation can be used to set the...

Page 103: ...n normal shooting without flash Mode Shutter speed setting Aperture flash aperture setting Shutter priority AE Manual 30 to 1 200 sec Auto Aperture priority AE Auto 30 to 1 200 sec Manual Manual exposure Manual 30 to 1 200 sec Manual If is set in low light conditions a slow shutter speed will be set Therefore use a tripod to prevent camera shake 2 When you press the shutter button fully the image ...

Page 104: ...ce a catchlight in the subject s eyes When you want to use fill flash to eliminate shadows Normal flash FP flash FEB Flash Exposure Bracketing With the Canon Speedlite 550EX three successive flash shots can be bracketed automatically up to 3 stops in 1 2 stop increments The flash output is changed for the three shots while the background exposure remains the same Standard exposure 0 Decreased expo...

Page 105: ... exposure compensation setting will override the camera s Modeling Flash Modeling flash allows you to see shadows light balance and other effects produced by multi flash settings Check that the camera and Speedlite are properly set for flash shot 1 Press the camera s depth of field pre view button The 550EX will fire a series of flashes for 1 sec at 70 Hz 2 Wireless Multi Flash E TTL Autoflash Sho...

Page 106: ... may result Some large studio flash units have a sync cord polarity that is the opposite of the EOS 10D s PC terminal Such flash units will not work with the EOS 10D unless you change the polarity of the sync cord Consult the manufacturer of the flash unit or purchase a commercially available polarity conversion cord The camera s PC terminal polarity is shown in the figure on the right Do not use ...

Page 107: ...ges and how to connect the camera to a TV monitor When attempting to playback images not taken with the camera The camera might not be able to properly display images captured with a different camera or edited with a personal computer for image processing or changing the file name 107 8 ...

Page 108: ...s The last captured image will appear on the LCD monitor 1 View another image Turn the dial counterclockwise to view the preceding older image Turn the dial clockwise to view the next newer image To quit the playback press the button The LCD monitor will turn off 2 If you leave the camera in the playback mode the playback mode will quit automatically after the auto power off time elapses p 142 Sin...

Page 109: ...tness level From left to right on the horizontal axis the brightness goes from dark to bright The more pixels there are toward the left the darker the image The more pixels there are toward the right the brighter the image If there are too many pixels on either side you can set exposure compensa tion p 89 to take the shot again so that the exposure is more accurate Highlight Alert When shooting in...

Page 110: ...ial counterclockwise to select the preceding older image Turn the dial clockwise to select the next newer image 3 From the index display switch to any other display mode To display a single image press the button To display the image with shooting information press the button Pressing the button switches to the single image displaay and pressing it again switches to magnified view p 111 4 While th...

Page 111: ...ion until it reaches the size in step 1 2 Scroll around Turn the dial to scroll the magnified portion horizontally over the image To scroll vertically press the button then turn the dial The button toggles between horizontal and vertical scrolling The scroll direction is indicated by the or arrows displayed on the LCD monitor To magnify a different portion of the image repeat steps 2 and 3 To quit...

Page 112: ...mation and magnified display Turn the dial counterclockwise to jump ten images backward or turn it clockwise to jump ten images forward During the magnified view the magnified position and magnification will be maintained during the image jump During index display Turn the dial counterclockwise to jump nine images backward or turn it clockwise to jump nine images forward To quit the image jump pre...

Page 113: ...lay 1 Start the auto play Press s After the images load for 2 sec auto play will start To pause the auto play press During pause will be displayed on the upper left of the image Press again to resume the auto play To quit the auto play press the button 2 During auto play pause you can turn the dial to display another image During auto play auto power off will not work 142 After you finish viewing ...

Page 114: ... by 90 270 and 0 To rotate another image repeat step 2 To quit the image rotation press the button The menu will reappear 2 If the shot was taken vertically with the camera grip pointing downward or upward rotate the image by 90 or 270 respectively to display it upright If you have set Auto rotate to On p 61 on the menu before taking vertical shots you need not rotate the image as above Image rota...

Page 115: ...reen While looking at the TV monitor you can view images and set the menu settings as you can with the LCD monitor When you finish set the switch to turn the TV off then disconnect the video cable 5 Using AC Adapter Kit ACK E2 optional is recommended p 174 Images and menus do not appear on the LCD monitor while the video cable is connected to the camera You can also switch the TV video signal to P...

Page 116: ... cancel the image protection press again The icon will disappear To protect another image repeat step 2 To quit the image protection press the button The menu will reappear 2 Once an image is protected it cannot be removed by the camera s Erase function To erase a protected image you must first remove the protection If you protect the images you need and erase all the images at once p 118 all non ...

Page 117: ...So be careful when erasing an image To prevent important images from being erased accidentally protect it Erasing a Single Image Set the camera for playback Press the button s The last captured image will appear on the LCD monitor 1 Select the image to be erased Turn the dial to select the image to be erased 2 3 Erase the image Turn the dial to select Erase then press s The access lamp will blink ...

Page 118: ...rase the images Turn the dial to select OK then press s All unprotected images will be erased Press to cancel erasure during image erasing 4 If you protect the images you need Æp 116 and erase all the images at once all non protected images will be erased This is handy when you want to erase all the images you do not need at once Images can be erased during image with shooting information display ...

Page 119: ...rmatting is completed the menu will reappear 2 A non Canon CF card or a CF card formatted with another camera or personal computer might not work with the EOS 10D camera In such a case format the CF card with the camera first Then it might work with the camera If you insert the CF card and the CF card error message appears use a utility program such as Scan Disk to diagnose and fix the CF card If ...

Page 120: ...120 ...

Page 121: ...rom the Camera By using the dedicated cable to connect the camera to a card photo printer or Canon BJ printer compatible with direct printing you can easily print images directly from the camera All direct printing operations can be done with the camera 9 121 ...

Page 122: ...directly from the camera For instructions on how to install the ink cassette ink tank and paper into the printer refer to the printer s manual For direct printing using AC Adapter Kit ACK E2 optional to power the camera is recommended p 174 If a battery pack will be used to power the camera be sure to fully recharge it first While printing monitor the battery level Connecting to a Card Photo Print...

Page 123: ...e s plug and connect the camera and printer When connecting the cable plug to the camera s terminal the cable plug s icon must face the front side of the camera 3 Turn the camera s switch to then press the button s An image in the CF card will be displayed 4 Turn on the printer Press the printer s main switch to turn it on s The icon will appear on the upper left on the camera s LCD monitor In the...

Page 124: ...anel 3 To disconnect the cable from the camera and printer follow the procedure below 1 Turn off the camera 2 Disconnect the cable from the printer 3 Disconnect the cable from the camera When you disconnect the camera from the printer the icon or icon will disappear from the camera s LCD monitor and the camera will return to normal playback Even while the camera is connected to the printer you can...

Page 125: ...s With a card photo printer On the upper right of the screen you can check the print style settings And on the upper left you can check the printing area If the printing paper does not match the printing settings single or multiple images go to the Style p 127 and Image menu to select the proper setting Standard or Multiple If the printing settings are okay go to step 4 With a BJ printer Be sure t...

Page 126: ...sume or Stop will be displayed The error number will be displayed on the BJ printer s operation panel Refer to the BJ printer s manual to see the error number description and resolve the error When the error is resolved the BJ printer will resume printing automatically images cannot be printed directly Images taken with Adobe RGB set as the color space will have low color saturation when printed d...

Page 127: ...redit card size paper is used for printing With a BJ printer Image Display Borders Date Imprint Single image Multiple images Borderless Bordered Off On A single image will be printed on the paper Eight images of the same shot will be printed on the paper The image will be printed on the entire paper without borders The print will have borders The print will not have a date imprinted The date recor...

Page 128: ...style setting Turn the dial to select the desired setting then press 3 Exit the style setting screen Press the button s The style setting screen will quit and the direct printing screen will appear On the upper right of the screen you can check the print style settings And on the upper left you can check the printing area 4 Printing area Printing style settings Image Borders Date Paper Borders Dat...

Page 129: ...ess s The Trimming screen will appear 1 Trim the image The operation icons in the image area will disap pear while you trim the image They will reappear after 5 sec of non operation Changing the trimming frame size Press the or button to change the size of the trimming frame The trimming frame s horizontal dimension can be adjusted to one of eight sizes and the vertical dimension can be adjusted t...

Page 130: ...image 3 The shape of the trimming frame is determined by the Image and Borders settings When a BJ printer is connected to the camera the color of the trimming frame will not change regardless of the trimming frame size magnification If you have set Trimming and then change the Style Image Borders the Readjust trimming message will appear on the LCD monitor Set Trimming again or reset the Style set...

Page 131: ...ital Print Order Format is a standard used to record on the CF card or other recording media the image number number of prints etc of images taken by digital cameras By fitting a CF card into a printer compatible with DPOF you can make prints as specified You will not need to fill out the desired numbers and quantities of prints when ordering prints from a printing lab Printers capable of direct p...

Page 132: ...inting with DPOF compatible printers note the following Images in the format cannot be printed Movies and TIFF images captured with other cameras also cannot be printed If DPOF was set with a different camera and the CF card is inserted in your EOS 10D camera the icon may appear on the LCD monitor If you then set DPOF settings the previous DPOF settings will be completely overwritten DPOF settings...

Page 133: ... Select the image to be printed Turn the dial to select the image then press s If Standard or Both has been set for Print Type p 135 the quantity displayed on the upper left will be 1 s If Index has been set for Print Type p 135 a checkmark will appear in the upper left box If Index has been set pressing will turn off the checkmark and the selection will be canceled To display three images on the ...

Page 134: ...press s The print order screen will appear 1 Select All Turn the dial to select All then press s The All screen will appear 2 Select Mark all Turn the dial to select Mark all then press s One print each will be specified for all the images then the print order screen will reappear If you select Clear all all the images selected for printing will be deselected If you select Cancel the print order s...

Page 135: ...ect the set up option Turn the dial to select Print Type Date or File No then press 3 The Set up options are as follows Print Type Standard Index Both Date Off On Off On The print will not have a date imprinted The date recorded for the image will be imprinted The file No is not imprinted on the print The file No is also imprinted on the print Prints one image on the paper The images are made smal...

Page 136: ... set to Index the Date and File No cannot both be set to On at the same time If Print Type has been set to Both the Date and File No can both be set to On at the same time However the index print will only have the File No imprinted Set the set up option Turn the dial to select the desired setting then press 4 Print Type Select Standard Index or Both Date Select On or Off File No Select On or Off ...

Page 137: ...ptions have not been set Print will not be selectable 3 Set the printing style For details see Setting the Printing Style p 127 With a card photo printer Check the printing style settings displayed on the upper right If the settings are okay go to step 5 With a BJ printer Be sure to set Style p 127 to the proper Paper setting 4 Start printing Check the printing options displayed on the upper left ...

Page 138: ...t up and set Date to On In step 4 the Style screen s Date option cannot be set However if the Print Type is Index the date will not be imprinted even if Date is set to On If Print Type has been set to Both the Date and File No can both be set to On at the same time However the standard printing will only have Date and the index print will only have the File No imprinted A BJ printer does not impri...

Page 139: ...ly settings for shooting are called Custom Functions C Fn The mark you see in this Instructions gives just a brief descrip tion of the respective Custom Function This chapter explains the menu settings and Custom Functions in detail The menu setting procedure is described in Menu Opera tions on page 32 11 139 ...

Page 140: ... each shot The exposure can be varied up to 2 stops in 1 2 stop increments p 90 WB BKT White balance bracketing A single shot captures three images each having a different color temperature The white balance can be varied up to 3 stops in whole stop increments based on the standard color temperature of current white balance mode p 54 Custom WB Selects the reference image to be used for setting the...

Page 141: ... or Set 3 is selected the color space will be set to sRGB When Adobe RGB is selected the color space can be changed to Adobe RGB The parameters will then be set to the standard setting ISO expansion Enables on or disables off the option of setting H ISO 3200 when the ISO speed is set as described in Setting the ISO Speed p 49 Protect Prevents the protected image from being erased acciden tally p 1...

Page 142: ...Off Sets the time period after which the power turns off automatically if the camera is not used This saves battery power It can be set to 1 min 2 min 4 min 8 min 15 min 30 min or Off Review Enables or disables the image from displaying on the LCD monitor immediately after capture Settable to Off On or On Info p 42 The display time is set with Review time Review time If Review has been set to On o...

Page 143: ...yback p 61 LCD Brightness Sets the LCD monitor s brightness level Turn the dial to set it to one of five brightness levels Date Time Sets the date and time Also sets the display format of the date and time p 154 File numbering Sets the automatic file numbering of the captured images Settable to Continuous or Auto reset p 59 Language Sets the menu s interface language Settable to English Italiano I...

Page 144: ...unctions Resets all the Custom Function settings to 0 p 152 Sensor clean For cleaning any dust etc from the image sensor s surface p 156 Firmware Ver x x x Displays the camera s firmware version Information on new firmware and firmware updates are provided at Canon s Web site Setup Menu Format Initializes the CF card loaded in the camera p 119 Video system Sets the video format for the video outpu...

Page 145: ...then press the button 1 Select the Custom Function No Turn the dial to select the desired Custom Function No then press 2 Change the setting Turn the dial to select the desired setting number then press Repeat steps 2 and 3 above to set any other Custom Functions The current Custom Function settings are displayed at the bottom of the screen 3 Exit Press the button to return to the main menu Press ...

Page 146: ...he same function as the button C Fn 02 Shutter release w o CF card 0 Possible without CF card 1 Not possible The shutter release will not work if there is no CF card in the camera so it prevents you from forgetting to load a CF card If there is no CF card and you press the shutter button will blink on the LCD panel and in the viewfinder C Fn 03 Flash sync speed in Av mode 0 Auto 1 1 200sec fixed F...

Page 147: ...et both of these Custom Functions and you execute both Custom Function operations the latter operation will not work The only exception is when AF stop is executed after AF start C Fn 05 AF assist beam Flash firing Sets the AF assist to be emitted by the camera or external Speedlite and sets the flash to be fired by the built in flash or external Speedlite 0 Emits Fires Enables the AF assist beam ...

Page 148: ...eously and embedded in the RAW image file 0 RAW Small 1 RAW Small 2 RAW Medium 3 RAW Medium 4 RAW Large 5 RAW Large The dedicated software is required to extract the JPEG image in the RAW image file C Fn 09 Bracket sequence Auto cancel Sets the shooting sequence for AEB and white balance bracket ing WB BKT If Auto cancel is set the bracketing will be canceled in the following cases AEB Canceled if...

Page 149: ...n it achieves focus When the AF point is selected it will still flash in red C Fn 11 Menu button display position Sets the menu item to be displayed when the button is pressed 0 Previous top if powered off menu Displays the preceding menu item that was set However if the switch is set to or if the battery pack or the CF card is replaced the top menu item Quality will be displayed 1 Previous menu D...

Page 150: ... selection sequence is shown on the left 4 FE lock The button sets FE lock When C Fn 04 1 2 3 p 146 is set FE lock will be enabled In this case the button does not set FE lock C Fn 14 Auto reduction of fill flash 0 Enable Obtains natural looking daylight flash shots automatically 1 Disable Prevents underexposure of a personnel subject set against a bright background such as a sunset C Fn 15 Shutte...

Page 151: ...ode holding down the button switches to automatic AF point selection Holding down the button switches from manual AF point selection to automatic AF point selection immediately Convenient when you are no longer able to focus track a moving subject with a manually selected AF point in the AI Servo AF mode In the automatic AF point selection mode holding down the button selects the center AF point 4...

Page 152: ...urn the dial to select Clear settings and press 1 Select Clear all Custom Functions Turn the dial to select Clear all Custom Functions and press 2 Clear all the Custom Function settings Turn the dial to select OK then press s All the Custom Function settings will be cleared Press the button to exit the menu and turn off the LCD monitor 3 ...

Page 153: ...153 Maintenance 12 12 Maintenance This chapter explains how to set the camera s date and time re place the date time battery and clean the image sensor 153 12 ...

Page 154: ...e item then press The selection will then shift to the next item 2 Set the date display format Turn the dial to select one of the following display formats Year month day Month day year Day month year 3 Press the button s The date and time will be set and the menu will reappear Press the button to turn off the LCD monitor and exit the menu 4 Each captured image is recorded with the date and time i...

Page 155: ...battery pack or DC coupler is attached to the camera the camera s date and time and menu functions will be maintained while you replace the battery Set the switch to 1 Remove the date time battery cover Use a coin to turn the cover by 45 degrees as shown by the arrow Do not turn the cover by more than 45 degrees 2 Remove the old battery Point the battery compartment downward and push in the edge o...

Page 156: ...ufficient Before cleaning the image sensor detach the lens from the camera Insert the DC coupler p 26 or a battery into the battery compartment and set the switch to 1 On the menu select Sensor clean Press the button Turn the dial to select Sensor clean then press s If you are using a battery having enough power the screen shown in step 3 will appear If the battery is exhausted a warning message w...

Page 157: ...not turn the switch to OFF Do not open the CF card slot cover Do not remove the battery Do not insert the blower tip inside the camera beyond the lens mount If the power goes out shutter will close and the shutter curtains and image sensor may be damaged Do not use a blower brush The brush can scratch the CMOS sensor Never use cleaning sprays or blower sprays The pressure and freezing action of th...

Page 158: ...158 ...

Page 159: ...159 Reference 13 13 Reference This section will help you understand your camera better It covers basic shooting concepts camera specifications system accesso ries and other reference information 159 13 ...

Page 160: ...mage processing with a personal computer The image quality is not affected when the raw image is compressed saved or decom pressed By using the dedicated software for image processing the image can be optimally enhanced for the specified purpose sRGB Color matching standard jointly developed by Microsoft and Hewlett Packard Cameras monitors applications and printers which comply with this standard...

Page 161: ...ard to store data in it It also erases any data stored on the card Before formatting a CF card be sure it has no valuable data File numbers and folders The captured images are automatically assigned a file number from 0001 to 9999 and stored in a folder that can contain up to 100 images The folders are numbered from 100 to 999 and stored in the CF card The file name of JPEG images will be IMG_ app...

Page 162: ...lens with a shorter focal length increases the depth of field A wide angle lens obtains a deeper depth of field than a telephoto lens 3 A longer distance between the camera and subject increases the depth of field 4 The depth of field behind the point of optimum focus 2 is longer than the depth of field in front of the point of optimum focus 1 Exposure Exposure occurs when the image sensor is expo...

Page 163: ... AF AI Servo AF AI Focus AF Single frame An image cannot be taken unless focus is achieved When focus is achieved it is locked With evaluative metering the exposure setting is also locked The exposure setting is stored in memory before the shot is taken The above conditions apply during continuous shooting approx 3 fps to a max burst of 9 images Autofocus tracks the moving subject and the exposure...

Page 164: ...ocal length 1 Increase the ISO speed 2 Use a flash the result will be the same as using Program AE 1 Decrease the ISO speed 2 Attach a neutral density filter to the lens The subject is too dark The subject is too bright The shot will be underexposed The shot will be overexposed The shot will be underexposed The shot will be overexposed The desired depth of field cannot be obtained The subject is t...

Page 165: ...omatically determined by Program AE are shown as colored lines with respect to the subject brightness Exposure Value gradations on the left and top edges of the graph Example Using an EF50 f 1 4 USM lens with a subject brightness of EV11 5 the point where the diagonal line from EV11 5 on the top edge intersects the Program AE line represents the corresponding shutter speed 1 250 second and apertur...

Page 166: ...ion is 0 3 seconds and is 15 seconds Aperture value readout The aperture value is normally displayed in 1 2 stop increments The larger the number the smaller the aperture opening The range of aperture values f numbers displayed depends on the lens used C Fn 06 1 the shutter speed and aperture value can be set in 1 3 stop increments p 122 1 2 stop increments Shutter speed Aperture value Shutter spe...

Page 167: ... was captured by another camera captured in a different format or edited with a personal computer Cannot rotate The image is not displayable because it was captured in an unknown format recording format of another camera manufacturer etc Unidentified Image The image cannot be erased because it is erase protected To delete the image first disable the erase protection Protected Printing of a non JPE...

Page 168: ...ect printing is connected to the camera the camera s LCD monitor may display any of the messages below No paper The paper cassette has not been inserted properly or there is no paper in the cassette Or there is a problem with the paper feed operation Description Message No ink There is no ink cassette or the ink cassette has no ink Incompatible paper size The wrong size paper has been loaded in th...

Page 169: ... the error description No paper The paper has not been inserted properly or there is no paper Or there is a problem with the paper feed operation Description Message No ink There is no ink tank or the ink tank has no ink Paper jam The paper jammed during printing Printer in use Printing from the personal computer or the memory card in the printer is in progress When the printing ends the images in...

Page 170: ...in Readjust trimming The style does not match the trimming that was set Cannot print The image was captured by another camera or in an incompatible format Or the image has been edited with a personal computer Could not print images The image was captured by another camera or it has been edited with a personal computer and printing was attempted according to the DPOF setting for prints images remai...

Page 171: ...n error occurs after you shoot the camera might have missed the shot Press the button to see if the image appears on the LCD monitor Error code Countermeasures Clean the lens contacts p 11 There is a problem with the CF card Do one of the following Remove and reload the CF card format the CF card or use another CF card The CF card is full Delete unnecessary images or replace the CF card Something ...

Page 172: ...mpartment cover is not closed s Close the battery compartment cover tightly p 24 CF card slot cover is not closed s Load the CF card firmly until the CF card eject button pops out then close the CF card slot cover tightly p 28 The access lamp still blinks even when the switch is set to If you set the switch to OFF right after shooting the access lamp will still blink for a few seconds while the im...

Page 173: ...ter button s To prevent camera shake hold the camera still and press the shutter button gently p 30 36 The data in the CF card is damaged s Format the CF card p 119 s Use the correct CF card p 6 175 The image cannot be erased The image is protected s Cancel the protection first p 116 The date and time is wrong The correct date and time has not been set s Set the correct date and time p 154 No imag...

Page 174: ...he DC coupler is inserted into the camera s battery compartment Shoe mount Speedlites Flash shot with an EX series Speedlite is as easy as normal auto exposure shooting without flash All EX series Speedlites enable E TTL autoflash high speed sync FP flash and FE lock With the 550EX an easy to use wireless E TTL autoflash system is possible with multiple Speedlites Compact Power Adapter CA PS400 Qu...

Page 175: ...the shutter button down halfway or completely Also includes shutter release lock and a one touch locking plug for connecting to the EOS 10D s remote control terminal Timer Remote Controller TC 80N3 The remote controller attaches with an 80 cm 2 6 ft cord and includes built in 1 self timer 2 interval timer 3 long exposure timer and 4 shutter release count setting function You can set the time from ...

Page 176: ...ubber Frame Eb Angle Finder C Eyepiece Extender EP EX15 E series Dioptric Adjustment Lenses Eyecup Eb Neck Strap EW 100DB Battery Charger CB 5L Battery Grip BG ED3 Battery Pack BP 511 AC Adapter AC E2 DC Coupler DR 400 Date time CR2025 lithium battery EF lenses Remote Switch RS 80N3 Timer Remote Controller TC 80N3 Wireless Controller LC 4 ...

Page 177: ...ter for direct printing Card Photo Printer Interface cable IFC 300PCU EOS DIGITAL Solution Disk Adobe Photoshop Elements Disk PC AT compatible computer Macintosh computer CF card Card reader PC card adapter USB port PC card slot USB port Parallel port PC card slot ...

Page 178: ...dium Fine Approx 1 3 MB 2048x1360 pixels 4 Medium Normal Approx 0 7 MB 2048x1360 pixels 5 Small Fine Approx 0 8 MB 1536x1024 pixels 6 Small Normal Approx 0 4 MB 1536x1024 pixels 7 RAW 3072x2048 pixels RAW Small Normal Approx 6 0 MB RAW Small Fine Approx 6 4 MB RAW Medium Normal Approx 6 2 MB RAW Medium Fine Approx 6 8 MB RAW Large Normal Approx 6 7 MB RAW Large Fine Approx 8 0 MB Exact file sizes ...

Page 179: ...ervo AF AI Focus AF Manual focusing MF AF point selection Automatic selection manual selection home position Active AF point indicator Superimposed in viewfinder and indicated on LCD panel AF assist beam Stroboscopic flash Effective range Approx 4 0m 13 1ft at center approx 3 5m 11 5ft off center Exposure Control Metering system TTL full aperture metering with 35 zone SPC Evaluative metering linka...

Page 180: ...at 1 250 sec or faster speeds Max burst during continuous shooting 9 shots LCD Monitor Type TFT color liquid crystal monitor Screen size 1 8 inches Pixels Approx 118 000 Image coverage Approx 100 with respect to the effective pixels Brightness control 5 levels Playback Image display format Single image single image Info magnified view approx 1 5x 10x in 15 steps consecutive magnified image viewing...

Page 181: ...CR2025 lithium battery Dimensions and Weight Dimensions W x H x D 149 7 x 10⁷ 5 x 75 0 mm 5 9 x 4 2 x 3 0 in Weight 790 g 27 9 oz body only Operating Environment Operating temperature range 0 40 C 32 104 F Operating humidity range 85 or lower Battery Charger CB 5L Compatible batteries Battery Pack BP 511 BP 512 Battery mount 1 Power cord length Approx 1 8 m 5 9 ft Recharging time Approx 90 min Rat...

Page 182: ...n Rate 47 Continuous Numbering 59 Continuous shooting 76 Creative zone 18 Custom Functions 146 Custom White Balance 52 D Date Time 154 DC coupler 19 26 Default Settings 34 35 Depth of field Preview 85 162 Dioptric Adjustment 36 Direct Printing 121 137 DPOF 131 Drive Mode 76 E E TTL autoflash 95 Equipment Check List 3 Erasing 117 Erasing All Images 118 Erasing a Single Image 117 Error Codes 171 Eva...

Page 183: ...AL 115 144 Parameters 56 Partial Metering 75 PC Terminal 106 Portrait 40 Print Order 131 Printing Options 135 Printing Style 127 Print Type 135 Processing 47 Program AE 80 Program Line 165 Protection 116 Q Quantity 127 Quick Control Dial 20 31 R RAW 46 160 RAW JPEG 48 Recharging the Battery 22 24 174 Red eye Effect 160 Red eye Reduction 99 Registering an AF Point 69 Replacing the Battery 155 Rotat...

Page 184: ...nofiori Milano Italy CANON Schweiz AG Geschäftsbereich Wiederverkauf Industriestrasse 12 CH 8305 Dietlikon Switzerland CANON G m b H Oberlaaerstrasse 233 4th floor 1100 Wien Austria CANON España S A C Joaquín Costa 41 28002 Madrid Spain SEQUE Soc Nac de Equip Lda Praça da Alegria 58 2 1269 149 Lisboa Portugal CENTRAL CANON LATIN AMERICA INC DEPTO DE VENTAS SOUTH AMERICA 703 Waterford Way Suite 400...

Reviews: