background image

64 • 

Additional Information

FUNC. Menu (cont.)

1

 Option available only when the mode switch is set to 

.

2

 Option available only in the original index screen with DVD-RW discs in VR mode.

3

 Option available only in the playlist index screen with DVD-RW discs in VR mode.

4

 Option available only in the index screen with DVD-RW discs in VR mode.

5

 Option available only during playback.

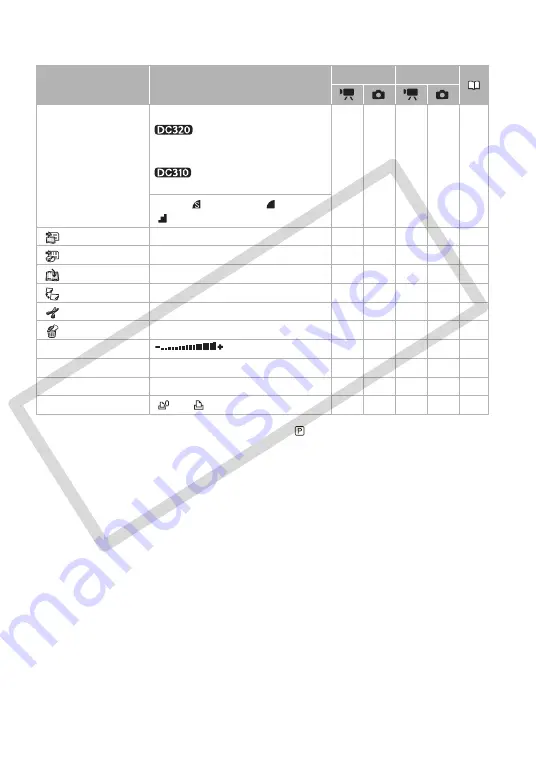
Menu item

Setting options

CAMERA

PLAY

Still image size/quality

Size:

[LW 1152x648],

 [L 1152x864]

[S 640x480]

[L 1024x768]

, [S 640x480]

z

52

Quality: [

SUPER FINE], 

[

FINE]

[

NORMAL]

[

 TO PLAYLIST]

2

z

46

[

 TO ORIGINAL]

3

z

46

[

 ADD TO PLAYLIST]

2

[ALL SCENES], [ONE SCENE], [CANCEL]

z

45

[

 MOVE]

3

z

46

[

 DIVIDE]

3

z

46

[

 DELETE]

4

[NO], [YES]

z

36

[SPEAKER VOL.]

5

z

35

[SLIDESHOW]

z

54

[PROTECT]

z

58

[PRINT ORDER]

[

0] - [

99] COPIES

z

60

CO

PY

Summary of Contents for DC310

Page 1: ...ADA INC MONTREAL 5990 C te de Liesse Quebec H4T 1V7 If you have any questions call the Canon Canada Information Center toll free at 1 800 828 4040 CANADA only Si vous avez des questions veuillez t l p...

Page 2: ...ouraged to try to correct the interference by one or more of the following measures Reorient or relocate the receiving antenna Increase the separation between the equipment and receiver Connect the eq...

Page 3: ...tion to overturn 10 Power Sources The CA 570 Compact Power Adapter should be operated only from the type of power source indicated on the marking label If you are not sure of the type of power supply...

Page 4: ...ation instructions Improper adjustment of other controls may result in damage and will often require extensive work by a qualified technician to restore the product to its normal operation e If the pr...

Page 5: ...on a DVD RW disc can be edited or deleted Also the disc can be initialized Initializing a DVD RW disc clears all the recordings and restores the free space on the disc to its initial value so you can...

Page 6: ...sidebar on page 49 However to be sure always refer to the instruction manual of the external device and make sure it is compatible before inserting the disc For the highest compatibility with external...

Page 7: ...oth layers Therefore and depending on the amount of free space on the disc this process may be lengthy 3 You will need to unfinalize the disc first Disc type DVD R DVD R DL DVD RW Disc specifications...

Page 8: ...the Camcorder 20 Power Switch 21 Operating Modes 21 Joystick and Joystick Guide 22 Using the Menus 24 First Time Settings 24 Setting the Date and Time 24 Changing the Language 25 Changing the Time Zo...

Page 9: ...7 Initializing the Disc 47 Disc Playback on an External Device 47 Changing the Disc Title 48 Finalizing the Disc 49 Disc Playback on External Devices 49 Unfinalizing the Disc Additional Recordings on...

Page 10: ...u Options Lists 63 FUNC Menu 63 Setup menus 65 Camera Setup Advanced Zoom Image Stabilizer etc 66 Disc Operations Initialization Finalization etc 67 Still Image Operations Card Initialization etc 67 D...

Page 11: ...finder screen Scene refers to one movie unit from the point you press to start recording until you press again to pause the recording The terms photo and still image are used interchangeably with the...

Page 12: ...t on file to help you refer to this information in the event of an insurance claim such as loss or theft Receive information on new products and promotions Upon your request we will send you informati...

Page 13: ...Guide Left side view Front view Right side view Lens cover switch 29 51 open closed AV terminal 61 CARD access indicator 51 Speaker switch 20 Lock button DISC access indicator 29 CHARGE indicator 18 M...

Page 14: ...stment lever 30 Viewfinder 30 QUICK START button and standby lamp 32 PLAY mode indicator green 21 CAMERA mode indicator red 21 OPEN disc cover switch 26 Start Stop button 29 DC IN terminal 19 Serial n...

Page 15: ...CD video light 40 Digital effects 44 Recording mode 31 Disc type DVD R DVD R DL DVD RW 5 Finalized disc mark 48 Manual focus 41 Image stabilizer 65 Disc operation Time code Playback time hours minutes...

Page 16: ...uality size 52 Manual focus 41 Number of still images available on the memory card Self timer 40 AF frame 57 Joystick guide 21 Focus exposure automatically set and locked 51 Camcorder shake warning 65...

Page 17: ...counts from 1 to 10 seconds when you start recording This is helpful to avoid scenes that are too short Number of still images available on the card displayed in red No card in green 6 or more images...

Page 18: ...on page 82 1 Turn off the camcorder 2 Attach the battery pack to the camcorder Press the battery pack lightly and slide it up until it clicks 3 Connect the power cord to the compact power adapter 4 P...

Page 19: ...his camcorder To prevent equipment breakdowns and excessive heating do not connect the supplied compact power adapter to voltage converters for overseas travels or special power sources such as those...

Page 20: ...n to turning the camcorder on and off the switch also toggles the camcorder s operating mode To turn on the camcorder Hold the lock button pressed down and turn the switch to ON To change the operatin...

Page 21: ...of this manual positions other than those relevant to the function explained are marked with a striped pattern Operating mode Operatingmode indicator switch Icon display Operation Red movies Recordin...

Page 22: ...The selected option will be highlighted in light blue Menu items not available will appear grayed out With some settings you will need to make further selections and or press Follow the additional op...

Page 23: ...n screen step 3 5 Select the desired option and press to save the setting 6 Press You can press to close the menu at any time Abbreviation of Menu Selections in this Manual In this manual the arrow is...

Page 24: ...e recharge the built in lithium battery 78 and set the time zone date and time again The date appears in a year month day format only in the first setup screen In subsequent screen displays the date a...

Page 25: ...the local time at your destination and press Refer to the changing date and time displayed on the screen To adjust for daylight saving time select the area name marked with a 4 Press to close the men...

Page 26: ...the normal and bright settings NOTES This setting does not affect the brightness of the recording Using the bright setting will shorten the effective usage time of the battery pack Inserting and Remov...

Page 27: ...ar when a new DVD RW disc is first inserted if the switch is set to movies If the disc is already initialized you can start recording movies once the record pause indicator appears Otherwise perform t...

Page 28: ...Insert the memory card straight all the way into the memory card slot 4 Close the cover Do not force the cover closed if the memory card is not correctly inserted First push the memory card once to r...

Page 29: ...re that the DISC access indicator is off 2 Turn off the camcorder 3 Close the lens cover and the LCD panel 4 Remove the disc IMPORTANT When recording movies try to get a calm stable picture Excessive...

Page 30: ...may take longer with a disc in VR mode than a disc in VIDEO mode The time between turning on the camcorder and being able to record The time between turning the switch to and the camcorder shutting o...

Page 31: ...peed Selecting the Zoom Type Options Default value MENU CAMERA SETUP ZOOM TYPE Desired option Recording mode Disc type DVD R DVD RW DVD R DL 20 min 36 min 30 min 54 min 60 min 108 min 21 FUNC 22 FUNC...

Page 32: ...When you press the camcorder enters the standby mode In standby mode the camcorder consumes only about half the power used when recording saving energy when you are using a battery pack Additionally...

Page 33: ...t the length of time until shut off with the STANDBY OFF setting 68 To restore the power if the camcorder shut off turn the switch toward MODE and release it or turn the camcorder off and then on agai...

Page 34: ...f after the scene was recorded you changed the operating mode turned off the camcorder or removed the disc Basic Playback Playing Back the Video 1 Move the switch to movies 2 Turn the switch to ON the...

Page 35: ...me The sound from the built in speaker will be muted when you close the LCD panel or while the STV 250N Stereo Video Cable is connected to the AV terminal If you turn down the volume completely the ic...

Page 36: ...C OPERATIONS DEL ALL MOVIES YES When you are deleting the playlist this menu option will be replaced by DEL PLAYLIST IMPORTANT Be careful when deleting original recordings Once deleted an original sce...

Page 37: ...recording The contents to be displayed can be selected with the DATA CODE setting 67 Additional Functions Special Scene Recording Programs Recording in a very bright ski resort or capturing the full...

Page 38: ...ys or in shaded places Check the image on the screen FIREWORKS To avoid camcorder shake we recommend using a tripod Make sure to use a tripod especially in mode as the shutter speed slows down PORTRAI...

Page 39: ...S Do not set the mode switch to during the actual recording of a scene the brightness of the picture may change abruptly SHUTTER PRIO AE When setting the shutter speed the number display will flash if...

Page 40: ...LIGHT OFF LCD LIGHT ON Press Using the viewfinder select LCD LIGHT OFF instead to turn the LCD video light off Closing the LCD panel will also turn the LCD video light off The LCD display turns entir...

Page 41: ...er focal distance or push it toward for a closer focal distance Pushing the joystick toward FOCUS again will return the camcorder to autofocus 4 Push the joystick toward NEXT to save the focus adjustm...

Page 42: ...tial brightness of the picture Pushing the joystick toward EXP again will cancel the exposure lock and return the camcorder to automatic exposure 4 Push the joystick toward NEXT to lock and save the e...

Page 43: ...better results in the following cases Changing lighting conditions Close ups Subjects in a single color sky sea or forest Under mercury lamps and certain types of fluorescent lights Image Effects You...

Page 44: ...dly push the joystick toward NEXT to display it 2 Push the joystick toward The icon of the selected effect turns green Push the joystick toward again to deactivate the fader effect Push the joystick t...

Page 45: ...After you add scenes to the playlist you can switch between the original scenes and the playlist Adding Scenes to the Playlist You can choose to add to the playlist all the original scenes at once or...

Page 46: ...the bottom of the screen Dividing Scenes You can divide scenes in order to leave only the best parts and later cut out the rest Remember that when you divide scenes in the playlist you do not affect...

Page 47: ...menu IMPORTANT Initializing the disc will permanently erase all recordings The lost original recordings cannot be recovered Disc Playback on an External Device Changing the Disc Title Before you final...

Page 48: ...s If the procedure was not completed correctly due to high temperature let the camcorder cool off before resuming operation Place the camcorder on a table or other stable surface before starting the p...

Page 49: ...mode can be played only on VR mode compatible DVD players Depending on your DVD device you may not be able to play the disc In order to play the disc on a computer you need to have DVD playback softw...

Page 50: ...the procedure Subjecting the camcorder even to slight impacts for example to place it on a table or to disconnect a cable after the unfinalization process started may result in permanent data loss Do...

Page 51: ...image is being recorded IMPORTANT Observe the following precautions while the card access display appears on screen and when the CARD access indicator is on or flashing Failing to do so may result in...

Page 52: ...indicates the approximate number of images that can be recorded with the current quality size setting NOTES When printing still images use the following guidelines as a reference for selecting the pr...

Page 53: ...rn the switch to ON then turn it toward MODE and release it to set the camcorder in PLAY mode The green PLAY indicator will turn on 3 Use the joystick to move between images Image Jump Function You ca...

Page 54: ...corder Do not change the position of the switch or the operating mode The following may not be displayed correctly Images not recorded with this camcorder Images edited on a computer Images whose file...

Page 55: ...age you want to see enlarged To cancel the magnification move the zoom lever toward W until the frame disappears Erasing Photos You can erase still images recorded on the memory card You can erase eit...

Page 56: ...frames per second will be lower when camcorder shake warning is displayed on the screen Number of frames shots per second Normal speed 3 frames High speed 5 frames Maximum number of continuous shots L...

Page 57: ...F autofocus frame to be used Options Default value Except for the FIREWORKS recording program MENU CAMERA SETUP FOCUS PRI Desired option NOTES In the FIREWORKS recording program the focus priority is...

Page 58: ...en displays on and off in the following sequence All displays on All displays off1 All displays on Regular displays only removes the histogram and information icons All displays off 1 However the mark...

Page 59: ...The original still images cannot be recovered INITIALIZE Clears the file allocation table but does not physically erase the stored data COMPL INIT Erases all data completely 21 FUNC 22 FUNC FUNC You c...

Page 60: ...rint orders by inserting the camcorder s memory card into a DPOF compatible printer that has a memory card slot Refer to the printer s instruction manual for the procedure You can set print orders for...

Page 61: ...fer also to the instruction manual of the connected device Connecting to a TV or VCR AV Terminal Sound from the built in speaker will be muted while the STV 250N Stereo Video Cable is connected to the...

Page 62: ...peaker will be muted while the STV 250N Stereo Video Cable is connected to the camcorder We recommend powering the camcorder using the compact power adapter Refer also to the instruction manual of the...

Page 63: ...the tables FUNC Menu Setup menus FUNC Menu Appendix Menu Options Lists Menu item Setting options CAMERA PLAY Recording programs1 PROGRAM AE SHUTTER PRIO AE PORTRAIT SPORTS NIGHT SNOW BEACH SUNSET SPO...

Page 64: ...able only in the index screen with DVD RW discs in VR mode 5 Option available only during playback Menu item Setting options CAMERA PLAY Still image size quality Size LW 1152x648 L 1152x864 S 640x480...

Page 65: ...ED CONT SHOOT or AEB If you press while reviewing a still image it will continue to be displayed indefinitely Press to return to the normal display IMG STAB The image stabilizer compensates for camcor...

Page 66: ...ency sounds will be suppressed along with the sound of wind When recording in surroundings unaffected by wind or if you want to record low frequency sounds we recommend setting the wind screen to OFF...

Page 67: ...ally and or horizontally Using the markers will not affect the recordings DEMO MODE The demonstration mode displays the camcorder s main features It starts automatically when the camcorder is powered...

Page 68: ...es Folders are numbered from 101 to 998 RESET Image numbers will restart from 101 0101 every time you insert a new memory card CONTINUOUS Image numbers will continue from the number following that of...

Page 69: ...FORMAT Changes the date format for on screen displays Menu item Setting options CAMERA PLAY T ZONE DST List of world time zones z z z z 25 DATE TIME z z z z 24 DATE FORMAT Y M D 2008 1 1 AM 12 00 M D...

Page 70: ...40 C 104 F The battery pack is damaged Use a different battery pack If you connect a faulty power adapter or battery pack the CHARGE indicator flashes approx twice per second and the charging stops Ch...

Page 71: ...Set the camcorder to mode 29 Load a disc that has been tested 6 The disc is full END appears on the screen Delete some recordings DVD RW in VR mode to free some space 36 or replace the disc The camco...

Page 72: ...R DVD R DL disc after it was finalized 48 Unfinalize 49 the disc first DVD RW in VIDEO mode You may not be able to edit the title if you entered it with another digital device Cannot edit or delete s...

Page 73: ...e memory card 59 if the icon still appears in red List of Messages List of Messages in alphabetical order CANNOT ENTER THE STANDBY MODE NOW The camcorder cannot enter the Quick Start standby mode 32 w...

Page 74: ...ord additional scenes on a finalized DVD R DVD R DL disc You cannot record additional scenes or unfinalize a DVD RW disc in VIDEO mode that was finalized with another digital device DISC MUST BE FINAL...

Page 75: ...inserted a disc recorded in a different Television System PAL or SECAM UNABLE TO RECOVER DATA Could not recover a corrupted file This message can also appear if condensation has formed If you suspect...

Page 76: ...the camcorder does not function properly consult qualified service personnel Handle the camcorder with care Do not subject the camcorder to shocks or vibration as this may cause damage Battery Pack C...

Page 77: ...ocks Do not attach any labels or stickers on the disc surfaces The disc may not rotate in a stable manner and this may cause malfunctions Keep the disc clean of dust dirt or smudges Even very small sm...

Page 78: ...t or dirt Check the direction before inserting the memory card Forcing a memory card into the slot if it is not correctly oriented may damage the memory card or the camcorder Do not attach any labels...

Page 79: ...reen when the temperature changes suddenly Wipe it with a soft dry cloth Condensation Moving the camcorder rapidly between hot and cold temperatures may cause condensation water droplets to form on it...

Page 80: ...temala Haiti Honduras Jamaica Japan Korea Mexico Micronesia Myanmar Nicaragua Panama Peru Philippines Puerto Rico Saint Kitts and Nevis Saint Lucia Saint Vincent and the Grenadines Surinam Taiwan Trin...

Page 81: ...e WS 20 Wrist Strap SS 600 SS 650 Shoulder Strap MultiMedia Card NB 2LH BP 2L13 BP 2L14 BP 2L24H Battery Pack Computer VCR Card adapter Card reader writer PictBridge compatible printers Compatible DVD...

Page 82: ...following table are approximate and vary according to recording mode and charging recording or playback conditions The effective usage time of the battery pack may decrease when recording in cold sur...

Page 83: ...n 115 min 145 min 140 min 240 min 235 min Playback Time XP 140 min 245 min 290 min 495 min SP 170 min 300 min 355 min 590 min LP 185 min 320 min 385 min 635 min Battery pack NB 2LH BP 2L13 BP 2L14 BP...

Page 84: ...shoulder strap for more security and portability Pass the ends through the strap mount and adjust the length of the strap WS 20 Wrist Strap Use this for extra additional protection for active shooting...

Page 85: ...2A001AA STV 250N Stereo Video Cable D82 0590 002 Optional Accessories BP 2L13 Battery Pack 2069B002AA BP 2L14 Battery Pack 9582A002AA BP 2L24H Battery Pack 2383B002AA CB 2LW Battery Charger 0763B001AA...

Page 86: ...els other zoom types 690 000 pixels 16 9 Still images 600 000 pixels 4 3 Still images 800 000 pixels 1 6 inch CCD approx 680 000 pixels Effective pixels1 all figures are approximate values 16 9 Movies...

Page 87: ...x 480 pixels File Format Design rule for Camera File system DCF Exif 2 2 compliant DPOF compliant Image Compression Method JPEG compression Super Fine Fine Normal This camcorder has been tested with S...

Page 88: ...40 V AC 50 60 Hz Rated output consumption 8 4 V DC 1 5 A 29 VA 100 V 39 VA 240 V Operating temperature 0 40 C 32 104 F Dimensions 52 x 29 x 90 mm 2 1 x 1 1 x 3 5 in Weight 135 g 4 8 oz Battery type Re...

Page 89: ...ime 25 Time zone 25 Digital effects 44 Disc title 47 Disc types DVD R DVD R DL DVD RW 5 Discs that have been tested 6 Drive mode 56 E EASY recording program 30 Erasing still images 55 Error messages 7...

Page 90: ...mages Review 65 S Scene editing 45 Screen icons 15 SD SDHC card 28 Self timer 40 Serial number 13 Setup menus 22 65 Shutter speed 39 Slideshow 54 Snow recording program 38 SP mode 31 Special scene rec...

Page 91: ...ndling accident improper maintenance or failure to follow operating instructions B If the Equipment is defective as a result of leaking batteries sand dirt or water damage C If defects or damages are...

Page 92: ...ish of the Equipment media nor does it apply to Equipment purchased outside Canada If the Equipment contains a hard disk drive Canon Canada recommends that data stored on that drive be duplicated or b...

Page 93: ...lgary Alberta T2E 7K7 CANON CANADA INC MONTREAL 5990 C te de Liesse Quebec H4T 1V7 If you have any questions call the Canon Canada Information Center toll free at 1 800 828 4040 CANADA only Si vous av...

Reviews: