background image

7

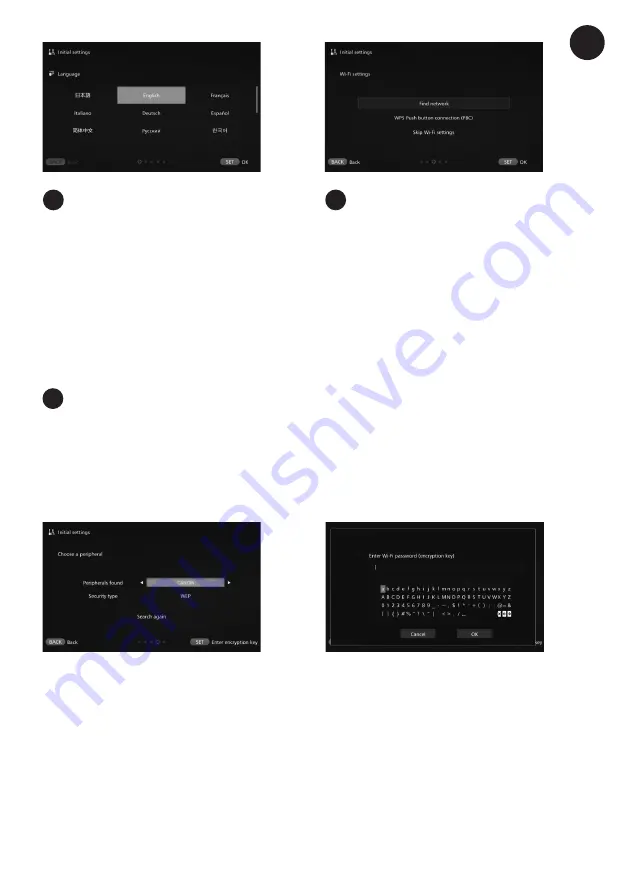
Select an item.

• Select an item, then press <

S

>.

• Select a step as appropriate for the item.

• Find network

: Go to step 4-A.

• WPS Push button connection (PBC)

: Go to step 

4-B.

• Skip Wi-Fi settings

: Go to step 5.

• When Connect Station is connected via a wired 

LAN, this screen will not be displayed. Go to 

step 5.

Select the language.

• Press the <

T

> key to select the language, then 

press <

S

>.

• Depending on the selected language, a screen 

may appear prompting you to select your 

country or region. Select an area first, then select 

a country or region.

3

2

EN

Find network.

Before establishing a connection, ensure you have the following information:
• Access point name (SSID)
• Encryption key (password) specified for the access point
*  For information on the access point name (SSID) and encryption key (password), refer to the access 

point’s instruction manual.

4A

Select the access point name (SSID) to 

connect to.

• Press the <

h

> <

g

> keys to select the access 

point name (SSID) of the 

Peripherals found

, then 

press <

S

>.

• When 

Enter manually

 is selected, enter the 

access point name (SSID) in the input screen.

Enter the encryption key (password).

• Select a character with the <

T

> keys, then press 

<

S

> to enter it.

• When you are finished, select 

OK

, then press 

<

S

>. Wait until the connection is complete.

• This screen is not displayed when you connect to 

an unencrypted access point.

• When the connection is complete, the 

Set date/

time

 screen will appear.

Summary of Contents for CS100

Page 1: ...is product are subject to change for product improvement or firmware update In such a case sample screens or operation instructions in this manual may differ from the screens or operations on the actu...

Page 2: ...home screen 8 Importing images and videos Viewing images albums devices or shooting month Creating and viewing albums Printing still images Operating with a web browser Transferring and sharing images...

Page 3: ...one tap of your NFC camera or upload images easily from your phone tablet or memory card Then enjoy them in Full HD on your TV and share them with friends online 6 Back Up 1 Import 2 View 3 Share 4 P...

Page 4: ...ed When the firmware is being updated When importing images is complete Remove card slot cover to access card slots The power lamp also blinks in green The lamp stays lit when the processing is comple...

Page 5: ...facing outward as shown in the illustration Do this before plugging into the mains Insert batteries in the battery compartment making sure that their plus and minus ends are correct then close the cov...

Page 6: ...ed LAN the screens shown in steps 3 and 4 will not be displayed Turn on the TV set and switch the TV s video input to select the connected terminal Turn on Connect Station Press the power button to tu...

Page 7: ...have the following information Access point name SSID Encryption key password specified for the access point For information on the access point name SSID and encryption key password refer to the acce...

Page 8: ...is complete Check the settings then press S The Home screen will appear Image importing status You can check the importing status while importing an image from a camera camcorder card etc Images Imag...

Page 9: ...is displayed on the camera camcorder s LCD monitor communication is established via Wi Fi even if the camera camcorder is moved away from Connect Station When Connect Station is connected the Wi Fi l...

Page 10: ...D Card CF Card Import images by connecting Connect Station to a camera camcorder with an interface cable USB cable For information on the interface cable refer to the Camera Camcorder Instruction Manu...

Page 11: ...inks When you select New images received and press S u and the lamp will turn off When you select a new image group and press S the images in that group will be displayed as thumbnails When you select...

Reviews: