background image

Before Using the Scanner

13

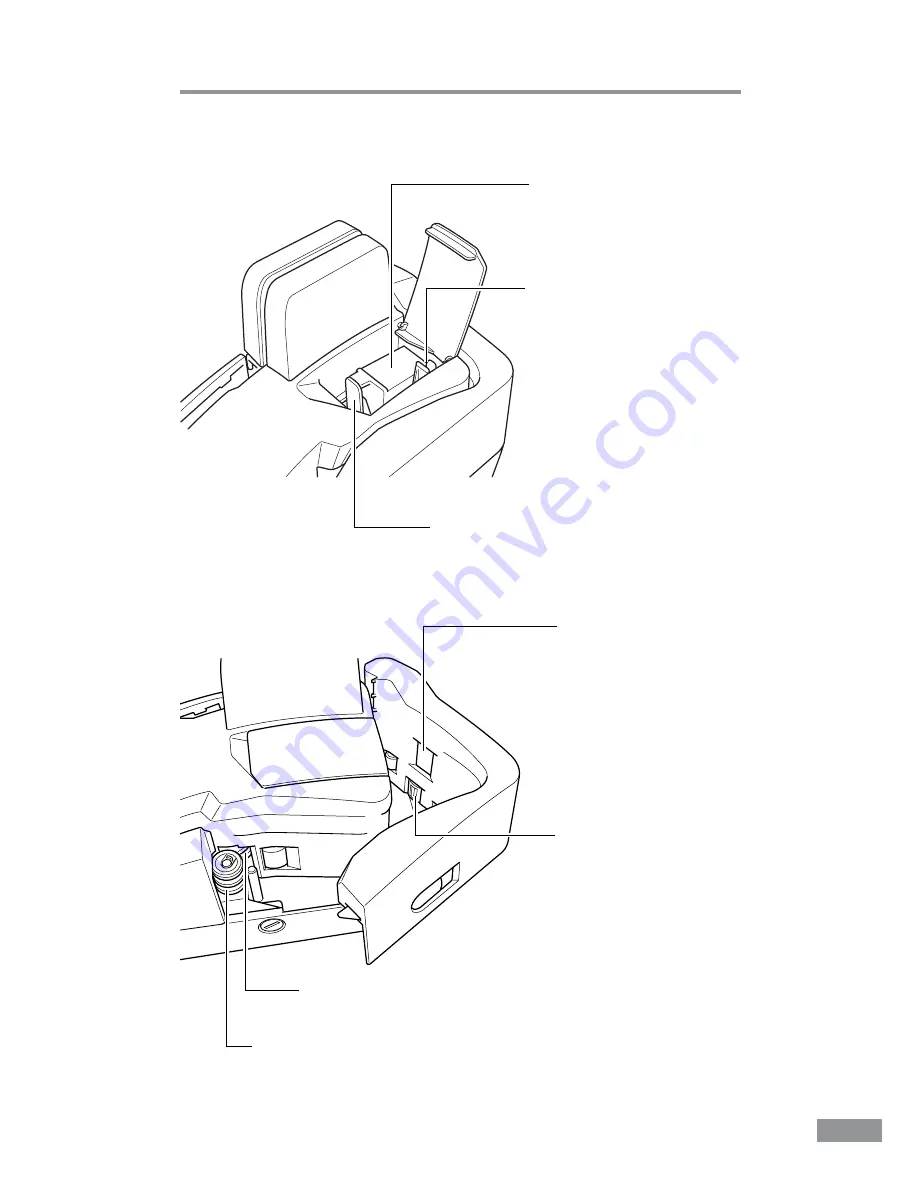
Ink Cartridge
The ink cartridge is not
included, and must be
purchased separately.
(See p. 26.)

Print Position Adjustment
Lever
Adjusts the print position.
(See p. 45.)

Lock Lever
Locks the ink cartridge in place.
(See p. 28 and p. 56.)

Ink Absorber
Absorbs any ink that leaks
out of the ink cartridge.
(See p. 52.)

Magnetic Head for MICR
Reads MICR text printed in
magnetic ink. (See p. 51.)

Separation Roller
Separates a stack of documents into
single sheets one by one. (See p. 43.)

Feeding Roller
Feeds the document. (See p. 43.)

Inside of the Imprinter Cover

Inside of the Maintenance Cover

Summary of Contents for CR-25 - imageFORMULA Desktop Check Scanner

Page 1: ...Startup Manual Please read this manual before operating this unit After you finish reading this manual store it in a safe place for future reference Canon Check Reader...

Page 2: ...tware Use the accompanying setup disc to install Scanning Utility for CR 25 55 See p 17 Install the accompanying software before connecting the Canon CR 25 55 to a computer Do not connect the CR 25 55...

Page 3: ...ase the separation between the equipment and receiver Connect the equipment into an outlet on a circuit different from that to which the receiver is connected Consult the dealer or an experienced radi...

Page 4: ...days from the date you purchased the same as evidenced by a receipt or otherwise The limited warranty does not apply if the failure of the diskette resulted from accident abuse or misapplication of t...

Page 5: ...demark of Adaptec Inc Other product and company names herein may be the trademarks of their respective owners Copyright Copyright 2007 by CANON ELECTRONICS INC All rights reserved No part of this publ...

Page 6: ...e to read it before using the scanner Startup Manual INTRODUCTION Thank you for purchasing the Canon CR 25 55 Check Reader scanner Please read this manual thoroughly before using the machine to famili...

Page 7: ...always pay attention to these warnings CAUTION Indicates a caution concerning operations that may lead to injury to persons or damage to property if not performed correctly To use the machine safely a...

Page 8: ...k Cartridge 26 Installation Procedure 26 Scanning Utility Software 30 Using the Scanning Utility 30 Uninstalling the Scanning Utility 33 Using the Scanner 36 Documents 36 Document Types 36 Placing Doc...

Page 9: ...ocations Dust can get inside the scanner and cause problems Avoid warm or humid locations such as in the vicinity of a water faucet water heater or humidifier and avoid locations where the fumes from...

Page 10: ...er pull directly on the power cord To remove the plug from the outlet grasp the plug directly and remove it from the outlet Keep the area around the power plug clear of articles so that the power plug...

Page 11: ...t use flammable liquids to clean the scanner including alcohol benzene or paint thinner If the scanner ever makes a strange noise emits smoke or a strange odor becomes hot or if the scanner does not o...

Page 12: ...a risk of fire or electrical shock To allow you to easily unplug the power cord at any time do not place other objects around the power outlet Such obstacles could prevent you from unplugging the powe...

Page 13: ...etic ink or toner Supports OCR Optical Character Recognition Character images such as E13B OCR A OCR B and check writer are recognized as characters by the OCR function Easy Maintenance Maintenance co...

Page 14: ...nada only Checking the Packing List The contents of the carton in which this scanner is shipped are described below If anything is missing or damaged contact your local authorized Canon dealer or serv...

Page 15: ...ding Unit Removing the Protective Packing Tape Remove all of the protective packing tape before using the scanner 1 Remove the protective tape indicated by the from the scanner 2 While lowering the OP...

Page 16: ...re Using the Scanner 11 4 Gently close the reading unit until it clicks into place 3 Remove the protective tape indicated by the from the reading unit 4 Gently close the reading unit until it clicks i...

Page 17: ...tenance Cover Open this cover to clear paper jams or clean the scanner See p 48 and p 58 Eject Stopper Adjust to match the length of the document See p 38 Power Indicator Lights green when the power i...

Page 18: ...ver Locks the ink cartridge in place See p 28 and p 56 Ink Absorber Absorbs any ink that leaks out of the ink cartridge See p 52 Magnetic Head for MICR Reads MICR text printed in magnetic ink See p 51...

Page 19: ...n the scanner See p 48 and p 58 Connectors Power Switch Power Switch Turns the scanner power ON or OFF See p 23 and p 25 Power Connector Connect the included AC adapter plug See p 21 USB Connector Con...

Page 20: ...contact the store where you purchased the computer or the manufacturer of the computer for more information Use the most recent version of the USB 2 0 driver provided by Microsoft Contact your local...

Page 21: ...ng the Scanning Utility on p 17 2 Connect the power cord to the scanner See Connecting the Power Cord on p 21 3 Connect the scanner to the PC See Connecting the Scanner to Your PC on p 22 4 Turn ON th...

Page 22: ...to install the CR 25 55 device driver 1 Turn ON your computer Windows starts 2 Log on as a user with Administrator privileges 3 Insert the setup disc into the PC s CD ROM drive 4 Click the Start butto...

Page 23: ...ppear on the screen to install the software 1 Select the installation language and then click OK 2 Read the Welcome text and then click Next 3 Read the License Agreement text and then click Yes 4 Read...

Page 24: ...Installing the Scanner 19 5 Installation of the scanning utility starts 6 After the scanning utility is installed installation of the Canon driver starts 7 This completes the installation...

Page 25: ...After installation is complete click the Finish button to exit the installer Note Installing the scanning utility will put the Scanning Utility for CR 25_55 icon on your Windows Start menu See Using t...

Page 26: ...to use the power cord and AC adapter provided with the scanner Make sure the scanner is turned OFF when performing this operation 1 Connect the bundled power cord a to the AC adapter 2 Connect the AC...

Page 27: ...r use with the scanner See p 15 1 Connect the type A plug to the scanner 2 Connect the type B plug to the computer Note The CR 25 55 passed the Hi Speed USB 2 0 certification test However computer ope...

Page 28: ...o the right to turn ON the scanner The power indicator lights green when the power is ON WARNING If the scanner makes a strange noise emits smoke or a strange odor becomes hot or if the scanner does n...

Page 29: ...arts automatically Windows 2000 Windows XP Note The installation finished message is not displayed in Windows 2000 If your operating system is Windows XP a message appears after the device driver is i...

Page 30: ...fore turning OFF the scanner Turning OFF the scanner before exiting the scanning utility can cause unstable operation of the computer Wait at least 10 seconds before turning the scanner back ON after...

Page 31: ...included with the scanner Purchase an ink cartridge separately as shown below Manufacturer Hewlett Packard Model numbers C6602B blue C6602G green C6602R red Installation Procedure Perform the followi...

Page 32: ...its bag IMPORTANT Do not touch the ink cartridge contacts This can cause a bad electrical contact and reduced print quality 4 Grasp the tag and then peel off the tape covering the ink jet nozzle IMPO...

Page 33: ...es not load properly see p 29 Ink Cartridge Lock Lever 5 Load the ink cartridge as illustrated 6 Push in the ink cartridge until it clicks into place 7 Make sure that the ink cartridge lock lever lock...

Page 34: ...en installed the two ink cartridge pins will not fit into the holes on the carriage Push back the ink cartridge lock lever a in the direction of the arrow and reset the cartridge in the correct positi...

Page 35: ...lity To access the scanning utility help start the scanning utility click Help on the menu bar and then select Help 1 Turn the scanner power ON 2 Turn ON your computer Windows starts 3 Click the Start...

Page 36: ...lick Scanner Setting and then specify the scanning parameters Note For details about how to configure scanning parameters click the Help button in the settings dialog box to view the Canon driver help...

Page 37: ...32 Scanning Utility Software 6 After scanning is complete select Exit on the File menu to quit the scanning utility...

Page 38: ...TANT You must uninstall Scanning Utility for CR 25 55 and Canon Driver for CR 25 55 separately 1 Log on as a user with Administrator privileges 2 Click the Start button point to Settings and then clic...

Page 39: ...rties for Windows XP Add or Remove Programs dialog box is displayed Note If you are using Windows XP double click the Add or Remove Programs icon 4 Select the application that you want to delete from...

Page 40: ...5 Click the Yes button to start the uninstaller Scanning Utility for CR 25 55 is selected Canon Driver for CR 25 55 is selected Uninstallation starts 6 After the uninstall is complete click the OK bu...

Page 41: ...nd rollers dirty resulting in lines on images Always clean the rollers after scanning a document written in pencil Scanning documents that are written in pencil or similar material can make the roller...

Page 42: ...uments This section describes how to place a document for scanning 1 Pull out the document feed tray Note When scanning multiple documents sort them into batches of uniform paper quality and thickness...

Page 43: ...documents with their front sides facing right and with their edges flush against the document load mark 4 Extend the eject stopper beyond the length of the loaded documents IMPORTANT If the eject stop...

Page 44: ...fore scanning documents of a different thickness perform the procedure below to confirm that documents are separated one sheet at a time If documents do not feed properly see Calibrating Paper Thickne...

Page 45: ...position of the eject stopper If necessary see the illustration in step 4 on p 38 5 Click Scan Page from the File menu and confirm that only one sheet is fed Note If the sheets do not feed properly t...

Page 46: ...Using the Scanner 41 6 Exit the scanning utility...

Page 47: ...cument meets the conditions of this scanner See Documents on page 36 Your unit has been carefully adjusted to meet most conditions However the below adjustment may be needed depending on your environm...

Page 48: ...r and stop at the position shown below Note If you were unable to slide both sheets through the gap between the rollers turn the paper thickness adjustment dial counter clockwise left until both sheet...

Page 49: ...justment dial clockwise too much may damage the rollers 7 Remove the sheets from the paper path and close the maintenance cover 8 Confirm that the document feeds properly See Confirming Proper Documen...

Page 50: ...rint position Note You can adjust the print position by moving the print cartridge carriage up or down so that the distance between the document bottom edge and the center of text is one of three leve...

Page 51: ...ypes of document may be misdetected as double fed Documents with a colored background Documents with a glossy finish If misdetection of double feeds occurs often turn off double feed detection Double...

Page 52: ...iscolor the exterior of the scanner They also create a risk of fire or electrical shock Cleaning the Scanner To clean the exterior of the scanner dampen a cloth with water or a mild detergent wring th...

Page 53: ...ome dirty after scanning then the sensor glass or rollers inside the scanner may be dirty Clean them periodically 1 Hook your finger around the open lever and open the maintenance cover 2 While loweri...

Page 54: ...comprise two rollers each an upper roller and a lower roller Note Move roller e in the direction of the arrow to rotate rollers b d e k and p When cleaning rollers b d e k and p wipe them while rotati...

Page 55: ...swab to wipe dirt from the entire surface of each IMPORTANT Scratches on the sensor glass may cause marks on the images and could cause feeding errors If there are scratches on the sensor glass contac...

Page 56: ...ead with a commercially available audio head cleaner 1 Hook your finger around the open lever and open the maintenance cover 2 Clean the magnetic head with a commercially available audio head cleaner...

Page 57: ...d the ink heads and the ink absorber 1 Hook your finger around the open lever and open the maintenance cover 2 Dampen a cloth with water wring the cloth out thoroughly and then wipe off the dirt aroun...

Page 58: ...MPORTANT When removing the ink cartridge always make sure that the carriage is lowered to its lowest position You cannot remove the ink cartridge without lowering the carriage to its lowest position 5...

Page 59: ...a dry cotton swab to wipe off any ink on the ink jet nozzle 7 Reinstall the ink cartridge See Installing the Ink Cartridge on p 26 8 Gently close the imprinter cover 9 Gently close the maintenance cov...

Page 60: ...t even after you have cleaned the ink jet nozzle Perform the following steps to replace the ink cartridge 1 Hook your finger around the open lever and open the maintenance cover 2 Open the imprinter c...

Page 61: ...the carriage to its lowest position 4 Push back the ink cartridge lock lever in the direction of the arrow in the illustration below and pull out the ink cartridge by grasping the tab as shown in the...

Page 62: ...Not Recognize the Scanner p 61 Scanning Is Slow p 61 Images Are Not Scanned p 62 Documents Do Not Feed Properly p 62 Scanned Images Are Not Correct p 63 If you still cannot resolve the problem after...

Page 63: ...mmed paper upwards or backwards against the feeding direction Doing so can damage the internal parts of the scanner CAUTION When removing jammed paper take care not to cut your hand on the edge of the...

Page 64: ...jammed at the pickup area Pull the paper forward and clear the jam from the maintenance cover 2 If the paper is jammed at any other area Pull the paper forward and clear the jam from the nearest open...

Page 65: ...into place If additional assistance is required contact your local authorized Canon dealer or service representative The Scanner Does Not Turn ON Check the following Is the power switch in the ON pos...

Page 66: ...face Remedy This product is not guaranteed to operate with all types of USB interfaces Contact your local authorized Canon dealer or service representative for more information See p 15 Cause The scan...

Page 67: ...each possible cause Cause Attempting to scan a document of a size thickness or weight that the scanner cannot scan Remedy Check the size thickness and weight of the document For more information on p...

Page 68: ...ver or application software is not running normally Remedy If the software is set properly for scanning and scanning is still not possible the scanner driver or the application software may not be run...

Page 69: ...or diffusion 256 level grayscale 24 bit color Scanning Resolution Primary Scan Lines x Secondary Scan Lines Excluding 24 bit Color 100 x 100 dpi 200 x 200 dpi 300 x 300 dpi 24 bit Color 100 x 100 dpi...

Page 70: ...mm 7 4 188 mm 8 8 223 mm AC Adapter 100 240V Model MG1 3607 Input AC 100 240V 50 60Hz 65VA 82VA Output DC16V 1 8A Power Supply 0 5 W max separate AC adapter Weight Approximately 0 7 lb 0 3 kg includi...

Page 71: ...e cover 12 Open lever 26 Magnetic Head for MICR 13 N Names and functions of parts 12 Notes concerning disposal 7 Notes on normal handling 6 P Paper jam 58 Paper thickness adjustment dial 12 Print posi...

Page 72: ...EG AMSTELVEEN THE NETHERLANDS CANON LATIN AMERICA INC 703 WATERFORD WAY SUITE 400 MIAMI FLORIDA 33126 U S A CANON AUSTRALIA PTY LTD 1 THOMAS HOLT DRIVE NORTH RYDE SYDNEY N S W 2113 AUSTRALIA CANON SI...

Reviews: