background image

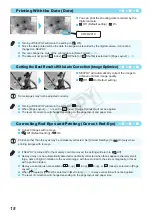
Printing With the Date (Date)

Getting the Best Results With Auto Correction (Image Optimize)

Correcting Red Eyes and Printing (Correct Red-Eye)

1

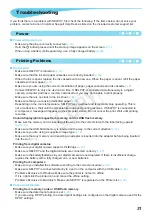
Correct images with red-eye.

 Off (Default setting) / 

 On

Portions other than the eyes may be mistakenly corrected. Set [Correct Red-Eye] to [

 On] only when 

printing images with red-eye. 

If SELPHY is turned off or the memory card is removed, the setting will return to [

 Off].

Red-eye may not be automatically detected or optimally corrected when faces appear extremely small, 

large, dark or bright in relation to the overall image, with faces turned to the side or diagonally, or faces 

with a portion hidden.
Red-eye correction is not available if [

 2-up], [

 4-up], [

 8-up], or [

 Index] is selected in [Page 

Layout] 

(p. 19)

. 

When [  Sepia] or [

 B/W] is selected in [My Colors] 

(p. 20)

, red-eye correction will not be applied.

The level of correction will change depending on the page layout and paper size.


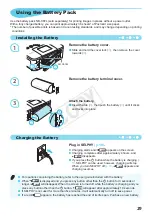
SELPHY will automatically correct the image to 

achieve optimum image quality.

 Off /   On (Default setting)

Some images may not be adjusted correctly.

Turning off SELPHY will return the setting to [

 On]. 

When [Page Layout] 

(p. 19)

 is set to [

 Index], [Image Optimize] will not be applied.

The level of correction will change depending on the page layout and paper size.


Turning off SELPHY will return the setting to [

 Off].

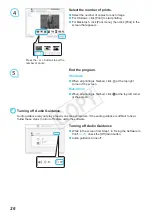
Since the date printed will be the date the image was recorded by the digital camera, it cannot be 

changed on SELPHY.

You can change the style of the printed date in [Date Format] 

(p. 21)

.

The date will not print if [

 Index], [


ID Photo] or [


Shuffle] is selected in [Page Layout] 

(p. 19)

.


You can print the shooting date recorded by the 

digital camera.

 Off (Default setting) / 

 On

08/08/2010

COP

Y

Summary of Contents for 4350B001

Page 1: ... second version or an excerpt of the things that have changed is included with the repaired product 2 The differences in the firmware versions 1 First version The settings for the printing layout for printing multiple images on a single sheet see page 19 in the user guide are saved even when the printer s power is turned off This can be convenient you intend to print with the same layout the next ...

Page 2: ...ENGLISH Printer User Guide Make sure you read this guide including the Safety Precautions section before using the printer Store this guide safely so that you can use it in the future COPY ...

Page 3: ...per Cassette PCC CP300 Color Ink Cassette Label Set KC 18IF Full page labels 18 Color Ink Cassette Label Set KC 18IL 8 label sheets 18 Some accessories may not be available depending on the region Card size paper cassette may not be included depending on the region Printer User Guide This Guide Warranty Card Power Cord Package Contents Check if the following items are included in your printer pack...

Page 4: ...______________ 34 Read This First Warning Against Copyright Infringement The images printed with this product should be intended for personal use Do not print images that infringe upon copyright laws without the prior permission of the copyright holder Warranty Limitations This product s warranty is only effective in the country of sale If there is a problem with the printer while abroad please re...

Page 5: ...r fire Immediately stop using the equipment and distance yourself from it Unplug the power cord periodically and wipe away any dust and dirt that has collected on the plug the exterior of the power outlet and the surrounding area with a dry cloth Do not handle the power cord with wet hands Do not use the equipment in a manner that exceeds the rated capacity of the electrical outlet or wiring acces...

Page 6: ...ilted surface Keep SELPHY at least 1 m 3 ft from devices emitting electromagnetic waves or strong magnetic fields Make sure there is at least 10 cm 4 in of free space around SELPHY Since paper will pass in and out of SELPHY during printing make sure the space behind the printer is greater than the length of the paper Never place SELPHY close to motors or other devices that generate strong electrom...

Page 7: ...utton Restores the previous screen p 7 cancels printing p 14 p Print Button Starts printing p 14 Security cables such as a Kensington lock can be attached to this slot Paper Cassette Compartment Cover p 10 Card Slots p 12 Paper Cassette Compartment p 10 Ink Cassette Lock p 14 Ink Cassette Compartment p 10 Ink Cassette Compartment Cover p 10 Battery Cover p 29 Air vents are behind the battery cover...

Page 8: ... for the displayed image Paper orientation Information Displayed on the Screen You can hide the information displayed on the screen and view images at a larger size Make the setting Press the ud buttons to select Info Display Press the l r buttons to select Off then press the v button to complete the setting Pressing the v button again will restore the image display screen Display the settings scr...

Page 9: ...k Cassette Paper Sets other than Postcard size may also be used in the same way to prepare for printing Check the ink cassette Check that the paper size and the size shown on the color ink cassette Card size Postcard size etc match Check that the ink sheet is taut with no slack If the ink sheet is slack push and turn the sprocket as shown in the illustration If you overwind the ink sheet it may no...

Page 10: ...ch the print surface shiny side or touch the paper with wet hands If the print surface becomes dirty or wet you will not be able to make clean prints Set the paper Set the paper into the paper cassette that you prepared You can place up to 18 sheets in the paper cassette Inserting 19 or more sheets may damage the printer or cause malfunction Hold the paper as shown in the illustration with the shi...

Page 11: ...cated by the arrow on the cassette until it clicks and locks into place Close the ink cassette compartment cover Insert the paper cassette Make sure that the outer lid is open p 8 and insert the paper cassette all the way into the compartment Plug the adapter cord into SELPHY Fully insert the adapter plug into SELPHY Connect the power cord Connect the power cord to the compact power adapter then p...

Page 12: ...age settings screen Press the ud buttons to select Language Press the o button Select a language Press the udl r buttons to select a language then press the o button Pressing the v button twice will restore the screen in Step 1 Setting the Display Language You can change the language displayed in the LCD monitor menus and messages Adjust the screen for ease of viewing Raise the LCD monitor and adj...

Page 13: ...rchase the CompactFlash Card Adapter for xD Picture Card For memory cards that require an adapter be sure to first insert the memory card into the adapter before inserting into the appropriate card slot If you insert the memory card into a card slot without using an adapter you may not be able to remove the memory card from the printer Use a memory card formatted in the device used for taking the ...

Page 14: ...er image repeat Steps 4 and 5 Number of copies for the displayed image Total number of images to be printed Label side Selecting and Printing Images You can select an image and specify the number of copies for printing In this section an SD memory card will be used as an example but you can print from other memory cards using the same steps Turn on SELPHY Press and hold the q button until the scre...

Page 15: ...nting This may cause the printer to malfunction It may take some time before images display if the memory card contains a large number of images When the total number of copies for printing is set to 0 and you press the p button the currently displayed image will print once If the Start DPOF printing screen displays refer to Printing Images Using Digital Camera Specified Settings DPOF Print p 28 I...

Page 16: ...ns to set the number of copies You can select up to 99 copies per image If there are more than 1000 images on the card only 999 copies will be printed in order of the most recent by shooting date Number of sheets required Number of copies Print Press the p button to start printing To cancel printing press the v button Printing All Images You can print all images on a memory card at once COPY ...

Page 17: ...LPHY and put the other inside the original packaging or a bag to protect it from dust and store it in a dark place When storing new paper and ink cassettes leave them in unopened packages and keep them in a dark place Storing the Printed Photos When both edges of a print have perforations you can remove the edges by bending them Use an oil based pen to write on prints To prevent discoloration do n...

Page 18: ...ttings screen Press the k button Press the ud buttons to select Print Settings then press the o button Select the item and change the settings Press the ud buttons to select an item Press the l r buttons to change the settings then press the v button to complete the setting Pressing the v button again will restore the image display screen Refer to pp 18 21 for information about each setting Print ...

Page 19: ...en Sepia or B W is selected in My Colors p 20 red eye correction will not be applied The level of correction will change depending on the page layout and paper size SELPHY will automatically correct the image to achieve optimum image quality Off On Default setting Some images may not be adjusted correctly Turning off SELPHY will return the setting to On When Page Layout p 19 is set to Index Image ...

Page 20: ...emoved from the slot The image position cannot be specified Depending on the selected layout the settings made in Date p 18 Image Optimize p 18 Correct Red Eye p 18 Borders p 20 Smooth Skin p 21 or Brightness p 21 may not be applied If you select Print All Images p 15 in Index you can print all images on a memory card as an index print Printing an ID Photo ID Photo Prints two ID photos each in thr...

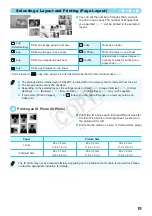
Page 21: ... Shuffle Shuffle automatically arranges images in a variety of sizes for printing A group of up to 8 images or a group of up to 20 images can be printed on a single sheet Prints can be made on L size or Postcard size paper p 2 In Making Settings p 17 press the ud buttons to select Page Layout in the screen in Step 2 Press the l r buttons to select Shuffle then press the o button When the screen sh...

Page 22: ...ected in Page Layout p 19 The setting will be retained even if SELPHY is turned off or the memory card is removed from the slot You can change the order of the printed date p 18 mm dd yy Default Setting dd mm yy yy mm dd Makes skin look smooth and beautiful in prints Off Default setting On When printing is finished turning off SELPHY and removing the memory card will return the setting to Off Corr...

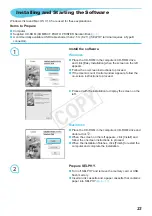
Page 23: ... G5 or Intel Processor RAM Windows 7 64 bit 2 GB or more Windows 7 32 bit Vista 64 bit 32 bit 1 GB or more Windows XP 512 MB or more Mac OS X v10 4 v10 5 512 MB or more Mac OS X v10 6 1 GB or more Interface USB Free Hard Disk Space 120 MB or more 140 MB or more Display 1 024 x 768 pixels or more 1 024 x 768 pixels or more For Windows XP Microsoft NET Framework 2 0 max 280 MB must be installed Inst...

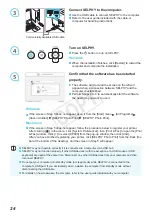
Page 24: ... pp 8 10 Proceed with the installation to display the screen on the left Macintosh Place the CD ROM in the computer s CD ROM drive and double click When the screen on the left appears click Install and follow the onscreen instructions to proceed When the installation finishes click Finish to restart the computer and complete the installation Installing and Starting the Software Windows Vista and M...

Page 25: ...LPHY Photo Print from the Dock the bar at the bottom of the desktop and the screen in Step 5 will appear Commercially available USB cable SELPHY may not operate correctly if it is connected to a computer via a USB hub SELPHY may not function properly if other USB devices with the exception of a USB mouse or USB keyboard are used at the same time Disconnect any other USB devices from your computer ...

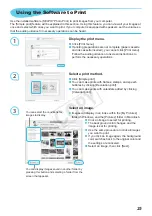
Page 26: ... color changes and the image is set for printing Use the same procedure to click all images you want to print If you click an image again the background color switches back to the original color and the settings are canceled Select an image then click Next Using the Software to Print Use the installed software SELPHY Photo Print to print images from your computer The Simple print feature will be e...

Page 27: ...f the screen Macintosh When all printing is finished click at the top left corner of the screen Turning off Audio Guidance Audio guidance may not play properly on some computers If the audio guidance is difficult to hear follow these steps to turn it off before using the software Turning off Audio Guidance While in the screen from Step 1 in Using the Software to Print p 25 check the Off radio butt...

Page 28: ...aken with any digital camera or video camera regardless of the manufacturer or model by connecting to a printer without using a computer Make sure that a memory card is not inserted in SELPHY and it is not connected to a computer Connect SELPHY to the digital camera using the interface cable USB cable included with the digital camera First turn on SELPHY then turn on the digital camera and play ba...

Page 29: ...inserted that contains DPOF information set with the digital camera Printing Images Using Digital Camera Specified Settings DPOF Print You can make print settings and select images to print on your digital camera and then print the images all at once For details refer to the user guide included with your digital camera Insert a memory card containing DPOF settings into the appropriate memory card ...

Page 30: ... used however charging will stop When you turn SELPHY off p 11 appears and charging resumes For cautions concerning the battery refer to the user guide included with the battery When is displayed and you press any button other than the q button for 3 seconds or longer will disappear When the screen is turned off while the battery is charging and you press any button other than the q button will ap...

Page 31: ...re is an obstacle between the Bluetooth unit and the mobile phone When there is electromagnetic interference from magnetic fields static electricity or radio waves in the area The maximum file size that can be transferred is 2 3 MB varies depending on mobile phone Data transfer time increases when data size is large Therefore the amount of time before printing may also increase Depending on the mo...

Page 32: ...will appear on the computer screen Do not cancel the print Wait until printing resumes Cannot display print images from memory card or USB flash memory Make sure the memory card is inserted all the way into the correct slot with the label facing upward pp 12 13 Make sure the USB flash memory is inserted all the way in the correct direction p 14 Make sure you are using a supported image type p 12 M...

Page 33: ... the paper size matches the size of the paper cassette p 2 Paper is not feeding properly frequent paper jams Make sure the paper and paper cassette are correctly inserted pp 8 10 Make sure there are less than 19 sheets in the cassette Make sure 19 or more sheets have not collected on the outer lid of the paper cassette Make sure that you are using dedicated paper p 9 Cannot print the specified num...

Page 34: ...d MMCplus Card HC MMCplus Card miniSD Memory Card 4 miniSDHC Memory Card 4 microSD Memory Card 4 microSDHC Memory Card 4 microSDXC Memory Card 4 RS MMC Card 4 MMCmobile Card 4 MMCmicro Card Memory Stick Memory Stick PRO Memory Stick Duo Memory Stick PRO Duo Memory Stick micro 4 USB Flash Memory FAT exFAT only supported Operating Temperatures 5 40 C 41 104 F Operating Humidity 20 80 Power Source Co...

Page 35: ...ts evaporate naturally before use When SELPHY becomes dirty wipe the casing with a soft dry cloth When dust or dirt has accumulated on the battery cover or vents pp 6 29 be sure to remove the ink cassette p 14 before cleaning If dust gets in through the vents the printer may not print cleanly Never wipe using volatile solvents such as benzine paint thinner or diluted neutral solvent They may cause...

Page 36: ...n which can be determined by turning the equipment off and on the user is encouraged to try to correct the interference by one or more of the following measures Reorient or relocate the receiving antenna Increase the separation between the equipment and receiver Connect the equipment into an outlet on a circuit different from that to which the receiver is connected Consult the dealer or an experie...

Page 37: ...ut prior notice Illustrations and screenshots in this guide may differ slightly from the actual equipment The above items notwithstanding Canon accepts no liability for damages due to mistaken operation of the products This product is designed to achieve excellent performance when used with genuine Canon accessories Canon shall not be liable for any damage to this product and or accidents such as ...

Page 38: ...ENGLISH Printer User Guide Make sure you read this guide including the Safety Precautions section before using the printer Store this guide safely so that you can use it in the future COPY ...

Page 39: ...per Cassette PCC CP300 Color Ink Cassette Label Set KC 18IF Full page labels 18 Color Ink Cassette Label Set KC 18IL 8 label sheets 18 Some accessories may not be available depending on the region Card size paper cassette may not be included depending on the region Printer User Guide This Guide Warranty Card Power Cord Package Contents Check if the following items are included in your printer pack...

Page 40: ...______________ 34 Read This First Warning Against Copyright Infringement The images printed with this product should be intended for personal use Do not print images that infringe upon copyright laws without the prior permission of the copyright holder Warranty Limitations This product s warranty is only effective in the country of sale If there is a problem with the printer while abroad please re...

Page 41: ...r fire Immediately stop using the equipment and distance yourself from it Unplug the power cord periodically and wipe away any dust and dirt that has collected on the plug the exterior of the power outlet and the surrounding area with a dry cloth Do not handle the power cord with wet hands Do not use the equipment in a manner that exceeds the rated capacity of the electrical outlet or wiring acces...

Page 42: ... the printer Setting Up SELPHY Place SELPHY on a stable and even surface such as a table Never place it on an unstable or tilted surface Keep SELPHY at least 1 m 3 ft from devices emitting electromagnetic waves or strong magnetic fields Make sure there is at least 10 cm 4 in of free space around SELPHY Since paper will pass in and out of SELPHY during printing make sure the space behind the printe...

Page 43: ...utton Restores the previous screen p 7 cancels printing p 14 p Print Button Starts printing p 14 Security cables such as a Kensington lock can be attached to this slot Paper Cassette Compartment Cover p 10 Card Slots p 12 Paper Cassette Compartment p 10 Ink Cassette Lock p 14 Ink Cassette Compartment p 10 Ink Cassette Compartment Cover p 10 Battery Cover p 29 Air vents are behind the battery cover...

Page 44: ... for the displayed image Paper orientation Information Displayed on the Screen You can hide the information displayed on the screen and view images at a larger size Make the setting Press the ud buttons to select Info Display Press the l r buttons to select Off then press the v button to complete the setting Pressing the v button again will restore the image display screen Display the settings scr...

Page 45: ...k Cassette Paper Sets other than Postcard size may also be used in the same way to prepare for printing Check the ink cassette Check that the paper size and the size shown on the color ink cassette Card size Postcard size etc match Check that the ink sheet is taut with no slack If the ink sheet is slack push and turn the sprocket as shown in the illustration If you overwind the ink sheet it may no...

Page 46: ...ch the print surface shiny side or touch the paper with wet hands If the print surface becomes dirty or wet you will not be able to make clean prints Set the paper Set the paper into the paper cassette that you prepared You can place up to 18 sheets in the paper cassette Inserting 19 or more sheets may damage the printer or cause malfunction Hold the paper as shown in the illustration with the shi...

Page 47: ...cated by the arrow on the cassette until it clicks and locks into place Close the ink cassette compartment cover Insert the paper cassette Make sure that the outer lid is open p 8 and insert the paper cassette all the way into the compartment Plug the adapter cord into SELPHY Fully insert the adapter plug into SELPHY Connect the power cord Connect the power cord to the compact power adapter then p...

Page 48: ...age settings screen Press the ud buttons to select Language Press the o button Select a language Press the udl r buttons to select a language then press the o button Pressing the v button twice will restore the screen in Step 1 Setting the Display Language You can change the language displayed in the LCD monitor menus and messages Adjust the screen for ease of viewing Raise the LCD monitor and adj...

Page 49: ...rchase the CompactFlash Card Adapter for xD Picture Card For memory cards that require an adapter be sure to first insert the memory card into the adapter before inserting into the appropriate card slot If you insert the memory card into a card slot without using an adapter you may not be able to remove the memory card from the printer Use a memory card formatted in the device used for taking the ...

Page 50: ...er image repeat Steps 4 and 5 Number of copies for the displayed image Total number of images to be printed Label side Selecting and Printing Images You can select an image and specify the number of copies for printing In this section an SD memory card will be used as an example but you can print from other memory cards using the same steps Turn on SELPHY Press and hold the q button until the scre...

Page 51: ...nting This may cause the printer to malfunction It may take some time before images display if the memory card contains a large number of images When the total number of copies for printing is set to 0 and you press the p button the currently displayed image will print once If the Start DPOF printing screen displays refer to Printing Images Using Digital Camera Specified Settings DPOF Print p 28 I...

Page 52: ...ns to set the number of copies You can select up to 99 copies per image If there are more than 1000 images on the card only 999 copies will be printed in order of the most recent by shooting date Number of sheets required Number of copies Print Press the p button to start printing To cancel printing press the v button Printing All Images You can print all images on a memory card at once COPY ...

Page 53: ...LPHY and put the other inside the original packaging or a bag to protect it from dust and store it in a dark place When storing new paper and ink cassettes leave them in unopened packages and keep them in a dark place Storing the Printed Photos When both edges of a print have perforations you can remove the edges by bending them Use an oil based pen to write on prints To prevent discoloration do n...

Page 54: ...ttings screen Press the k button Press the ud buttons to select Print Settings then press the o button Select the item and change the settings Press the ud buttons to select an item Press the l r buttons to change the settings then press the v button to complete the setting Pressing the v button again will restore the image display screen Refer to pp 18 21 for information about each setting Print ...

Page 55: ...en Sepia or B W is selected in My Colors p 20 red eye correction will not be applied The level of correction will change depending on the page layout and paper size SELPHY will automatically correct the image to achieve optimum image quality Off On Default setting Some images may not be adjusted correctly Turning off SELPHY will return the setting to On When Page Layout p 19 is set to Index Image ...

Page 56: ...uttons then press the q button to turn on SELPHY To disable this function so that settings are not saved repeat the above procedure The image position cannot be specified Depending on the selected layout the settings made in Date p 18 Image Optimize p 18 Correct Red Eye p 18 Borders p 20 Smooth Skin p 21 or Brightness p 21 may not be applied If you select Print All Images p 15 in Index you can pri...

Page 57: ... Shuffle Shuffle automatically arranges images in a variety of sizes for printing A group of up to 8 images or a group of up to 20 images can be printed on a single sheet Prints can be made on L size or Postcard size paper p 2 In Making Settings p 17 press the ud buttons to select Page Layout in the screen in Step 2 Press the l r buttons to select Shuffle then press the o button When the screen sh...

Page 58: ...ected in Page Layout p 19 The setting will be retained even if SELPHY is turned off or the memory card is removed from the slot You can change the order of the printed date p 18 mm dd yy Default Setting dd mm yy yy mm dd Makes skin look smooth and beautiful in prints Off Default setting On When printing is finished turning off SELPHY and removing the memory card will return the setting to Off Corr...

Page 59: ... G5 or Intel Processor RAM Windows 7 64 bit 2 GB or more Windows 7 32 bit Vista 64 bit 32 bit 1 GB or more Windows XP 512 MB or more Mac OS X v10 4 v10 5 512 MB or more Mac OS X v10 6 1 GB or more Interface USB Free Hard Disk Space 120 MB or more 140 MB or more Display 1 024 x 768 pixels or more 1 024 x 768 pixels or more For Windows XP Microsoft NET Framework 2 0 max 280 MB must be installed Inst...

Page 60: ... pp 8 10 Proceed with the installation to display the screen on the left Macintosh Place the CD ROM in the computer s CD ROM drive and double click When the screen on the left appears click Install and follow the onscreen instructions to proceed When the installation finishes click Finish to restart the computer and complete the installation Installing and Starting the Software Windows Vista and M...

Page 61: ...LPHY Photo Print from the Dock the bar at the bottom of the desktop and the screen in Step 5 will appear Commercially available USB cable SELPHY may not operate correctly if it is connected to a computer via a USB hub SELPHY may not function properly if other USB devices with the exception of a USB mouse or USB keyboard are used at the same time Disconnect any other USB devices from your computer ...

Page 62: ... color changes and the image is set for printing Use the same procedure to click all images you want to print If you click an image again the background color switches back to the original color and the settings are canceled Select an image then click Next Using the Software to Print Use the installed software SELPHY Photo Print to print images from your computer The Simple print feature will be e...

Page 63: ...f the screen Macintosh When all printing is finished click at the top left corner of the screen Turning off Audio Guidance Audio guidance may not play properly on some computers If the audio guidance is difficult to hear follow these steps to turn it off before using the software Turning off Audio Guidance While in the screen from Step 1 in Using the Software to Print p 25 check the Off radio butt...

Page 64: ...aken with any digital camera or video camera regardless of the manufacturer or model by connecting to a printer without using a computer Make sure that a memory card is not inserted in SELPHY and it is not connected to a computer Connect SELPHY to the digital camera using the interface cable USB cable included with the digital camera First turn on SELPHY then turn on the digital camera and play ba...

Page 65: ...inserted that contains DPOF information set with the digital camera Printing Images Using Digital Camera Specified Settings DPOF Print You can make print settings and select images to print on your digital camera and then print the images all at once For details refer to the user guide included with your digital camera Insert a memory card containing DPOF settings into the appropriate memory card ...

Page 66: ... used however charging will stop When you turn SELPHY off p 11 appears and charging resumes For cautions concerning the battery refer to the user guide included with the battery When is displayed and you press any button other than the q button for 3 seconds or longer will disappear When the screen is turned off while the battery is charging and you press any button other than the q button will ap...

Page 67: ...re is an obstacle between the Bluetooth unit and the mobile phone When there is electromagnetic interference from magnetic fields static electricity or radio waves in the area The maximum file size that can be transferred is 2 3 MB varies depending on mobile phone Data transfer time increases when data size is large Therefore the amount of time before printing may also increase Depending on the mo...

Page 68: ...will appear on the computer screen Do not cancel the print Wait until printing resumes Cannot display print images from memory card or USB flash memory Make sure the memory card is inserted all the way into the correct slot with the label facing upward pp 12 13 Make sure the USB flash memory is inserted all the way in the correct direction p 14 Make sure you are using a supported image type p 12 M...

Page 69: ... the paper size matches the size of the paper cassette p 2 Paper is not feeding properly frequent paper jams Make sure the paper and paper cassette are correctly inserted pp 8 10 Make sure there are less than 19 sheets in the cassette Make sure 19 or more sheets have not collected on the outer lid of the paper cassette Make sure that you are using dedicated paper p 9 Cannot print the specified num...

Page 70: ...d MMCplus Card HC MMCplus Card miniSD Memory Card 4 miniSDHC Memory Card 4 microSD Memory Card 4 microSDHC Memory Card 4 microSDXC Memory Card 4 RS MMC Card 4 MMCmobile Card 4 MMCmicro Card Memory Stick Memory Stick PRO Memory Stick Duo Memory Stick PRO Duo Memory Stick micro 4 USB Flash Memory FAT exFAT only supported Operating Temperatures 5 40 C 41 104 F Operating Humidity 20 80 Power Source Co...

Page 71: ...moving from the bag In the event that condensation does form within SELPHY keep it at room temperature until the water droplets evaporate naturally before use When SELPHY becomes dirty wipe the casing with a soft dry cloth When dust or dirt has accumulated on the battery cover or vents pp 6 29 be sure to remove the ink cassette p 14 before cleaning If dust gets in through the vents the printer may...

Page 72: ...35 COPY ...
Page 73: ...notice Illustrations and screenshots in this guide may differ slightly from the actual equipment The above items notwithstanding Canon accepts no liability for damages due to mistaken operation of the products This product is designed to achieve excellent performance when used with genuine Canon accessories Canon shall not be liable for any damage to this product and or accidents such as fire etc ...

Reviews: