background image

12

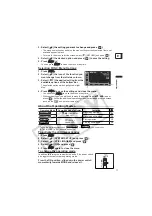
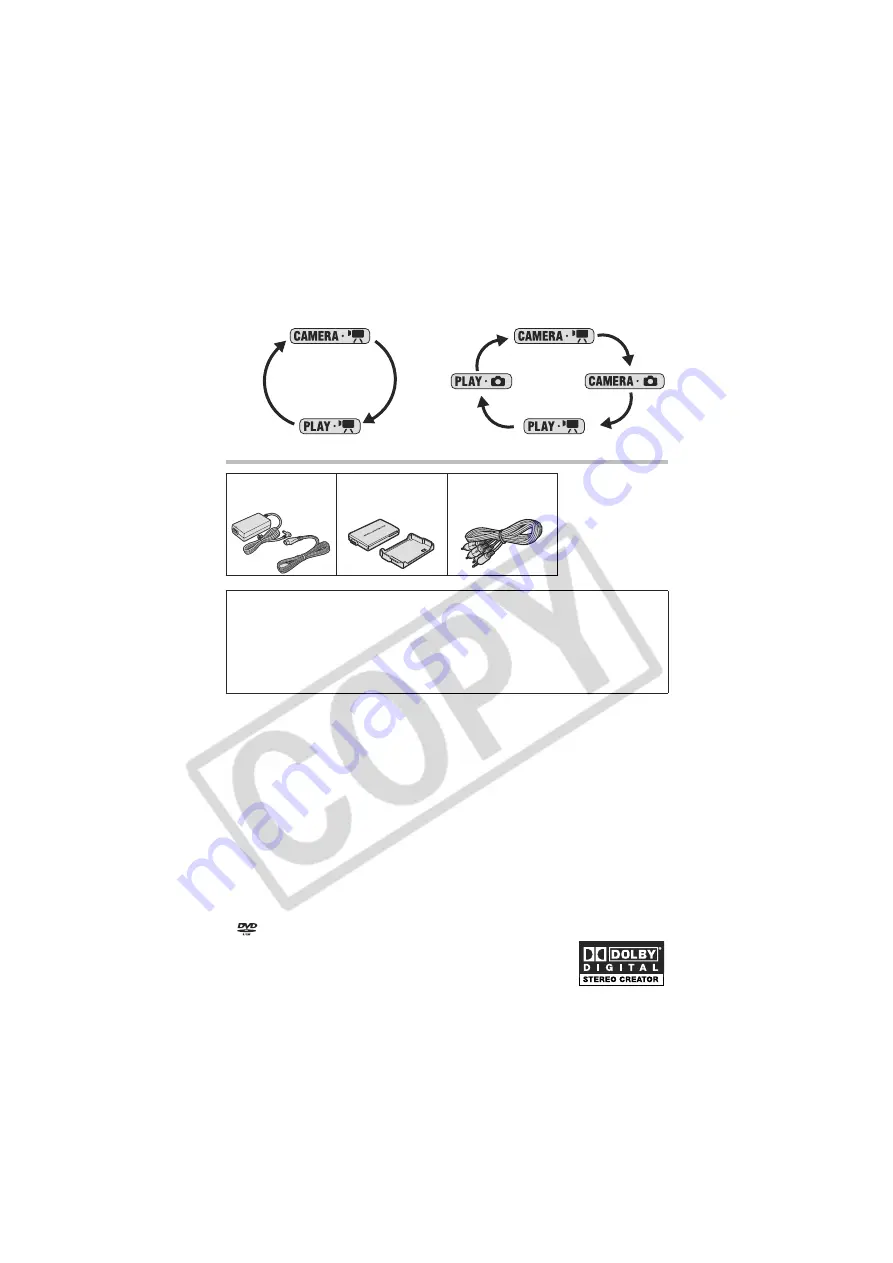
This action will toggle the operation mode in the following sequence:

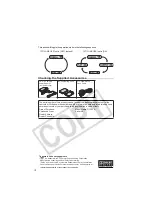
Checking the Supplied Accessories

CA-570 Compact 
Power Adapter
(incl. power cord)

BP-208 Battery Pack

STV-250N Stereo 
Video Cable

The serial number of this product can be found at the battery attachment unit of the 
camcorder. Write down the number and other information here and retain this book as a 
permanent record of your purchase to aid identification in case of theft.
Date of Purchase:

Model Name: DC100 A

Purchased From:

Serial No.:

Dealer Address:
Dealer Phone No.:

[STILL IMAGES] set to [OFF] (default)

[STILL IMAGES] set to [ON]

Trademark Acknowledgements

 is a trademark of DVD Format/Logo Licensing Corporation.

• Manufactured under license from Dolby Laboratories.

“Dolby” and the double-D symbol are trademarks of Dolby Laboratories.

• Other names and products not mentioned above may be trademarks or 

registered trademarks of their respective companies.

Summary of Contents for 1185B001 - DC 100 Camcorder

Page 1: ... 9 DPFRUGHU QVWUXFWLRQ 0DQXDO DPpVFRSH 9 0DQXHO G LQVWUXFWLRQ iPDUD 9 0DQXDO GH QVWUXFFLRQHV QJOLVK UDQoDLV VSDxRO 38 0 176 ...

Page 2: ...ZKLFK FDQ EH GHWHUPLQHG E WXUQLQJ WKH HTXLSPHQW RII DQG RQ WKH XVHU LV HQFRXUDJHG WR WU WR FRUUHFW WKH LQWHUIHUHQFH E RQH RU PRUH RI WKH IROORZLQJ PHDVXUHV 5HRULHQW RU UHORFDWH WKH UHFHLYLQJ DQWHQQD QFUHDVH WKH VHSDUDWLRQ EHWZHHQ WKH HTXLSPHQW DQG UHFHLYHU RQQHFW WKH HTXLSPHQW LQWR DQ RXWOHW RQ D FLUFXLW GLIIHUHQW IURP WKDW WR ZKLFK WKH UHFHLYHU LV FRQQHFWHG RQVXOW WKH GHDOHU RU DQ H SHULHQFHG UDG...

Page 3: ...tcombinationtooverturn 10 Power Sources The CA 570 Compact Power Adapter should be operated only from the type of power source indicated on the marking label If you are not sure of the type of power supply to your home consult your product dealer or local power company Regarding other power sources such as battery power refer to instructions in this manual 11 Polarization The CA 570 Compact Power ...

Page 4: ...peration instructions Improper adjustment of other controls may result in damage and will often require extensive work by a qualified technician to restore the product to its normal operation e If the product has been dropped or the cabinet has been damaged f When the product exhibits a distinct change in performance This indicates a need for service 19 Replacement Parts When replacement parts are...

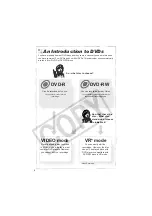
Page 5: ... recording Never worry about mistakenly recording over a precious memory PLAYING Just select a scene from the index screen Just insert your finalized disc into a DVD player and immediately find the scene you want to play back from the index 28 No need to play the whole thing or run the tape forward and back to find that scene you want Finalization is a process required to make the DVD discs you re...

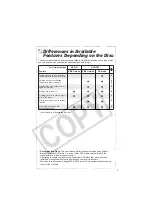
Page 6: ...not edit or delete the recordings You can record on it many times You can delete scenes or initialize the disc and start recording again Now that I have the disc What disc standard do I choose to initialize it VR mode VIDEO mode Once finalized a disc recorded in VIDEO mode will play in most common DVD players However you cannot edit the recordings You can easily edit the recordings However the dis...

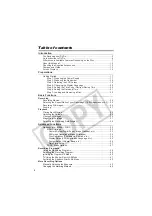
Page 7: ...g the disc in order to use it again for recording 57 Giving a title to the disc 58 Finalizing the disc in order to play it with a DVD player 61 Adding recordings to a disc already finalized 63 Converting still images into Photomovie scenes 60 Recommended Discs This camcorder s performance was tested using Hitachi Maxell HG series DVD discs For use of other DVD media contact directly the manufactur...

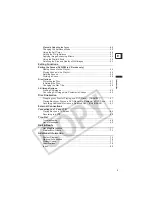
Page 8: ... your Recordings 16 9 Widescreen or 4 3 25 Recording Still Images 26 Zooming 27 Playback Playing Back Movies 28 Adjusting the Volume 29 Viewing Still Images 30 Magnifying the Image 31 Selecting the Recording Data Display 32 Advanced Functions Options Lists MENU FUNC 33 MENU Options 33 Camera Setup Digital Zoom Image Stabilizer etc 33 Still Image Operations Erase All Images 34 Disc Operations Photo...

Page 9: ...ing the Disc 57 Changing the Disc Title 58 Still Image Options Erasing Still Images 59 Converting Still Images into Photomovie Scenes 60 Disc Finalization Preparing your Disc for Playing on a DVD Player FINALIZE 61 Playing Back your Disc on a DVD Player or a Computer s DVD Drive 62 Recording Additional Movies on a Finalized Disc UNFINALIZE 63 External Connections Connecting to a TV and VCR Playing...

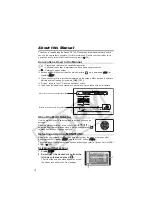
Page 10: ...reen The photos included in the manual are simulated pictures taken with a still camera About the Multi Selector Use the multi selector to select options in a menu and change settings Push the multi selector up down left or right to select an item In most places press the multi selector itself to make a selection or change a setting Selecting an Option MENU FUNC Many of the camcorder s functions c...

Page 11: ...ith some settings you will need to make further selections and or press Follow the additional operation guides that will appear on the screen such as the icon small arrows etc About the Operating Modes To use the still images functions or you need to set STILL IMAGES to ON as explained below To activate the still images modes 1 Press 2 Select SYSTEM SETUP and press 3 Select STILL IMAGES and press ...

Page 12: ... this book as a permanent record of your purchase to aid identification in case of theft Date of Purchase Model Name DC100 A Purchased From Serial No Dealer Address Dealer Phone No STILL IMAGES set to OFF default STILL IMAGES set to ON Trademark Acknowledgements is a trademark of DVD Format Logo Licensing Corporation Manufactured under license from Dolby Laboratories Dolby and the double D symbol ...

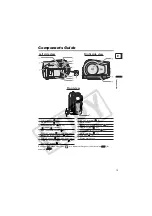
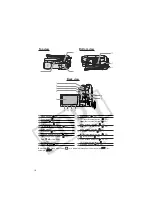
Page 13: ...ial number Lens cover switch 24 26 open closed BATTERY RELEASE switch 17 RESET button 66 EXP Exposure switch 43 DISPLAY button 32 Multi Selector Disc compartment cover 22 DC IN terminal 17 button Multi Selector 10 Grip belt 19 FOCUS button 44 Multi Selector Stereo microphone WIDE SCR Widescreen button 25 PLAYLIST button 54 Left side view Right side view Front view MENU ...

Page 14: ...on 28 Speaker 29 Tripod socket 25 OPEN disc cover switch 22 fast forward button 28 Index screen button 28 Strap mount Viewfinder 19 D EFFECTS button 50 play pause button 28 Dioptric adjustment lever 19 Operating mode indicator 11 Red CAMERA Green PLAY stop button 28 DISC access indicator 24 26 CHG charge indicator 17 Power switch 11 Start stop button 24 26 Top view Bottom view Back view MENU ...

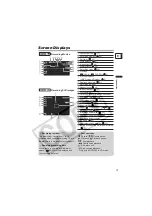
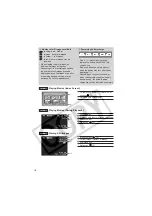
Page 15: ...n 34 Level marker 35 Zoom 27 Exposure 43 Metering mode 43 Still image quality size 53 Number of still images available Remaining battery charge AF frame 45 Camcorder shake warning 33 AF AE locked during still image recording 26 Recording reminder The camcorder counts from 1 to 10 seconds when you start recording This is helpful to avoid scenes that are too short Remaining recording time When there...

Page 16: ...ages in red No more images can be recorded When viewing the still images the display will always be in green Depending on the recording conditions the number of still images available displayed may not decrease even after a recording has been made or may decrease by 2 still images at once Remaining battery charge When starts flashing in red replace the battery pack with a fully charged one When yo...

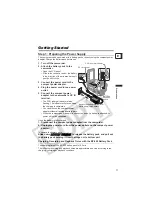
Page 17: ... can also use the compact power adapter without attaching a battery pack When the compact power adapter is connected even if a battery is attached its power will not be consumed Once the battery is fully charged 1 Disconnect the compact power adapter from the camcorder 2 Unplug the power cord from the power outlet and the compact power adapter To remove the battery pack Slide down to release the b...

Page 18: ...e charging will not start If you connect a faulty power adapter or battery pack the CHG charge indicator flashes rapidly approx twice per second and the charging stops The CHG charge indicator also serves as a rough estimate of the battery charge status Continuously on Battery fully charged Flashes approx twice per second Battery over 50 charged Flashes approx once per second Battery less than 50 ...

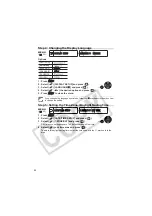
Page 19: ...n rotate the panel by 180 degrees toward the lens allowing the subject to monitor the LCD screen while you use the viewfinder Rotating the panel by 180 degrees is also useful if you wish to include yourself when recording with the self timer LCD Backlight You can switch the brightness of the LCD screen to NORMAL or BRIGHT 1 Press 2 Select DISPLAY SETUP and press 3 Select BACKLIGHT and press 4 Sele...

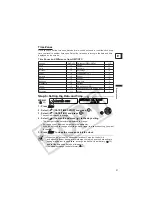
Page 20: ...ge the setting Step 5 Setting the Time Zone Daylight Saving Time 1 Press 2 Select DATE TIME SETUP and press 3 Select T ZONE DST and press The time zone setting appears The default setting is New York 4 Select your time zone and press To adjust for daylight saving time select the time zone with the mark next to the area MENU 33 DISPLAY SETUP LANGUAGE ENGLISH DEUTSCH ENGLISH ESPAÑOL FRANÇAIS ITALIAN...

Page 21: ...need to change all settings move to a specific setting you want to change 5 Press to close the menu and start the clock When you do not use the camcorder for about 3 months the built in rechargeable lithium battery may discharge completely and the date and time setting may be lost In such case recharge the built in lithium battery 72 and set the time zone date and time again You can also change th...

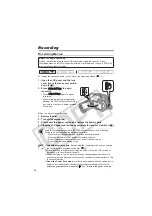
Page 22: ... can start recording movies once the record pause indication appears When using a DVD RW You need to initialize new discs before you can start recording The disc initialization screen will appear when a new DVD RW is first inserted It will not appear when inserting a disc already initialized In that case you can start recording once the record pause indication appears Select the desired disc speci...

Page 23: ...r finishes recognizing the disc before you start recording Removing the Disc 1 Slide fully in the direction of the arrow and gently open the disc cover completely until it stops Do not subject the camcorder to strong impacts while the DISC access indicator is on or flashing Retract the grip belt under the camcorder so it will not get in the way of the disc cover It may take a moment after pressing...

Page 24: ... disc cover and do not remove the disc Do not disconnect the power source or turn off the camcorder Do not change the operating mode About the recording time By changing the recording mode you can change the recording time available on the disc 38 When recording in bright places it may be difficult to use the LCD screen In such case use the viewfinder instead When recording in very loud places suc...

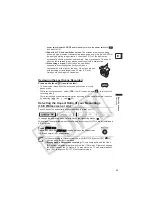
Page 25: ... scene and returns to record pause mode While reviewing the scene select the icon and press to return to the recording mode While reviewing a scene immediately after recording it you can also delete the scene by selecting the icon 55 Selecting the Aspect Ratio of your Recordings 16 9 Widescreen or 4 3 You can select the aspect ratio of your recording to match your TV To change the operating mode r...

Page 26: ...disc access display appears and while the DISC access indicator is on or flashing Failing to do so may result in permanent data loss Do not subject the camcorder to vibrations or strong impacts Do not open the disc cover and do not remove the disc Do not disconnect the power source or turn off the camcorder Do not change the operating mode If the subject is not suitable for autofocus turns yellow ...

Page 27: ...ngle Move it toward T to zoom in telephoto You can also change the zoom speed 33 You can select one of three fixed zoom speeds or a variable speed that depends on how you operate the zoom lever Press lightly for a slow zoom press harder for faster zooms Keep at least 1 m 3 3 ft to the subject At wide angle you can focus on a subject as close as 1 cm 0 39 in When set to VARIABLE the zoom speed will...

Page 28: ...Press to stop the playback and return to the scene index screen To use the viewfinder close the LCD panel About the screen display During playback the recording s time code will be displayed at the upper right corner of the screen in hours minutes seconds You can also choose to display instead the date and time when the scene was recorded and additional recording data 32 As long as you don t turn ...

Page 29: ...able with discs initialized in VIDEO mode Depending on the recording you might occasionally notice a brief stop of the picture or sound at the point where the scene changes During the playback of a Photomovie scene even though the display may change according to the fast forward reverse playback the actual playback speed will not change Adjusting the Volume The camcorder plays the sound with the b...

Page 30: ...nt data loss Do not subject the camcorder to vibrations or strong impacts Do not open the disc cover and do not remove the disc Do not disconnect the power source or turn off the camcorder Do not change the operating mode Slideshow 1 Press 2 Select SLIDESHOW and press 3 Select START and press Images are played back one after another Press to stop the slideshow Index Screen 1 Move the zoom lever to...

Page 31: ...hange the operating mode refer to About the Operating Modes 11 1 Move the zoom lever toward T The image is magnified by 2 times and a frame appears indicating the position of the magnified area To further enlarge the image move the zoom lever toward T To reduce the magnification to less than 2 times move the zoom lever toward W will appear for images that cannot be enlarged 2 Select the part of th...

Page 32: ... the desired option and press 5 Press to close the menu Turning the On screen Displays On Off During playback repeatedly press to turn the on screen displays on off in the following sequence MENU 33 DISPLAY SETUP DATA CODE DATE TIME DATE Displays the date or time when the scene or still image was recorded TIME DATE TIME Displays both the date and time of the recording CAMERA DATA Displays the expo...

Page 33: ...tical zoom range With the digital zoom the image is digitally processed so the image resolution will deteriorate the more you zoom in The digital zoom indicator will appear in light blue from 25x up to 100x and dark blue from 100x up to 1000x The digital zoom cannot be used with the NIGHT recording program or with the multi image screen VARIABLE SPEED 3 SPEED 2 SPEED 1 When set to VARIABLE the zoo...

Page 34: ...e suppressed along with the sound of wind We recommend to leave the wind screen OFF for most recording environments ON OFF Still Image Operations Erase All Images STILL IMG OPER NO YES Disc Operations Photomovie Finalize etc DISC OPERATIONS Displays a screen where you can verify the details regarding the disc The disc information includes the disc title the disc type DVD R or DVD RW the disc speci...

Page 35: ...tate the LCD panel 180 degrees to face the subject the picture displayed will be a mirror image right and left reversed so that the image on the display will match that of the subject All on screen displays will also be reversed 32 DATE TIME DATE TIME CAMERA DATA CAM D T 32 DATE TIME DATE TIME ON OFF A horizontal line will appear at the center of the screen You can frame the picture by referring t...

Page 36: ...pproximately 30 seconds before the camcorder shuts off the message AUTO POWER OFF will appear RESET CONTINUOUS Select the image numbering method to be used on a new disc Images are automatically assigned consecutive image numbers from 0101 to 9900 and stored in folders containing up to 100 images Folders are numbered from 101 to 998 RESET Image numbering will start anew from 101 0101 every time yo...

Page 37: ...FUNC Menu Options Mode switch PROGRAM AE SHUTTER PRIO AE APERTURE PRIO AE Mode switch PORTRAIT SPORTS NIGHT SNOW BEACH SUNSET SPOTLIGHT FIREWORKS Mode switch EVALUATIVE CENT WEIGHT AVERAGE SPOT Mode switch AUTO DAYLIGHT SHADE CLOUDY TUNGSTEN FLUORESCENT FLUORESCENT H SET Mode switch IMAGE EFFECT OFF VIVID NEUTRAL LOW SHARPENING SOFT SKIN DETAIL CUSTOM Mode switch 50 D EFFECT OFF FADER EFFECT MULTI...

Page 38: ...of the picture or sound at the point where the scene changes The camcorder uses a variable bit rate VBR when encoding the video data so the actual recording times will vary depending on the content of the scenes Size L 1024x768 S 640x480 Quality SUPER FINE FINE NORMAL ALL SCENES ONE SCENE CANCEL This option is available only from the original index screen This option is available only from the pla...

Page 39: ...lurring other distracting details Snow Use this mode to record in bright ski resorts It prevents the subject from being underexposed Spotlight Use this mode to record spotlit scenes Sports Use this mode to record sports scenes such as tennis or golf Beach Use this mode to record on a sunny beach It prevents the subject from being underexposed Fireworks Use this mode to record fireworks Night Use t...

Page 40: ... when played back SNOW BEACH The subject may become overexposed on cloudy days or in shaded places Check the image on the screen The picture may not appear smooth when played back FIREWORKS To avoid camcorder shake we recommend using a tripod Make sure to use a tripod especially in as the shutter speed slows down Using the Program AE Mode The camcorder automatically adjusts the aperture and shutte...

Page 41: ...for the recording condition In such case readjust the shutter speed When using a slow shutter speed in dark places you can obtain a brighter image but the image quality may be lower and the autofocus may not work well Do not point the camcorder directly at the sun when the shutter speed is set to 1 1000 or higher The image may flicker when recording with high shutter speeds Recording movies under ...

Page 42: ...nge the operating mode refer to About the Operating Modes 11 Mode switch Aperture value guideline 1 8 2 0 2 4 2 8 3 4 4 0 4 8 5 6 6 7 8 0 9 5 11 14 16 large m aperture size o small 1 Select the recording program APERTURE PRIO AE as described in Selecting the Recording Program 40 2 Press 3 Change the aperture value and press to save the setting Available aperture values vary depending on the zoom p...

Page 43: ...ent range depends on the brightness of the picture at the time you locked the exposure Pressing again will cancel the exposure lock and return the camcorder to the previous setting Changing the Metering Method You can select the light metering mode To change the operating mode refer to About the Operating Modes 11 Mode switch Options 37 EVALUATIVE EVALUATIVE Appropriate for standard shooting condi...

Page 44: ...you set the mode switch to Readjust the focus when you have turned off the camcorder Infinity Focus Use this function when you wish to focus on faraway subjects such as mountains or fireworks 1 Adjust the zoom 2 Keep pressed down for more than 2 seconds appears Pressing again will return to autofocus If you operate the zoom or the multi selector during infinity focus changes to MF and the camcorde...

Page 45: ...hooting conditions one or more AF frames out of the nine frames available are automatically selected and focused on Four framing corners will appear on the screen when making the selection the corners do not appear while actually recording Center point Mode switch The center AF frame is selected to focus This is convenient for making sure the focus is exactly where you want it A single focusing fr...

Page 46: ...appears on the screen Press first halfway to activate the autofocus and then fully to record the still image The camcorder will record the still image after a 10 second countdown The countdown appears on the screen Once the countdown has begun you can also press to cancel the self timer The self timer will be canceled if you turn off the camcorder CAMERA SETUP SELF TIMER ON MENU MENU Start Stop St...

Page 47: ...r SET When you have set the custom white balance Depending on the light source may keep flashing The result will still be better than with AUTO Reset the white balance when the lighting condition changes Turn off the digital zoom The camcorder retains the custom white balance setting even if you turn it off 37 AUTO AUTO Settings are automatically set by the camcorder Use this setting for outdoor s...

Page 48: ...m white balance may provide better results in the following cases Changing lighting conditions Close ups Subjects in a single color sky sea or forest Under mercury lamps and certain types of fluorescent lights ...

Page 49: ...ancing effects VIVID Emphasizes the contrast and color saturation NEUTRAL Tones down the contrast and color saturation LOW SHARPENING Records subjects with softened outlines SOFT SKIN DETAIL Softens the details in the skin tone area for a more complimentary appearance To obtain the best effect use this setting when recording a person in close up Note that areas similar to the skin color may lack i...

Page 50: ...s a sequence of 4 9 or 16 still images and displays them as one split screen Sound will be recorded normally When you are not using the digital effect select D EFFECT OFF Selecting a Fader Effect To change the operating mode refer to About the Operating Modes 11 Mode switch BLK WHT only FADE T fade trigger WIPE CORNER corner wipe JUMP FLIP PUZZLE ZIGZAG BEAM TIDE BLK WHT black and white SEPIA ART ...

Page 51: ... the recording program Using the Multi Image Screen To change the operating mode refer to About the Operating Modes 11 Mode switch except for the NIGHT recording program Options Digital Effects icon FADER EFFECT Press Desired fader effect Press 37 D EFFECT OFF S SPEED Select how fast the images will be captured MANUAL One image will be added to the split screen every time you press Hold pressed do...

Page 52: ...lying 1 Press to capture the images 2 Press to record the multi image screen displayed Digital Effects icon MULTI S Press S SPEED Desired transition speed S SPLIT Desired number of images Press FUNC FUNC D EFFECTS Start Stop ...

Page 53: ...his number is the number of images that can be recorded on the disc however the maximum number of remaining images displayed on the screen will be 9999 The number displayed on the right corner indicates the approximate number of images that can be recorded with the current quality size setting 37 L 1024x768 FINE Image Size Image Quality Number of Images VIDEO Mode DVD R RW VR Mode DVD RW L 1024x76...

Page 54: ...e DVD RW initialized in VR mode Adding Scenes to the Playlist Options From the original index screen select the scene to add to the playlist To add all scenes there is no need to select any particular scene When the operation is completed ADDED TO PLAYLIST will be displayed Press to check the scenes in the playlist index screen Moving Scenes in the Playlist From the original index screen press Fro...

Page 55: ...l index screen select the scene to delete To delete a scene only in the playlist press first and then select the scene Deleting a Scene Just After Recording As long as you have not turned the camcorder off or changed the operating mode after recording a scene you can delete it while reviewing it To change the operating mode refer to About the Operating Modes 11 Disc type DVD RW discs VIDEO or VR m...

Page 56: ...ivided To change the operating mode refer to About the Operating Modes 11 Disc type DVD RW initialized in VR mode From the original index screen select the scene to divide To divide a scene only in the playlist press first and then select the scene You can use the following icons and the special playback modes 28 to bring the scene to a precise point Skip to the beginning of the current next scene...

Page 57: ...or in order to change the disc specification Avoid moving the camcorder while the operation is in progress Initializing the disc will permanently erase all recordings even if the disc is protected The lost original recordings cannot be recovered The disc initialization will take approximately one minute Disc type DVD RW discs VIDEO or VR mode Options Close the menu only after the screen display re...

Page 58: ... screen when playing the finalized disc in most DVD players To change the operating mode refer to About the Operating Modes 11 Select one character at a time and press to add it to the title Select BACKSPACE and press to delete the last character DISC OPERATIONS DISC TITLE Enter the title up to 20 characters SET YES MENU MENU ...

Page 59: ... a Single Image Just After Recording You can erase the still image you recorded last while you are reviewing the image immediately after recording it To change the operating mode refer to About the Operating Modes 11 Disc type DVD RW discs VIDEO or VR mode While reviewing the image immediately after recording Erasing All Images To change the operating mode refer to About the Operating Modes 11 Dis...

Page 60: ... still images on the disc where each image will be displayed for approx 3 seconds To change the operating mode refer to About the Operating Modes 11 Converting a Single Image Select the still image you want to convert to a scene Converting All Images This function does not affect the original still images If the disc becomes full while creating a Photomovie scene the operation will be canceled CON...

Page 61: ...ace it on a table or to disconnect the AV cable after the finalization process started may result in permanent data loss Always power the camcorder using the compact power adapter The operation cannot be started if the camcorder is powered only with the battery pack Avoid the following actions while the operation is in progress Failing to do so can interrupt the process and result in permanent dat...

Page 62: ...in the DVD player 3 Select the scene you want to play from the index screen On a Computer s DVD Drive You need to have DVD playback software installed in your computer to play the disc 1 Insert a finalized disc in the DVD drive 2 Run the DVD playback software Refer also to the instruction manual and help modules of your DVD playback software To view still images recorded on the disc close first an...

Page 63: ...nalization process started may result in permanent data loss Always power the camcorder using the compact power adapter The operation cannot be started if the camcorder is powered only with the battery pack Avoid the following actions while the operation is in progress Failing to do so can interrupt the process and result in permanent data loss Do not move the camcorder Do not disconnect the compa...

Page 64: ...ect the STV 250N Stereo Video Cable to the camcorder s AV terminal and the terminals on the TV or VCR Connect the white plug to the white audio terminal L left the red plug to the red audio terminal R right and the yellow plug to the yellow VIDEO terminal 3 On a TV Set the input selector to VIDEO On a VCR Set the input selector to LINE IN We recommend powering the camcorder using the compact power...

Page 65: ...lank cassette and set the device to record pause mode 2 This camcorder Locate the scene you wish to copy and pause playback shortly before the scene 3 This camcorder Resume the movie playback 4 Connected device Begin recording when the scene you wish to copy appears Stop recording when copying is complete 5 This camcorder Stop playback We recommend powering the camcorder using the compact power ad...

Page 66: ...resets all settings flashes on the screen Load a disc 22 flashes on the screen Battery pack is exhausted Replace or charge the battery pack 17 Video noise appears on screen When using the camcorder in a room where a plasma TV is located keep a distance between the camcorder and the plasma TV Video noise appears on the TV screen When using the camcorder in a room where a TV is located keep a distan...

Page 67: ...e scene or still image is being recorded on the disc 24 26 The point where the start stop button was pressed does not match the beginning end of the recording There is a slight interval between pressing the start stop button and the actual start of the recording on the disc This is not a malfunction The recording suddenly stops shortly after starting recording The disc is dirty Clean the disc with...

Page 68: ... You cannot add more than 999 scenes to the playlist Cannot divide the scene You cannot edit or delete scenes on a disc that was protected in another digital device Cannot edit the disc title You cannot add a title to a DVD R disc after it was finalized 61 Unfinalize the disc first DVD RW in VIDEO mode 63 You may not be able to edit the title if you entered it with another digital device Remove th...

Page 69: ...the compact power adapter and remove the battery pack and let the camcorder cool down before resuming use Message Explanation SET THE TIME ZONE DATE AND TIME You have not set the time zone date and time This message appears each time you turn the power on until you set the time zone date and time 20 CHANGE THE BATTERY PACK Battery pack is exhausted Replace or charge the battery pack 17 TEMPERATURE...

Page 70: ...ompletely before resuming use 73 The disc may not be loaded correctly Try removing the disc and reinserting it 22 The disc is not initialized Initialize the disc 57 DISC ACCESS FAILURE CHECK THE DISC There was an error when reading the disc or attempting to write onto it Try cleaning the disc or replace it 72 This message can also appear if condensation has formed Wait until the camcorder dries co...

Page 71: ... does not function properly consult qualified service personnel Handle the camcorder with care Do not subject the camcorder to shocks or vibration as this may cause damage Battery Pack Charged battery packs continue to discharge naturally Therefore charge them on the day of use or the day before to ensure a full charge Attach the terminal cover whenever a battery pack is not in use Contact with me...

Page 72: ...n the disc Do not bend scratch or wet the disc and do not subject it to strong shocks Do not attach labels or stickers on the disc surfaces The disc may not rotate in a stable manner and this may cause malfunctions Return discs to their case for storage When writing on the label side of the disc avoid hard tip pens Use waterproof soft tipped felt pens instead Moving a disc rapidly between hot and ...

Page 73: ... Lens and Viewfinder If the lens surface is dirty the autofocus may not work properly Remove any dust or dirt particles using a non aerosol type blower brush Use a clean soft lens cleaning cloth to gently wipe the lens or viewfinder Never use tissue paper LCD Screen Clean the LCD screen using a clean soft lens cleaning cloth Condensation may form on the surface of the screen when the temperature c...

Page 74: ... use the compact power adapter to operate the camcorder and to charge battery packs in any country with power supply between 100 and 240 V AC 50 60 Hz Consult the Canon Service Center for information on plug adapters for overseas use Playback on a TV Screen You can only play back your recordings on TVs compatible with the NTSC system The NTSC system is used in the following countries areas America...

Page 75: ...fers from area to area BP 208 Battery Pack CG 300 Battery Charger STV 250N Stereo Video Cable CA 570 Compact Power Adapter SC 2000 Soft Carrying Case WS 20 Wrist Strap Shoulder Strap BP 208 Battery Pack TV VCR Mini DVD Disc DVD R RW DVD player recorder Mini DVD Disc DVD R RW Computer ...

Page 76: ... charging condition Shoulder Strap You can attach a shoulder strap for more security and portability Pass the ends through the strap mount and adjust the length of the strap Use of genuine Canon accessories is recommended This product is designed to achieve excellent performance when used with genuine Canon accessories Canon shall not be liable for any damage to this product and or accidents such ...

Page 77: ...ovided Accessories CA 570 Compact Power Adapter 8468A002AA BP 208 Battery Pack 0802B002AA STV 250N Stereo Video Cable 3067A002AA D82 0590 201 Optional Accessories CG 300 Battery Charger 0784B002AA WS 20 Wrist Strap 3118A002AA D81 0190 202 SC 2000 Soft Carrying Case 9389A001AA This mark identifies genuine Canon video accessories When you use Canon video equipment we recommend Canon brand accessorie...

Page 78: ...alent Movies 16 9 Image stabilizer ON 43 8 1 095 mm 16 9 Image stabilizer OFF 41 0 1 025 mm 4 3 recordings 49 8 1 245 mm Still images 43 6 1 090 mm Lens Configuration 10 elements in 8 groups AF system TTL autofocus manual focusing possible Minimum Focusing Distance 1 m 3 3 ft 1 cm 0 39 in on maximum wide angle White Balance Auto white balance preset white balance DAYLIGHT SHADE CLOUDY TUNGSTEN FLU...

Page 79: ...er supply 100 240 V AC 50 60 Hz Power consumption 17 W Rated output 8 4 V DC 1 5 A Operating temperature 0 40 C 32 104 F Dimensions 52 x 90 x 29 mm 2 1 x 3 5 x 1 1 in Weight 135 g 4 8 oz Battery type Rechargeable Lithium Ion Battery Rated voltage 7 4 V DC Operating temperature 0 40 C 32 104 F Battery capacity 850 mAh Dimensions 39 x 8 x 63 mm 1 5 x 0 31 x 2 5 in Weight 40 g 1 4 oz ...

Page 80: ...disc 61 Fireworks SCN 39 Focus priority 34 Focusing mode 45 FUNC menu 11 37 G Grip belt 19 I Image enhancing effects 49 Image jump 31 Image stabilizer 33 Index screen movies 28 Index screen still images 30 Initialization disc 57 L Language 20 LCD backlight 19 LCD screen rotating the 19 Lens cover 24 26 LP mode 38 M Magnifying a still image 31 Maintenance 73 MENU 10 33 Metering method 43 Mode switc...

Page 81: ...er 46 Serial number 13 Shoulder strap 76 Shutter speed 41 Slideshow 30 Snow SCN 39 SP mode 38 Speaker 29 Sports SCN 39 Spotlight SCN 39 Still image quality 53 Still image size 53 Sunset SCN 39 T Telephoto 27 Time zone 20 Troubleshooting 66 Tv recording program 41 V VIDEO mode disc specification 6 Viewfinder Dioptric adjustment 19 Volume 29 VR mode disc specification 6 W White balance 47 Wide angle...

Page 82: ...ailure to follow operating instructions B If the equipment is defective as a result of leaking batteries sand dirt or water damage C If defects or damages are caused by the use of unauthorized parts or by service other than our authorized agent D If the equipment is used for commercial or industrial use This Limited Warranty does not cover cabinet exterior finish DVD discs nor does it apply to equ...

Page 83: ...ed or removed c The digital video equipment is used for commercial professional or industrial purposes This limited warranty does not cover the cabinet exterior finish of the DVD equipment DVD discs nor does it apply to DVD equipment purchased outside Canada TO OBTAIN WARRANTY SERVICE Ship your Canon digital video equipment in its original carton box or equivalent properly packed fully insured wit...

Page 84: ...RQO Q 6L YRXV DYH GHV TXHVWLRQV YHXLOOH WpOpSKRQHU VDQG IUDLV DX DQDGD 1 VHXOHPHQW 0 2 121 0 1 6 5 9 3HULIHULFR 6XU 1R RO 5DQFKR GH Q DOGR 3 0p LFR 0p LFR 121 8 6 1 1 56 2 DPHVEXUJ 5RDG DPHVEXUJ 1 86 1752 121 7 1 0 5 1 685 0e5 DWHUIRUG D 6XLWH 0LDPL 86 6 121 21 21 203 1 7 7KH 0HWURSROLV 7RZHU 0HWURSROLV ULYH XQJKRP RZORRQ RQJ RQJ 38 0 1L 121 1 35 17 1 3 1 035 0 8 321 035 62 1 3Ï1 3ULQWHG RQ UHXVHG...

Reviews: