© 2020
|
Johnson Outdoors Marine Electronics, Inc.
|
cannondownriggers.com
14
INSTALLING THE BOOM OR TELESCOPIC BOOM
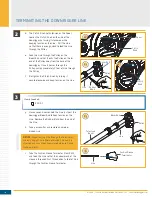
4
#6 x 1
Item(s) needed:
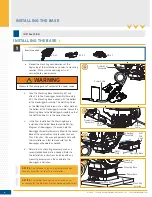
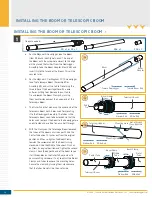
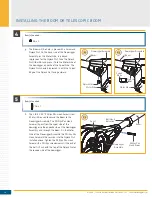
g. The Boom will be held in place with a Screw and
Nylock Nut. On the back side of the Downrigger
Assembly, on the Motor Side, is a keyed
impression for the Nylock Nut. Take the Nylock
Nut (Item #6) and press it into the Motor Side of
the downrigger, opposite of the Spool Side. The
Nylock Nut should be pressed in with the Curved
Edge of the Nylock Nut facing outward.
Boom
Boom
Boom
Boom
4g
4g
Downrigger Assembly
Downrigger Assembly
Downrigger Assembly
Downrigger Assembly
Nylock Nut
Nylock Nut
Nylock
Nylock
Nut
Nut
Motor Side
Motor Side
Motor Side
Motor Side
Curved
Curved
Edge
Edge
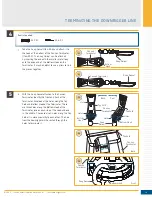
5
#16 x 1
Item(s) needed:
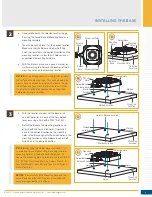
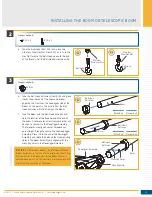
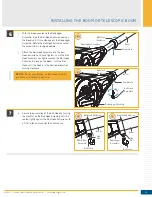
h. The 1/4-20 X 2" Phillips Pan Head Screw (Item
#16) will be used to secure the Boom to the
Downrigger Assembly. The Phillips Pan Head
Screw will pass from the spool side of the
downrigger to the opposite side of the Downrigger
Assembly and through the Boom. On the Motor
Side of the Downrigger Assembly the Phillips Pan
Head Screw will be secured into the Nylock Nut
installed above. Tighten the Phillips Pan Head
Screw with a Phillips screwdriver until the end of
the bolt is flush with the top of the Nylock Nut on
the reverse side of the downrigger.
Boom
Boom
5h
Ball Hook
Ball Hook
Extrusion
Extrusion
Downrigger
Downrigger
Assembly
Assembly
Phillips Pan
Phillips Pan
Head Screw
Head Screw
Spool
Spool


