background image

© 2020  

|

  Johnson Outdoors Marine Electronics, Inc.  

|

  cannondownriggers.com      

3

SAFETY CONSIDERATIONS

Please thoroughly read this user manual. Follow all instructions and heed all safety and cautionary notices below. Use of this  
downrigger is only permitted for persons that have read and understood these user instructions. Minors may use this product only  
under adult supervision.

WARNING

You are responsible for the safe and prudent operation of your vessel. We have designed your Cannon product to be an accurate 
and reliable tool that will enhance boat operation and improve your ability to catch fish.  This product does not relieve you from the 
responsibility for safe operation of your boat.  You must avoid hazards to navigation and always maintain a permanent watch so you 
can respond to situations as they develop. You must always be prepared to regain manual control of your boat.  Learn to operate 
your Cannon product in an area free from hazards and obstacles.

WARNING

It is recommended to only use Johnson Outdoors approved accessories with your Cannon. Using non-approved accessories 
including those used to mount or control your product may cause damage, unexpected operation and injury. Be sure to use the 
product and all approved accessories, including remotes and/or devices, safely and in a manner directed to avoid accidental or 
unexpected operation. Keep all factory installed parts in place including motor, electronic and accessory covers, enclosures and 
guards. Failure to adhere to this warning may affect your warranty. 

WARNING

Do not touch the Spool/Reel while the downrigger is in use. Holding or touching it may result in moderate to severe injuries.

Summary of Contents for MAGNUMTM 10

Page 1: ...MAGNUM TM 5 MAGNUM TM 10 MAGNUM TM 10 TS ELECTRIC DOWNRIGGERS Installation Instructions ...

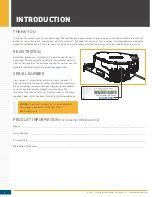
Page 2: ...d or you may complete registration online at cannondownriggers com PRODUCT INFORMATION For Consumer Reference Only Model _________________________________________________________________________________________________________________ Serial Number _________________________________________________________________________________________________________ Purchase Date _______________________________...

Page 3: ... always maintain a permanent watch so you can respond to situations as they develop You must always be prepared to regain manual control of your boat Learn to operate your Cannon product in an area free from hazards and obstacles WARNING It is recommended to only use Johnson Outdoors approved accessories with your Cannon Using non approved accessories including those used to mount or control your ...

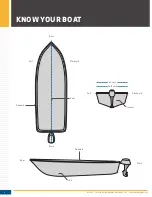
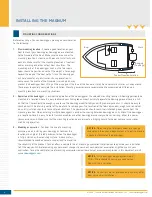
Page 4: ... 2020 Johnson Outdoors Marine Electronics Inc cannondownriggers com 4 KNOW YOUR BOAT Stern Inboard Outboard Keel Bow Port Port Starboard Starboard Gunwale Transom Bow Hull Stern Gunwale ...

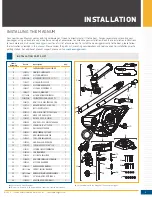
Page 5: ...NRIGGER ASSEMBLY 1 B 3991913 CNN ASSY SWIVEL BASE 1 C 3991930 ASSY CNN MNT BASE 1 D 3392010 t ASSY BOOM TELESCOPIC SS TS 1 E 2210821 ASY BOOM TELESCOPIC 1 F 3991904 ASSY CNN ROD HOLDER 1 G 3994807 ASSY BAG DT PRO MAG ST 1 H 3994815 BAG ASSY BOOM END 1 U 2277002A ASY HDW RELEASE UNIVERSAL 2 V 2200109 t SALTWATER RELEASE OR8 BE TS 2 2 9280720 HDW SCR 1 4 20X2 TRUSS HD PHIL 4 4 2371712 WASHER FLAT 9 ...

Page 6: ...e boat and to retrieve gear The location of the telescopic boom weight and rod holder when fully installed should not encounter obstructions The power cables should reach their intended power source from the mounting location When installing multiple downriggers consider the spacing between downriggers units Mount the downrigger in a location where it is easy to route transducer cables and other d...

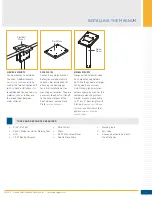
Page 7: ...hey are necessary to add extra strength to the base material of the boat Options include Deck Plate Item No 2200693 SIDE RAIL MOUNTS Can be mounted to a welded T section Side Rail Mounts Item No 2250940 can also be used at the two rail section butt joint In both installations it is recommended to use a non slip material such as rubber or a thin wood sheet between metal surfaces GIMBAL MOUNTS Desig...

Page 8: ...it and function Use a second person to help with the installation and test to make sure that the downrigger will operate as desired d Determine if a mounting accessory such as a recommended deck plate is needed Refer to the installation instructions included with any mounting accessory and then complete the downrigger installation INSTALLATION Power Cable Power Cable Downrigger Downrigger Assembly...

Page 9: ...sing a Drill with a 9 32 Drill Bit i Return the Base to the mounting location and align it with the four drilled holes Orientate it back in the desired direction so the mounting holes in the Base align with the drilled holes in the mounting location and the Release Knob or Soft Grip Knob in the desired direction Mounting Holes Mounting Holes Release Knob Release Knob Release Knob Release Knob Mark...

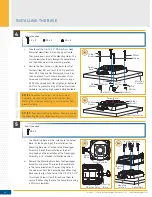
Page 10: ...s Phillips Phillips Screws Screws Phillips Phillips Screws Screws Phillips Phillips Screws Screws Phillips Phillips Screws Screws Swivel Swivel Base Base Swivel Base Swivel Base 4j 4j 5l 5m NOTICE To prevent seizing of the stainless steel hardware do not use high speed installation tools Wetting the screws or applying an anti seize may help prevent seizing l The Mounting Base will be installed to ...

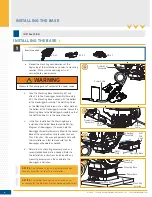
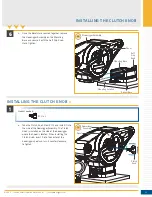
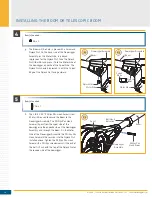
Page 11: ...sembly Downrigger Downrigger Assembly Assembly Mounting Base Mounting Base Soft Soft Grip Grip Knob Knob Spool Spool Spool Spool Clutch Clutch Knob Knob Swivel Base Swivel Base Mounting Location Mounting Location 6n 1a a Take the Clutch Knob Item 10 and install it into the side of the Downrigger Assembly The Clutch Knob is installed on the side of the downrigger where the Spool is located When ins...

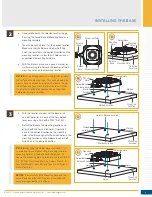
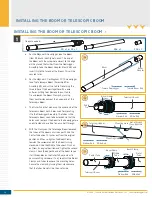
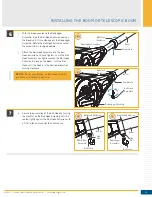
Page 12: ...or the Magnum 10 or Magnum 10 TS downrigger take the Telescopic Boom Assembly D or Assembly E and cut the Cable Tie holding the three tubes of the boom together with a wire cutter or cutting tool Remove the cut Cable Tie and loosen the Boom Clamps by turning them counterclockwise at the narrow end of the Telescopic Boom c The Outer Tube that makes up the wider end of the Telescopic Boom has 3 hole...

Page 13: ...d of the boom The two holes across from each other will be used to secure it to the Downrigger Assembly The two holes are aligned so that hardware can pass straight through to secure it to the Downrigger Assembly Place it into the end of the Downrigger Assembly and rotate the holes so that the mounting holes in the Boom Assembly are aligned with the mounting holes in the Downrigger Assembly 3 18 x...

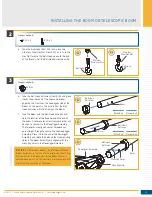
Page 14: ... Nut Nylock Nylock Nut Nut Motor Side Motor Side Motor Side Motor Side Curved Curved Edge Edge 5 16 x 1 Item s needed h The 1 4 20 X 2 Phillips Pan Head Screw Item 16 will be used to secure the Boom to the Downrigger Assembly The Phillips Pan Head Screw will pass from the spool side of the downrigger to the opposite side of the Downrigger Assembly and through the Boom On the Motor Side of the Down...

Page 15: ...om Boom Boom 6i 6j Ball Hook Ball Hook Extrusion Extrusion Ball Hook Ball Hook Extrusion Extrusion Screw Hole Screw Hole Screw Hole Screw Hole Ball Hook Ball Hook Assembly Assembly Downrigger Assembly Downrigger Assembly Downrigger Assembly Downrigger Assembly NOTICE Do not over tighten the Ball Hook Assembly or denting of the Boom is possible 7k 7k 7 k Secure the orientation of the Ball Hook by t...

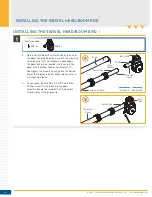
Page 16: ...ter For Magnum 10 downriggers the Boom End will go into the Narrow End of the Telescopic Boom Make sure the holes in all pieces are aligned b Once aligned take the 8 18 X 5 8 Screw Item 28 and insert it into the end of the Boom Assembly Secure the screw with a Phillips Head screwdriver by turning clockwise 1a 1b 38 x 1 Mounting Mounting Holes Holes Center Tube Center Tube Center Tube Center Tube S...

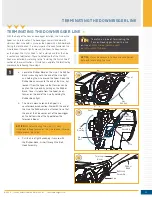
Page 17: ...m the Spool so that tension can be kept on the Line end by pulling on the Rubber Band Once it is loose from the Spool keep tension on the end of the Line by holding the Rubber Band tight b The Line is wound around the Spool in a counterclockwise direction Work with the end of the Line the Rubber Band is attached to so that the end of the Line comes out of the downrigger on the bottom side of the S...

Page 18: ...eep tension on the Line g Have a second person hold the Line just past the downrigger Boom End to keep tension on the Line Remove the Rubber Band from the end of the Line h Take a wire cutter and remove any worn or kinked Line 2 3 NOTICE When routing Line through the Terminator use only straight Line Worn or kinked Line can be stressed and may break prematurely when retrieving trolling weights i T...

Page 19: ...rminator There are three holes along the Bottom Hook of the Terminator one on each side of the hook and one in the middle There are also 3 holes along the Top Fold all in close proximity to each other The Line from the downrigger will be routed through the holes to terminate it 4j 4j 5k Cannon Cannon Terminator Terminator Cannon Terminator Cannon Terminator Cannon Cannon Terminator Terminator Cann...

Page 20: ... the Bottom Hook o With the Line through the loop on the Snap Swivel pass it along the Bottom Hook of the Terminator and insert it into the hole in the space at the far end of the Terminator where the Bottom Hook is detached from its base Pull about 6 inches of the Line through the hole 6 NOTICE When routing the Line through the Terminator there may be areas where there is slack in the Line While ...

Page 21: ... the Line just exited and the very first hole that the Line was fed through on the Terminator s Turn the Terminator over so that the front of it is facing towards you The end of the Line that was just inserted into the back of the Terminator should run along the track in the middle of the Terminator Feed the Line all the way along this Track so that it exits the hole in the middle of the Terminato...

Page 22: ...ntil it is seated against it Once fully seated the downrigger is successfully terminated A Cannon Weight can then be attached directly to the Snap Swivel 9 10 CAUTION Do not overload the downrigger It is designed to retrieve a maximum of 20 lb weights only Cannon Cannon Terminator Terminator Cannon Cannon Terminator Terminator Cannon Cannon Terminator Terminator Cannon Terminator Cannon Terminator...

Page 23: ...ows independent adjustment of the Rod Holder along two axes which can be easily adjusted every 15 of rotation The symmetrical design will allow mounting of the Rod Holder on either side of the downrigger or two Rod Holders at the same time The spring along the shaft of the Soft Grip Knob allows the knob to be loosened and the Rod Holder to be indexed without fully disassembling it To install follo...

Page 24: ...h will help to hold the position of the knob and help to hold it in place when the position of the holder is changed during use Secure the Dual Axis Rod Holder Tube with the Soft Grip Knob e To adjust the direction of the Dual Axis Rod Holder Arm or tube loosen the Soft Grip Knob and rotate in the desired direction Then re tighten the Soft Grip Knob to secure in place 22 x 1 34 X 1 2c 2e 2d 2c Sof...

Page 25: ...delines apply to general rigging to support your Cannon product Powering multiple downriggers or additional electrical devices from the same power circuit may impact the recommended conductor gauge and circuit breaker size If you are using wire longer than that provided with your unit follow the conductor gauge and circuit breaker sizing table below If your wire extension length is more than 30 fe...

Page 26: ...uit reset circuit breaker breaker If the zinc sacrificial anodes on your boat and on the outboard outdrive are more than half dissolved it is recommended that they be replaced Clean anodes on a regular basis with a non corrosive brush Any coating of slime or growth on the boat should be cleaned off All metal parts including the hull if metal should be interconnected by a grounding wire This includ...

Page 27: ...th a Deep Cycle marine battery Only run a downrigger from a Starter battery if it is recharged by an alternator while the downrigger is running WARNING For safety reasons disconnect the downrigger from the battery when the downrigger is not in use or while the battery batteries are being charged If installing a leadwire plug observe proper polarity and follow instructions in your boat owner s manu...

Page 28: ... of that accessory which can cause excess corrosion Any damage caused by incorrect connections between battery systems will not be covered under warranty Automatic jump start systems and selector switches tie the negatives of the connected batteries together Please see a qualified marine technician if installing your Cannon downrigger with one of these systems or a selector switch The downrigger w...

Page 29: ...or braided lines Positive Ion Control is a feature that is based on the principle that applying a low voltage positive electrical field into the water where you re fishing will attract fish and increase your chances to catch more fish Since fish are attracted by a slight positive charge and repelled by a strong positive or negative charge generating and controlling the correct charge can be critic...

Page 30: ...the fishing rod firmly into the Clamp of the Line Release at the loop created in the fishing line d Click through a series of increasing tension settings on the Clamp The Line Release can be used with any test line on salt or fresh water and may be adjusted from 2 to 22 pounds of grip tension on the line e Once the Line Release is attached to the fishing line make sure the Fishing Rod is held secu...

Page 31: ... 2020 Johnson Outdoors Marine Electronics Inc cannondownriggers com 31 NOTES This completes the installation of your Magnum A complete Owner s Manual can be downloaded at cannondownriggers com ...

Page 32: ...ers rock solid bases and plates It s everything you need to rig your boat up to fit the way you fish and you can mount it all up on our track system which features interchangeable components made of high strength aluminum MOUNTS Rig it up and reel em in with a variety of mounting options suited to fit the way you fish LINE RELEASES WEIGHTS We offer a wide variety of downrigger accessories designed...

Page 33: ...MAGNUM TM 5 MAGNUM TM 10 MAGNUM TM 10 TS TREUILS DE PÊCHE ÉLECTRIQUES Instructions d installation ...

Page 34: ...rmulaire d enregistrement ci joint et le retourner par la poste ou complètez l enregistrement en ligne sur cannondownriggers com INFORMATIONS SUR LE PRODUIT À des fins de référence par le client seulement Modèle _______________________________________________________________________________________________________________ Numéro de série ____________________________________________________________...

Page 35: ...rcer une veille permanente afin de pouvoir réagir au fur et à mesure que les situations se présentent Vous devez toujours être prêt à reprendre le contrôle manuel de votre bateau Apprenez à utiliser votre produit Cannon dans une zone exempte de dangers et d obstacles AVERTISSEMENT Nous recommandons d utiliser exclusivement les accessoires approuvés par Johnson Outdoors avec votre Cannon L utilisat...

Page 36: ...hnson Outdoors Marine Electronics Inc cannondownriggers com 36 CONNAISSEZ VOTRE BATEAU Poupe En bord Hors bord Quille Étrave Bâbord Bâbord Tribord Tribord Plat bord Tableau arrière Étrave Coque Poupe Plat bord ...

Page 37: ...re commandée individuellement Article Ensemble Nº de pièce Description Qté A CANNON DOWNRIGGER ASSEMBLY 1 B 3991913 CNN ASSY SWIVEL BASE 1 C 3991930 ASSY CNN MNT BASE 1 D 3392010 t ASSY BOOM TELESCOPIC SS TS 1 E 2210821 ASY BOOM TELESCOPIC 1 F 3991904 ASSY CNN ROD HOLDER 1 G 3994807 ASSY BAG DT PRO MAG ST 1 H 3994815 BAG ASSY BOOM END 1 U 2277002A ASY HDW RELEASE UNIVERSAL 2 V 2200109 t SALTWATER ...

Page 38: ...èche télescopique du poids et du porte canne lorsqu il est complètement installé ne devrait pas être comporter d obstructions Les câbles d alimentation doivent pouvoir atteindre leur source d alimentation prévue à partir de l emplacement de montage Lors de l installation de plusieurs treuils de pêche considérez l espacement entre les treuils Montez le treuil de pêche à un endroit permettant l ache...

Page 39: ...ase du bateau Les options incluent les tôles de pont article nº 2200693 MONTURE POUR LE CÔTÉ GARDE CORPS Elle peut être montée sur une section en T Les montures pour côté garde corps nº de pièce 2250940 peuvent aussi être utilisées au joint bout à bout de deux sections de garde corps Dans les deux situations il est recommandé d utiliser un matériau antidérapant comme du caoutchouc ou un morceau de...

Page 40: ...on et à faire des essais afin de vous assurer que le treuil de pêche fonctionnera comme voulu d Déterminez si un accessoire de montage comme une tôle de pont recommandée est nécessaire Reportez vous aux instructions d installation incluses avec les accessoires de montage et terminez l installation du treuil de pêche INSTALLATION Câble Câble d alimentation d alimentation Assemblage Assemblage de tr...

Page 41: ...ent marqué avec une mèche de 9 32 po 7 mm i Replacez la base sur l emplacement de montage et alignez la avec les quatre trous percés Réorientez la dans la direction désirée afin que les trous dans la base s alignent sur les trous percés dans le bateau et que le bouton de déverrouillage ou le bouton à prise souple soit orienté comme voulu Trous de montage Trous de montage Bouton de Bouton de déverr...

Page 42: ...s de montage Trous de montage Vis Vis cruciformes cruciformes Vis Vis cruciformes cruciformes Vis Vis cruciformes cruciformes Vis Vis cruciformes cruciformes Base Base pivotante pivotante Base pivotante Base pivotante 4j 4j 5l 5m AVIS Pour prévenir le grippage de la quincaillerie en acier inoxydable n utilisez pas d outils haute vitesse pour l installation Le fait de mouiller les vis ou d applique...

Page 43: ...Assemblage Assemblage de treuil de de treuil de pêche pêche Base de montage Base de montage Bouton Bouton à prise à prise souple souple Bobine Bobine Bobine Bobine Bouton Bouton d embrayage d embrayage Base pivotante Base pivotante Emplacement Emplacement de montage de montage 6n 1a a Installez le bouton d embrayage article nº 10 sur le côté de l assemblage du treuil Le bouton d embrayage est inst...

Page 44: ...icle nº 48 et insérez le à l autre extrémité de la flèche Il sera fixé plus tard b Pour le treuil de pêche Magnum 10 ou Magnum 10 TS prenez la flèche télescopique assemblage D ou assemblage E et coupez l attache fils qui tient les trois tubes de la flèche avec un coupe fils ou un couteau Enlevez l attache fils et desserrez les bagues de serrage à l extrémité étroite de la flèche télescopique en le...

Page 45: ... plus éloignés l un de l autre sur la courbe du tube servent à fixer la flèche sur l assemblage de treuil de pêche Les deux trous sont alignés de manière à ce que la quincaillerie puisse traverser le tube afin de le fixer au treuil Placez le tube sur l assemblage de treuil de pêche et tournez le de manière à ce que les trous de montage s alignent avec les trous de montage de l assemblage de treuil...

Page 46: ...ylock Écrou Nylock Écrou Écrou Nylock Nylock Côté du Côté du moteur moteur Côté du Côté du moteur moteur Bord Bord courbé courbé 5 16 x 1 Articles requis i Une vis tête bombée cruciforme 1 4 20 X 2 po 51 mm article nº 16 sert à fixer la flèche à l assemblage de treuil de pêche La vis à tête bombée cruciforme traverse le boîtier du treuil du côté de la bobine au côté opposé en traversant l assembla...

Page 47: ...het boulon à crochet Trou de vis Trou de vis Trou de vis Trou de vis Assemblage Assemblage de crochet de crochet à boule à boule Assemblage de treuil de pêche Assemblage de treuil de pêche Assemblage de treuil de pêche Assemblage de treuil de pêche AVIS Ne serrez pas trop l assemblage de crochet à boule car il risque de déformer la flèche 7k 7k 7 l Fixez l orientation du crochet à boule en tournan...

Page 48: ... flèche sera insérée dans l extrémité étroite de la flèche télescopique Assurez vous que les trous de toutes les les pièces sont alignés b Une fois les trous alignés insérez une vis nº 8 18 X 5 8 po 16 mm article nº 28 dans l extrémité de l assemblage de flèche Fixez la vis avec un tournevis cruciforme en tournant dans le sens horaire 1a 1b 38 x 1 Trous de Trous de montage montage Tube central Tub...

Page 49: ...irant sur l élastique Une fois l élastique détaché de la bobine maintenez la tension sur la ligne en gardant l élastique tendu b La ligne est enroulée sur la bobine dans le sens antihoraire Travaillez avec l extrémité de la ligne à laquelle l élastique est attaché de manière à ce que la ligne se déroule du treuil de pêche par le bas sous la flèche télescopique c Tirez la ligne tendue avec l élasti...

Page 50: ...ndez à une deuxième personne de tenir la ligne au delà de la tête de flèche afin de garder la ligne tendue Enlevez l élastique de l extrémité de la ligne h Coupez toute partie usée ou pliée de la ligne avec un coupe fil 2 3 AVIS lors de l acheminement de la ligne à travers la terminaison n utilisez qu une ligne droite Une ligne usée ou pliée peut être sous contrainte et casser de façon prématurée ...

Page 51: ...chet inférieur de la terminaison un de chaque côté et un au centre Il y a également 3 trous le long du pli supérieur tous rapprochés les uns des autres Pour effectuer la terminaison la ligne doit être enfilée dans ces trous 4j 4j 5k Terminaison Terminaison Cannon Cannon Terminaison Cannon Terminaison Cannon Terminaison Terminaison Cannon Cannon Terminaison Terminaison Cannon Cannon Terminaison Ter...

Page 52: ...u crochet inférieur de la terminaison et insérez le dans le trou à l autre extrémité de la terminaison où se trouve l espace entre le crochet et la terminaison Tirez environ 6 pouces 15 cm de ligne par le trou 6 AVIS lors de l acheminement de la ligne à travers la terminaison il peut y avoir du mou dans la ligne Aux fins d acheminement de la ligne le mou ne présente pas de problème Il sera repris ...

Page 53: ...ans lequel il a été enfilé dans la terminaison s Retournez la terminaison afin que l avant soit orienté vers vous L extrémité de la ligne qui vient d être insérée dans l arrière de la terminaison doit passer dans la rainure au centre de la terminaison Acheminez la ligne dans cette rainure jusqu à ce qu il sorte du trou au centre de la terminaison et le long du centre du crochet inférieur à l extré...

Page 54: ...treuil de pêche est réussie Une plombée Cannon peut alors être attaché directement au mousqueton pivotant 9 10 ATTENTION Ne surchargez pas le treuil de pêche Il est conçu pour récupérer un poids maximum de 20 lb 9 1 kg Terminaison Terminaison Cannon Cannon Terminaison Terminaison Cannon Cannon Terminaison Terminaison Cannon Cannon Terminaison Cannon Terminaison Cannon Terminaison Terminaison Canno...

Page 55: ...mettra le montage du porte canne d un côté ou l autre du treuil de pêche ou de deux porte canne en même temps Le ressort sur l arbre du bouton à prise souple permet de desserrer le bouton et de régler le porte canne sans avoir à le démonter complètement Pour l installation suivez les étapes ci dessous AVIS l assemblage de porte canne n est pas couvert par la garantie s il est utilisé avec de l équ...

Page 56: ...ton et le gardent en place lorsque la position du porte canne est modifiée pendant l usage Serrez le tube de porte canne sur axe avec le bouton à prise souple e Pour régler l orientation du bras ou du tube de porte canne sur axe desserrez le bouton à prise souple et tournez les éléments à la position voulue Resserrez ensuite le bouton à prise souple afin de le fixer en place 22 x 1 34 X 1 2c 2e 2d...

Page 57: ...ement des lignes directrices générales ATTENTION Ces lignes directrices s appliquent au gréement général pour soutenir le produit de Cannon L alimentation de plusieurs treuils de pêche ou d autres appareils électriques à partir du même circuit d alimentation peut influer sur le calibre des conducteurs et le dimensionnement des disjoncteurs recommandés Pour un fil plus long que celui fourni avec l ...

Page 58: ...t manuel de manuel de 25 A 25 A Si les anodes sacrificielles de zinc sur votre bateau et votre moteur hors bord extérieur sont dissoutes plus que la moitié on recommande de les remplacer Nettoyez régulièrement les anodes à l aide d une brosse non corrosive Toute couche ou croissance de biofilm devrait être nettoyée Toutes les pièces en métal y compris la coque si en métal devraient être interconne...

Page 59: ...de pêche avec une batterie de démarrage que si elle est rechargée par un alternateur pendant que le treuil de pêche est en marche AVERTISSEMENT Pour des raisons de sécurité débranchez le treuil de pêche de la batterie lorsque le treuil de pêche n est pas utilisé ainsi que pendant la charge de la batterie Si vous installez un raccordement en fil de plomb respectez les polarités appropriées et suive...

Page 60: ...oire ce qui peut entraîner une corrosion excessive Tout dommage causé par de mauvaises connexions entre les systèmes de batterie ne sera pas couvert par la garantie Les systèmes de démarrage d appoint et les commutateurs relient les bornes négatives des batteries connectées entre elles Veuillez consulter un technicien marin qualifié si vous installez votre treuil de pêche Cannon avec un de ces sys...

Page 61: ...ôle positif des ions Positive Ion Control est une fonction basée sur le principe de l appli d un champ électrique positif à faible tension dans l eau où vous pêchez afin d attirer le poisson et d augmenter vos chances d en attraper Étant donné que le poisson est attiré par une faible charge électrique positive et repoussé par une forte charge électrique positive ou négative la génération et le con...

Page 62: ...sitif de dévidoir à la boucle que vous venez de former d Effectuez une série de déclics de tension croissante sur la pince Le dispositif de dévidage de la ligne peut être utilisé avec n importe quelle ligne à pêche pour l eau salée ou douce et peut être ajusté avec une tension de prise de 2 à 22 lb 1 à 10 kg sur la ligne e Une fois le dispositif de dévidage de la ligne attaché à la ligne à pêche a...

Page 63: ...nson Outdoors Marine Electronics Inc cannondownriggers com 63 REMARQUES L installation de votre Magnum est maintenant terminée Vous pouvez télécharger le manuel du propriétaire complet sur cannondownriggers com ...

Page 64: ...es plaques très solides C est tout ce qu il vous faut pour équiper votre bateau selon votre mode de pêche et tout peut se monter sur notre système de rails qui comprend des composants interchangeables fabriqués en aluminium à résistance élevée FIXATIONS Équipez le et pêchez à votre guise avec diverses options de montage qui conviennent à votre mode de pêche DISPOSITIFS DE DÉVIDAGE DE LIGNE ET POID...

Reviews: