EN 07
3. Use of the Oven
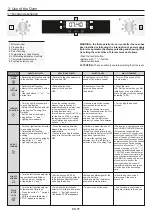
3.1 Display description
WARNING : the first operation to carry out after the oven has
been installed or following the interruption of power supply
(this is recognizable the display pulsating and showing
12:00
) is setting the correct time. This is achieved as follows.
•Push the central button.
•Set time with "-" "+" buttons.
•Release all buttons.
ATTENTION:
The oven will only operate providing the clock is set.
• Enables you to turn off the
sound of the minute minder.
• Rotate the function selector to
the position OFF.
• To turn off the sound of the
minute minder
• Enables you to set the
time which appears on
the display
• Rotate the function
selector to the position
OFF.
• Turn the right function selector
to a cooking function
• Rotate the left function
selector to the position "End of
cooking"
• Set the end time of cooking by
using buttons " + " and " - "
• Lighting Auto appears
• It allows to preset the end of
cooking time you want.
• When the cooking time is set,
turn the function selector to OFF
to go back to actual time.
• To view the cooking time
selected, turn the left function
selector to End of cooking Time
• When the cooking time has
elapsed, the oven switch off
automatically.
• To stop the cooking functions
early, turn the function control to
OFF
• Turn the left function selector to
the position Minute Minder.
• Set the time of cooking by
using buttons “+”and “-”
• Allow to use the oven as
alarm even if the oven is
switch off
• The oven cannot be used.
• To set the time
NB : Set the time when you first
install your oven or just after a
black out (the clock is showing a
pulsating 12.00)
• Turn the right function selector
to a cooking function
• Rotate the left function selector
to the position "Cooking Time
Duration”
• Set the time of cooking by
using buttons " + " and " - "
• Lighting Auto appears
•When the cooking time has
elapsed, the oven switch off
automatically and the alarm rings
for few seconds To stop the
cooking functions early,
turn the function control to OFF or
set the time on 00.00; by rotating
the function selector to Cooking
Time Duration and by using the
buttons " + " and " - “
• It allows to preset the cooking
time required for the recipe
chosen.
• When the cooking time is set,
turn the function selector toOFF to
go back to actual time.
• To view the cooking time
selected, turn the left function
selector to Cooking Time duration.
•This function is normally used with
the COOKING DURATION function
•For example, the desired food
needs to cook for 45 minutes and I
want it to be ready for 12.30; in this
case: at the end of the set time, the
oven automatically switches off and
an alarm sounds. Select the desired
cooking function. Set the cooking
duration to 45 minutes (“-” “+”). Set
the end of cooking to 12:30 (“-” “+”).
Cooking will automatically begin at
11:45 (12:30 minus 45 minutes), at
the end of the set cooking time, the
oven will automatically switch off.
WARNING: by setting only the end
of cooking time, and not the
cooking duration, the oven will
immediately switch on and switch
off at the end of the set cooking
time.
• Set the time on 00.00 by
turning the left function selector
to the position Minute Minder,
and using the button " - “
• Turn the left function selector
to the position Child lock.
• Press the button " + " during 5
seconds
• Child lock is available when "
STOP " appears on display
• Turn back the left function
selector to Child lock and press
button " + " during 5 seconds.
• Indication STOP disappears.
• Rotate the left function
selector to the position “Set the
time”.
• Use the buttons " + " or " - " to
set the time
•Emits an audible signal at the
end of a set time.
•During operation, the display
shows the remaining time.
• This function is useful when
there are children in the house.
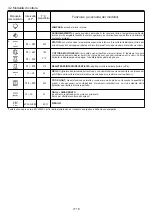
FUNCTION
HOW TO ACTIVATE
HOW TO DEACTIVATE
WHAT IT DOES
WHY IT IS NEEDED
SILENCE
MODE
END OF
COOKING
MINUTE
MINDER
CHILD
SAFETY
LOCK
SET
THE TIME
COOKING
DURATION
• For cooking the desired
recipes.
• Rotate the left function selector
to the position " Silence mode “
1. Minute minder
2. Clock setting
3. Cooking time
4. End of cooking
5. Temperature or clock display
6. LCD display adjustment controls
7. Thermostat selector knob
8. Function selector knob
8
1
2
3
4
5
6

